


Are you looking to enhance your Ethereum experience with faster and cheaper transactions?
Arbitrum One is here to revolutionize the way you interact with Ethereum. Built as a Layer 2 scaling solution, Arbitrum One offers significant improvements in transaction speed and cost compared to the Ethereum mainnet. And the best part? You can seamlessly integrate Arbitrum One with your favorite Ethereum wallet, Metamask.
In this step-by-step guide, we will walk you through the process of setting up and using Arbitrum One with Metamask, so you can start enjoying all the benefits it has to offer.
Before we dive in, let’s take a moment to understand what Arbitrum One is and how it works. Arbitrum One is a Layer 2 scaling solution developed by Offchain Labs. It aims to alleviate the scalability issues of the Ethereum mainnet by processing transactions off-chain and only submitting the final outcome to the Ethereum mainnet. This allows for faster transaction confirmation times and significantly reduces gas fees.
A Step-by-Step Guide to Using Arbitrum One with Metamask
Arbitrum One is a Layer 2 scaling solution for Ethereum that aims to enhance user experience by reducing fees and improving transaction speeds. In this guide, we will walk you through the process of using Arbitrum One with Metamask, a popular Ethereum wallet.
Step 1: Install Metamask
If you haven’t already, start by installing the Metamask extension on your preferred web browser. You can find it in the Chrome Web Store or other app stores depending on your browser. Once installed, create a new wallet or import an existing one.
Step 2: Set Up Arbitrum One Network
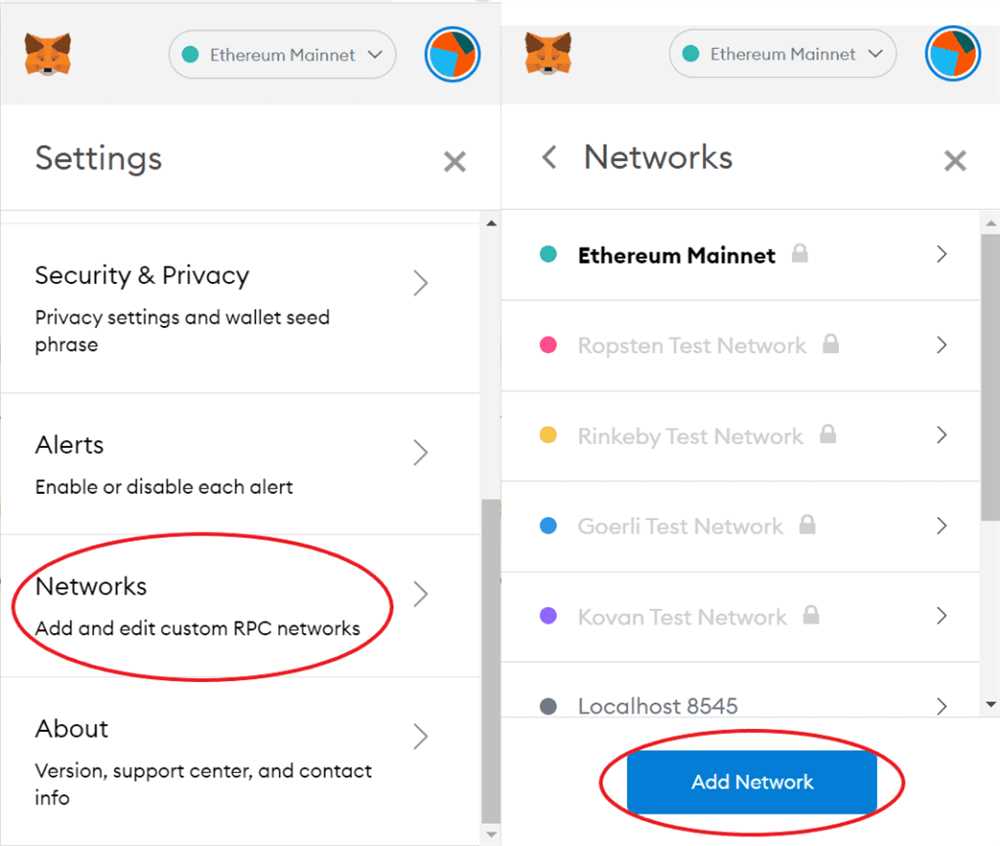
- Open Metamask and click on the network dropdown (usually displaying Ethereum Mainnet).
- Scroll down and click on “Custom RPC”.
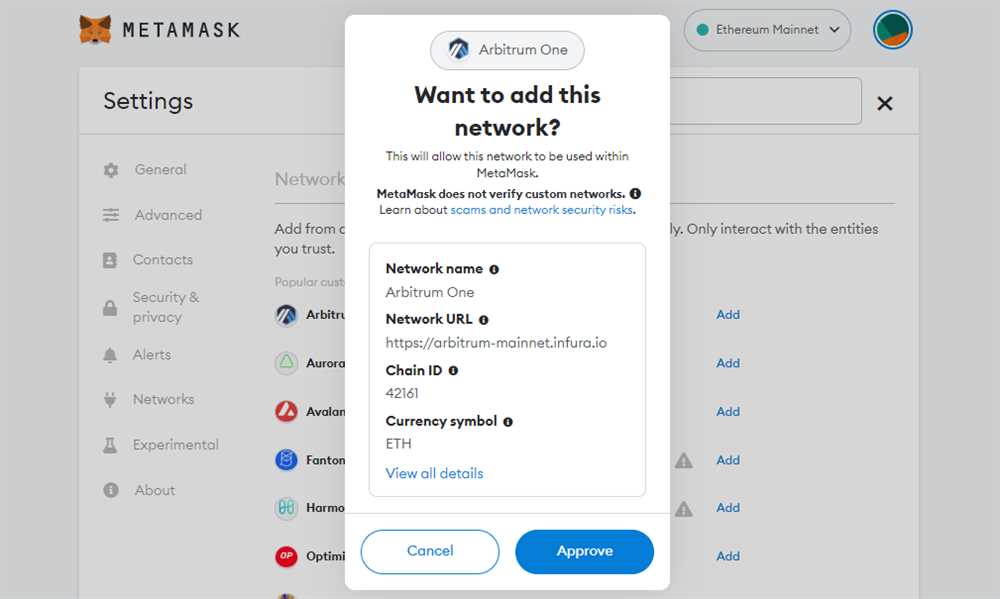
- In the “New Network” tab, fill out the following details:
- Network Name: Arbitrum One
- New RPC URL: https://arbitrum-mainnet.infura.io/v3/YOUR_INFURA_PROJECT_ID
- Chain ID: 42161
- Symbol: ETH
- Block Explorer URL: https://arbiscan.io/ (optional)
- Click “Save” to add the Arbitrum One network to your Metamask.
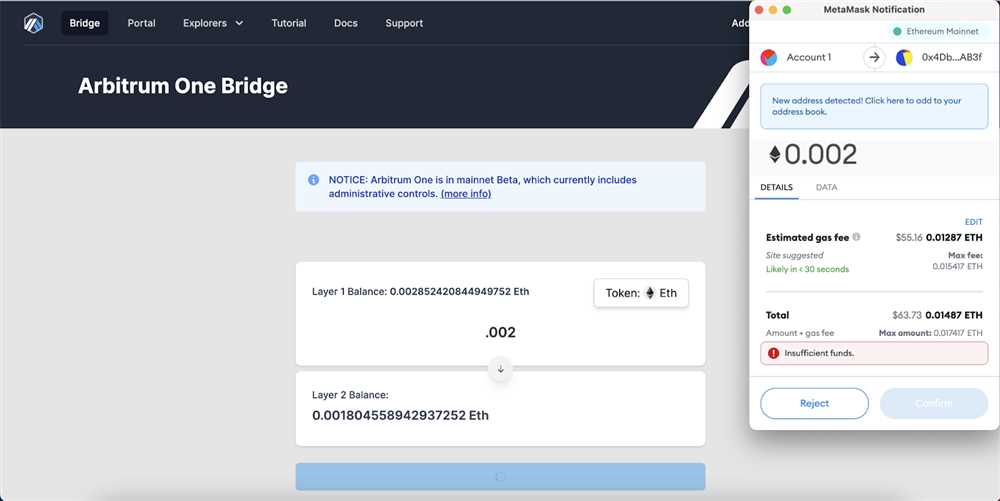
Step 3: Fund Your Metamask Wallet
In order to interact with the Arbitrum network, you need to have some ETH in your Metamask wallet. You can either transfer ETH from another wallet or purchase it from a cryptocurrency exchange and send it to your Metamask address.
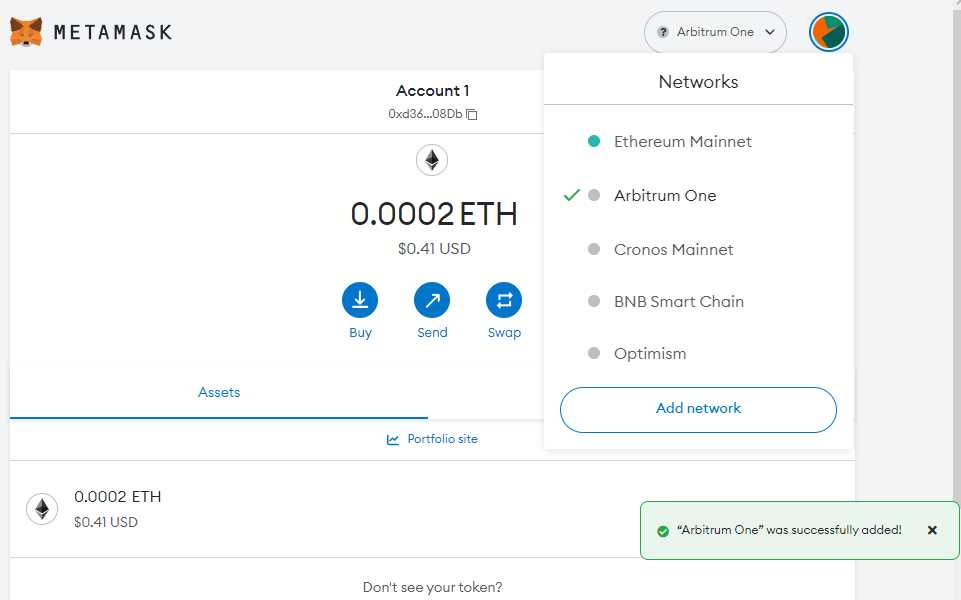
Step 4: Switch to Arbitrum One Network
- Ensure that you are on the correct network by clicking on the network dropdown in Metamask.
- Select “Arbitrum One” from the list of available networks.
- Metamask will prompt you to confirm the switch. Click “Switch” to proceed.
Step 5: Enjoy Using Arbitrum One!
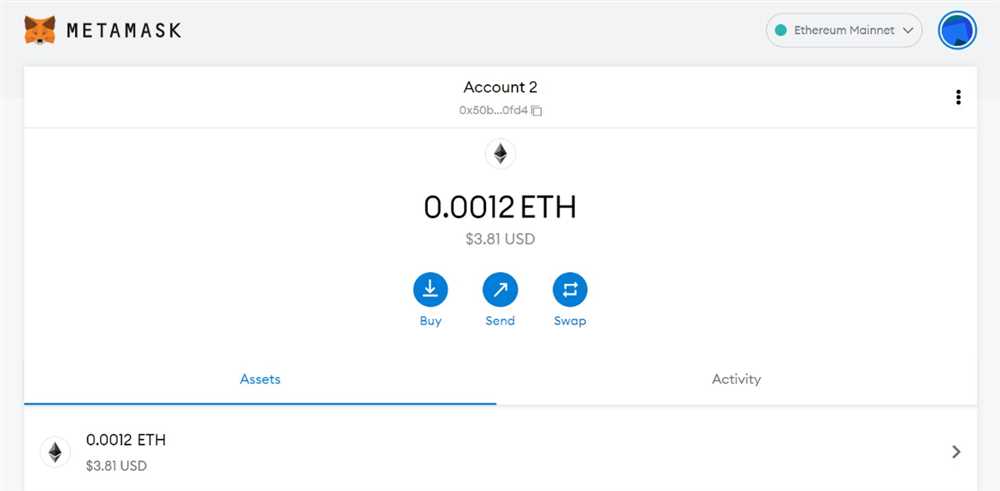
Now that you’re on the Arbitrum One network, you can enjoy the benefits of faster and cheaper transactions compared to the Ethereum Mainnet. You can interact with decentralized applications (dApps), send and receive ETH, and make use of other features provided by the Arbitrum network.
Remember that while Arbitrum One is a Layer 2 solution, it still relies on the Ethereum Mainnet for security. It’s important to stay informed about the risks and limitations of using Layer 2 solutions and exercise caution when interacting with unfamiliar dApps or contracts.
That wraps up our step-by-step guide to using Arbitrum One with Metamask! We hope this guide has helped you get started with this exciting Ethereum scaling solution. Happy transacting!
Seamless Integration for Enhanced Ethereum Experience
As Ethereum continues to evolve and scale, users are increasingly seeking ways to improve their experience and optimize their interactions with the network. One of the key solutions that has emerged to address this need is Arbitrum One, a Layer 2 scaling solution built on Ethereum.
With Arbitrum One, users can enjoy a seamless integration that enhances their Ethereum experience in several ways. Firstly, Arbitrum One provides significantly faster transaction times compared to the Ethereum mainnet. This means that users can enjoy near-instantaneous confirmation of their transactions, eliminating the frustrating delays often experienced on the mainnet.
In addition to speed, Arbitrum One also offers significantly reduced transaction fees. This is possible due to the offloading of computation and storage to the Arbitrum virtual machine, which allows for cost-efficient processing of transactions. As a result, users can save on gas fees and enjoy a more cost-effective Ethereum experience.
Another key benefit of Arbitrum One is its seamless integration with Metamask, one of the most popular Ethereum wallets. Metamask users can easily connect to the Arbitrum network and access their accounts and assets without any additional steps or complications. This eliminates the need for users to switch wallets or learn how to use a new interface, making the transition to Arbitrum One smooth and hassle-free.
To get started with Arbitrum One and Metamask, users simply need to follow a few simple steps. First, they need to add the Arbitrum One network to their Metamask settings by entering the network details provided by the Arbitrum team. Once added, users can switch between the Ethereum mainnet and Arbitrum One with just a few clicks, allowing for seamless integration and a smooth user experience.
In conclusion, Arbitrum One offers a seamless integration for users looking to enhance their Ethereum experience. With faster transaction times, reduced fees, and seamless integration with Metamask, Arbitrum One provides a user-friendly solution that improves the overall usability and efficiency of the Ethereum network.
Step 1: Download and Install Metamask Browser Extension
To get started with using Arbitrum One with Metamask, the first step is to download and install the Metamask browser extension. Metamask is a popular Ethereum wallet and a necessary tool to interact with the Arbitrum One network.
Follow the steps below to install Metamask:
1. Open the Web Browser
Launch your preferred web browser and go to the official Metamask website.
2. Download the Extension
On the Metamask website, locate the “Get Chrome Extension” or “Get Firefox Add-On” button, depending on the browser you are using. Click on the respective button to start the download process.
3. Add the Extension
Once the extension is downloaded, you will see a prompt asking for permission to add the extension. Click on “Add to [Browser Name]” to install Metamask.
After the installation is complete, you will see the Metamask icon appear in your browser’s toolbar.
Note: If you already have Metamask installed, make sure it is updated to the latest version to ensure compatibility with Arbitrum One.
Now that you have successfully installed the Metamask browser extension, you are ready to proceed to the next step and configure Metamask for use with Arbitrum One.
Get Ready to Access the World of Decentralized Finance
Decentralized Finance, also known as DeFi, is a rapidly growing sector within the cryptocurrency ecosystem. It offers users the opportunity to engage in various financial activities without the need for intermediaries such as banks.
With the emergence of blockchain technology, the world of finance has been revolutionized. DeFi applications enable users to access a wide range of financial services, such as lending, borrowing, trading, and earning interest on their digital assets, directly on the blockchain.
Getting started with DeFi can be a bit overwhelming, but with the right tools and knowledge, anyone can participate in this exciting new world. One of the key tools you will need is a cryptocurrency wallet that supports Ethereum and its various networks.
Why Choose Metamask?
Metamask is one of the most popular Ethereum wallets and browser extensions, trusted by millions of users worldwide. It allows you to securely store your Ethereum-based assets, interact with decentralized applications (dApps), and manage your transactions.
Using Metamask, you can seamlessly integrate with Arbitrum One, a Layer 2 scaling solution for Ethereum. This integration offers enhanced speed, lower fees, and improved user experience when interacting with DeFi protocols and dApps.
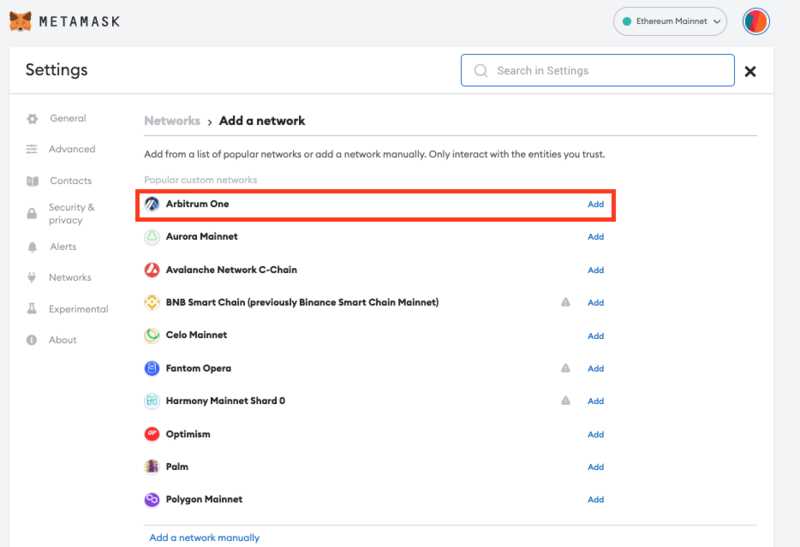
How to Connect Metamask with Arbitrum One
To connect Metamask with Arbitrum One, follow these simple steps:
- Open your Metamask wallet and click on the network selection dropdown located at the top of the application.
- Select “Custom RPC” from the network options available.
- In the “Network Name” field, enter “Arbitrum One”.
- In the “New RPC URL” field, enter “https://arb1.arbitrum.io/rpc”.
- Click the “Save” button to add the new network.
- You should now see “Arbitrum One” as one of the network options in your Metamask wallet.
- Click on “Arbitrum One” to switch to the Arbitrum L2 network. You are now ready to access the world of decentralized finance on Arbitrum One!
Now that you have successfully connected your Metamask wallet with Arbitrum One, you can start exploring the wide range of DeFi protocols and dApps available on the network. Whether you’re looking to earn passive income through yield farming, participate in decentralized exchanges, or take part in other financial activities, Arbitrum One provides a seamless and enhanced Ethereum experience.
Conclusion
Decentralized Finance has revolutionized the way we interact with traditional financial services. With tools like Metamask and the integration with Arbitrum One, you can take advantage of the benefits offered by DeFi and access a world of exciting opportunities.
Remember to always do your own research and exercise caution when using DeFi platforms. Familiarize yourself with the risks involved and only invest what you can afford to lose. Now, get ready to unlock the power of decentralized finance with Metamask and Arbitrum One!
Step 2: Create a New Ethereum Wallet on Metamask
To start using Arbitrum One with Metamask, you will need to create a new Ethereum wallet on the Metamask platform. Follow these steps to set up your wallet:
Step 1: Install the Metamask Extension
If you haven’t already, go to the Metamask website and install the Metamask extension for your browser. Once the extension is installed, you will see the Metamask icon in your browser toolbar.
Step 2: Launch Metamask
Click on the Metamask icon to launch the extension. If this is your first time using Metamask, you will be prompted to create a new wallet. If you already have a Metamask wallet, click on “Import Wallet” to import an existing wallet.
Step 3: Set Up Your Wallet
Follow the on-screen instructions to set up your new wallet. This will involve creating a unique password and agreeing to the terms of service. Make sure to choose a strong password to protect your wallet.
Step 4: Save Your Secret Backup Phrase
After setting up your wallet, you will be shown a secret backup phrase. This phrase is extremely important as it can be used to restore your wallet if you forget your password or lose access to your device. It is crucial that you write down this phrase and store it in a safe place.
Step 5: Connect to Arbitrum One
Once your wallet is set up, you will need to connect it to the Arbitrum One network. Click on the network selector in the Metamask extension and choose “Arbitrum One” from the network options. This will switch your wallet to the Arbitrum One network.
That’s it! You have successfully created a new Ethereum wallet on Metamask and connected it to the Arbitrum One network. Now you’re ready to start exploring the enhanced Ethereum experience that Arbitrum One offers.
Securely Store Your Digital Assets and Keep Your Funds Safe
When conducting transactions in the world of cryptocurrencies, it is of utmost importance to make sure that your digital assets are securely stored and your funds are safe. Here are some key steps you can take to ensure the security of your assets:
1. Choose a Reliable Wallet: Select a reputable digital wallet that supports the cryptocurrencies you own. Look for wallets that offer robust security features such as multi-factor authentication and hardware wallet integration.
2. Enable Two-Factor Authentication (2FA): Activate 2FA on your wallet to add an extra layer of security. This typically involves using your mobile device to confirm transactions or logins.
3. Keep Your Software Updated: Regularly update your wallet software and operating system to benefit from the latest security patches. Software updates often include bug fixes and security enhancements.
4. Use Reliable Exchanges: If you trade or convert your digital assets on exchanges, choose reputable platforms with a strong track record of security. Research and read reviews to ensure you are using a trustworthy exchange.
5. Create Strong Passwords: Use a combination of uppercase and lowercase letters, numbers, and special characters to create a strong and unique password for your wallet and exchange accounts. Avoid reusing passwords.
6. Enable Wallet Encryption: Encrypt your wallet to protect your private keys and prevent unauthorized access. This adds an extra layer of security in case your device is lost or stolen.
7. Be Cautious of Phishing Attacks: Be vigilant against phishing attempts, which involve fraudulent emails, websites, or messages designed to trick you into revealing your private keys or login credentials. Always double-check the URLs of websites and be cautious of unsolicited requests for sensitive information.
8. Safely Store Your Backup Phrases: When setting up your wallet, you will usually be provided with a backup phrase or seed phrase. Safely store this phrase offline in a secure location, such as a hardware wallet or a piece of paper stored in a safe place.
9. Consider Cold Storage: For long-term storage of large amounts of digital assets, consider using cold storage methods such as hardware wallets or offline paper wallets. These options provide enhanced security by keeping your assets offline and away from potential cyber threats.
10. Stay Informed: Stay updated with the latest security practices in the cryptocurrency space. Subscribe to reliable sources of information and educate yourself about common security threats and best practices for securing your digital assets.
By following these steps, you can ensure that your digital assets are securely stored and your funds remain safe while navigating the exciting world of cryptocurrencies.
Frequently Asked Questions:
What is Arbitrum One?
Arbitrum One is a layer 2 scaling solution for Ethereum, designed to improve scalability and reduce gas fees.
How can I integrate Arbitrum One with Metamask?
To integrate Arbitrum One with Metamask, you need to follow a step-by-step guide which includes installing the Arbitrum One network on Metamask, transferring funds to Arbitrum One, and interacting with dApps on the Arbitrum network.
What are the benefits of using Arbitrum One with Metamask?
Using Arbitrum One with Metamask allows for enhanced Ethereum experience, including faster transactions, lower fees, and access to a wide range of dApps on the Arbitrum network.
Are there any risks involved in using Arbitrum One with Metamask?
While the Arbitrum team has taken measures to ensure the security of their protocol, there is always a certain level of risk involved in using any technology. It is recommended to do thorough research and exercise caution when using new platforms or protocols.
Can I switch back to the Ethereum mainnet after using Arbitrum One with Metamask?
Yes, you can switch back to the Ethereum mainnet by selecting the Ethereum network in your Metamask wallet. Your funds will still be accessible on the Ethereum mainnet.
+ There are no comments
Add yours