


Metamask is a popular and user-friendly cryptocurrency wallet that allows users to interact with decentralized applications (dApps) on the Ethereum network. However, with the surge in popularity of the Binance Smart Chain (BSC) and BEP20 tokens, many users are now looking to set up Metamask for BEP20 transactions as well. In this comprehensive guide, we will walk you through the step-by-step process of setting up Metamask for BEP20 transactions, so you can take full advantage of the BSC ecosystem.
Before we dive into the setup process, it’s important to understand what BEP20 tokens are. BEP20 is a token standard on the Binance Smart Chain, similar to ERC20 on the Ethereum network. These tokens are used for various purposes, including decentralized finance (DeFi) applications, gaming platforms, and more. By setting up Metamask for BEP20 transactions, you will be able to seamlessly interact with these tokens and participate in the growing BSC ecosystem.
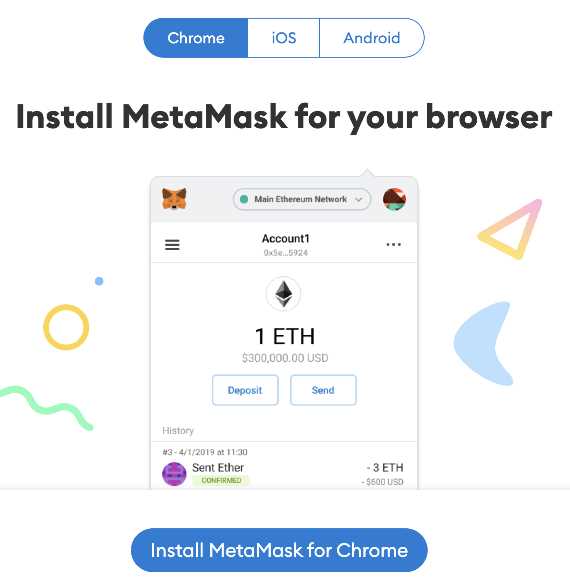
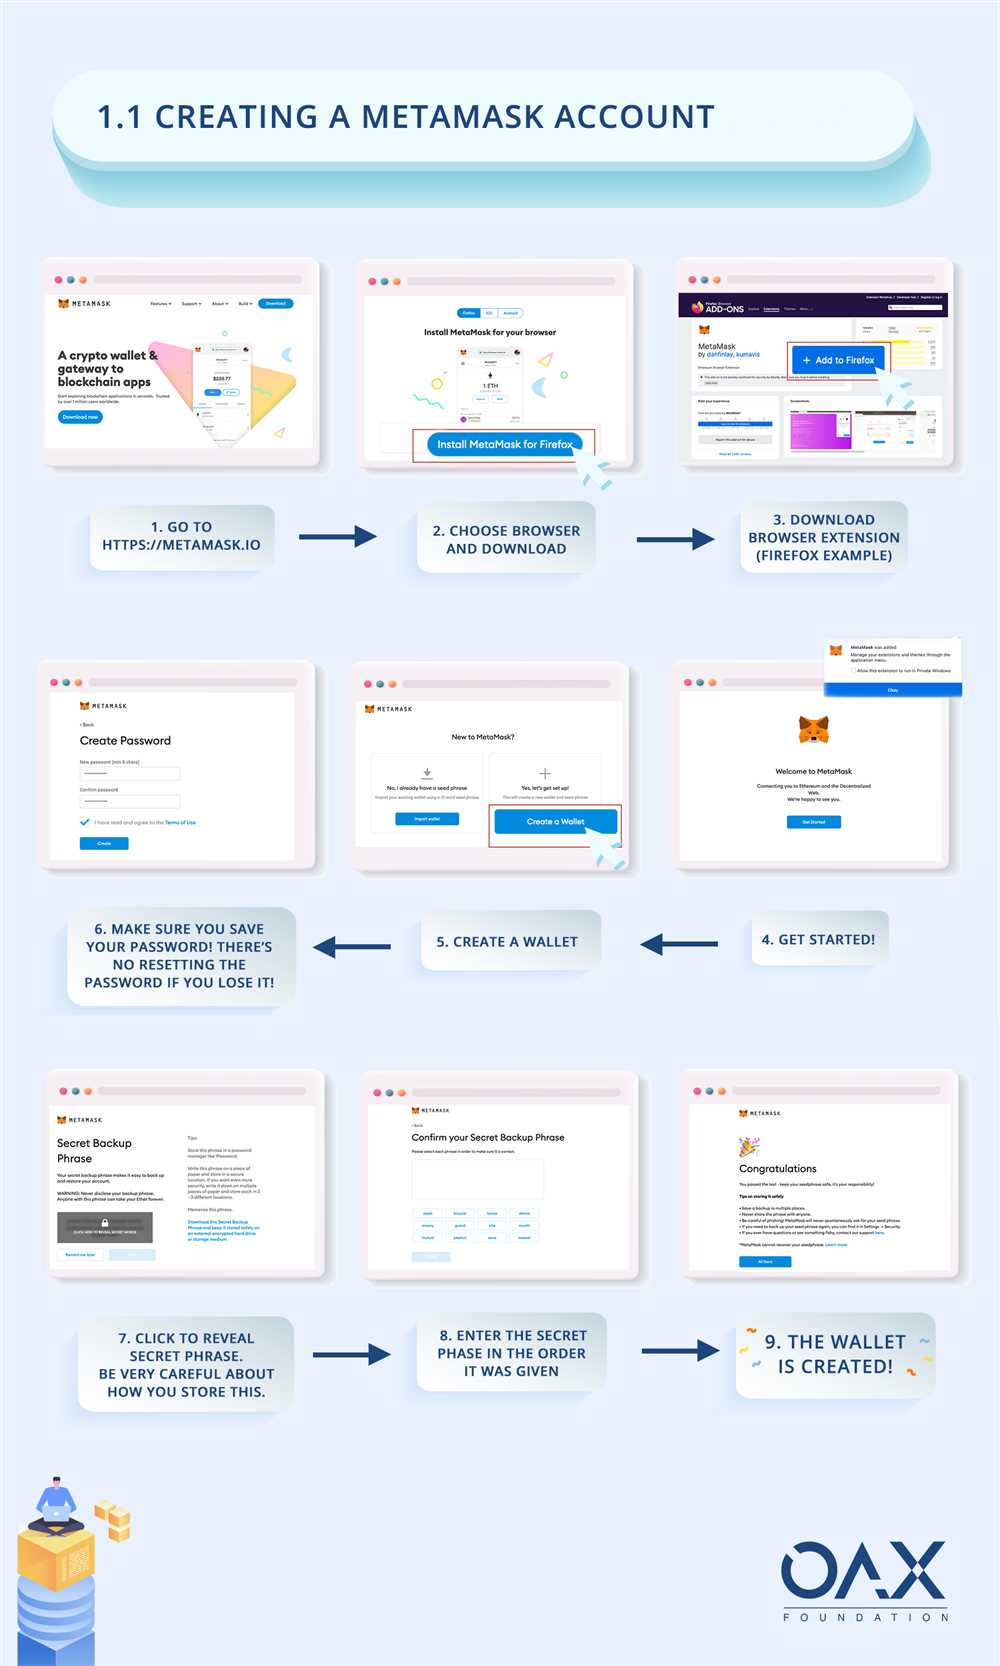
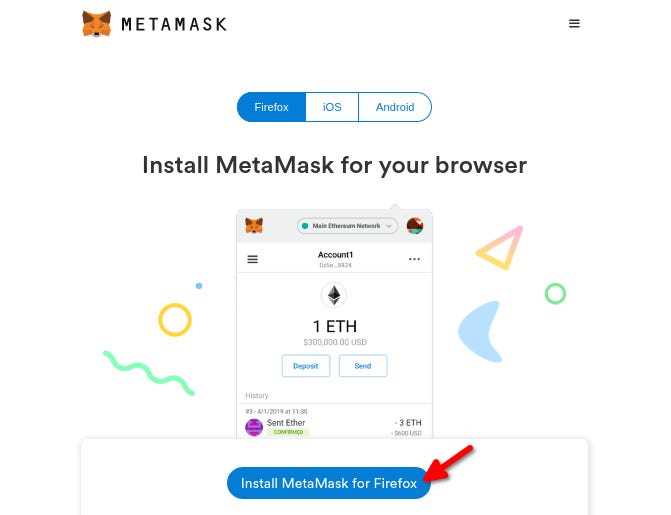
To begin, you will need to install the Metamask extension for your web browser. Metamask is currently available for Chrome, Firefox, Brave, and Edge. Simply search for “Metamask” in the extension marketplace of your chosen browser and click “Add to Chrome” (or the equivalent) to install the extension.
Once the extension is installed, you will see the Metamask icon in your browser’s toolbar. Click on the icon and follow the prompts to create a new wallet. Make sure to securely back up your wallet seed phrase, as this will be the only way to recover your wallet if you forget your password or lose access to your device.
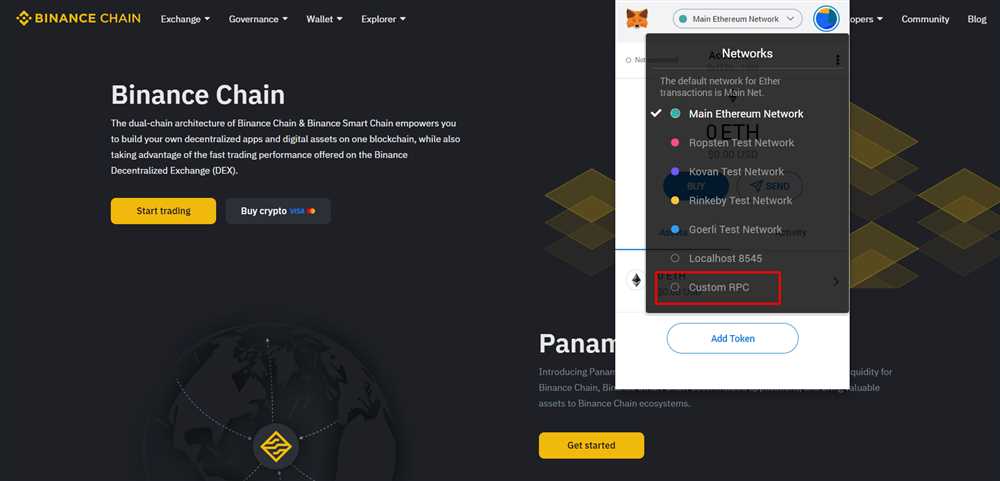
With your wallet created, you can now connect it to the Binance Smart Chain. Click on the Metamask icon and select “Settings” from the menu. Under the “Networks” tab, click on “Add Network” and enter the following details:
Network Name: Binance Smart Chain Mainnet
New RPC URL: https://bsc-dataseed.binance.org/
Chain ID: 56
Symbol: BNB
Block Explorer URL: https://bscscan.com
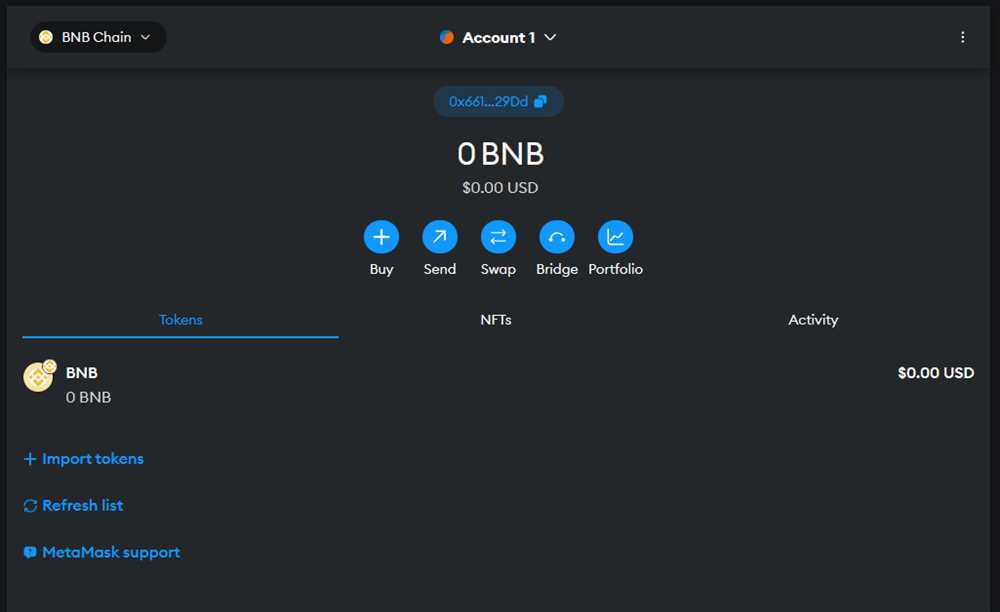
Click “Save” to add the Binance Smart Chain network to your Metamask wallet. You are now ready to start using Metamask for BEP20 transactions! Simply select the Binance Smart Chain network from the Metamask dropdown menu, and you will be able to send, receive, and interact with BEP20 tokens.
In conclusion, setting up Metamask for BEP20 transactions is a straightforward process that will allow you to seamlessly navigate the Binance Smart Chain ecosystem. By following the steps outlined in this guide, you can confidently start using Metamask for BEP20 transactions and take advantage of the numerous opportunities offered by the BSC network.
A Step-by-Step Guide to Installing Metamask
If you’re new to the world of cryptocurrency and decentralized applications, installing and setting up Metamask is one of the first steps you need to take. Metamask is a popular browser extension wallet that allows you to interact with blockchain networks like Ethereum and Binance Smart Chain.
Here’s a step-by-step guide to help you install Metamask:
Step 1: Install the Metamask Extension
First, open your web browser (Google Chrome, Firefox, or Brave) and visit the official Metamask website or search for “Metamask” in your browser’s extension store. Click on the “Add to Chrome” or “Add to Firefox” button to start the installation process.
Step 2: Create a New Wallet
After installing the extension, click on the Metamask icon that appears in the top-right corner of your browser. A welcome screen will pop up, asking you to “Get Started”. Click on this button to create a new wallet.
You will be asked to read and accept the terms of use and privacy notice. Make sure to read them carefully, and if you agree, click on the “Accept” button.
Next, you will be prompted to create a new password. Make sure to choose a strong password and store it in a safe place. After entering your password, click on “Create” to proceed.
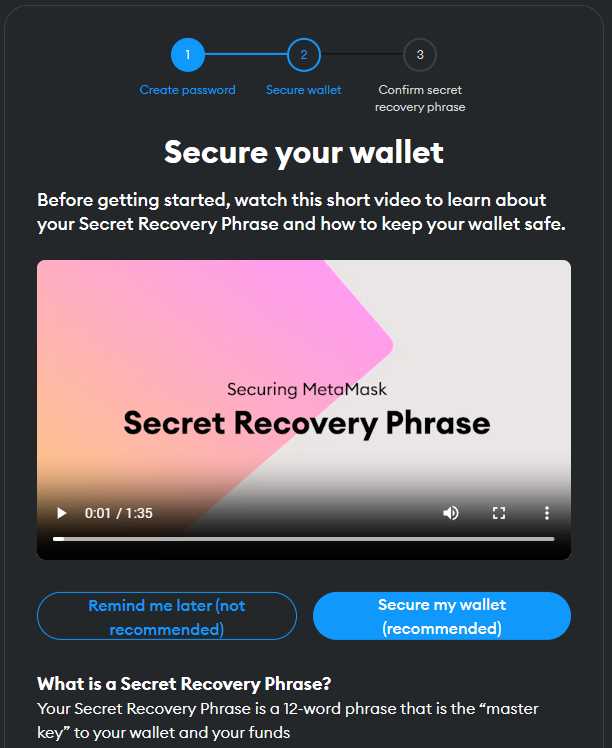
Step 3: Backup your Seed Phrase
Metamask will then generate a unique 12 or 24-word seed phrase that you can use to recover your wallet in case of loss or theft. Make sure to write down this seed phrase on a piece of paper or use a hardware wallet like Ledger to store it securely. Click on “Next” once you have securely backed up your seed phrase.
Metamask will then ask you to verify your seed phrase by asking you to click on the words in the correct order. This is to ensure that you have correctly written down your seed phrase. Once done, click on “Confirm” to proceed.
Step 4: Connect to a Network
Now that you have successfully installed Metamask and created a wallet, you need to connect it to a specific network. Click on the network name in the top-center of the Metamask popup and select the network you want to connect to (e.g., Ethereum Mainnet or Binance Smart Chain).
If you are using a network like Binance Smart Chain, you may need to add it manually by clicking on “Custom RPC” and entering the network details.
Step 5: Import an Existing Wallet (Optional)
If you already have a wallet and want to import it into Metamask, you can do so by clicking on the account icon in the top-right corner and selecting “Import Account”. You will be asked to enter your wallet’s private key or seed phrase.
It’s important to note that importing a wallet into Metamask will overwrite any existing wallet data in that browser extension.
That’s it! You have now successfully installed and set up Metamask. You can start using it to interact with decentralized applications, manage your cryptocurrency, and make BEP20 transactions!
What Is Metamask?
Metamask is a cryptocurrency wallet and browser extension that allows users to interact with blockchain applications directly from their web browser. It serves as a bridge between the traditional internet and the decentralized web, enabling users to securely store, manage, and transact with their digital assets.
Metamask is specifically designed to work with Ethereum-based applications and supports the BEP20 token standard on the Binance Smart Chain. It provides users with a simple and intuitive interface to access various decentralized applications (dApps) such as decentralized exchanges, lending platforms, and decentralized finance (DeFi) protocols.
When you set up Metamask, you create a unique wallet address that functions as your digital identity on the blockchain. This address allows you to send and receive funds, interact with smart contracts, and perform various transactions on the Ethereum and Binance Smart Chain networks. Metamask also provides you with a mnemonic phrase or a seed phrase, which is a series of words that can be used to recover your wallet in case of loss or device failure.
By using Metamask, you can securely connect your wallet to different dApps and authorize transactions without needing to share your private keys directly. This significantly reduces the risk of exposing your private keys to potential security threats.
Overall, Metamask is a powerful tool that empowers users to access and interact with the decentralized web, providing them with a user-friendly interface, enhanced security features, and seamless integration with Ethereum-based applications and the Binance Smart Chain.
“`html
How to Download and Set Up Metamask
To use the BEP20 network and interact with BEP20 tokens, you’ll need to download and set up the Metamask wallet. Metamask is a browser extension that allows you to manage your Ethereum and BEP20 wallet, as well as interact with decentralized applications (dApps).
Step 1: Download Metamask
Go to the official Metamask website at https://metamask.io and click on the “Get Chrome Extension” button if you’re using Google Chrome. If you’re using a different browser, you can find the appropriate extension in your browser’s extension store. Follow the instructions to download and install the Metamask extension.
Step 2: Create a New Wallet
Once you have installed the Metamask extension, click on the Metamask icon in your browser’s toolbar. A welcome popup will appear, click on the “Get Started” button to create a new wallet.
If you already have a Metamask account, you can import it by clicking on “Import Wallet” instead.
Step 3: Set Up a Password
Choose a strong password for your wallet and confirm it. This password will be used to encrypt your wallet’s private keys, so make sure it’s secure and something you can remember.
Step 4: Backup Your Seed Phrase
Metamask will provide you with a unique 12-word seed phrase. It is extremely important to backup this seed phrase in a safe and secure location. This seed phrase can be used to restore your wallet in case you lose access to it.
Write down the seed phrase and store it in a safe place, away from prying eyes. Do not take a screenshot or share it with anyone.
Step 5: Confirm Your Seed Phrase
To verify that you have correctly written down your seed phrase, Metamask will ask you to select the words in the correct order from a list of provided words. This is to ensure that you have properly backed up your seed phrase.
Select the words in the correct order and click “Confirm” to proceed.
Step 6: Connect to the BEP20 Network
Once you have set up your wallet, Metamask will automatically connect to the Ethereum network. To switch to the BEP20 network, click on the network name at the top of the Metamask extension and select “Custom RPC”.
In the Custom RPC settings, enter the following details:
| Network Name | BEP20 Network |
|---|---|
| New RPC URL | https://bsc-dataseed1.binance.org/ |
| Chain ID | 56 |
| Symbol | BNB |
| Block Explorer URL | https://bscscan.com |
Click “Save” to save the network settings.
Congratulations! You have successfully downloaded and set up Metamask for BEP20 transactions. You can now manage your BEP20 tokens and interact with dApps on the BEP20 network.
Importing and Managing BEP20 Tokens
Once you have set up your Metamask wallet for BEP20 transactions, you might want to import and manage BEP20 tokens. BEP20 tokens are tokens built on the Binance Smart Chain (BSC) that adhere to the BEP20 token standard. These tokens can be stored in your Metamask wallet for easy access and management.
To import BEP20 tokens into your Metamask wallet, you need to follow these steps:
Step 1: Finding the Token Contract Address
The first step is to find the token contract address. This can usually be found on the token’s website, a blockchain explorer, or a token listing platform. Make sure you have the correct contract address for the token you want to import.
Step 2: Adding the Token to Metamask
Once you have the token contract address, you need to add the token to your Metamask wallet. Follow these steps:
- Open Metamask and click on the “Assets” tab
- Click on “Add Token” and select “Custom Token”
- Paste the token contract address into the “Token Contract Address” field
- Metamask should automatically fill in the “Token Symbol” and “Decimals of Precision” fields. If not, you can find this information on the token’s website or with the token issuer.
- Click “Next” and then “Add Tokens” to complete the import process
Step 3: Managing BEP20 Tokens
Once you have imported BEP20 tokens into your Metamask wallet, you can easily manage them. Here are some common actions you can perform:
- Send: You can send your BEP20 tokens to another wallet address by clicking on the token in your Metamask wallet, selecting “Send”, and entering the recipient’s address.
- Receive: You can receive BEP20 tokens by sharing your wallet address with the sender.
- View balance: You can check the balance of your BEP20 tokens by navigating to the “Assets” tab in Metamask.
- Remove: If you want to remove a token from your Metamask wallet, you can do so by clicking on the token in the “Assets” tab and selecting “Remove”.
Managing BEP20 tokens in your Metamask wallet is a simple and convenient way to access and interact with tokens built on the Binance Smart Chain.
Sending and Receiving BEP20 Transactions
Sending and receiving BEP20 transactions is a fundamental aspect of using Metamask. Whether you want to send tokens to another address or receive tokens from someone else, Metamask makes it easy to handle these transactions securely and efficiently.
Sending BEP20 Transactions
To send BEP20 transactions using Metamask, follow these steps:
- Open your Metamask extension and make sure you are logged into your desired wallet.
- Click on the “Send” button in the top navigation bar.
- Enter the recipient’s address in the “To” field. Make sure the address is correct to avoid sending tokens to the wrong person.
- Specify the amount of tokens you want to send in the “Amount” field. Double-check the amount to prevent any errors.
- Choose the desired transaction speed by adjusting the gas fees. Higher gas fees result in faster transactions, but at a higher cost.
- Review the transaction details and make sure everything is correct. Once you are satisfied, click on the “Confirm” button.
- Metamask will prompt you to confirm the transaction again. Follow the instructions and click on “Confirm” once more.
- Wait for the transaction to be processed on the Ethereum network. You can track the progress by clicking on the transaction hash provided by Metamask.
- Once the transaction is confirmed, the recipient will receive the tokens in their wallet.
Receiving BEP20 Transactions
To receive BEP20 transactions using Metamask, follow these steps:
- Open your Metamask extension and make sure you are logged into your desired wallet.
- Copy your wallet’s address by clicking on the account icon and selecting “Copy Address to Clipboard”.
- Share your wallet’s address with the person who wants to send you tokens.
- Once the sender has your address, they can initiate the transaction from their wallet.
- Wait for the sender to complete the transaction and for it to be confirmed on the Ethereum network.
- Once the transaction is confirmed, the tokens will be automatically added to your wallet and you will be able to see the balance.
Remember to keep your wallet’s address secure and only share it with trusted individuals. Additionally, always double-check transaction details before confirming to avoid any potential mistakes. Using Metamask to send and receive BEP20 transactions ensures a secure and reliable experience.
Frequently Asked Questions:
What is Metamask?
Metamask is a cryptocurrency wallet and browser extension that allows users to interact with decentralized applications (dApps) on the Ethereum blockchain. It also supports the Binance Smart Chain (BEP20) network.

+ There are no comments
Add yours