


MetaMask is a popular browser extension that allows developers and users to interact with the Ethereum blockchain. It provides a secure and convenient way to manage Ethereum accounts, send and receive transactions, and access decentralized applications (dApps).
If you are a developer working on Ethereum projects, using MetaMask on the Rinkeby test network can be incredibly helpful. The Rinkeby test network is similar to the main Ethereum network, but the ether on Rinkeby has no real-world value. This allows you to test your smart contracts and dApps without spending real ether.
To get started with MetaMask on Rinkeby, you first need to install the MetaMask browser extension. It is available for Chrome, Firefox, and Brave browsers. Once installed, you can create a new MetaMask wallet or import an existing one.
After setting up your MetaMask wallet, you can switch to the Rinkeby test network by selecting it from the network dropdown menu in the MetaMask extension. To obtain test ether for Rinkeby, you can use various faucet services that distribute test ether to developers. Once you have test ether in your Rinkeby wallet, you are ready to start testing your Ethereum projects!
Getting Started with MetaMask on Rinkeby Test Network for Ethereum Development

If you are a developer looking to test and deploy your Ethereum smart contracts, the Rinkeby test network is a great option. It allows you to experiment with your code without spending real Ether. To interact with the Rinkeby network, you’ll need to set up and connect MetaMask, a popular Ethereum wallet and browser extension.
Step 1: Install MetaMask
To get started, you’ll first need to install the MetaMask extension in your web browser. Visit the official MetaMask website and download the extension for your browser of choice. Follow the installation instructions provided by MetaMask to complete the setup process.
Step 2: Create a MetaMask Wallet
After installing MetaMask, you’ll be prompted to create a new wallet. Click on the “Get Started” button and follow the instructions to create a new account. Make sure to store your mnemonic phrase in a safe place, as it will be required to recover your wallet.
Step 3: Connect to the Rinkeby Test Network
Once you’ve created your wallet, you’ll need to connect MetaMask to the Rinkeby Test Network. Open MetaMask and click on the network dropdown at the top of the extension. Select “Rinkeby Test Network” from the list of available networks.
Step 4: Obtain Rinkeby Ether
In order to interact with the Rinkeby network, you’ll need some Rinkeby Ether. Unlike the main Ethereum network, Rinkeby Ether is obtained for free through faucets. Search online for a Rinkeby Ether faucet, enter your wallet address, and submit a request to receive test Ether.
Step 5: Start Developing on Rinkeby
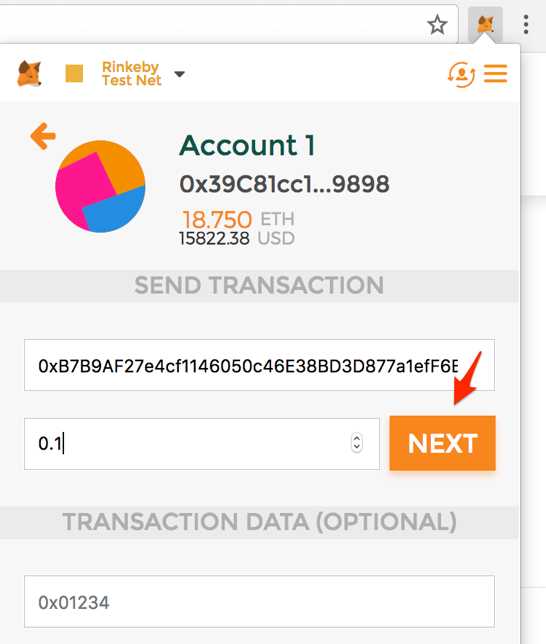
With your MetaMask wallet connected to the Rinkeby Test Network and some Rinkeby Ether in your account, you are now ready to start developing and deploying your Ethereum smart contracts. Use your preferred development tools or frameworks to write and test your code, and deploy your contracts to the Rinkeby network using MetaMask as the signing tool.
| Step | Description |
|---|---|
| Step 1 | Install MetaMask |
| Step 2 | Create a MetaMask Wallet |
| Step 3 | Connect to the Rinkeby Test Network |
| Step 4 | Obtain Rinkeby Ether |
| Step 5 | Start Developing on Rinkeby |
Install and Set Up MetaMask
MetaMask is a browser extension that allows you to interact with the Ethereum blockchain. Here’s a step-by-step guide on how to install and set up MetaMask on the Rinkeby Test Network:
Step 1: Install the MetaMask Extension
- Open your preferred web browser and go to the MetaMask website.
- Click on the “Get Chrome Extension” or “Get Firefox Extension” button to download the extension.
- Follow the on-screen instructions to install the extension in your browser.
Step 2: Create a MetaMask Wallet
- Once the extension is installed, click on the MetaMask icon in your browser’s toolbar.
- A new window will open with the MetaMask login screen. Click on the “Create a Wallet” button.
- Read and accept the terms of use, and click on the “Continue” button.
- Create a strong password for your wallet and click on the “Create” button.
- Back up your secret backup phrase by clicking on the “Next” button and following the instructions. This backup phrase is important as it allows you to restore your wallet if you lose access to it.
- Once you have backed up your secret backup phrase, click on the “All Done” button.
Step 3: Connect to the Rinkeby Test Network
- In the MetaMask window, click on the network dropdown located at the top of the page.
- Select “Rinkeby Test Network” from the dropdown menu.
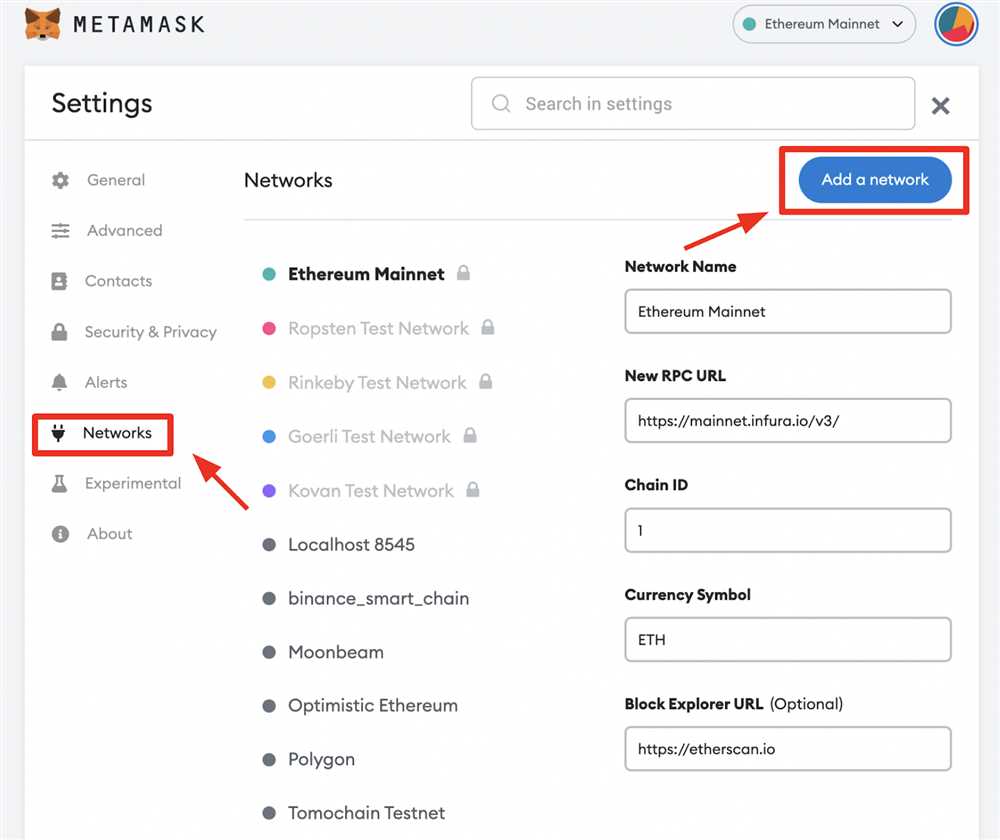
- If you don’t see Rinkeby Test Network in the dropdown, click on “Custom RPC” and enter the following details:
- Network Name: Rinkeby
- New RPC URL: https://rinkeby.infura.io/v3/YOUR_INFURA_PROJECT_ID
- ChainID: 4
- Symbol (optional): ETH
- Block Explorer URL (optional): https://rinkeby.etherscan.io
- Click on the “Save” button to connect to the Rinkeby Test Network.
Congratulations! You have successfully installed and set up MetaMask and connected it to the Rinkeby Test Network. Now you can start developing and testing your Ethereum applications on this test network.
Creating a Rinkeby Test Network Account
To get started using MetaMask on the Rinkeby Test Network for Ethereum development, you will first need to create a Rinkeby test network account. Here’s how:
- Make sure you have MetaMask installed in your browser. If not, you can install it from the MetaMask website.
- Launch MetaMask by clicking on the MetaMask icon in your browser toolbar.
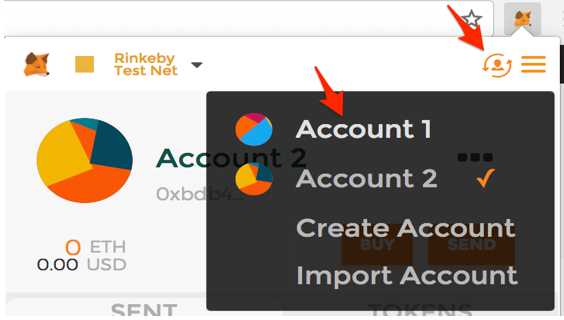
- If you already have a MetaMask account, ensure you are connected to the Main Ethereum Network and log out of your current account. If you don’t have a MetaMask account yet, proceed to the next step.
- Click the “Get Started” button on the MetaMask login screen.
- Create a strong password for your MetaMask account and click “Create”.
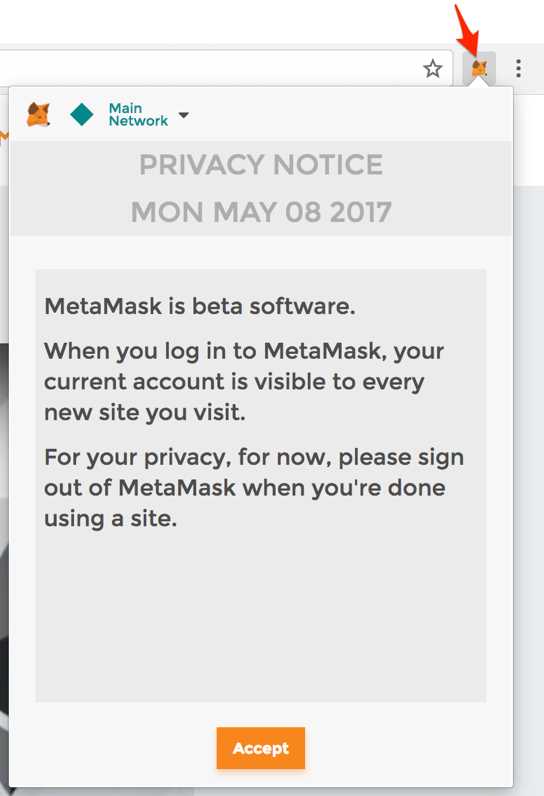
- Read and accept the MetaMask Terms of Use and Privacy Notice.
- Click the “Next” button to reveal your secret backup phrase.
- Write down your secret backup phrase and store it somewhere safe. This phrase is crucial for recovering your account in case you lose access to your MetaMask account.
- Confirm your secret backup phrase by selecting the words in the correct order.
- Congratulations! You have successfully created a MetaMask account.
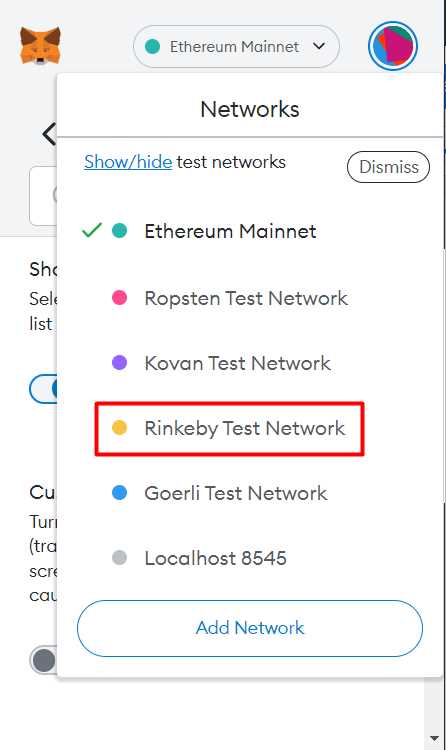
- Now, to switch to the Rinkeby Test Network, click on the network selection dropdown at the top of the MetaMask window.
- Select “Rinkeby Test Network” from the list of available networks.
- You may be asked to confirm your switch to the Rinkeby Test Network. Click “Switch” to proceed.
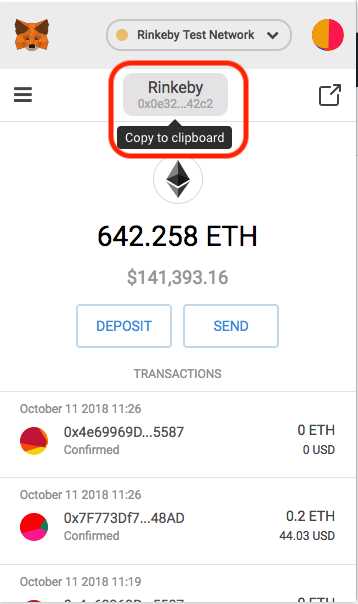
- Your MetaMask account is now connected to the Rinkeby Test Network!
With your Rinkeby test network account set up, you are ready to start developing and testing your Ethereum applications without using real ether on the main Ethereum network.
Deploying Smart Contracts on Rinkeby Test Network
If you are developing Ethereum smart contracts, it is essential to test them in a realistic environment before deploying them on the actual Ethereum network. The Rinkeby Test Network provides a perfect platform for this purpose. Here’s a step-by-step guide on how to deploy your smart contracts on the Rinkeby Test Network using MetaMask:
Step 1: Set Up MetaMask
Make sure you have MetaMask installed and set up in your web browser. If you haven’t done so already, install the MetaMask extension and create a new account. Then, connect your MetaMask wallet to the Rinkeby Test Network.
Step 2: Get Rinkeby Ether
In order to deploy your smart contracts on the Rinkeby Test Network, you will need some Rinkeby Ether. You can obtain Rinkeby Ether for free from the official Rinkeby Faucet by providing your Rinkeby address and solving a captcha.
Step 3: Compile and Deploy Your Smart Contracts
Using a development framework like Truffle, you can compile your smart contracts into bytecode and ABI (Application Binary Interface). Then, deploy your smart contracts to the Rinkeby Test Network using the MetaMask wallet connected to the network.
Step 4: Test Your Smart Contracts
After deploying your smart contracts, you can test their functionality on the Rinkeby Test Network. Use tools like Remix, Truffle, or your own custom UI to interact with your contracts and verify that they behave as expected.
Step 5: Discover and Fix Issues
If you encounter any issues or bugs while testing your smart contracts on the Rinkeby Test Network, make necessary adjustments to your code and redeploy the contracts for further testing. Rinse and repeat until you are satisfied with their performance.
Step 6: Deploying on the Main Ethereum Network
Once you have thoroughly tested and resolved any issues on the Rinkeby Test Network, you can confidently deploy your smart contracts on the main Ethereum network. Remember to consider the costs and implications of deploying your contracts on the main network.
Conclusion
Using the Rinkeby Test Network and MetaMask, you can safely deploy and test your smart contracts before going live on the Ethereum main network. This approach allows you to identify and fix any issues, ensuring that your contracts function as intended and providing a smooth experience for your users.
Frequently Asked Questions:
What is MetaMask?
MetaMask is a browser extension and a digital wallet that allows users to interact with the Ethereum blockchain. It enables users to manage their Ethereum accounts, securely store and send Ether, as well as interact with decentralized applications (dApps).
How can I download and install MetaMask?
To download and install MetaMask, you can visit the MetaMask website or search for it in the extension store of your preferred browser. Once you find it, click on the “Add to [browser name]” button and follow the prompts to install the extension.
What is the Rinkeby Test Network?
The Rinkeby Test Network is one of the test networks available for developers to test their Ethereum applications without using real Ether. It is a fully functioning Ethereum network that operates similarly to the main Ethereum network, but with test Ether that has no real-world value.
What are the benefits of using the Rinkeby Test Network?
Using the Rinkeby Test Network allows developers to test their applications in a real-world-like environment without the risk of losing real Ether. It also allows for easy deployment and testing of smart contracts before deploying them on the main Ethereum network.
How can I switch to the Rinkeby Test Network in MetaMask?
To switch to the Rinkeby Test Network in MetaMask, click on the MetaMask icon in your browser toolbar to open the extension. Next, click on the current network name (e.g., “Main Ethereum Network”) and select “Rinkeby Test Network” from the dropdown menu. MetaMask will then switch to the Rinkeby Test Network, and you can start interacting with dApps and deploying/testing contracts on this network.
+ There are no comments
Add yours