


Are you looking to enhance the security of your cryptocurrency transactions? Integrating Ledger with Metamask is the perfect solution. By combining the hardware wallet security of Ledger with the ease of use of Metamask, you can enjoy a seamless and secure experience when managing your digital assets.
Step 1: Set up your Ledger hardware wallet
Before you can integrate Ledger with Metamask, you need to set up and initialize your Ledger hardware wallet. Follow the instructions provided by Ledger to properly secure and configure your wallet.
Step 2: Install Metamask on your browser
If you haven’t already, install the Metamask extension on your preferred browser. Metamask is a popular Ethereum wallet that allows you to manage your digital assets and interact with decentralized applications (dApps) directly from your browser.
Step 3: Enable “Ledger Live” in Metamask
In the Metamask extension, click on the account icon in the top right corner and select “Settings”. Scroll down to the “Advanced” section and enable the “Ledger Live” integration.
Step 4: Connect your Ledger wallet to Metamask
Connect your Ledger hardware wallet to your computer using the USB cable provided. Unlock your Ledger wallet and open the Ethereum app. In Metamask, click on the account icon again and select “Connect Hardware Wallet”. Choose “Ledger” as the type of wallet and follow the instructions to establish the connection.
Step 5: Confirm the connection on your Ledger wallet
Your Ledger wallet will prompt you to confirm the connection. Verify that the wallet address shown on your computer matches the one displayed on your Ledger device. If they match, confirm the connection on your Ledger wallet.
Step 6: Start using Ledger with Metamask
Once the connection is established, you can now start using your Ledger hardware wallet in conjunction with Metamask. You can access your Ledger accounts, manage your digital assets, and interact with dApps seamlessly.
With Ledger and Metamask integrated, you can enjoy the best of both worlds – the security of a hardware wallet and the convenience of a browser extension. Follow these simple steps, and you’ll be on your way to a safer and smoother cryptocurrency experience.
How to Integrate Ledger with Metamask

If you want to enhance the security of your Ethereum transactions and account, you can integrate your Ledger hardware wallet with the popular Metamask wallet. This integration allows you to sign transactions securely with your Ledger device while enjoying the convenience of using Metamask’s user-friendly interface.
Before you begin, make sure you have the following:
- A Ledger hardware wallet
- The Ledger Live software installed on your computer
- The Metamask extension installed on your browser
Follow these steps to integrate Ledger with Metamask:
- Connect your Ledger device to your computer and enter your PIN.
- Open the Ledger Live software and make sure it is up-to-date.
- Navigate to the “Manager” tab in the Ledger Live software.
- Find and install the Ethereum app on your Ledger device.
- Open the Metamask extension in your browser.
- Click on the Metamask icon and select “Connect Hardware Wallet.”
- Choose “Ledger” as the type of hardware wallet you want to connect.
- Follow the on-screen instructions to connect your Ledger device to Metamask.
- Once connected, your Metamask wallet will display your Ethereum accounts associated with your Ledger device.
Now you can use Metamask as usual, but with the added security of your Ledger device. When you perform a transaction, Metamask will prompt you to confirm the transaction on your Ledger device. Simply verify the transaction details on the Ledger device and approve it.
Integrating Ledger with Metamask is an excellent way to ensure the safety of your Ethereum funds while enjoying the benefits of a user-friendly wallet interface. Follow the steps above and start securely managing your Ethereum accounts today!
Step 1: Install Metamask and Ledger Live
The first step to integrating Ledger with Metamask is to download and install both the Metamask extension and Ledger Live software.
Metamask:
Metamask is a browser extension that allows you to interact with Ethereum-based decentralized applications (dApps). It serves as a digital wallet for managing your Ethereum assets and securely storing your private keys.
To install Metamask:
- Open your preferred web browser.
- Go to the Metamask website.
- Click on the “Get Chrome Extension” or “Get Firefox Extension” button, depending on your browser.
- Follow the on-screen instructions to add the extension to your browser.
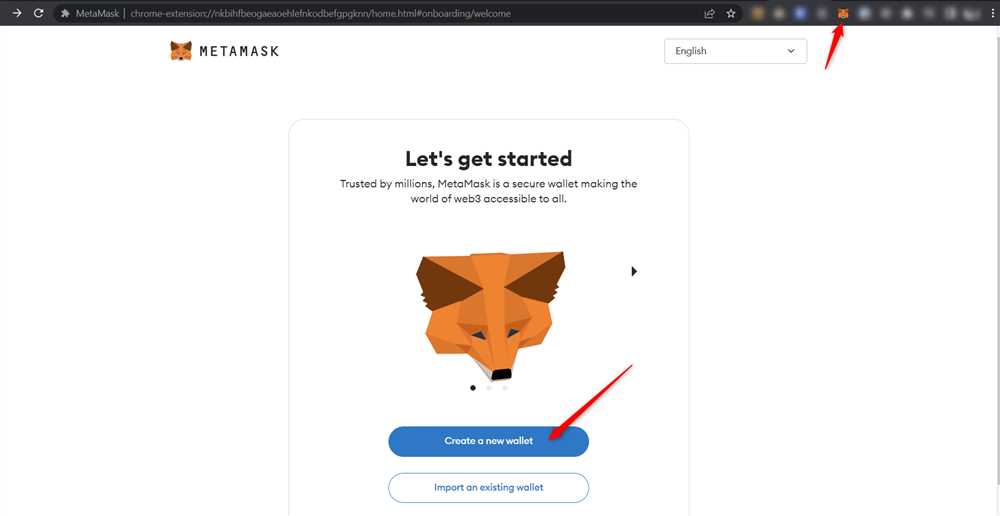
- Create a new account or import an existing one using your seed phrase or private key.
- Set up a password and complete the account creation process.
Ledger Live:
Ledger Live is the companion desktop application for managing your Ledger hardware wallet. It allows you to securely store and manage your cryptocurrency assets, as well as interact with various blockchain networks.
To install Ledger Live:
- Visit the Ledger website.
- Click on the “Download” button.
- Choose the appropriate software version for your operating system (Windows, Mac, or Linux).
- Once the download is complete, open the installer and follow the on-screen instructions to install the software.
- Launch Ledger Live and set up a new device if you haven’t already done so. Follow the prompts to connect your Ledger hardware wallet to the computer.
- Complete the device setup by creating a PIN code and recording your recovery phrase.
After successfully installing both Metamask and Ledger Live, you are ready to proceed to the next step of integrating them.
Step 2: Connect Ledger to Metamask
Now that you have set up your Ledger device, the next step is to connect it to Metamask. This will allow you to securely manage your Ethereum assets using both Ledger’s hardware security and Metamask’s user-friendly interface.
Follow the steps below to connect Ledger to Metamask:
- Ensure that your Ledger device is plugged in and unlocked.
- Open the Metamask extension in your browser and click on the profile icon in the top right corner.
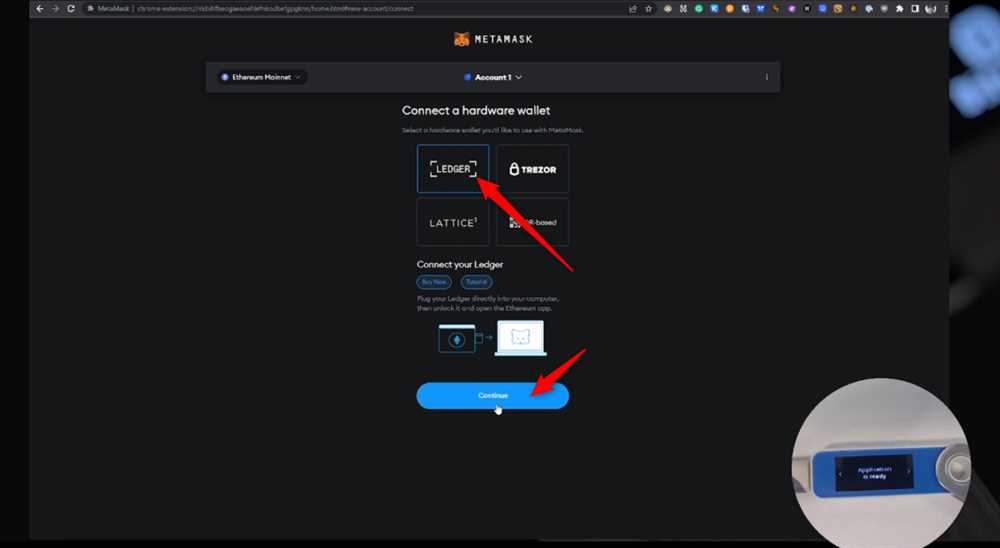
- Select “Connect Hardware Wallet” from the dropdown menu.
- Choose “Ledger” as the hardware wallet provider.
- A new window will open prompting you to connect your Ledger device.
- Click on the “Connect” button.
- Metamask will detect your Ledger device and ask you to confirm the connection on your Ledger device’s screen.
- On your Ledger device, navigate to the Ethereum app and click on the confirmation button.
- Once the connection is successful, Metamask will display your Ledger account(s) under the “Accounts” section.
Congratulations! You have now successfully connected your Ledger device to Metamask. You can now use Metamask to manage your Ethereum accounts and interact with decentralized applications.
Remember to always keep your Ledger device plugged in and unlocked when using Metamask to access your accounts.
Step 3: Enable Contract Data and Browser Mode
In order to integrate Ledger with Metamask, you need to enable contract data and browser mode. This step is important to ensure that you can interact with smart contracts and perform transactions on the Ethereum network.
Follow the steps below to enable contract data and browser mode on your Ledger device:
| Step | Description |
|---|---|
| 1 | Connect your Ledger device to your computer using the USB cable. |
| 2 | Enter your PIN code on the Ledger device to unlock it. |
| 3 | Open the Ethereum app on your Ledger device. |
| 4 | Navigate to the “Settings” menu. |
| 5 | Scroll down and select “Contract data”. |
| 6 | Make sure that the “Allow contract data” option is set to “Yes”. |
| 7 | Go back to the “Settings” menu. |
| 8 | Scroll down and select “Browser support”. |
| 9 | Make sure that the “Browser support” option is set to “Yes”. |
| 10 | Disconnect your Ledger device from your computer. |
By following these steps, you have successfully enabled contract data and browser mode on your Ledger device. This will allow you to integrate it with Metamask and interact with smart contracts on the Ethereum network.
Step 4: Confirm and Sign Transactions

Once you have connected your Ledger wallet to MetaMask and selected the desired account, you can start confirming and signing transactions. This is an essential step in ensuring the security of your transactions on the Ethereum network.
When you initiate a transaction on MetaMask, you will see a popup window on your Ledger device. This window will display the details of the transaction, including the recipient address, the amount being sent, and the gas fee. Take a moment to carefully review these details and ensure they are correct.
After confirming that the transaction details are accurate, you can use the buttons on your Ledger device to either sign or reject the transaction. To sign the transaction, simply press the “Sign” button on your Ledger device. If you believe the transaction is fraudulent or incorrect, you can press the “Reject” button to cancel the transaction.
Keep in mind that once you have signed a transaction, it cannot be reversed or modified. Therefore, it is crucial to double-check all transaction details before signing to avoid any potential loss of funds or other issues.
After signing the transaction, you will see a confirmation message on both MetaMask and your Ledger device. The transaction will then be broadcasted to the Ethereum network for processing. Depending on network congestion, it may take some time for the transaction to be confirmed and included in a block.
In summary, confirming and signing transactions using Ledger with MetaMask is a straightforward process that adds an extra layer of security to your Ethereum transactions. By carefully reviewing transaction details and using your Ledger device to sign transactions, you can ensure the integrity and safety of your funds and interactions on the Ethereum network.
Frequently Asked Questions:
What is Ledger?
Ledger is a hardware wallet that provides a secure way to store your cryptocurrencies. It stores your private keys offline and protects them from potential hacks or attacks.
Why should I integrate Ledger with Metamask?
Integrating Ledger with Metamask adds an extra layer of security to your cryptocurrency transactions. It allows you to securely sign transactions using your Ledger hardware wallet, ensuring that your private keys never leave the device.
+ There are no comments
Add yours