


Metamask is a popular wallet and browser extension that allows users to interact with decentralized applications on the Ethereum network. However, with the rise in popularity of the Avalanche blockchain, many users are now looking for ways to use Metamask with Avax transactions. In this article, we will guide you through the process of setting up and using Metamask to seamlessly transact on the Avax network.
Step 1: Install Metamask Extension
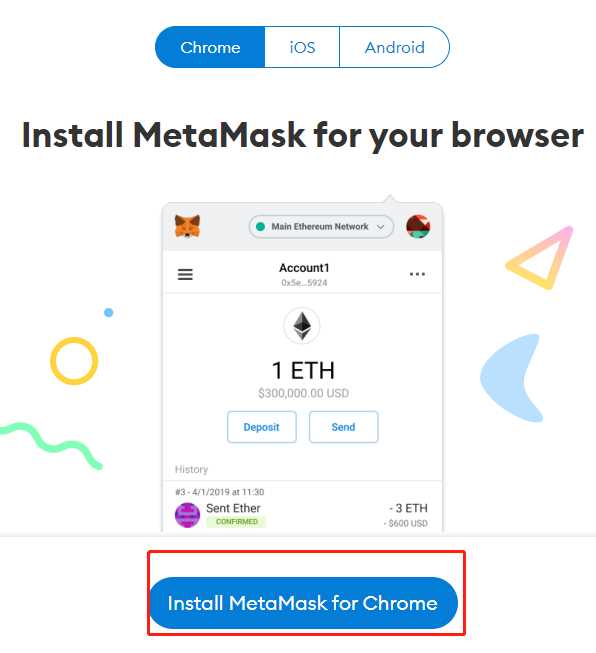
The first step in using Metamask for Avax transactions is to install the Metamask browser extension. To do this, go to the Metamask website and click on the “Get Chrome Extension” button. Follow the instructions to add the extension to your browser. Once installed, you will see the Metamask icon in your browser toolbar.
Step 2: Create a New Wallet
After installing the Metamask extension, click on the extension icon to open the Metamask wallet. If this is your first time using Metamask, you will be prompted to create a new wallet. Follow the instructions to set a strong password and create a new wallet. Make sure to securely store your seed phrase, as this is the only way to recover your wallet if you forget your password.
Step 3: Connect to the Avalanche Network
Once your wallet is created, you will be automatically connected to the Ethereum network. In order to transact on the Avax network, you will need to add the Avalanche network to your Metamask wallet. To do this, click on the network dropdown menu and select “Custom RPC”. Enter the Avalanche network details, including the RPC URL and the chain ID. After saving the settings, you will be connected to the Avax network.
Step 4: Add Avax Tokens
Now that you are connected to the Avax network, you will need to add Avax tokens to your Metamask wallet in order to transact with them. To do this, click on the asset dropdown menu and select “Add Token”. Enter the Avax contract address and the token symbol. Metamask will automatically detect the token, and you will be able to see your Avax balance in your wallet.
With your Metamask wallet set up and connected to the Avax network, you are now ready to transact on the Avax blockchain. Whether you want to buy, sell, or trade Avax tokens, Metamask makes it easy to interact with the Avax network and participate in the growing ecosystem of decentralized applications.
The Basics of Metamask for Avax Transactions
Metamask is a popular web3 wallet that allows users to interact with blockchain networks, including the Avalanche (Avax) network. With Metamask, you can securely store, send, and receive Avax and other digital assets.
Installing Metamask
To get started with Metamask, you’ll first need to install the extension in your web browser. Metamask is available for Chrome, Firefox, Brave, and Edge. Simply go to the extension store for your chosen browser and search for “Metamask”. Click on the “Add to Chrome” (or equivalent) button to install the extension.
Creating a Wallet
Once you have installed Metamask, you can create a new wallet by following these steps:
- Click on the Metamask icon in your browser toolbar.
- Click on “Get Started”.
- Click on “Create a Wallet”.
- Follow the prompts to set a strong password and agree to the terms of service.
- After creating your wallet, Metamask will generate a secret backup phrase. This phrase is very important, as it can be used to restore your wallet if you lose access. Make sure to write it down and keep it in a secure place.
Connecting to Avax Network
To connect Metamask to the Avalanche network, follow these steps:
- Click on the Metamask icon in your browser toolbar.
- Click on the network selection button (usually displays “Ethereum Mainnet” by default).
- Click on the “Custom RPC” option.
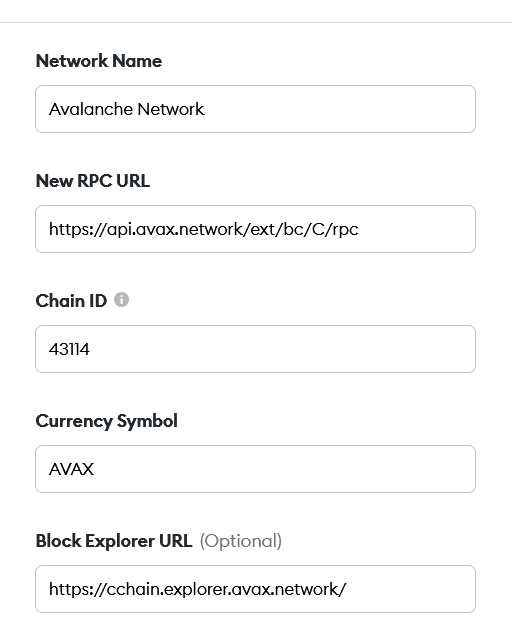
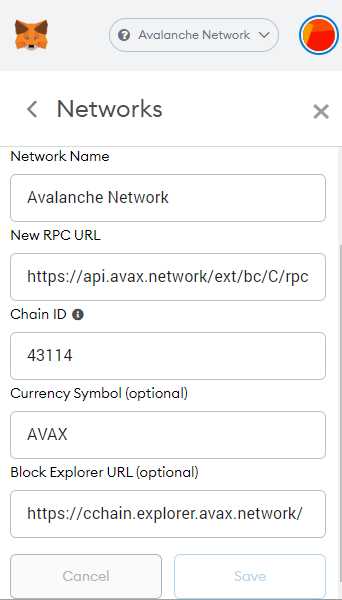
- Enter the Avalanche network details:
- Network Name: Avalanche Mainnet
- New RPC URL: https://api.avax.network/ext/bc/C/rpc
- ChainID: 43114
- Symbol: AVAX
- Block Explorer URL: https://cchain.explorer.avax.network/
- Click “Save” to connect to the Avax network.
Once connected to the Avax network, you can now start using Metamask to send, receive, and interact with Avax transactions. Make sure to always double-check the transaction details before confirming, as blockchain transactions are irreversible.
Setting Up Metamask for Avax Transactions
In order to start using Metamask for Avax transactions, you will first need to download and install the Metamask extension on your browser. Metamask is a digital wallet that allows you to interact with the Avax network and perform various transactions.
Step 1: Download and Install Metamask
To download Metamask, visit the official website at https://metamask.io and choose the appropriate version for your browser (e.g., Chrome, Firefox, Brave). Click on the download button and follow the instructions to install the extension.
Step 2: Set Up Metamask
Once Metamask is installed, click on the extension icon in your browser to launch it. You will be prompted to create a new wallet or import an existing one. Choose the option that suits you best and follow the on-screen instructions.
During the setup process, Metamask will generate a unique 12-word recovery phrase, also known as a seed phrase. It is important to write down this phrase and store it in a safe place, as it can be used to recover your wallet in case you lose access to your device.
Step 3: Connect Metamask to the Avax Network
After setting up your wallet, you will need to add the Avax network to Metamask in order to interact with it. To do this, open Metamask and click on the network selector at the top of the screen. Choose “Custom RPC” and enter the following details:
| Network Name: | Avax Mainnet |
| New RPC URL: | https://api.avax.network/ext/bc/C/rpc |
| Chain ID: | 43114 |
| Symbol: | AVAX |
| Block Explorer URL: | https://cchain.explorer.avax.network/ |
Click “Save” to add the Avax network to Metamask.
Now you’re all set! You can now use Metamask to send and receive AVAX tokens, interact with smart contracts, and participate in the Avax ecosystem. Remember to always double-check the transaction details before confirming any transactions.
Installing the Metamask Extension
Metamask is a browser extension that allows you to interact with the Avalanche (Avax) network. To start using Metamask for Avax transactions, you need to install the Metamask extension in your preferred web browser.
Step 1: Choose your Browser
Metamask is compatible with several web browsers, including Google Chrome, Firefox, Brave, and Microsoft Edge. Visit the respective web store for your chosen browser.
Step 2: Install Metamask
- Search for “Metamask” in the browser’s extension or add-on search bar.
- Click on the Metamask extension from the search results.
- Click on the “Add” or “Install” button.
If prompted, review the extension’s permissions and click “Accept” or “Add” to continue with the installation.
Step 3: Set Up Metamask
After installation, you will see the Metamask icon in your browser’s toolbar. Click on the icon to open Metamask for the first time.
Follow the on-screen instructions to begin setting up your Metamask wallet. This includes creating a new wallet, importing an existing wallet, or restoring a wallet from seed phrase. Make sure to carefully follow the provided instructions and secure your wallet with a strong password.
Once your wallet is set up, you will have access to your Avax address and can start using Metamask for Avax transactions.
Using Metamask for Avax Transactions
Metamask is a popular browser extension that allows users to interact with decentralized applications (dApps) on the Avalanche (Avax) network. By setting up and using Metamask, users can send and receive Avax tokens, interact with smart contracts, and participate in various DeFi activities.
To start using Metamask for Avax transactions, follow these steps:
- Install Metamask: First, install the Metamask extension on your web browser (currently only available for Chrome, Firefox, and Brave). Visit the official Metamask website or search for “Metamask” in your browser’s extension store, and follow the installation instructions.
- Create or Import Account: Once installed, open Metamask and either create a new account or import an existing one using your seed phrase or private key. Make sure to secure your account by setting up a strong password and enabling two-factor authentication.
- Connect to Avax Network: After setting up your account, click on the network selection dropdown in the Metamask extension. Choose “Custom RPC” and enter the Avax network details:
| Network Name | Network URL |
|---|---|
| Avalanche Mainnet | https://api.avax.network/ext/bc/C/rpc |
| Avalanche Fuji Testnet | https://api.avax-test.network/ext/bc/C/rpc |
- Add Avax Tokens: To view your Avax balance and send/receive tokens, you need to add the Avax token to your Metamask wallet. Click on “Add Token” in the Metamask extension, and enter the Avax token address:
| Network | Token Address |
|---|---|
| Avalanche Mainnet | 0xf38C4a96Bb26B78E0F9eD4452748A2dc99187628 |
| Avalanche Fuji Testnet | 0xc7198437980c041c805A1EDcbA50c1Ce5db95118 |
Make sure to double-check the token address to ensure accuracy.
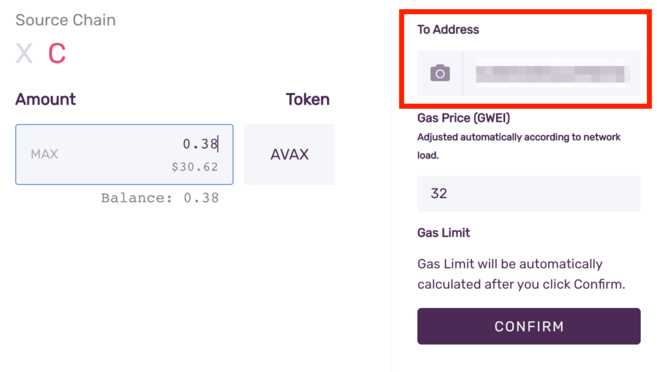
- Send and Receive Avax: With Metamask set up and connected to the Avax network, you can now send and receive Avax tokens. Simply enter the recipient’s address and the amount you wish to send, review the transaction details, and confirm the transaction. You can also specify a gas fee to speed up or slow down the transaction processing.
Using Metamask for Avax transactions provides a user-friendly and secure approach to interact with the Avax network. Make sure to stay updated with the latest Metamask version and exercise caution when conducting transactions.
Connecting Metamask to the Avax Network
In order to set up and use Metamask for Avax transactions, you first need to connect it to the Avax network. Here are the steps to do so:
Step 1: Install Metamask
If you haven’t already done so, you need to install the Metamask extension in your preferred web browser. You can find and install Metamask from the official Metamask website or the browser extension store.
Step 2: Create or Import a Wallet
Once Metamask is installed, open the extension and either create a new wallet or import an existing one by entering your seed phrase. Make sure to follow the recommended security practices when creating or importing a wallet.
Step 3: Switch to the Avax Network
By default, Metamask is configured to use the Ethereum network. To connect it to the Avax network, you need to switch the network configuration. In the Metamask extension, click on the network dropdown and select “Custom RPC”.
In the “New Network” section, enter the following details:
Network Name: Avalanche
New RPC URL: https://api.avax.network/ext/bc/C/rpc
Chain ID: 43114
Symbol: AVAX
Block Explorer URL: https://cchain.explorer.avax.network/
After entering the details, click “Save” to switch to the Avax network.
Step 4: Connect to a DApp
Now that Metamask is connected to the Avax network, you can start using it to interact with Avax DApps. Simply visit the desired DApp in your web browser and Metamask will automatically detect the network and prompt you to connect.
If Metamask doesn’t automatically prompt you to connect, you can manually connect it by clicking on the Metamask extension icon and selecting the Avax network.
Once connected, you can authorize transactions and interact with Avax DApps using Metamask.
Remember to always double-check the address and transaction details before confirming any transactions to ensure their accuracy and security.
Tips and Best Practices for Avax Transactions with Metamask
Metamask is a popular web-based wallet that allows users to interact with decentralized applications (dApps) on the Avalanche (Avax) network. When it comes to conducting Avax transactions with Metamask, there are several tips and best practices that can help ensure a smooth and secure experience.
1. Keep your Metamask wallet secure: It is crucial to secure your Metamask wallet to protect your funds. Make sure to set a strong password and enable two-factor authentication (2FA) for an additional layer of security.
2. Verify the transaction details: Before confirming a transaction on Metamask, double-check the details such as the address you are sending funds to and the amount you are sending. Always verify the accuracy of these details to avoid any mistakes or potential scams.
3. Set appropriate gas fees: Metamask allows users to manually adjust the gas fees for their transactions. It’s important to set an appropriate gas fee based on the network congestion to ensure that your transaction is processed efficiently. Low gas fees may result in slower transaction times, while high gas fees can be costly.
4. Keep an eye on gas prices: The gas prices on the Avax network can fluctuate, especially during periods of high demand. It is advisable to regularly check the current gas prices and adjust your gas fees accordingly to ensure optimal transaction speeds and cost-effectiveness.
5. Use a hardware wallet for added security: Consider using a hardware wallet, such as Ledger or Trezor, in conjunction with Metamask for enhanced security. Hardware wallets store your private keys offline, protecting them from potential online threats.
6. Stay updated with the latest Metamask version: Make sure to regularly update your Metamask wallet to the latest version. Developers often release updates that contain security enhancements and bug fixes, ensuring a more secure user experience.
| Important | Note |
|---|---|
| 7. Be cautious of phishing attempts: | Always be vigilant and wary of phishing attempts designed to steal your private keys or sensitive information. Double-check the URLs you visit and never share your private keys with anyone. |
By following these tips and best practices, you can confidently set up and use Metamask for Avax transactions, ensuring the security of your funds and a seamless experience within the Avax ecosystem.
Frequently Asked Questions:
What is Metamask?
Metamask is a browser extension that serves as a digital wallet for storing and managing cryptocurrencies. It allows users to interact with decentralized applications (dApps) on the Ethereum network and other compatible networks, such as Avalanche (Avax). Metamask provides a user-friendly interface for accessing and interacting with blockchain networks.
Can I use Metamask for Avax transactions on mobile devices?
Yes, you can use Metamask for Avax transactions on mobile devices. Metamask has a mobile app available for both iOS and Android devices. Simply download the Metamask mobile app from the respective app store, set up a new wallet, and configure it to connect to the Avalanche (Avax) network. Once set up, you can use Metamask on your mobile device to make Avax transactions just like on the desktop version.

+ There are no comments
Add yours