


Metamask is a popular browser extension wallet that allows users to interact with decentralized applications on the Ethereum blockchain. By default, it connects to the Ethereum Mainnet, but it also provides the option to connect to custom networks by setting up a custom RPC chain ID. This guide will walk you through the process of setting up a custom RPC chain ID in Metamask, allowing you to access and interact with different blockchain networks.
Setting up a custom RPC chain ID in Metamask can be useful for several reasons. It allows developers to connect to test networks, such as the Ropsten or Rinkeby testnets, to deploy and test their smart contracts. It also enables users to connect to other blockchain networks that are not supported by default in Metamask, expanding their access to a wider range of decentralized applications. Whether you’re a developer or a user, setting up a custom RPC chain ID in Metamask is a valuable skill to have.
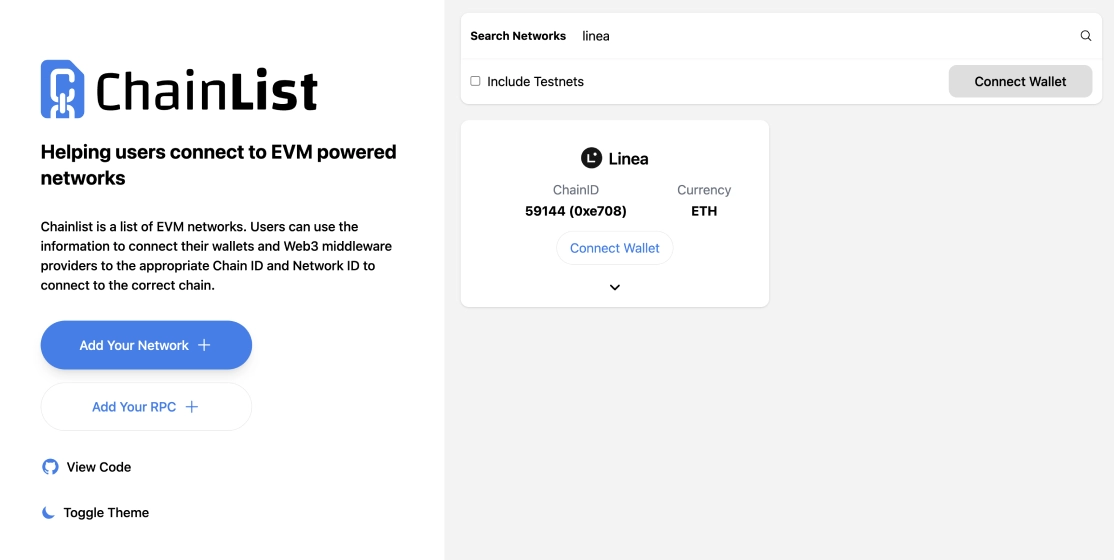
Before diving into the step-by-step guide, it’s important to note that setting up a custom RPC chain ID requires some technical knowledge. You’ll need to know the network’s URL, its chain ID, and optionally, any additional configurations or parameters required by the network. If you’re not familiar with these terms, it’s recommended to consult the network’s documentation or reach out to its community for assistance. Now, let’s get started with the guide on how to set up a custom RPC chain ID in Metamask.
What is a Custom RPC Chain ID?
A Custom RPC Chain ID is a unique identifier that is used to distinguish different blockchain networks within the Ethereum ecosystem. It is a crucial parameter that allows users to connect to specific networks and interact with decentralized applications (dapps).
When using applications like Metamask, users can choose between different Ethereum networks, such as the Mainnet, Ropsten, Kovan, Rinkeby, and Goerli, among others. However, sometimes developers create their own custom networks that are not part of the default options.
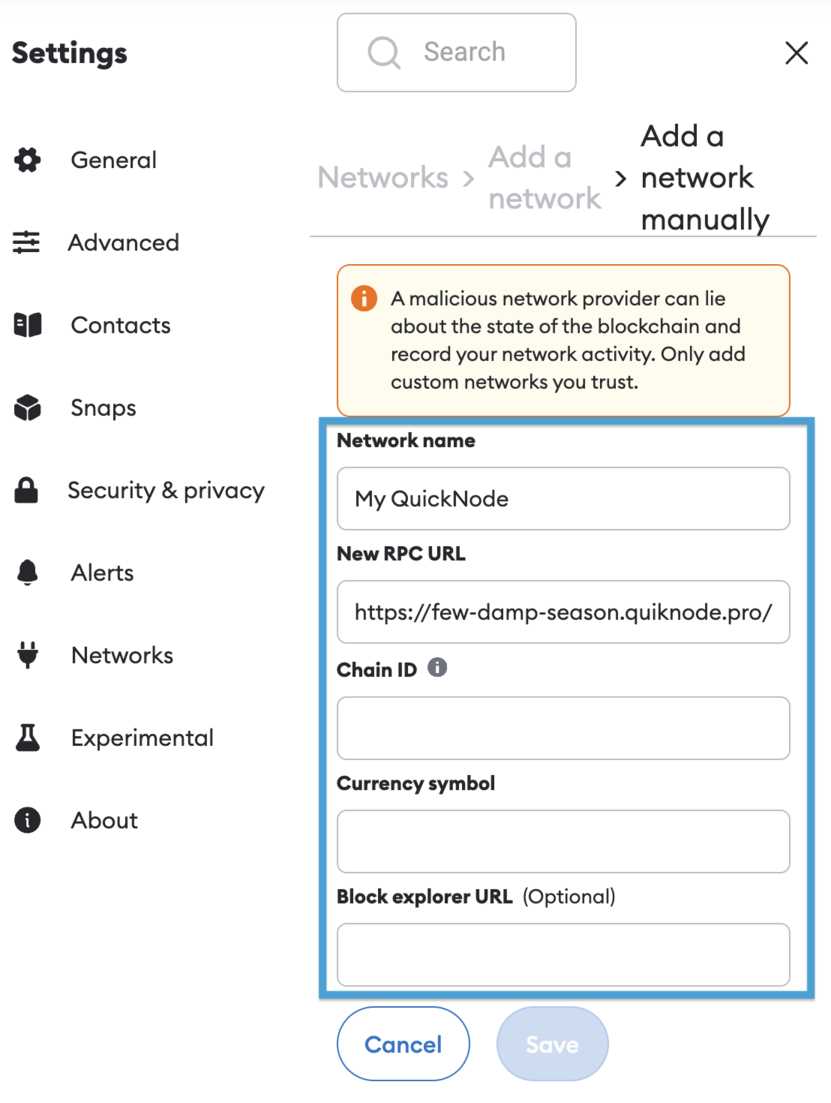
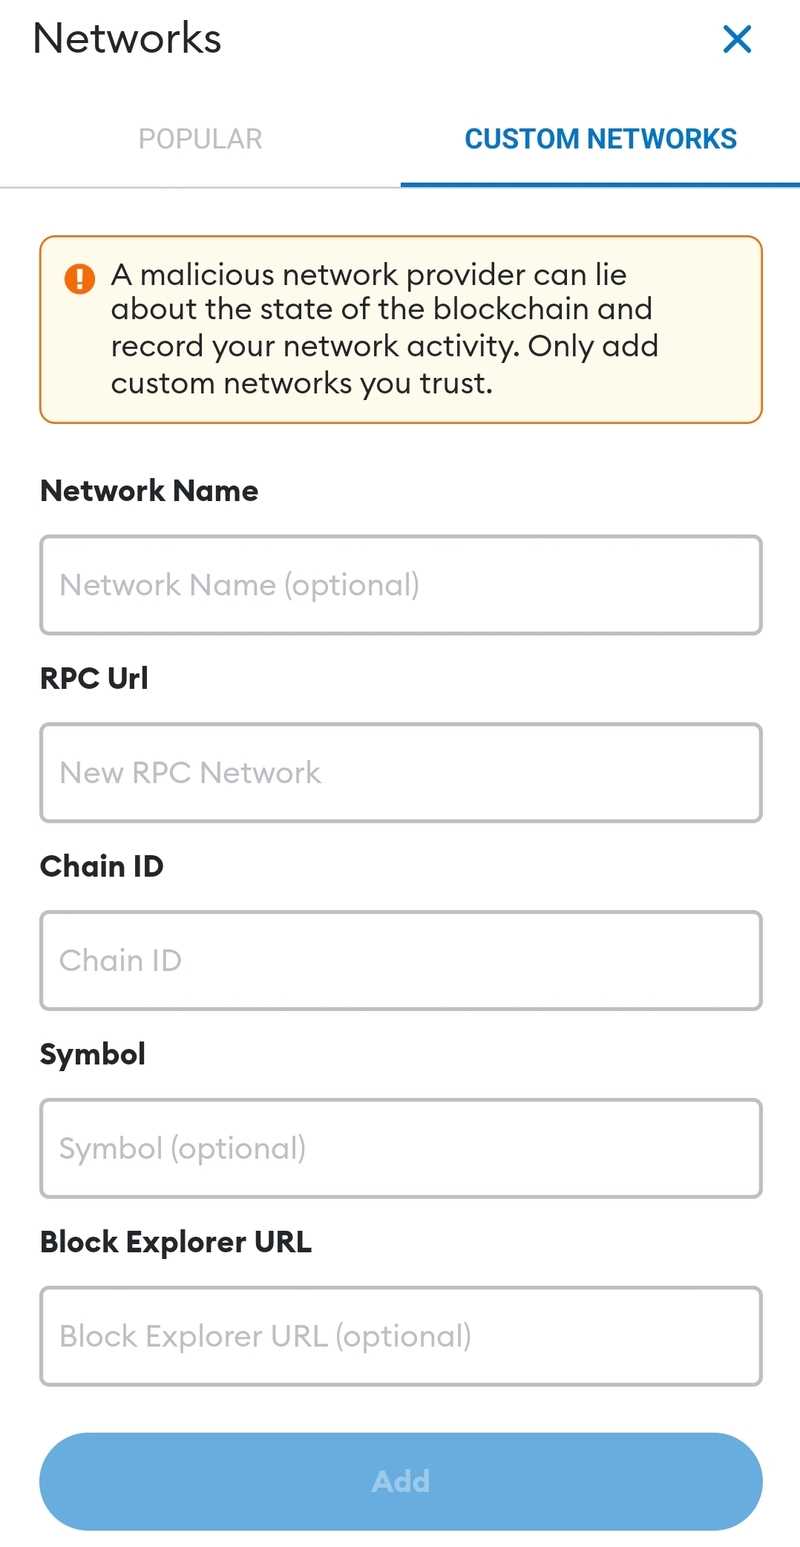
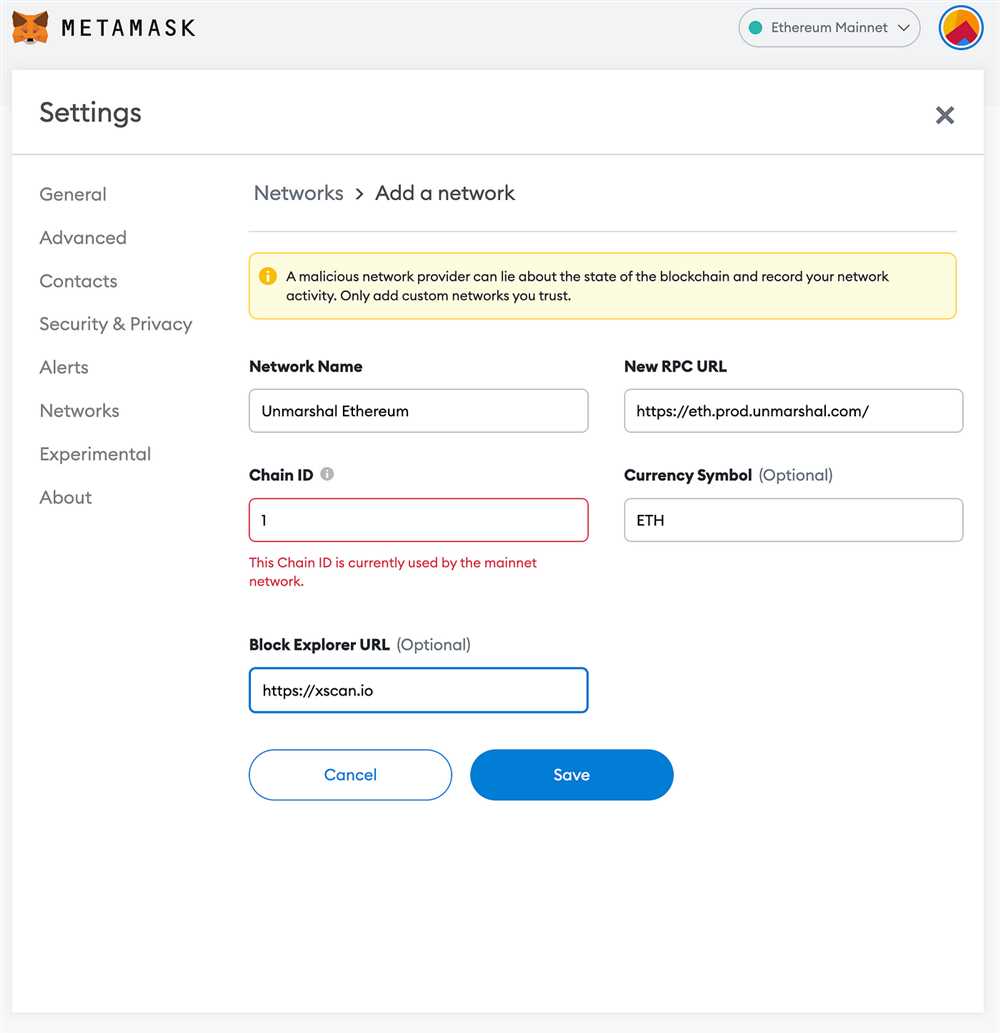
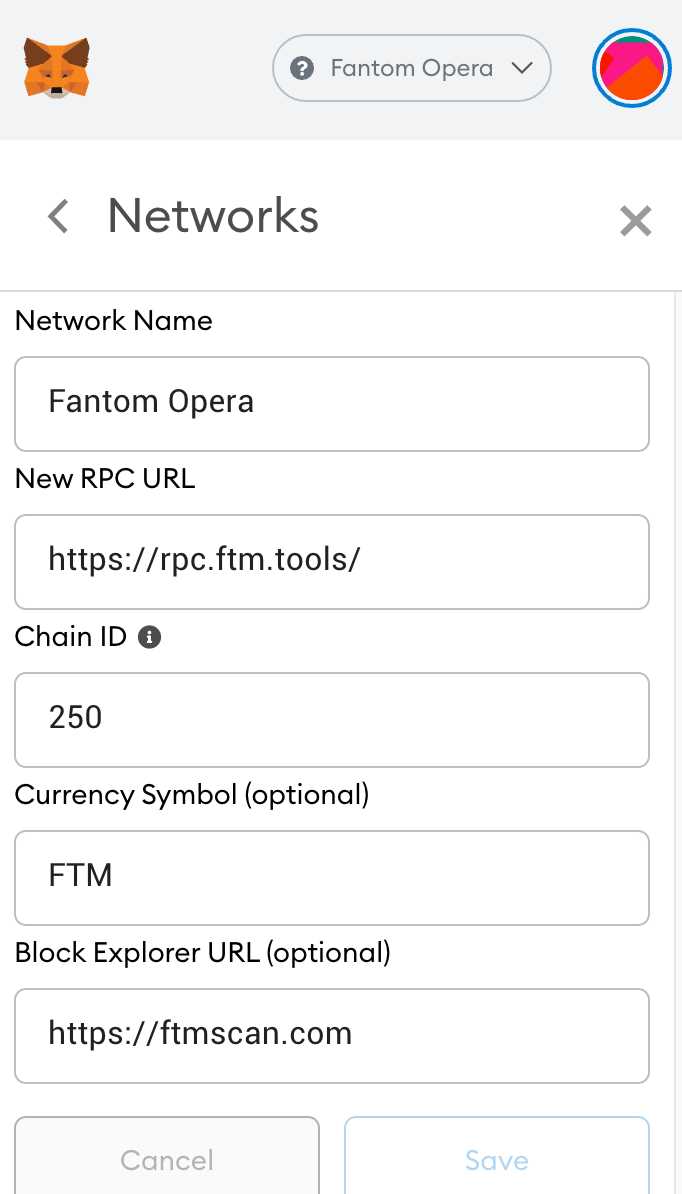
In order to connect to these custom networks, users need to set up a Custom RPC Chain ID. This involves providing specific network details, such as the network name, URL, chain ID, symbol, and block explorer URL. Once the Custom RPC Chain ID is properly configured, users can seamlessly connect to and interact with dapps that are deployed on these custom networks.
Custom RPC Chain IDs are commonly used for testing and development purposes, allowing developers to create and experiment with their own blockchain networks without interfering with the main Ethereum network. They can also be used for deploying private or permissioned blockchains.
Overall, a Custom RPC Chain ID is an essential tool for connecting to and utilizing non-default blockchain networks within the Ethereum ecosystem. It enables users to access a wide range of dapps, test new network configurations, and participate in specialized networks for various purposes.
Why Set Up a Custom RPC Chain ID?
Setting up a custom RPC (Remote Procedure Call) Chain ID in Metamask allows you to connect to a blockchain network of your choice. This provides you with the flexibility to interact with specific decentralized applications (dApps) and explore the unique features and capabilities offered by different blockchains.
Here are some reasons why you might want to set up a custom RPC Chain ID:
1. Access Different Networks:
By setting up a custom RPC Chain ID, you can connect to alternative blockchain networks beyond the default options provided by Metamask. This allows you to access various ecosystems, such as testnets or private networks, to experiment, develop, or participate in different blockchain communities.
2. Interact with Specific dApps:
Many dApps are built on specific blockchain networks. By setting up a custom RPC Chain ID, you can seamlessly interact with these applications without needing to switch between different wallet providers. This opens up new opportunities for accessing and using unique decentralized services.
3. Explore New Features:
Each blockchain network has its own set of features and capabilities. By setting up a custom RPC Chain ID, you can explore and experience different functionalities offered by various blockchains. This allows you to learn and adapt to different blockchain ecosystems, enabling you to make informed decisions when building or using decentralized applications.
4. Test and Develop:
Setting up a custom RPC Chain ID is particularly useful for developers who want to test their smart contracts, dApps, or blockchain integrations without affecting the main network. By connecting to a testnet or creating a private network, developers can safely experiment, iterate, and debug their applications before deploying them to the public.
Overall, setting up a custom RPC Chain ID in Metamask gives you greater flexibility and control over your blockchain interactions. It empowers you to explore new networks, engage with specific dApps, understand different blockchain features, and test your own developments. Whether you’re an enthusiast, developer, or investor, a custom RPC Chain ID opens up a world of possibilities in the decentralized ecosystem.
Step 1: Install Metamask
To set up a custom RPC chain ID in Metamask, the first step is to install the Metamask extension in your web browser. Metamask is available for Chrome, Firefox, Brave, and Edge.
Follow the steps below to install Metamask:
- Open your preferred web browser.
- Go to the official Metamask website.
- Click on the “Install Metamask” button.
- You will be redirected to your browser’s extension store.
- Click on the “Add to [browser name]” button to start the installation.
- Wait for the installation to complete.
- Once installed, you will see the Metamask icon in your browser’s toolbar.
Congratulations! You have successfully installed Metamask. Now you can move on to the next step in setting up a custom RPC chain ID.
Download and Install the Metamask Extension
To set up a custom RPC chain ID in Metamask, you will first need to download and install the Metamask extension for your preferred web browser. Follow the steps below to get started:
- Open your web browser and navigate to the Metamask website.
- Click on the “Get Chrome Extension” or “Get Firefox Extension” button, depending on the browser you are using.
- You will be redirected to the appropriate web store for your browser. Click on the “Add to Chrome” or “Add to Firefox” button to start the download.
- Once the extension is downloaded, it will automatically be added to your browser.
- Click on the Metamask icon in your browser’s toolbar to launch the extension.
- A welcome screen will appear with the option to import an existing wallet or create a new one. Choose the option that is most relevant to you.
- If you choose to create a new wallet, you will be prompted to provide a secure password. Make sure to choose a strong password that you can remember.
- After setting up your wallet, you will be able to access the Metamask extension and begin configuring your custom RPC chain ID.
Note: It is important to only download extensions from reliable sources to ensure the security of your cryptocurrency assets. Always double-check the website URL and read user reviews before downloading any extensions.
Create a New Metamask Wallet or Import an Existing One
Before you can set up a custom RPC chain ID in Metamask, you will need to have a wallet configured. Follow the steps below to create a new Metamask wallet or import an existing one:
|
Create a New Wallet |
Import an Existing Wallet |
|
|
Once you have set up or imported your wallet, you can proceed to the next steps to set up a custom RPC chain ID in Metamask.
Step 2: Access the Metamask Settings
In order to set up a custom RPC chain ID in Metamask, you will need to access the Metamask settings. Here are the steps to follow:
1. Open the Metamask Extension
First, make sure you have the Metamask extension installed in your web browser. You can find it in the extensions section of your browser’s settings.
2. Click on the Metamask Icon
Once you have the extension installed, you will see the Metamask icon at the top-right corner of your browser. Click on the icon to open the Metamask wallet interface.
3. Open the Metamask Menu
Inside the Metamask wallet interface, you will see a menu icon (represented by three horizontal lines) at the top-left corner. Click on this icon to open the Metamask menu.
4. Select “Settings”
In the Metamask menu, you will see various options. Look for the “Settings” option and click on it to open the Metamask settings.
5. Scroll Down to “Networks”
Within the Metamask settings, you will find a section called “Networks”. Scroll down until you see this section.
6. Click on “Add Network”
Under the “Networks” section, you will see an option to “Add Network”. Click on this option to add a custom RPC chain.
Once you have accessed the Metamask settings, you are ready to move on to the next step of setting up a custom RPC chain ID.
Frequently Asked Questions:
What is a custom RPC chain ID?
A custom RPC chain ID is a unique identifier for a custom network that you can set up in Metamask.
Why would I want to set up a custom RPC chain ID in Metamask?
You might want to set up a custom RPC chain ID in Metamask to connect to a specific blockchain network that is not supported out of the box.
How do I set up a custom RPC chain ID in Metamask?
To set up a custom RPC chain ID in Metamask, you need to open the Metamask extension, click on the network dropdown, select “Custom RPC”, and then enter the necessary details such as the URL, chain ID, and symbol.
What if I make a mistake when entering the details for a custom RPC chain ID?
If you make a mistake when entering the details for a custom RPC chain ID, you can always edit or delete the network in the Metamask settings.
Can I use a custom RPC chain ID to interact with decentralized applications (dApps)?
Yes, once you have set up a custom RPC chain ID in Metamask, you can use it to interact with decentralized applications (dApps) that are built on the corresponding blockchain network.
+ There are no comments
Add yours