


Metamask is a popular cryptocurrency wallet that allows users to interact with decentralized applications (dApps) on the Ethereum blockchain. With its easy-to-use interface and seamless integration, Metamask has become an essential tool for anyone navigating the world of cryptocurrencies.
If you’re looking to expand your crypto horizons and explore the Polygon network, adding the Polygon mainnet to your Metamask wallet is a crucial step. By connecting to the Polygon network, you’ll have access to a wide range of dApps and decentralized finance (DeFi) protocols that can enhance your crypto experience.
This step-by-step guide will walk you through the process of adding the Polygon mainnet to your Metamask wallet, enabling you to seamlessly switch between the Ethereum and Polygon networks and unlock the full potential of decentralized applications.
Step 1: Install Metamask Extension
Before you can add the Polygon mainnet to your Metamask wallet, you need to have the Metamask extension installed in your web browser. If you haven’t installed it yet, you can easily find and add it from the official Metamask website or your browser’s extension store.
Step 2: Open Metamask and Create/Import Wallet
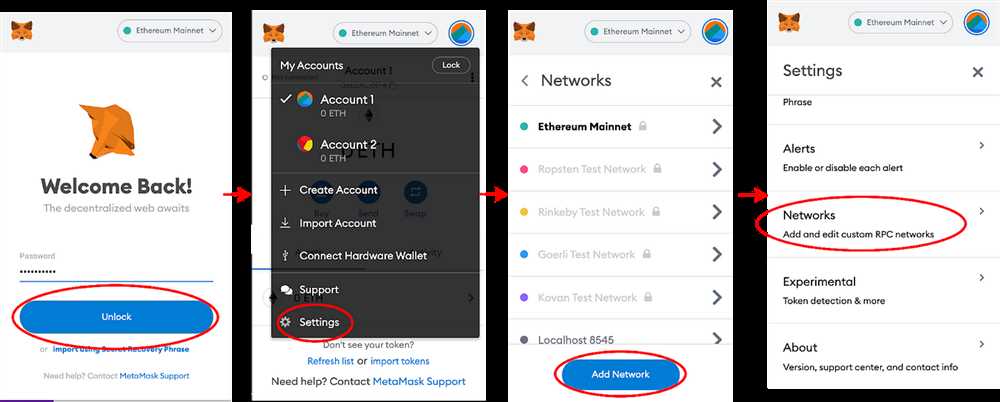
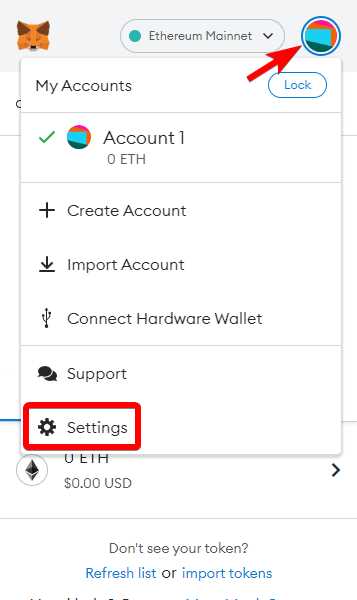
Once you have the Metamask extension installed, open the extension by clicking on the Metamask icon in your browser. If you’re new to Metamask, you’ll need to create a new wallet by setting up a strong password and securely backing up your seed phrase. If you already have a Metamask wallet, you can import it by clicking on “Import Wallet” and following the instructions.
Step 3: Switch to Polygon Mainnet
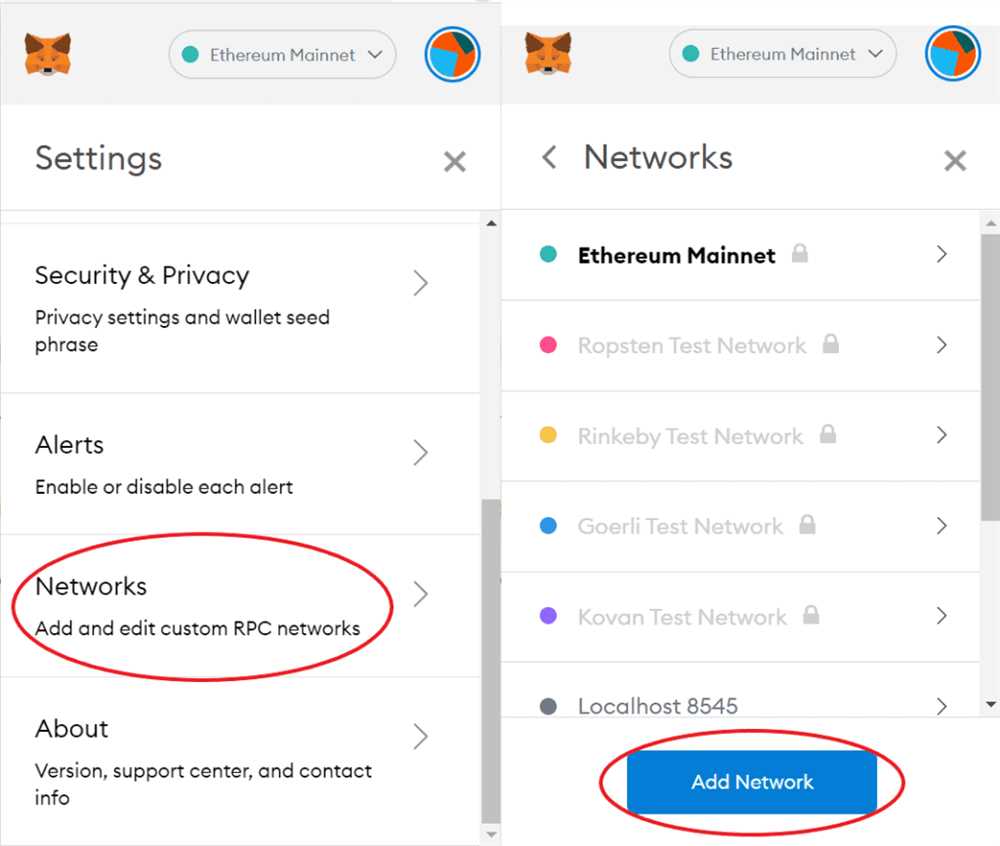
After setting up or importing your wallet, you’ll be on the Metamask dashboard. Look for the network selection dropdown menu, usually located at the top of the Metamask interface. Click on it and scroll down until you find “Custom RPC” or “Add Network.” Click on it to open the network configuration settings.
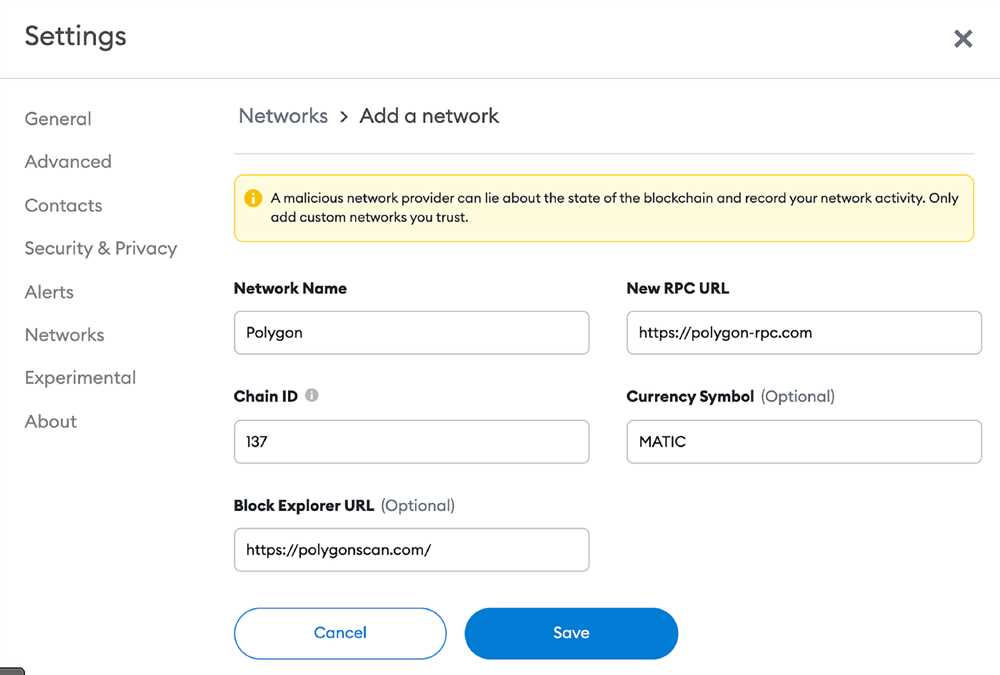
Step 4: Enter Polygon Mainnet Details
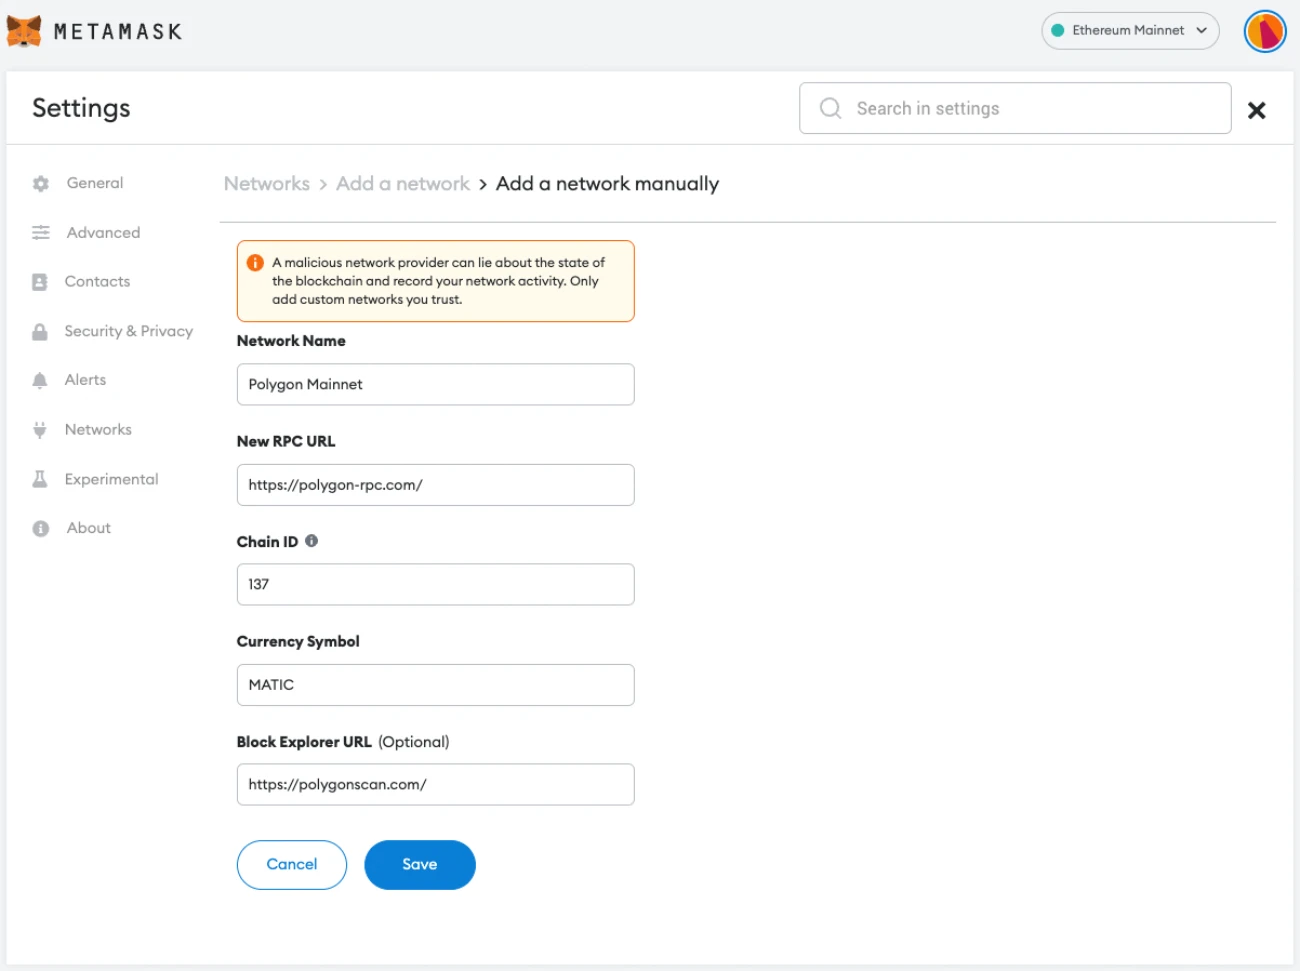
In the network configuration settings, you’ll need to enter the details for the Polygon mainnet. Fill in the following information:
Network Name: Polygon Mainnet
New RPC URL: https://rpc-mainnet.maticvigil.com/
Chain ID: 137
Symbol: MATIC
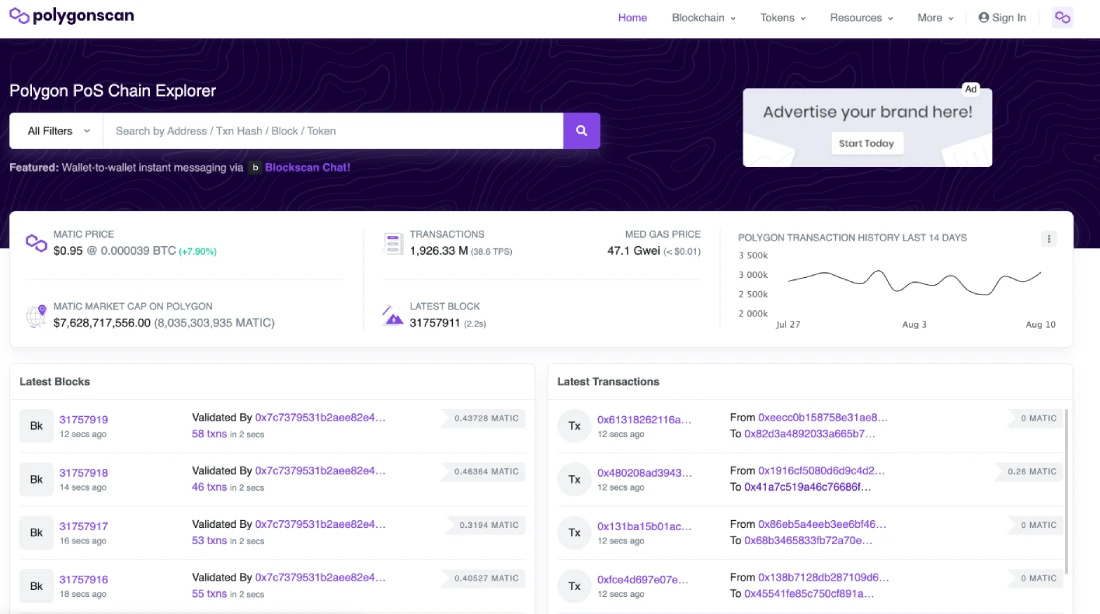
Block Explorer URL: https://polygonscan.com/
Double-check that you’ve entered the details correctly, then click on “Save” or “Add” to add the Polygon mainnet to your Metamask wallet.
Step 5: Switching Between Networks
Congratulations! You’ve successfully added the Polygon mainnet to your Metamask wallet. To switch between the Ethereum and Polygon networks, click on the network selection dropdown menu in the Metamask interface and select the network you want to use. You can now explore and interact with dApps and DeFi protocols on the Polygon network.
Remember to exercise caution and do your due diligence when using decentralized applications and participating in DeFi activities. Keep your wallet and seed phrase secure, and always double-check the addresses and smart contracts you’re interacting with.
Adding the Polygon mainnet to your Metamask wallet opens up a world of possibilities within the Polygon ecosystem. Explore the vibrant dApp and DeFi landscape, and enjoy the benefits of faster transactions and lower fees provided by the Polygon network.
What is Polygon Mainnet?
Polygon Mainnet is a Layer 2 scaling solution for Ethereum that aims to provide faster and cheaper transactions with a high level of security. It is built on top of Ethereum and allows developers to deploy and run smart contracts, similar to the Ethereum Mainnet.
Polygon Mainnet uses a Proof-of-Stake (PoS) consensus mechanism, which means that instead of miners, validators are responsible for verifying and adding transactions to the blockchain. This ensures a more energy-efficient and scalable network.
Advantages of Polygon Mainnet
One of the main advantages of Polygon Mainnet is its scalability. By offloading transactions to a Layer 2 solution, it can significantly increase the throughput of the network, allowing for faster and more efficient transactions. This is especially important as Ethereum’s network congestion and gas fees continue to increase.
In addition, Polygon Mainnet offers lower transaction fees compared to the Ethereum Mainnet. This makes it more affordable for users to interact with decentralized applications (dApps) and perform transactions on the network.
Use Cases of Polygon Mainnet
Polygon Mainnet has a wide range of use cases. It can be used for various decentralized applications, such as decentralized finance (DeFi) platforms, non-fungible tokens (NFTs), gaming platforms, and more. The scalability and lower transaction fees provided by Polygon Mainnet make it an attractive option for developers and users alike.
Furthermore, Polygon Mainnet also offers interoperability with other blockchains, allowing for seamless transfer of assets and data between different networks. This opens up possibilities for cross-chain applications and collaborations.
Why add Polygon Mainnet to Metamask?
Metamask is a popular cryptocurrency wallet and browser extension that allows users to interact with decentralized applications (DApps) on the Ethereum blockchain. By default, Metamask supports the Ethereum Mainnet. However, users can also add other blockchains, such as the Polygon Mainnet, to their Metamask wallet.
Benefits of adding Polygon Mainnet to Metamask:
1. Lower Transaction Fees: One of the key advantages of using Polygon Mainnet is the significantly lower transaction fees compared to the Ethereum Mainnet. This makes it more cost-effective for users to perform transactions and interact with DApps on the Polygon network.
2. Faster Transaction Confirmation: Polygon Mainnet offers faster transaction confirmation times due to its layer 2 scaling solution. This improves the overall user experience by reducing waiting times and increasing efficiency.
3. Access to a Growing Ecosystem: Adding Polygon Mainnet to Metamask opens up a whole new world of decentralized applications and projects built on the Polygon network. Polygon has gained popularity for its scalability and interoperability, attracting a wide range of developers and users.
How to add Polygon Mainnet to Metamask:
Adding Polygon Mainnet to Metamask is a relatively simple process. Here are the steps:
| Step | Description |
|---|---|
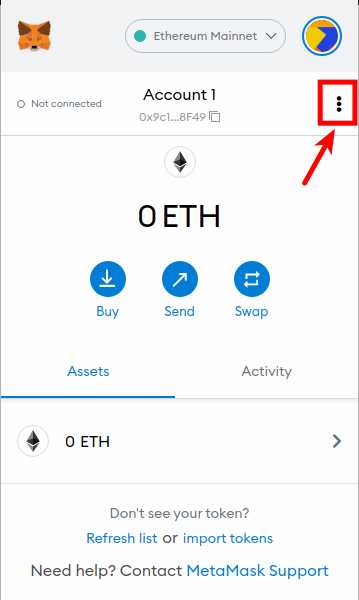
| Step 1 | Open the Metamask extension in your browser. |
| Step 2 | Click on the network dropdown arrow in the upper right corner of the Metamask interface. |
| Step 3 | Select “Custom RPC” from the dropdown menu. |
| Step 4 | Enter the following information in the appropriate fields:
|
| Step 5 | Click “Save” to add the Polygon Mainnet network to your Metamask wallet. |
Once you have successfully added Polygon Mainnet to Metamask, you can start using it to interact with DApps and perform transactions on the Polygon network. Make sure to have some MATIC tokens in your wallet to cover transaction fees on the Polygon Mainnet.
Adding Polygon Mainnet to Metamask expands the possibilities for users, providing access to a scalable and vibrant ecosystem of blockchain applications. With lower transaction fees and faster confirmation times, Polygon Mainnet offers an enhanced user experience compared to the Ethereum Mainnet.
Step 1: Install Metamask
Metamask is a wallet application that allows users to interact with the Ethereum blockchain. Follow the steps below to install Metamask:
1. Visit the Metamask website
Go to the official Metamask website by typing “metamask.io” in your web browser’s address bar and press Enter.
2. Choose your browser
Metamask is available for several web browsers including Google Chrome, Mozilla Firefox, and Brave. Choose the one that you prefer and click on the corresponding download link.
3. Install the extension
Once the download is complete, click on the installation file to start the installation process. Follow the on-screen instructions to install the Metamask extension on your browser.
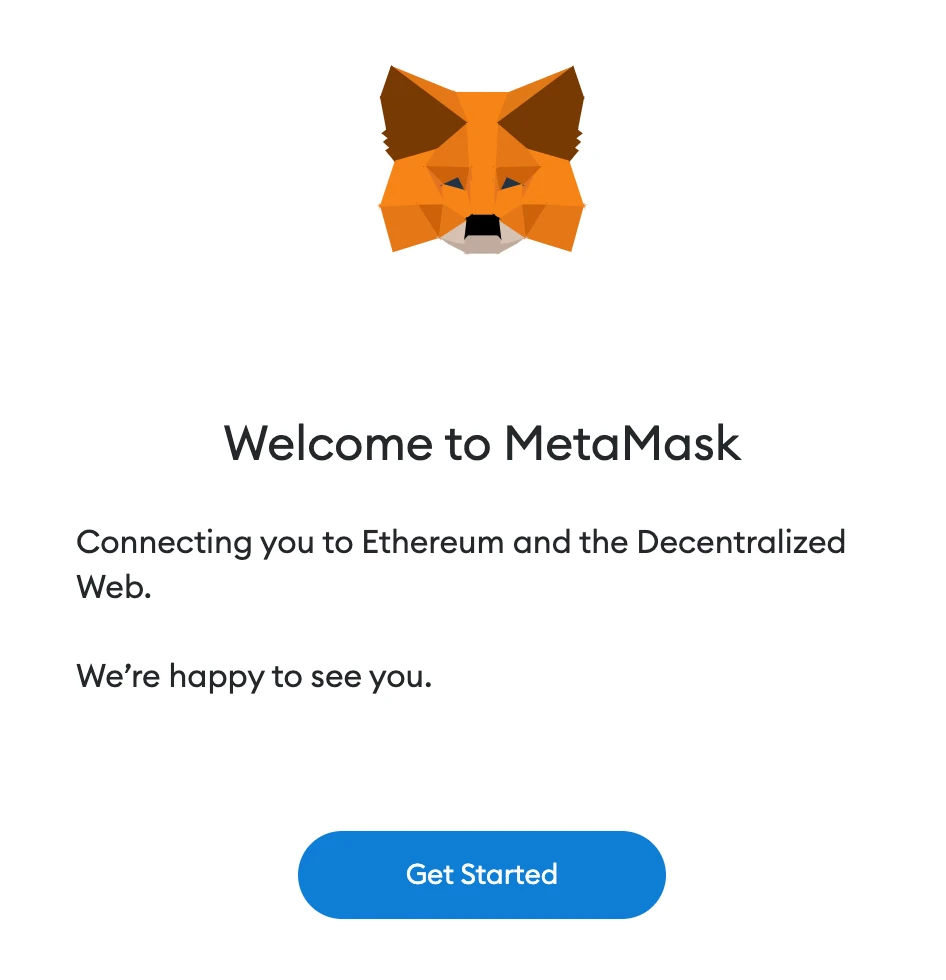
4. Create a new wallet
After the installation is complete, click on the Metamask icon in your browser’s toolbar to open the extension. Click on “Create a Wallet” to start the wallet creation process.
5. Set a strong password
Choose a strong password for your wallet. Make sure it is unique and not easily guessable. Enter the password in the required field and click on “Create” to proceed.
6. Save your secret backup phrase
Metamask will generate a secret backup phrase consisting of 12 random words. This phrase is used to recover access to your wallet in case you forget your password. Write down the backup phrase and store it in a safe place. Do not share it with anyone.
7. Confirm your backup phrase
In the next step, Metamask will ask you to confirm your backup phrase. Select the words in the correct order as shown on the screen to confirm that you have saved the backup phrase correctly.
8. Start using Metamask
After confirming the backup phrase, your Metamask wallet will be ready to use. You can now manage your Ethereum assets and interact with decentralized applications (DApps) on the Ethereum blockchain.
| Browser | Download Link |
|---|---|
| Google Chrome | Download |
| Mozilla Firefox | Download |
| Brave | Download |
Step 2: Add Polygon Mainnet to Metamask
To add the Polygon Mainnet to your Metamask wallet, follow these steps:
|
1. Open your Metamask wallet extension. |
|
2. Click on the network selection dropdown on the top of the screen. |
|
3. Scroll to the bottom of the list and click on “Custom RPC”. |
|
4. In the “New RPC URL” field, enter the following URL: https://polygon-rpc.com. |
|
5. Click on the “Save” button. |
|
6. After saving, you will see that the Polygon Mainnet has been added to your network list. |
|
7. To switch to the Polygon Mainnet, simply select it from the network selection dropdown. |
Now you have successfully added the Polygon Mainnet to your Metamask wallet. You can now use your wallet to interact with dapps and smart contracts on the Polygon network.
Frequently Asked Questions:
What is Metamask?
Metamask is a cryptocurrency wallet and browser extension that allows users to interact with decentralized applications (dApps) on the Ethereum blockchain.
Why would I want to add Polygon Mainnet to Metamask?
Adding Polygon Mainnet to Metamask allows you to easily access and interact with dApps and tokens built on the Polygon network, which offers faster and cheaper transactions compared to the Ethereum network.
Are there any fees associated with using Polygon Mainnet on Metamask?
Yes, there are fees associated with using Polygon Mainnet on Metamask. However, these fees are generally much lower compared to the fees on the Ethereum network.

+ There are no comments
Add yours