


If you’re new to the world of cryptocurrency and decentralized finance (DeFi), you’ve probably heard of MetaMask and the Avalanche (Avax) Network. MetaMask is a popular software cryptocurrency wallet that allows users to manage their digital assets and interact with blockchain applications, while the Avax Network is a blockchain platform that enables developers to create and deploy decentralized applications.
Connecting your MetaMask wallet to the Avax Network is a simple process that opens up a world of opportunities for you to explore and participate in the Avax ecosystem. By connecting your wallet to Avax, you’ll be able to securely store, send, and receive Avax tokens, as well as participate in various DeFi applications, such as decentralized exchanges (DEX), lending platforms, and yield farming.
To connect MetaMask to the Avax Network, follow these step-by-step instructions:
Step 1: Install and set up MetaMask if you haven’t done so already. MetaMask is available as a browser extension for Chrome, Firefox, and Brave browsers. Once installed, create a new wallet or import an existing one by following the on-screen instructions.
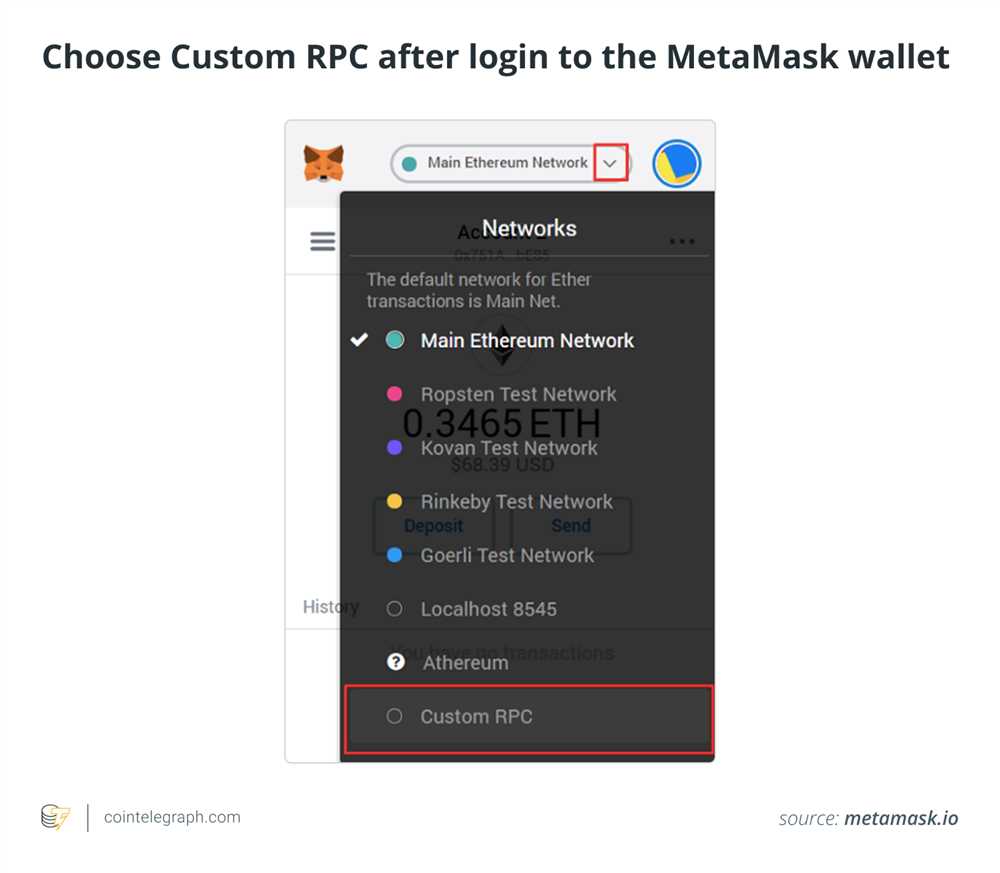
Step 2: Once you have set up your wallet, click on the MetaMask extension icon in your browser to open the wallet. On the wallet dashboard, click on the network dropdown menu (usually displaying “Ethereum Mainnet”) and select “Custom RPC” at the bottom of the list.
Step 3: In the “New RPC URL” field, enter the Avax Network’s RPC URL. The RPC URL for the Avax Network is https://api.avax.network/ext/bc/C/rpc. Make sure to double-check the URL to avoid any typos. Once entered, click on the “Save” button.
Step 4: After saving the RPC URL, your MetaMask wallet will now be connected to the Avax Network. You can confirm this by checking the network dropdown menu, which should now display “Custom RPC” with the Avax logo next to it.
Step 5: Congratulations! You’ve successfully connected your MetaMask wallet to the Avax Network. You can now start exploring and using decentralized applications on the Avax platform. Remember to be cautious and do your own research before interacting with any new DeFi protocols or investing in any projects.
By connecting MetaMask to the Avax Network, you’re joining a thriving community of developers, traders, and enthusiasts who are shaping the future of decentralized finance. Start exploring the Avax ecosystem today and unlock the full potential of decentralized applications!
The Importance of Connecting MetaMask to the Avax Network
MetaMask is a popular browser extension that allows users to interact with decentralized applications (DApps) on various blockchain networks. By connecting your MetaMask wallet to the Avax network, you gain access to a vibrant ecosystem of applications and services built on the Avalanche blockchain.
There are several reasons why connecting MetaMask to the Avax network is important:
- Access to Avax DApps: By connecting MetaMask to the Avax network, you can seamlessly interact with a wide range of decentralized applications that are built on the Avalanche blockchain. These DApps enable you to participate in DeFi protocols, liquidity mining, gaming, and much more.
- Seamless Cross-Chain Compatibility: Avalanche is a high-performance blockchain platform that supports interoperability with other blockchain networks. By connecting MetaMask to the Avax network, you can easily transfer assets between the Ethereum network and the Avax network, allowing you to take advantage of the best features and opportunities from both ecosystems.
- Secure Wallet Management: MetaMask provides a secure and user-friendly interface for managing your digital assets. By connecting MetaMask to the Avax network, you can securely store, send, and receive AVAX tokens and other assets on the Avalanche blockchain.
- Participate in Governance: Many projects on the Avax network offer token holders the opportunity to participate in governance decisions. By connecting MetaMask to the Avax network, you can actively participate in voting and decision-making processes, giving you a say in the future development of the network.
- Stay Up-to-Date: By connecting MetaMask to the Avax network, you can stay informed about the latest updates, advancements, and opportunities within the Avalanche ecosystem. This allows you to make informed decisions and stay ahead in the fast-paced world of blockchain technology.
In conclusion, connecting MetaMask to the Avax network is crucial for anyone looking to fully explore and take advantage of the opportunities offered by the Avalanche blockchain. Whether you’re interested in DeFi, gaming, or governance, connecting MetaMask to the Avax network opens up a world of possibilities.
Step 1: Download and Install MetaMask
To connect MetaMask to the Avax network, you will first need to download and install the MetaMask browser extension. MetaMask is a popular wallet and gateway to the decentralized web, allowing you to access and interact with decentralized applications (dApps).
Here are the steps to download and install MetaMask:
- Open your preferred browser (Chrome, Firefox, or Brave) and go to the MetaMask website: https://metamask.io/.
- Click on the “Get Chrome Extension” button if you are using Chrome, or the “Get Firefox Extension” button if you are using Firefox.
- You will be redirected to the Chrome Web Store or Mozilla Add-Ons, respectively. Click on the “Add to Chrome” button for Chrome or the “Add to Firefox” button for Firefox.
- A pop-up will appear asking for confirmation to add the extension. Click on the “Add Extension” button to proceed with the installation.
- Once the extension is added, the MetaMask icon will appear in your browser’s toolbar (top right corner) as a colorful fox head logo.
- Click on the MetaMask icon to launch the extension for the first time.
- You will be presented with a welcome screen. Click on the “Get Started” button.
- You will be asked to create a new wallet or import an existing one. Choose the option that suits you best. If you are new to MetaMask, select the “Create a Wallet” option.
- Follow the instructions to set up your MetaMask wallet, including creating a password and agreeing to the terms of use.
- Once your wallet is created, you will be given a unique seed phrase. It is extremely important to store this seed phrase securely as it can be used to recover your wallet if you ever forget your password or lose access to your device.
- After setting up your wallet, you will be taken to the main MetaMask interface, where you can view your account balance and manage your transactions.
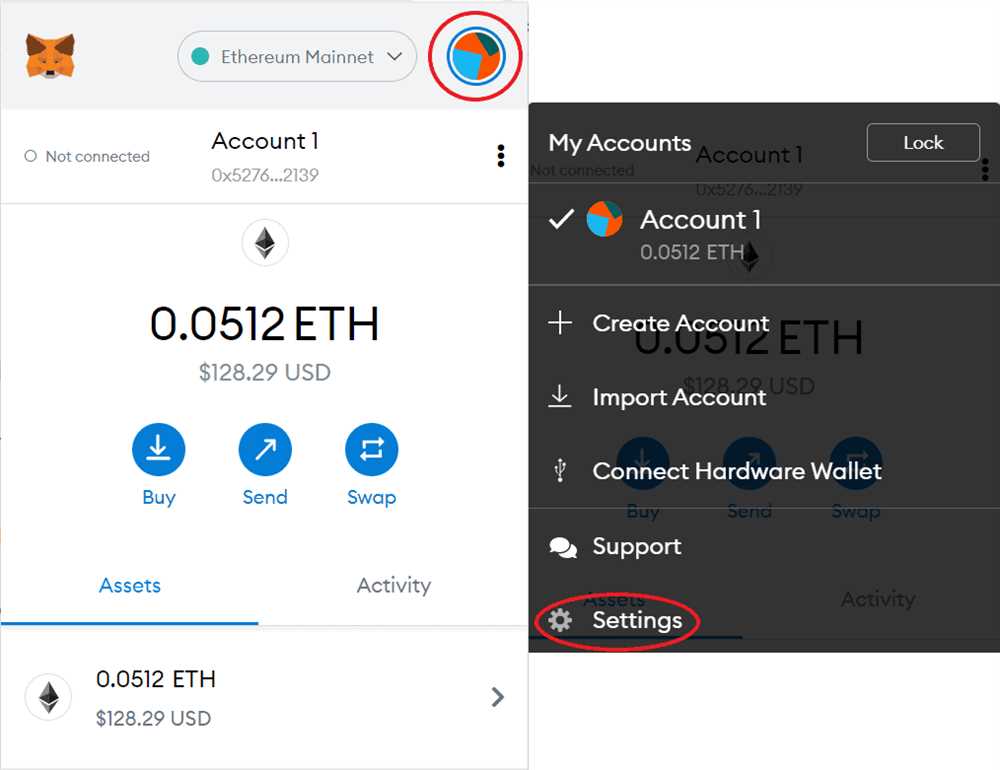
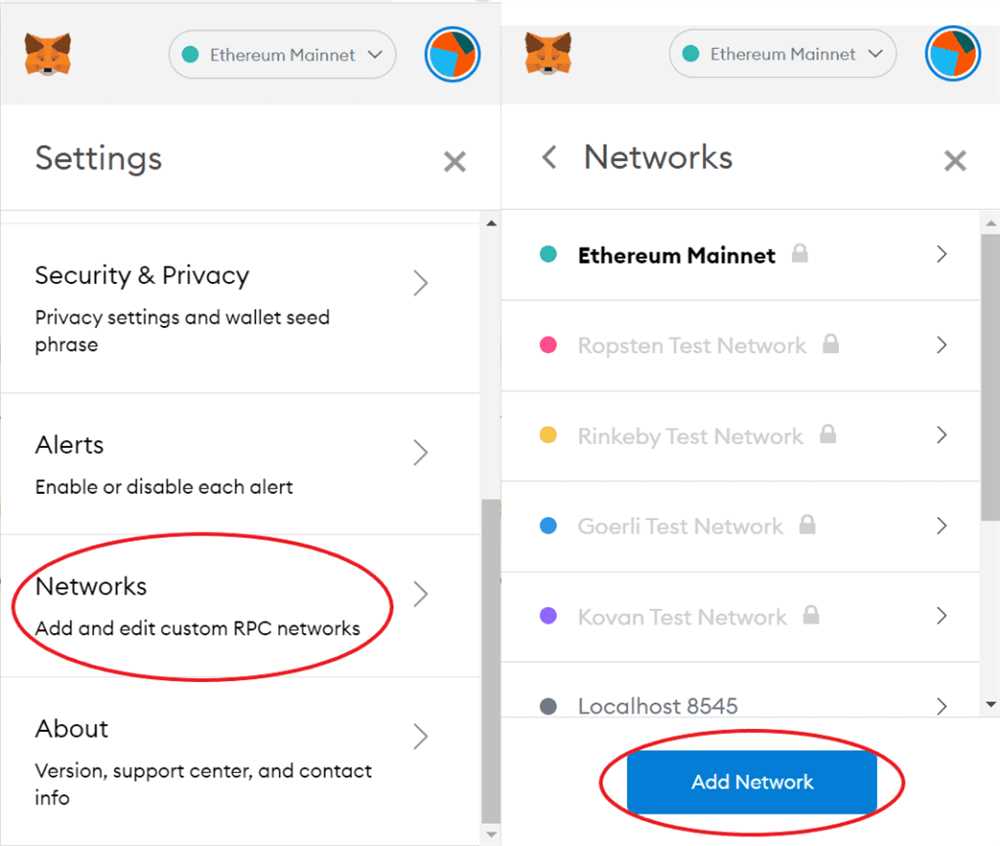
- Click on the account avatar in the top right corner and select “Settings.”
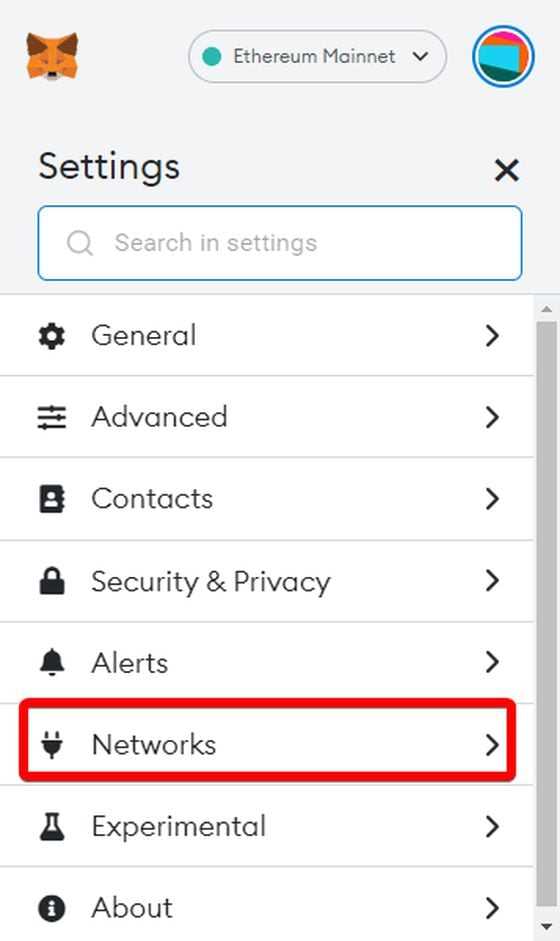
- In the settings, click on “Networks” and then “Add Network.”
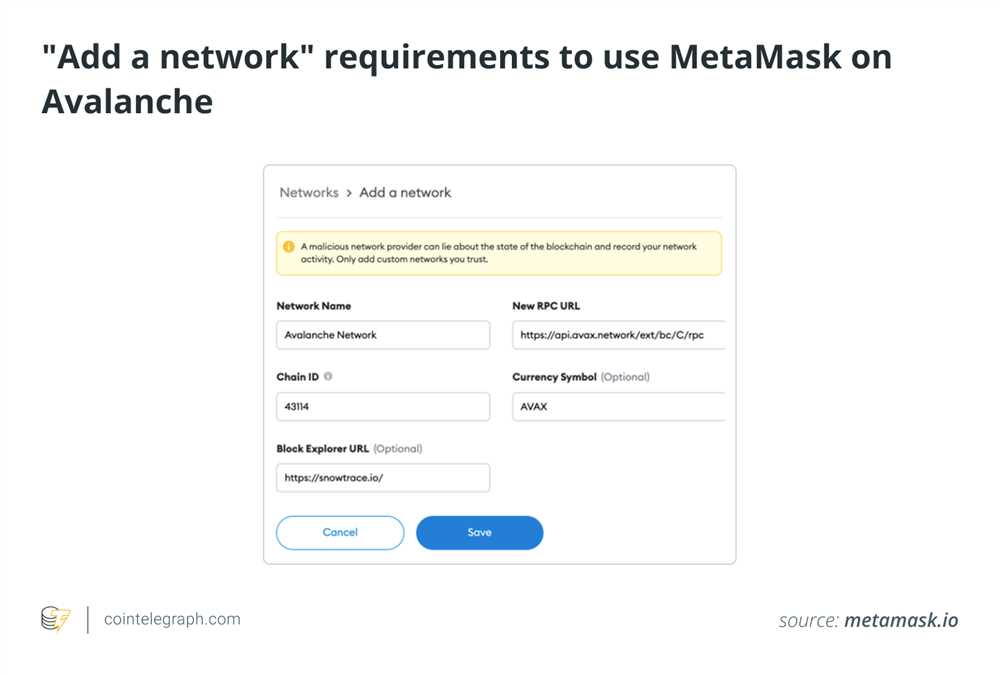
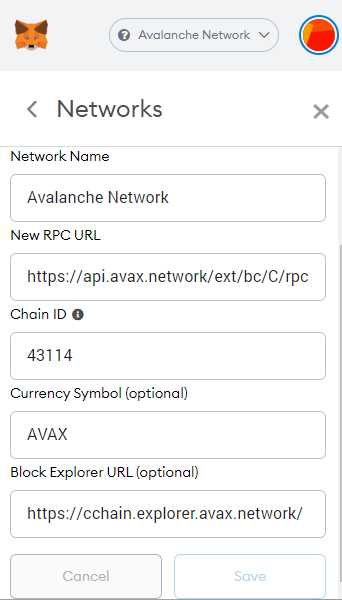
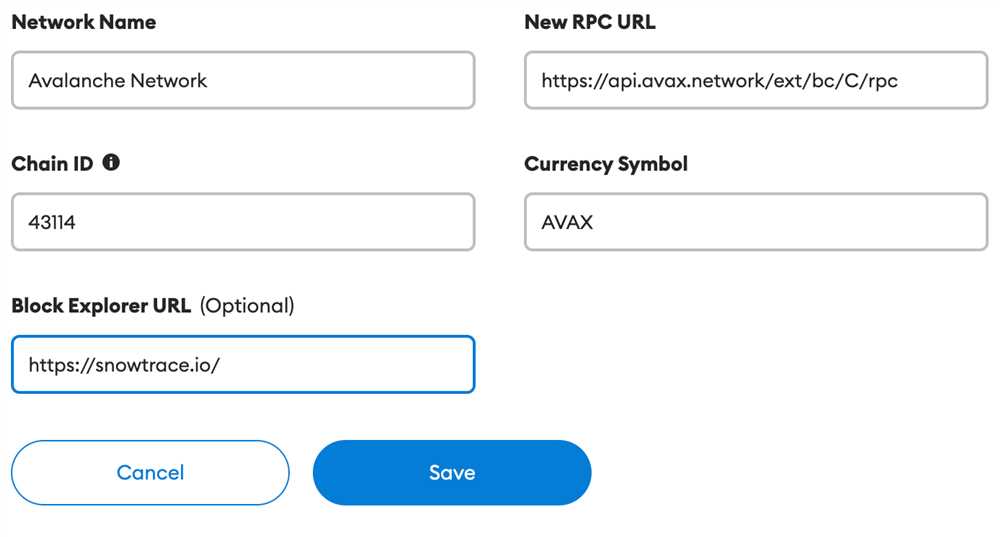
- Provide the following details to add the Avax network:
- Network Name: Avalanche Mainnet
- New RPC URL: https://api.avax.network/ext/bc/C/rpc
- Chain ID: 43114
- Symbol: AVAX
- Block Explorer URL: https://cchain.explorer.avax.network/
- Click on the “Save” button to add the Avax network to your MetaMask.
- Congratulations! You have successfully downloaded, installed, and set up MetaMask, and added the Avax network to your wallet.
Now you are ready to connect your MetaMask wallet to decentralized applications on the Avax network and start exploring the world of DeFi, NFTs, and other exciting dApps!
Step 2: Create a MetaMask Wallet
MetaMask is a digital wallet that allows you to manage your cryptocurrency assets and interact with decentralized applications (dApps) on the Avax network. To connect MetaMask to the Avax network, you first need to create a MetaMask wallet. Follow these steps to create a new wallet:
1. Install MetaMask: If you haven’t already, download and install the MetaMask extension for your preferred web browser (Chrome, Firefox, Brave, or Edge).
2. Launch MetaMask: Once installed, click on the MetaMask icon in your browser’s toolbar to launch the wallet.
3. Accept the terms of use: Read and accept the terms of use and privacy policy of MetaMask by clicking “Accept” or “Agree”.
4. Create a new wallet: Choose the “Create a Wallet” option on the welcome screen.
5. Set a strong password: Enter a strong and secure password for your MetaMask wallet. Make sure to use a combination of uppercase and lowercase letters, numbers, and special characters.
6. Backup your seed phrase: MetaMask will then provide you with a unique 12-word seed phrase. This phrase is crucial for recovering your wallet in case of loss or device failure. Write down the seed phrase and keep it in a safe place. Do not share it with anyone.
7. Confirm your seed phrase: To ensure you have correctly written down the seed phrase, MetaMask will ask you to select the words of your seed phrase in the correct order. This step is essential for verifying your backup.
8. Complete the wallet creation: Once you have confirmed your seed phrase, MetaMask will prompt you to complete the wallet creation process. Follow the instructions provided by MetaMask to finish setting up your wallet.
9. Fund your wallet: After creating your wallet, you will need to fund it with AVAX tokens to interact with the Avax network. There are various ways to acquire AVAX, such as purchasing it from a cryptocurrency exchange or receiving it from another wallet.
Once you have completed these steps, you will have successfully created a MetaMask wallet and be ready to connect it to the Avax network.
Note: It is important to secure your wallet and keep your seed phrase safe. Losing your seed phrase could result in permanent loss of access to your funds.
Step 3: Connect MetaMask to the Avax Network
Once you have successfully installed MetaMask, the next step is to connect it to the Avax Network. Follow the below steps:
Step 1: Open the MetaMask extension in your browser and click on the network dropdown located at the top of the window.
Step 2: In the network dropdown, select “Custom RPC” to add a custom network.
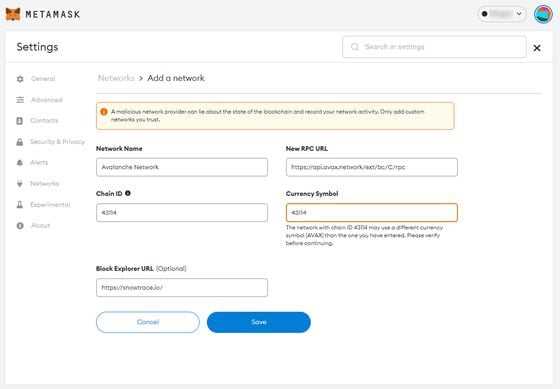
Step 3: A form will appear asking for network details. Fill in the following information:
Network Name: Enter a name for the network. You can use “Avax Network” or any other name you prefer.
New RPC URL: Enter the RPC URL for the Avax Network. The RPC URL is specific to the network and can usually be found on the network’s official website or in the documentation.
Chain ID: Enter the chain ID for the Avax Network. The chain ID is a unique identifier for the network and is also usually provided in the network’s documentation.
Symbol (optional): Enter the symbol for the Avax Network if desired.
Block Explorer URL (optional): You can enter the block explorer URL for the Avax Network if you want to easily view transaction details.
Step 4: After filling in the network details, click on the “Save” button to add the Avax Network to MetaMask.
Step 5: Once the Avax Network is added, you can select it from the network dropdown to connect to it. MetaMask will now be connected to the Avax Network, allowing you to interact with dApps and perform transactions on the network.
Note: Make sure to double-check the network details and verify the RPC URL and chain ID before adding the Avax Network to MetaMask. Using incorrect information can lead to undesirable consequences such as losing funds or interacting with malicious contracts.
Step 4: Verify the Connection
Once you have successfully connected MetaMask to the Avax network, it is important to verify the connection to ensure that everything is functioning correctly. Here are the steps to do so:
1. Open the MetaMask Extension
First, click on the MetaMask extension icon in your browser’s toolbar to open the MetaMask interface.
2. Check the Network
In the MetaMask interface, look at the top center of the screen. You should see the name of the network you are currently connected to. It should display “Avalanche” or “Custom RPC” if you have successfully connected to the Avax network.
3. Verify the Network ID
Next, click on the network name to open the network settings. In the network settings, verify that the Network ID matches the Avax Network ID, which is 43114.
4. Check the Account Balance
Finally, check your account balance in MetaMask to ensure it displays the correct amount of AVAX tokens. If the balance is showing zero or an incorrect value, there may be an issue with the connection. In this case, double-check your settings and try reconnecting to the Avax network.
| Network | Network ID | Explorer |
|---|---|---|
| Avalanche | 43114 | Avalanche Explorer |
| Custom RPC | 43114 | Avalanche Explorer |
By following these steps, you can verify that MetaMask is properly connected to the Avax network. This will ensure that you can seamlessly transact and interact with Avax-powered decentralized applications (dApps).
Frequently Asked Questions:
What is MetaMask?
MetaMask is a digital wallet that allows users to store and manage their cryptocurrencies. It is a browser extension that is compatible with popular browsers like Chrome and Firefox.
+ There are no comments
Add yours