


Metamask is a popular web extension wallet that allows you to securely manage your Ethereum assets. With the rise of layer 2 solutions like Polygon, it’s important to understand how to set up your Metamask wallet to interact with the Polygon network. In this step-by-step guide, we will walk you through the process of setting up Polygon on Metamask, so you can start taking advantage of its low fees and fast transactions.
Step 1: Install Metamask Extension
The first step is to install the Metamask extension on your preferred web browser. You can find the extension on the official Metamask website or in the extension/add-on store of your chosen browser. Once installed, create a new wallet or import an existing one by following the on-screen instructions.
Step 2: Connect to the Polygon Network
After setting up your Metamask wallet, click on the network dropdown at the top of the extension interface. Select “Custom RPC” and you will be presented with a form to fill in the network details.
Step 3: Add Polygon Network Details
In the form, fill in the following details:
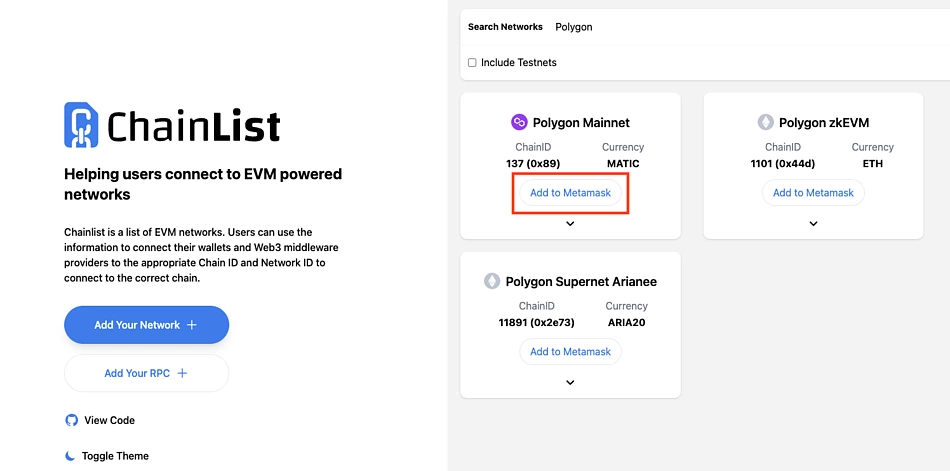
- Network Name: Polygon Mainnet
- New RPC URL: https://polygon-rpc.com/
- Chain ID: 137
- Symbol: MATIC
- Block Explorer URL: https://polygonscan.com/
Once all the details are filled, click on “Save” and you should see the Polygon network added to your network dropdown.
Step 4: Switch to Polygon Network
To switch to the Polygon network, click on the network dropdown and select “Polygon Mainnet”. Your Metamask wallet is now connected to the Polygon network, and you are ready to start using Polygon dapps and interacting with the Polygon ecosystem.
Setting up Polygon on Metamask is a simple process that allows you to access the benefits of the Polygon network. By following this step-by-step guide, you can easily switch between Ethereum and Polygon networks, enabling you to take advantage of the low fees and scalability that Polygon offers.
Step 1: Download and Install Metamask Extension

To get started with Polygon on Metamask, you need to have the Metamask extension installed on your web browser. Metamask is a digital wallet that allows you to connect to the Ethereum network and interact with decentralized applications.
Follow these steps to download and install Metamask:
- Open your web browser and visit the Metamask website.
- Click on the “Get started” button.
- Choose the option to download Metamask for your browser (e.g., Chrome, Firefox).
- Once the download is complete, click on the installation file to start the installation process.
- Follow the prompts to install Metamask on your computer.
After the installation is complete, you should see the Metamask icon added to your browser’s toolbar. Click on the icon to open Metamask.
Next, you’ll need to set up a Metamask account. Follow the prompts to create a new account or import an existing one using a seed phrase. Make sure to secure your account with a strong password and enable two-factor authentication for added security.
Once your account is set up, you’ll be ready to connect to the Polygon network and start using Polygon-based applications.
Step 2: Create a New Wallet and Set Up a Password
Once you have installed the Metamask extension and opened it in your browser, you can proceed to create a new wallet and set up a password for it. This will ensure the security of your wallet and protect your funds.
To create a new wallet, follow these steps:
- Click on the Metamask extension icon in your browser toolbar to open the Metamask window.
- Click on the “Get Started” button.
- Read and accept the terms of use by clicking on the “Accept” button.
- Create a new password for your wallet. Make sure it is strong and unique to prevent unauthorized access.
- Confirm the password by typing it again in the “Confirm Password” field.
- Click on the “Create” button to create your new wallet.
After completing these steps, your new wallet will be created, and you will be prompted to back up your seed phrase. This seed phrase is a series of randomly generated words that can be used to restore your wallet in case you forget your password or lose access to your device. It is crucial to write down and store this seed phrase in a safe place, as anyone with access to it can gain control over your wallet.
Once you have completed the setup process, you will be directed to the main Metamask interface, where you can start using your wallet on Polygon. Make sure to keep your password and seed phrase secure and never share them with anyone.
Step 3: Add the Polygon Network to Metamask
Adding the Polygon network to your Metamask wallet allows you to interact with the Polygon ecosystem. Here’s how to add the Polygon network:
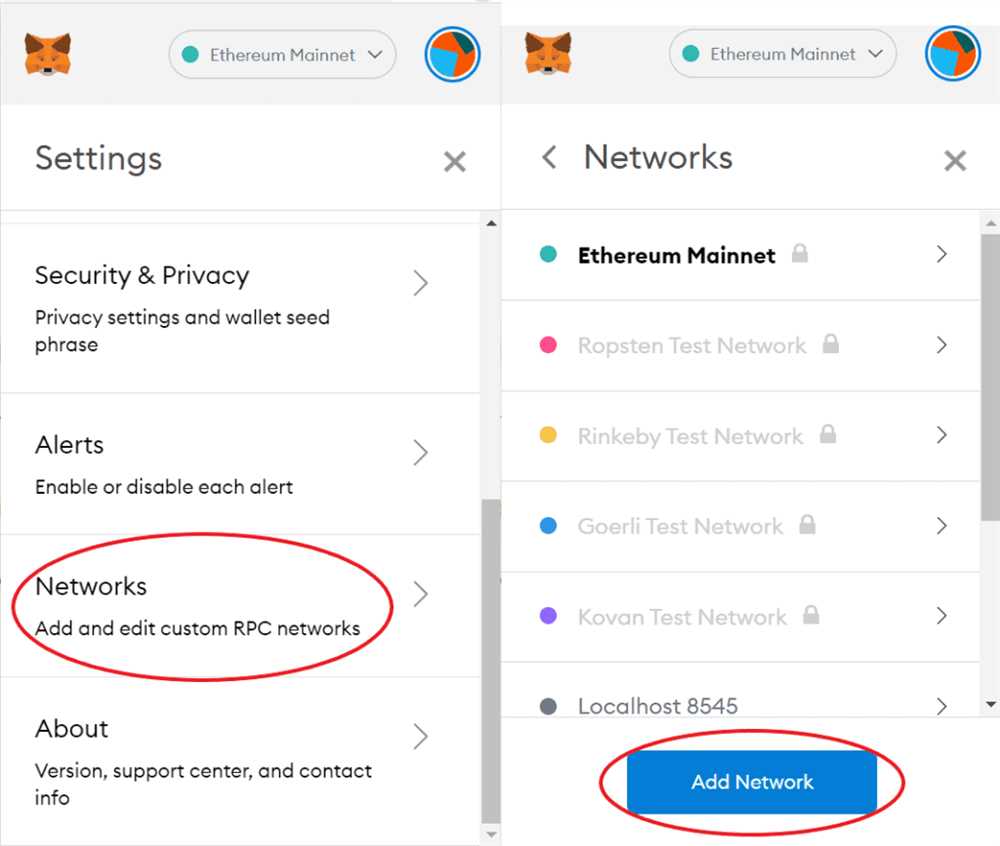
- Open your Metamask wallet extension in your browser.
- Click on the network selection dropdown at the top of the Metamask interface.
- Scroll down and click on “Custom RPC”.
- In the “New RPC URL” field, enter the following URL: https://rpc-mainnet.maticvigil.com/
- Provide a name for the network, such as “Polygon Mainnet”.
- You can also optionally upload the Polygon logo by clicking on the “Customize” button and selecting an image.
- Click on “Save” to add the Polygon network to your wallet.
Once you have added the Polygon network, you will be able to switch between different networks within the Metamask interface. Make sure you are connected to the Polygon network when interacting with Polygon-based dapps or transferring funds.
Frequently Asked Questions:
What is Polygon?
Polygon is a Layer 2 scaling solution for Ethereum that aims to improve scalability, reduce transaction fees, and enhance user experience.
How does Polygon work?
Polygon achieves scalability through the use of sidechains, which are separate blockchains that can execute transactions independently of the Ethereum mainnet. These sidechains are secured by a network of validators and are interconnected with each other and the Ethereum mainnet through the Polygon bridge.
Why should I set up Polygon on Metamask?
Setting up Polygon on Metamask allows you to access and interact with decentralized applications (dApps) and smart contracts on the Polygon network. It also enables you to take advantage of the low transaction fees and fast transaction speeds offered by Polygon.
+ There are no comments
Add yours