


Are you interested in trading cryptocurrencies seamlessly? Look no further than Uniswap, the decentralized cryptocurrency exchange. With its user-friendly interface and liquidity pools, Uniswap offers a seamless trading experience for both beginners and experienced traders. But before you can start trading, you need to connect your Metamask wallet to Uniswap. In this article, we will guide you through the simple steps to connect your wallet and begin trading on Uniswap.
Step 1: Install and Set Up Metamask Wallet
If you haven’t already, you need to install and set up the Metamask wallet on your device. Metamask is a browser extension that allows you to manage your Ethereum wallet and interact with decentralized applications (dApps) like Uniswap. Simply visit the Metamask website, download the extension for your preferred browser, and follow the step-by-step instructions to create a new wallet or import an existing one.
Step 2: Fund Your Metamask Wallet
Once you have set up your Metamask wallet, you need to fund it with Ethereum (ETH) or any other supported ERC-20 tokens. You can purchase ETH from popular cryptocurrency exchanges or send it from another wallet. Make sure you have enough ETH to cover the transaction fees on Uniswap, as every trade and interaction on the Ethereum network requires a small fee.
Step 3: Access Uniswap and Connect Your Wallet
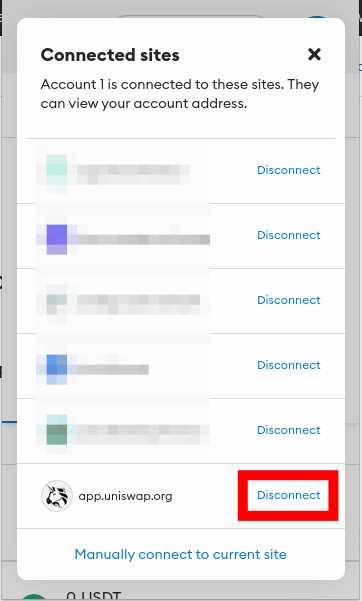
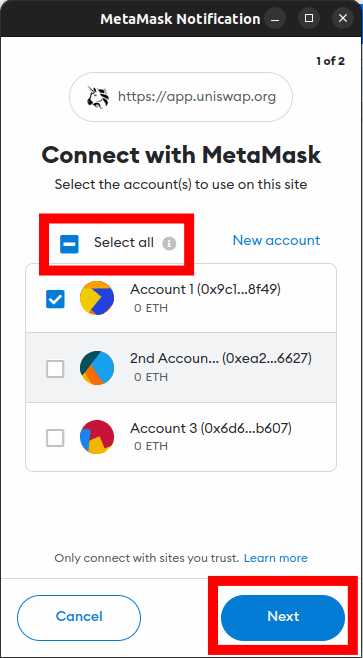
Now that your Metamask wallet is ready, visit the Uniswap website and click on the “Connect Wallet” button. A Metamask pop-up will appear, asking for your permission to connect. Click on “Connect” to authorize the connection between your wallet and Uniswap. Once connected, you will be able to see your wallet address and balance in the top right corner of the Uniswap interface.
Note: Make sure you are on the official Uniswap website (https://uniswap.org/) and avoid any phishing attempts or suspicious links that may compromise your wallet security.
Step 4: Start Trading on Uniswap
With your wallet connected, you are now ready to start trading on Uniswap. You can choose to swap tokens directly or provide liquidity to the Uniswap liquidity pools. Simply select the tokens you want to trade, enter the amount, and click on the “Swap” button to execute the trade. Remember to review the transaction details, including the estimated gas fees, before confirming the trade.
By following these simple steps, you can connect your Metamask wallet to Uniswap and start trading cryptocurrencies seamlessly. Uniswap’s decentralized nature ensures that you have full control of your funds, and with the help of Metamask, you can securely manage your wallet and interact with the vibrant world of decentralized finance.
Step-by-Step Guide: Connect Your Metamask Wallet to Uniswap in 3 Simple Steps
Uniswap is a decentralized exchange platform that allows users to trade cryptocurrencies directly from their digital wallets. To start trading on Uniswap, you’ll need to connect your Metamask wallet, which is a popular Ethereum wallet. Follow these simple steps to connect your Metamask wallet to Uniswap.
Step 1: Install Metamask
If you haven’t already, start by installing the Metamask wallet extension in your preferred web browser. Metamask supports Chrome, Firefox, and Brave browsers. Simply search for “Metamask” in your browser’s extension or add-on store, and click on the “Install” button. Once installed, click on the Metamask icon in your browser’s toolbar to set up your wallet.
Step 2: Set Up Metamask
When you click on the Metamask icon, a welcome screen will appear. Click on “Get Started” and choose a strong password for your wallet. Make sure to save your password in a secure place, as it cannot be recovered if lost. After setting your password, you’ll receive a secret backup phrase. Write down the phrase and keep it in a safe and private location. This backup phrase can be used to restore your wallet if needed.
Next, you’ll be prompted to choose a network. Select the Ethereum Mainnet to connect to the main Uniswap exchange. If you want to use the test network, you can select one of the available test networks. Once you’ve chosen your network, your Metamask wallet will be set up and ready to connect to Uniswap.
Step 3: Connect Metamask to Uniswap
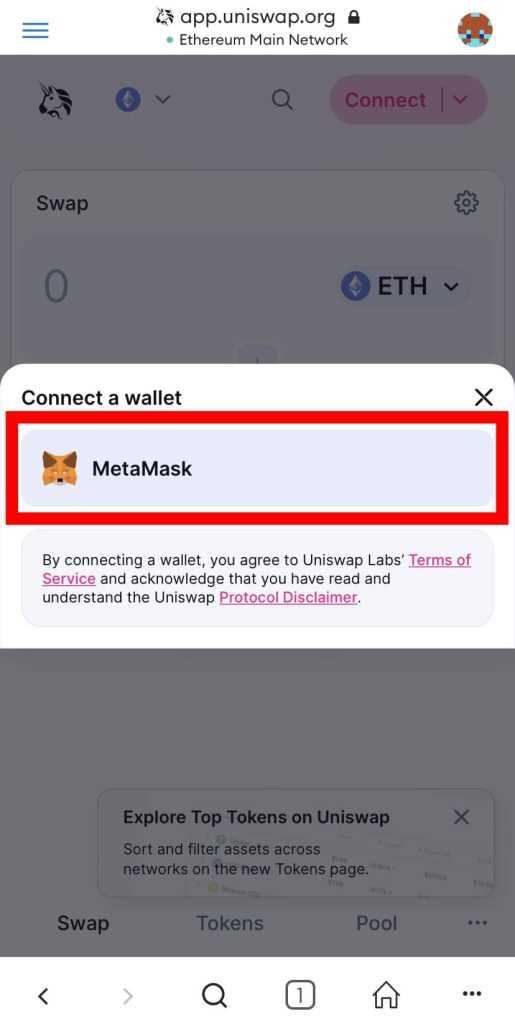
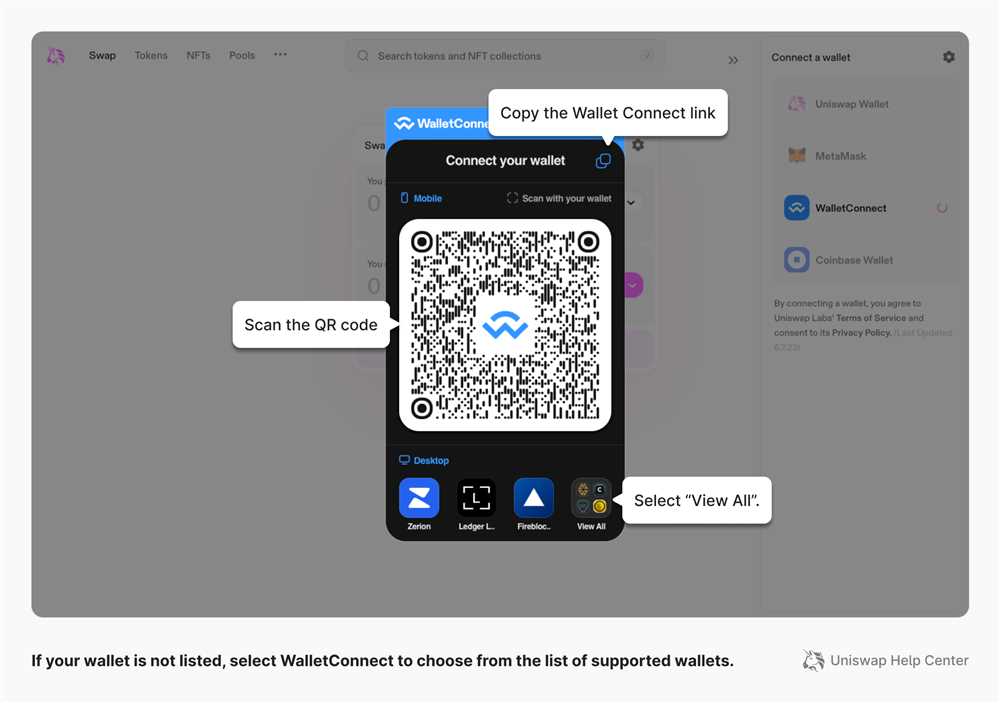
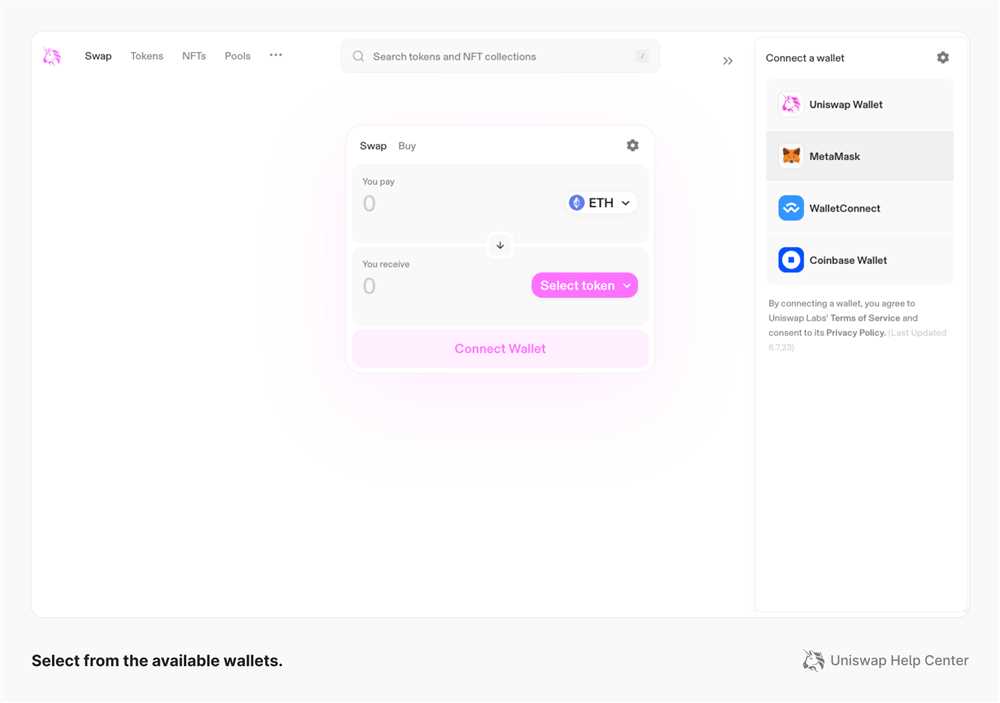
To connect your Metamask wallet to Uniswap, open the Uniswap website in your browser. Once the website loads, click on the “Connect Wallet” button, usually located in the top right corner of the page. A pop-up window will appear, showing a list of available wallets. Select the “Metamask” option.
Metamask will then prompt you to confirm the connection to Uniswap. Click on the “Connect” button to authorize the connection. After a few moments, your Metamask wallet will be successfully connected to Uniswap. You can now start trading cryptocurrencies on the Uniswap platform using your Metamask wallet.
Remember to always double-check the details of the trades you make on Uniswap, as transactions cannot be reversed. Also, ensure that you have enough Ethereum (ETH) in your Metamask wallet to cover gas fees for the transactions you want to execute on Uniswap.
By following these three simple steps, you’ll be able to connect your Metamask wallet to Uniswap and start trading cryptocurrencies seamlessly. Happy trading!
Step 1: Download and Install Metamask Wallet
Before you can connect your Metamask wallet to Uniswap and start seamlessly trading cryptocurrencies, you’ll need to download and install the Metamask wallet extension.
Here’s how to do it:
- Open your preferred web browser (e.g., Google Chrome, Mozilla Firefox).
- Go to the official Metamask website by typing “metamask.io” in the address bar or by searching for “Metamask” on your favorite search engine.
- On the Metamask website, click on the “Get Chrome Extension” or “Get Firefox Extension” button, depending on your browser choice.
- You will be redirected to the Chrome Web Store or the Firefox Add-ons website.
- Click on the “Add to Chrome” or “Add to Firefox” button to download and install the Metamask extension.
- A pop-up window will appear asking for confirmation. Click on “Add extension” to proceed with the installation.
- Once the installation is complete, you will see the Metamask icon added to your browser’s toolbar.
- Click on the Metamask icon to launch the wallet.
- A welcome screen will appear. Click on the “Get Started” button.
- Read and accept the terms of use and privacy policy by clicking on the corresponding checkboxes.
- Create a new wallet by clicking on the “Create a Wallet” button.
- Follow the on-screen instructions to set up a strong password for your wallet.
- After setting up your password, you will be presented with a unique 12-word seed phrase. Make sure to write down and securely store this seed phrase as it will be used to recover your wallet if you ever lose access to it.
- Confirm your seed phrase by entering the words in the correct order.
- Once your seed phrase is confirmed, your Metamask wallet will be created, and you will have successfully downloaded and installed the Metamask wallet extension.
Now that your Metamask wallet is set up, you’re ready to move on to the next step and connect it to Uniswap for seamless crypto trading.
Step 2: Create or Import a Wallet on Metamask
Before you can connect your Metamask wallet to Uniswap, you need to have a wallet set up on the Metamask extension. If you already have a wallet, you can skip this step and proceed to the next one. If not, follow these instructions to create or import a wallet on Metamask:
Creating a New Wallet:
- Download the Metamask extension from the official website and add it to your browser.
- Click on the Metamask icon in your browser toolbar to launch the extension.
- Click “Get Started” and then click “Create a Wallet”.
- Set a strong password for your wallet and click “Create”.
- Follow the instructions to securely back up your wallet’s seed phrase. This phrase is crucial for recovering your wallet and should be kept secret.
- Confirm your seed phrase by selecting the given words in the correct order and click “Confirm”.
- Your wallet is now created, and you can click “All Done” to complete the process.
Importing an Existing Wallet:
- If you already have a wallet on another platform or in another application, you can import it into Metamask.
- Download the Metamask extension from the official website and add it to your browser.
- Click on the Metamask icon in your browser toolbar to launch the extension.
- Click “Import Wallet” and then select the type of wallet you want to import (e.g., Ledger, Trezor, Keystore File, etc.).
- Follow the instructions provided by Metamask to import your wallet.
- Once imported, you will have access to your wallet funds through the Metamask extension.
After creating or importing a wallet on Metamask, you are now ready to connect it to Uniswap and start seamless cryptocurrency trading.
Step 3: Connect Metamask to Uniswap and Start Crypto Trading
Now that you have set up your Metamask wallet and funded it with cryptocurrency, it’s time to connect it to Uniswap and start trading. Follow these simple steps to get started:
- Open your web browser and navigate to the Uniswap website.
- Click on the “Connect Wallet” button located at the upper right corner of the page.
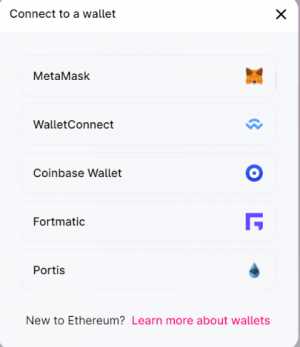
- A pop-up window will appear with a list of wallet options. Select “Metamask” from the list.
- You will be redirected to the Metamask extension. Ensure that you are logged into your Metamask account.
- Review the transaction details and click on the “Confirm” button in Metamask to connect your wallet to Uniswap.
- Once your wallet is connected, you will see your Ethereum address displayed on the Uniswap interface.
- Now you are ready to start trading! You can search for the cryptocurrency pairs you are interested in and use the trade function to buy or sell tokens.
- Remember to review the transaction details, including the token quantity and price, before confirming the trade.
- After confirming the transaction, you will receive a notification on Metamask indicating that your trade has been successful.
- Monitor your trades and manage your portfolio by checking your Metamask wallet balance and transaction history.
By following these steps, you can easily connect your Metamask wallet to Uniswap and start trading cryptocurrencies with ease and security.
Frequently Asked Questions:
What is Metamask?
Metamask is a cryptocurrency wallet and browser extension that allows users to interact with decentralized applications (dApps) on the Ethereum blockchain. It enables users to store, send, and receive Ethereum and ERC-20 tokens.
+ There are no comments
Add yours