


If you’re new to the world of cryptocurrencies and decentralized finance (DeFi), you’ve probably heard about Metamask. Metamask is a popular cryptocurrency wallet and gateway to the world of Ethereum and other blockchain networks. It allows users to securely store and manage their digital assets, as well as interact with decentralized applications (DApps) and smart contracts.
While Ethereum has been the go-to blockchain network for many users, it has faced scalability and high transaction fee issues. As a solution, the Polygon network, formerly known as Matic, has gained popularity as a Layer 2 scaling solution for Ethereum. It aims to provide a seamless experience for users by offering faster and cheaper transactions.
In this complete guide, we will walk you through the process of adding the Polygon network to your Metamask wallet. By doing so, you will be able to take advantage of the benefits offered by the Polygon network and access a wide range of DApps and DeFi protocols.
Step 1: Download and Install Metamask
The first step is to download and install the Metamask extension for your preferred web browser. Metamask is available for Google Chrome, Mozilla Firefox, and Brave. Once installed, create a new wallet or import an existing one by following the on-screen instructions.
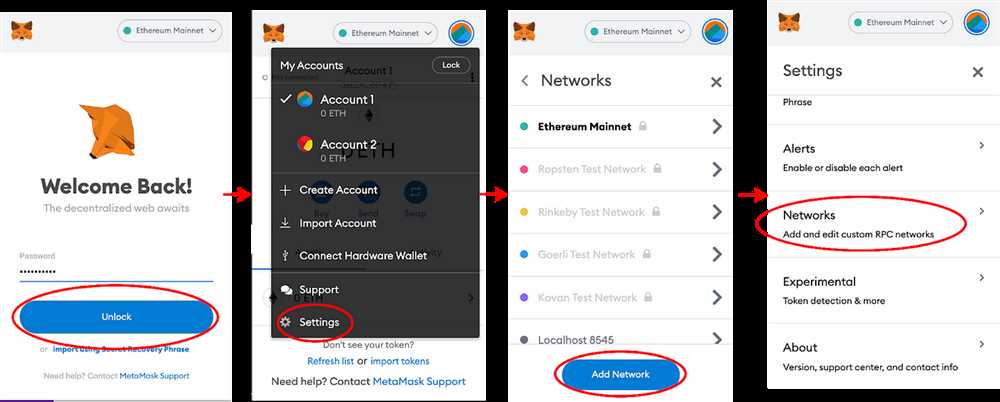
Step 2: Access the Metamask Settings
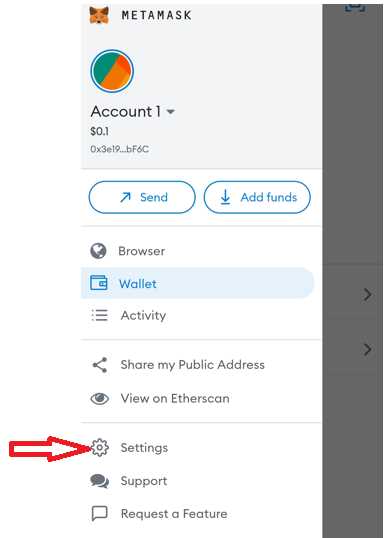
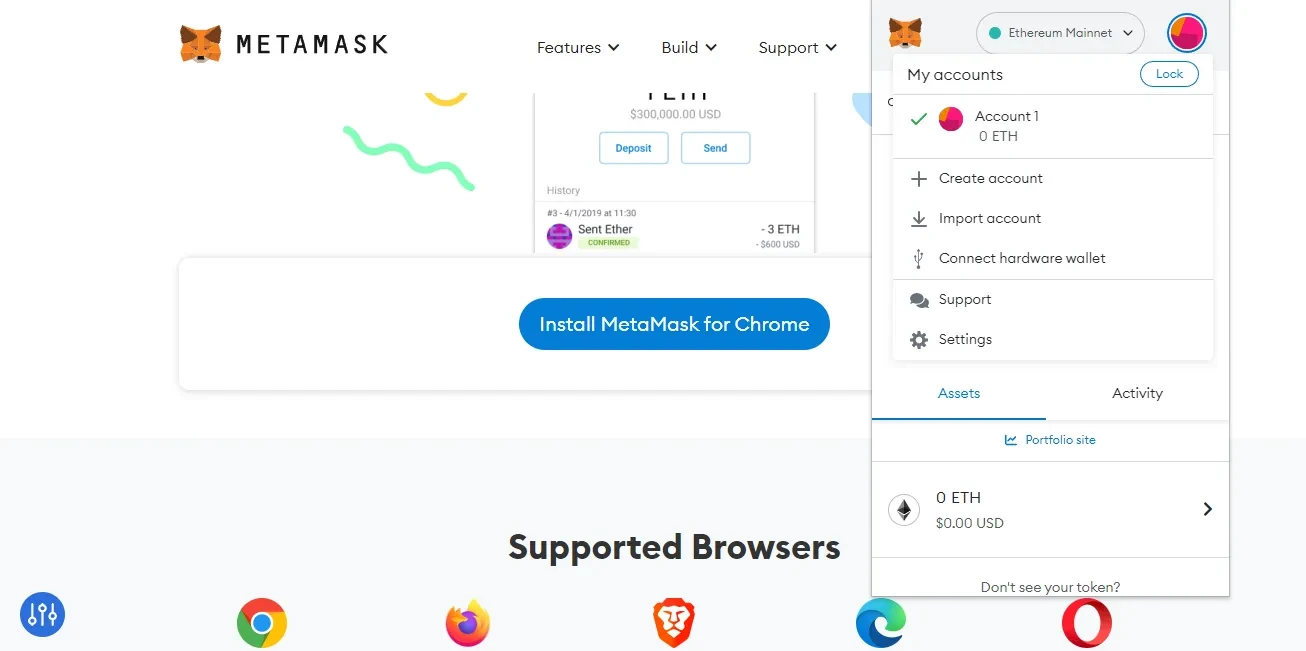
After successfully setting up your Metamask wallet, click on the Metamask extension icon in your web browser to open the wallet interface. From there, click on the profile icon at the top right corner to access the settings menu.
Step 3: Add the Polygon Network
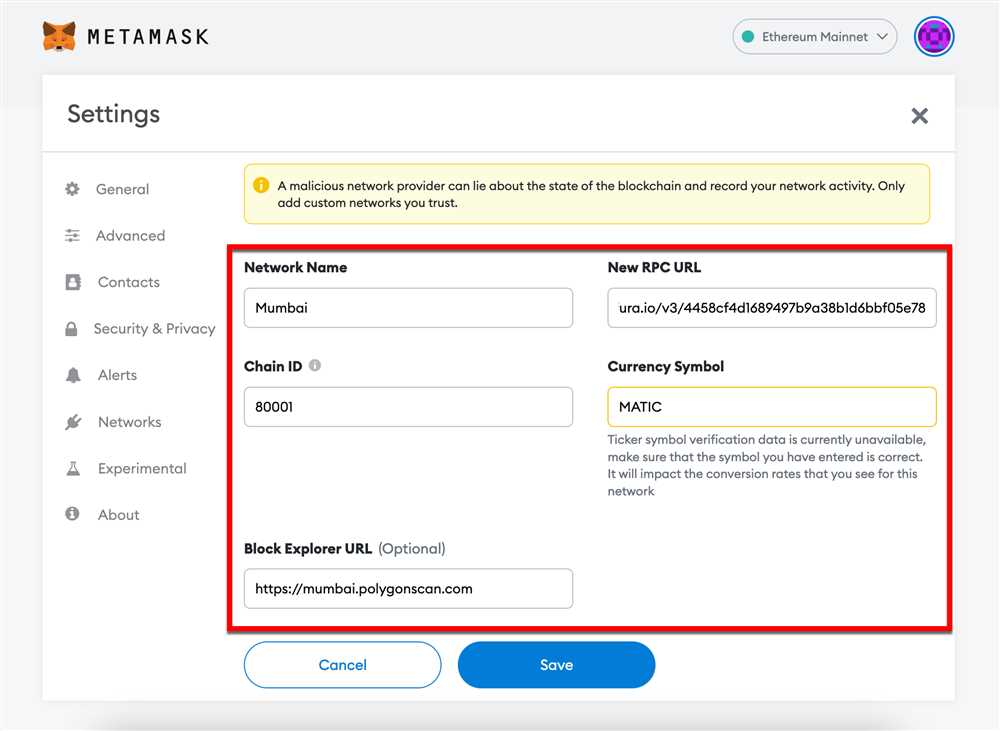
In the settings menu, select the “Networks” tab. Scroll down and click on the “Add Network” button to add a new network manually. Here, provide the following details:
Network Name: Polygon
New RPC URL: https://rpc-mainnet.matic.network
Chain ID: 137
Currency Symbol: MATIC
Block Explorer URL: https://explorer.polygonscan.com/
Once you have filled in the required details, click on the “Save” button to add the Polygon network to your Metamask wallet.
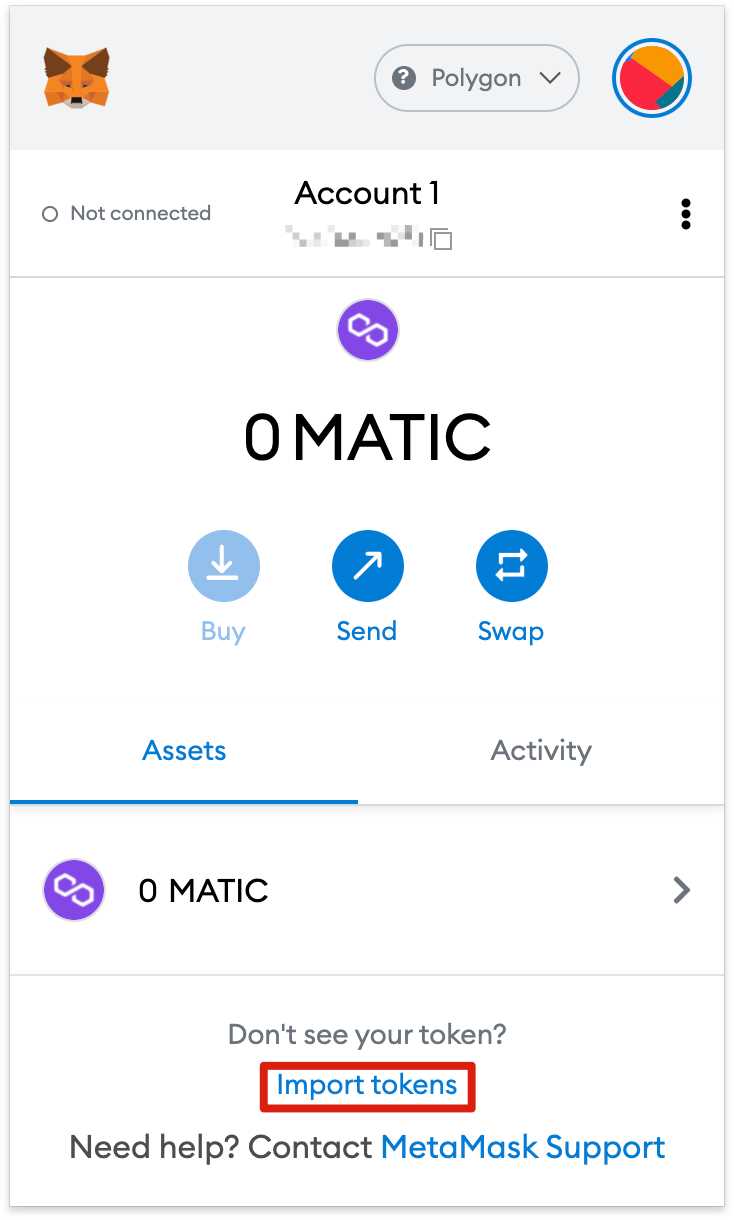
Step 4: Switch to the Polygon Network
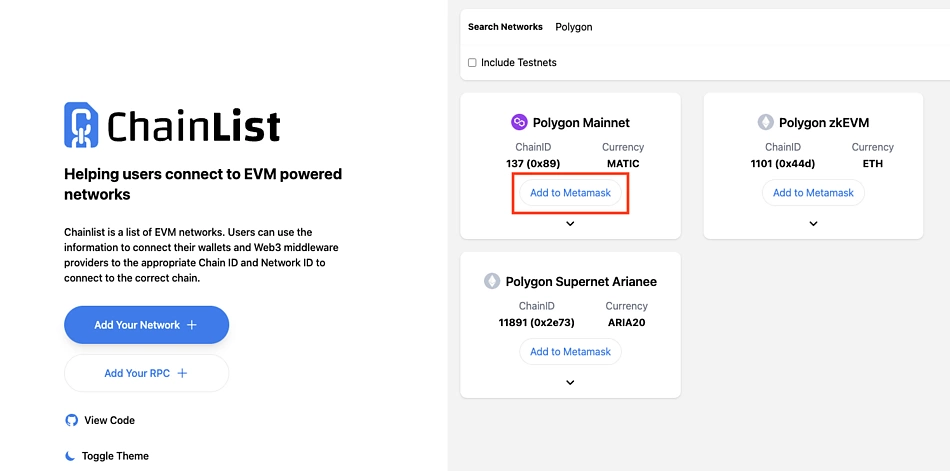
After adding the Polygon network, you can switch to it by clicking on the network selection dropdown in the Metamask wallet interface. Select “Polygon Mainnet” from the list of available networks.
Congratulations! You have successfully added the Polygon network to your Metamask wallet. You can now explore the world of Polygon-based DApps and DeFi protocols, and enjoy fast and cost-effective transactions.
How to Add Polygon Network to Metamask
If you’re looking to add the Polygon network to your Metamask wallet, you’re in the right place! This guide will walk you through the steps to easily connect your Metamask wallet to Polygon.
Step 1: Install the Metamask Extension
If you haven’t already, install the Metamask extension on your preferred browser. Metamask is available for Chrome, Firefox, Brave, and Edge browsers.
Step 2: Create or Import a Wallet
Once you have Metamask installed, open the extension and either create a new wallet or import an existing wallet using your recovery phrase or private key.
Step 3: Access the Network Settings
Once you have your wallet set up, click on the network dropdown menu in the top-right corner of the extension and select “Custom RPC”. This will open the network settings.
Step 4: Add the Polygon Network
In the network settings, fill in the following details to add the Polygon network:
| Network Name | Polygon |
|---|---|
| New RPC URL | https://rpc-mainnet.maticvigil.com/ |
| Chain ID | 137 |
| Symbol | MATIC |
| Block Explorer URL | https://explorer.matic.network/ |
Make sure you have filled in the details correctly and then click on the “Save” button to add the Polygon network.
Step 5: Connect to the Polygon Network
After you have successfully added the Polygon network, select the network from the network dropdown menu. Your Metamask wallet is now connected to the Polygon network and you can start using Polygon-based dApps and services.
That’s it! You have now successfully added the Polygon network to your Metamask wallet. Enjoy exploring the world of decentralized finance on Polygon!
Step 1: Installing Metamask Extension
Before you can add the Polygon Network to your Metamask wallet, you need to have the Metamask Extension installed in your web browser. Follow the steps below to install Metamask:
1. Open your web browser
Open your preferred web browser such as Google Chrome, Firefox, or Brave.
2. Go to the Metamask website
Visit the official Metamask website by typing “metamask.io” in the address bar and pressing Enter.
3. Download Metamask Extension
On the Metamask website, click on the “Get Started” button. This will direct you to the download page. Click on the download link that corresponds to your web browser.
4. Install the Extension
Once the download is complete, locate the downloaded file in your computer’s downloads folder and double-click on it to begin the installation process. Follow the on-screen instructions to complete the installation.
5. Set up your Metamask Wallet
After the installation is complete, you will see the Metamask icon in your web browser’s toolbar. Click on the icon to open Metamask. Follow the prompts to create a new wallet or import an existing one. Make sure to securely store your wallet’s seed phrase as it will be needed to restore your wallet in case of any issues.
6. Connect to the Polygon Network
With the Metamask Extension installed and your wallet set up, you are now ready to connect to the Polygon Network. Follow the remaining steps of this guide to add the Polygon Network to your Metamask wallet.
| Note: |
The steps and screenshots provided in this guide may vary slightly depending on the web browser and operating system you are using. However, the overall process should remain the same. |
Step 2: Adding Polygon Network
In order to add the Polygon network to your Metamask wallet, you need to follow these steps:
- Open your Metamask extension by clicking on the icon in your browser toolbar.
- Click on the network dropdown menu at the top of the extension, next to the account name.
- Scroll down and click on “Custom RPC”.
- A form will appear where you can enter the network details.
- Enter the following information:
Network Name Polygon New RPC URL https://rpc-mainnet.maticvigil.com Chain ID 137 Symbol MATIC Block Explorer URL https://explorer.matic.network/ - Click “Save” to add the Polygon network to your Metamask wallet.
Congratulations! You have successfully added the Polygon network to your Metamask wallet. Now you can interact with decentralized applications (dapps) and use various services on the Polygon network.
Step 3: Configuring the Polygon Network
Once you have added the Polygon network to your Metamask wallet, the next step is to configure it properly. Follow the steps below to configure the Polygon network:
- Click on the Metamask extension in your browser and open the wallet.
- Click on the network indicator, which is usually displayed as “Main Ethereum Network” or “Rinkeby Test Network”.
- Scroll down and click on “Custom RPC”.
- In the “New RPC URL” field, enter the following URL: https://rpc-mainnet.matic.network.
- Set the “Chain ID” field to 137.
- In the “Currency Symbol” field, enter the symbol for the Polygon network’s native currency, which is MATIC.
- Click on “Save” to save the changes.
After following these steps, your Metamask wallet will be configured to use the Polygon network. You can now seamlessly transact with Polygon-based applications and explore the vibrant ecosystem of decentralized finance (DeFi) projects on Polygon!
Frequently Asked Questions:
What is the Polygon Network?
The Polygon Network, formerly known as Matic Network, is a Layer 2 scaling solution for Ethereum. It aims to improve scalability and user experience by enabling faster and cheaper transactions on the Ethereum blockchain. The Polygon Network achieves this by utilizing sidechains and a Proof of Stake (PoS) consensus mechanism. It also provides developers with a framework to build and deploy decentralized applications (dApps) on its network.
+ There are no comments
Add yours