


Metamask is a popular cryptocurrency wallet and gateway to decentralized applications (DApps) that run on the Ethereum blockchain. It allows users to securely store and manage their Ethereum-based assets, as well as interact with various DApps. One of the most widely used DApps is Uniswap, a decentralized exchange platform that enables users to trade Ethereum and other ERC-20 tokens directly from their wallets.
Connecting Metamask to Uniswap is an essential step for anyone interested in participating in decentralized finance (DeFi) and trading cryptocurrencies on the Ethereum network. It provides a seamless and secure way to access Uniswap’s decentralized trading features, such as swapping tokens, providing liquidity, and earning trading fees. In this step-by-step guide, we will walk you through the process of connecting your Metamask wallet to Uniswap.
Step 1: Install the Metamask Extension
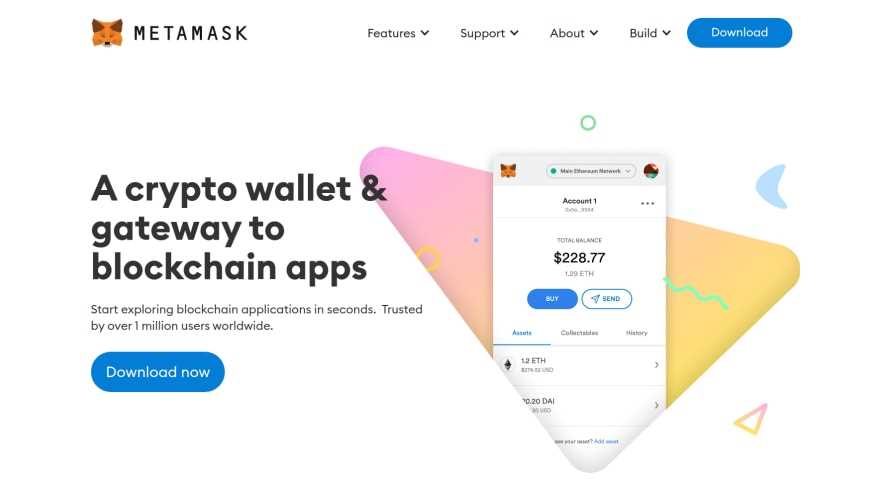
Before you can connect Metamask to Uniswap, you need to have the Metamask extension installed on your preferred web browser. Visit the official Metamask website or search for “Metamask” in your browser’s extension store to download and install the extension.
Step 2: Create or Import a Metamask Wallet
If you already have a Metamask wallet, skip this step. Otherwise, open the Metamask extension and follow the instructions to create a new wallet or import an existing one using your seed phrase. Make sure to securely backup your wallet’s seed phrase as it is the only way to recover your funds if you lose access to your wallet.
Step 3: Configure Metamask for the Ethereum Mainnet
Once your wallet is set up, click on the Metamask extension icon in your browser’s toolbar and select the “Main Ethereum Network” to connect to the Ethereum mainnet. If you are using a test network like Ropsten or Kovan for development purposes, select the appropriate network.
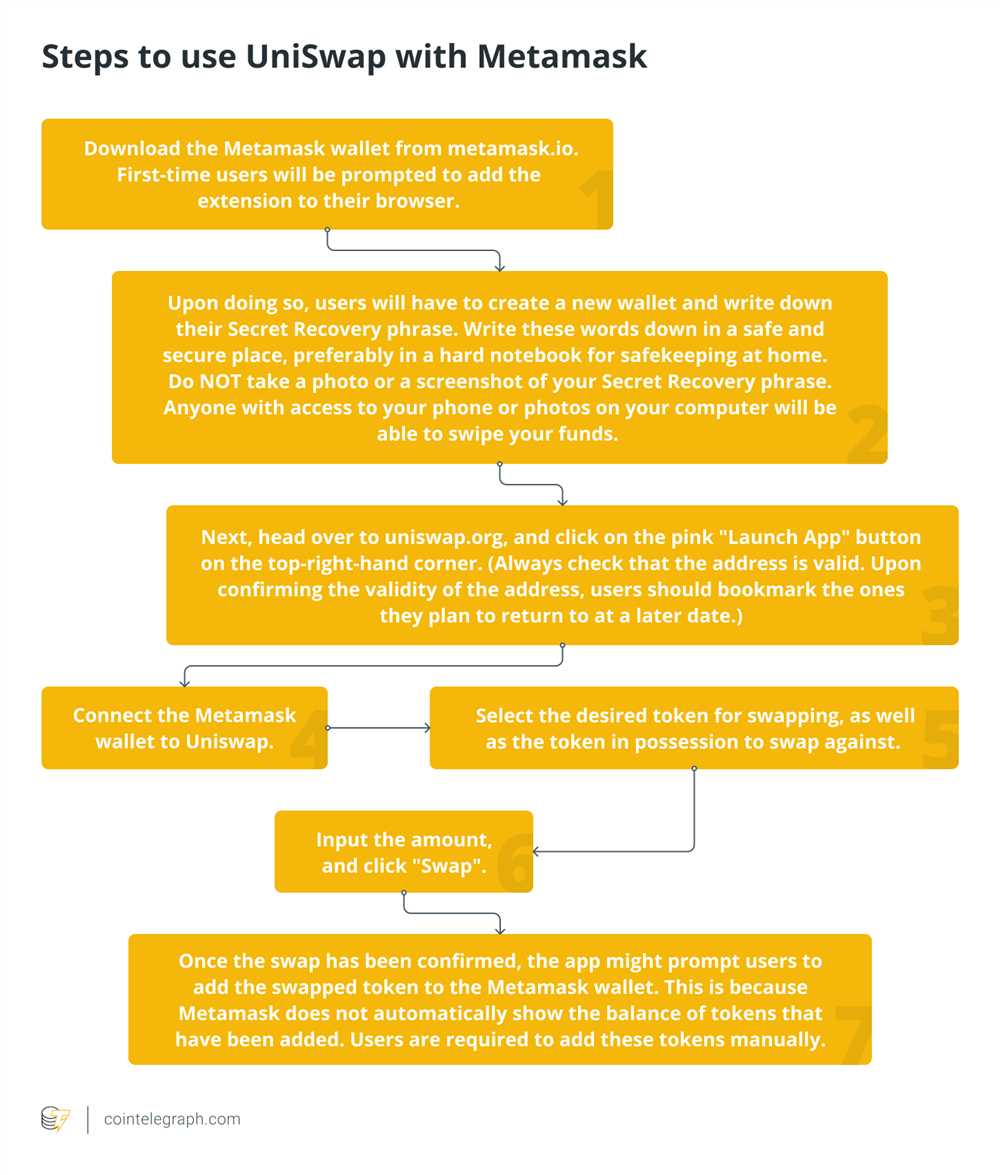
A Beginner’s Guide to Connecting Metamask to Uniswap
If you’re new to the world of decentralized finance (DeFi) and want to start trading cryptocurrencies on Uniswap, you’ll first need to connect your wallet. One of the most popular and user-friendly wallets to use with Uniswap is Metamask. Metamask is a browser extension that allows you to interact with Ethereum-based dApps, such as Uniswap.
To get started, follow these step-by-step instructions:
Step 1: Install Metamask
Before you can connect Metamask to Uniswap, you’ll need to install the Metamask extension in your browser. Visit the official Metamask website and follow the instructions to install it. Once installed, create a new wallet or import an existing one.
Step 2: Add Ethereum Network
Once you have Metamask installed, open the extension and click on the network selection dropdown. Select “Custom RPC” and enter the following details:
Network Name: Smart Chain Testnet (or any other Ethereum network you want to connect to)
New RPC URL: https://data-seed-prebsc-1-s1.binance.org:8545 (or the RPC URL of the desired network)
Chain ID: 97 (or the Chain ID of the desired network)
Currency Symbol: BNB (or the currency symbol of the desired network)
Click “Save” to add the network to Metamask.
Step 3: Obtain Testnet Tokens
If you’re using a testnet network, you’ll need some testnet tokens to interact with Uniswap. You can obtain testnet tokens from a faucet specific to the network you’re using. Visit the network’s faucet website and follow the instructions to obtain the tokens.
Step 4: Visit Uniswap
Now that you have Metamask set up, open a new tab and visit the Uniswap website. Ensure that you’re on the correct network by checking the network selection in Metamask.
Step 5: Connect Metamask
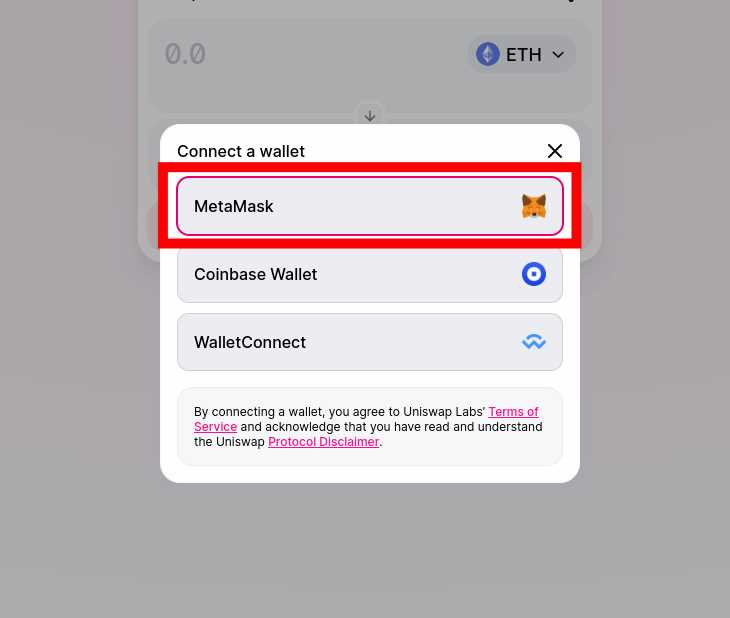
On the Uniswap website, click on the “Connect to a Wallet” button. Choose the “Metamask” option. Metamask will open and prompt you to connect. Review the permissions and click “Connect” to complete the connection.
Congratulations! You’ve successfully connected Metamask to Uniswap. You can now trade cryptocurrencies, provide liquidity, or perform other actions supported by Uniswap directly from your Metamask wallet.
Note: Always exercise caution when interacting with DeFi platforms and ensure you’re on the correct website to avoid scams or phishing attempts.
Installing Metamask Extension
In order to connect Metamask to Uniswap, you will need to install the Metamask extension in your web browser. The following steps will guide you through the process of installing the Metamask extension:
- Open your preferred web browser and search for the Metamask extension.
- Click on the official Metamask website that appears in the search results.
- On the Metamask website homepage, you will find a button that says “Get Chrome Extension” or “Get Firefox Extension”. Click on the button that corresponds to your web browser.
- After clicking on the button, you will be redirected to the extension download page in the Chrome Web Store or the Firefox Add-ons website.
- Click on the “Add to Chrome” or “Add to Firefox” button on the extension download page.
- A pop-up window may appear asking for confirmation to add the extension. Click on “Add extension” to proceed with the installation.
- The Metamask extension will then be installed in your web browser.
- Once the installation is complete, you will see the Metamask icon in the top right corner of your browser.
Congratulations! You have successfully installed the Metamask extension in your web browser. Now you are ready to connect Metamask to Uniswap and start trading cryptocurrency.
Creating a Metamask Account
To connect Metamask to Uniswap, you will first need to create a Metamask account. Metamask is a popular Ethereum wallet that allows you to securely store and manage your Ethereum and ERC-20 tokens.
Follow these steps to create a Metamask account:
Step 1: Install the Metamask Extension
Open your web browser and go to the Metamask website. Click on the “Get Chrome Extension” button if you are using Google Chrome or click on the relevant button for your browser. Follow the instructions to install the extension.
Step 2: Set Up Your Metamask Wallet
Once the extension is installed, you will see the Metamask fox icon in your browser toolbar. Click on the icon to open the Metamask interface.
Click on the “Get Started” button and then select “Create a Wallet”. Enter a strong password for your wallet and click continue. Make sure to choose a password that you will remember but is also secure.
Next, you will be shown a recovery phrase. This is an important piece of information that you can use to restore your account if you ever lose access to your device. Write down the recovery phrase and keep it in a safe place. Do not share it with anyone.
Step 3: Confirm Your Recovery Phrase
In order to confirm your recovery phrase, Metamask will ask you to select certain words from the list in the correct order. This is a security measure to ensure that you have recorded your recovery phrase correctly. Select the words according to the instructions and click on the “Confirm” button.
Once you have confirmed your recovery phrase, your Metamask account will be created. You can now use it to connect to Uniswap and other Ethereum-based applications.
| Tip: | You can also use an existing Metamask account if you already have one. Simply click on the Metamask fox icon, select “Import Account”, and follow the instructions to import your account using your recovery phrase or private key. |
Adding Funds to Metamask Wallet
Before you can start using the Metamask wallet to interact with Uniswap, you’ll need to add funds to your wallet. Follow these steps to add funds to your Metamask wallet:
Step 1: Get Ether (ETH)
In order to add funds to your Metamask wallet, you’ll need some Ether (ETH), which is the native cryptocurrency of the Ethereum network. If you don’t already have Ether, you can purchase it from a cryptocurrency exchange or obtain it from someone who already has Ether.
Step 2: Copy your Metamask wallet address
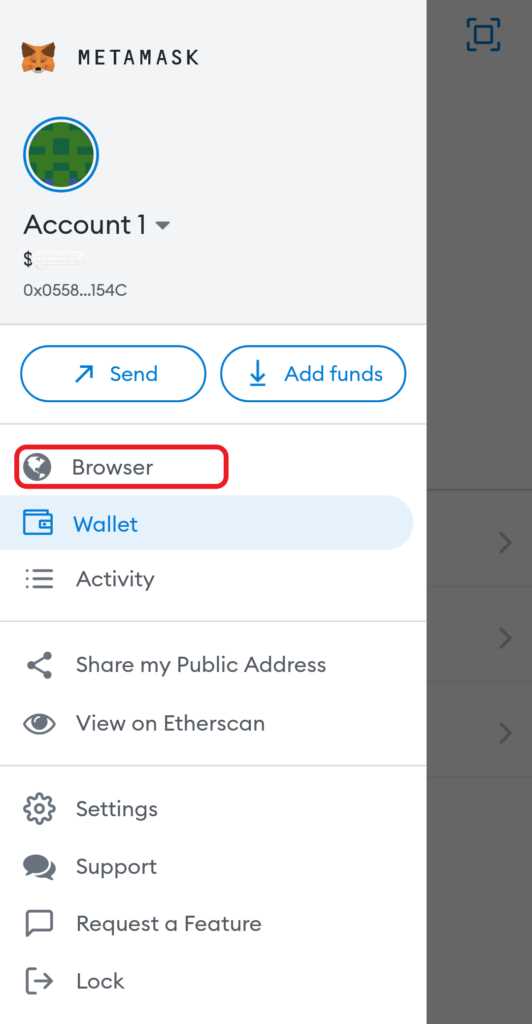
Open your Metamask wallet and copy your wallet address. This is a long string of characters that uniquely identifies your wallet on the Ethereum network. To copy your address, click on the account icon in the top right corner of the Metamask plugin and select “Copy Address” in the dropdown menu.
Step 3: Send Ether to your Metamask wallet
Go to the cryptocurrency exchange or wallet where you have Ether. Follow the instructions provided by the exchange or wallet to send Ether to your Metamask wallet. When prompted for the recipient address, paste your Metamask wallet address that you copied in Step 2.
Step 4: Confirm the transaction
After submitting the transaction to send Ether to your Metamask wallet, you’ll need to confirm the transaction. Depending on the exchange or wallet you’re using, this may involve entering a verification code, confirming the transaction on your mobile device, or other security measures.
Step 5: Wait for the transaction to be confirmed
Once you confirm the transaction, you’ll need to wait for it to be confirmed by the Ethereum network. This process can take a few minutes to a few hours, depending on network congestion. You can track the progress of your transaction by clicking on the transaction hash in your exchange or wallet.
Step 6: Check your Metamask wallet balance
After the transaction is confirmed, the Ether will be added to your Metamask wallet. You can check your wallet balance by opening the Metamask plugin in your browser and looking at the “Assets” tab. Your balance will be displayed next to the Ether logo.
Congratulations! You have successfully added funds to your Metamask wallet. Now you can use these funds to interact with Uniswap and other decentralized applications on the Ethereum network.
| Step | Description |
|---|---|
| Step 1 | Get Ether (ETH) |
| Step 2 | Copy your Metamask wallet address |
| Step 3 | Send Ether to your Metamask wallet |
| Step 4 | Confirm the transaction |
| Step 5 | Wait for the transaction to be confirmed |
| Step 6 | Check your Metamask wallet balance |
Connecting Metamask to Uniswap
If you’re new to the world of decentralized finance (DeFi), you might be wondering how to connect your Metamask wallet to Uniswap. Luckily, the process is simple and straightforward, allowing you to trade and interact with the Uniswap platform seamlessly.
Follow these step-by-step instructions to connect Metamask to Uniswap:
Step 1: Install and Set Up Metamask
If you haven’t already, download and install the Metamask extension for your preferred web browser. Once installed, create a new wallet by following the prompts provided. Make sure to securely save your seed phrase to restore your wallet if needed.
Step 2: Fund Your Metamask Wallet
Before you can start trading on Uniswap, you’ll need to have some cryptocurrency in your Metamask wallet. Purchase or transfer Ethereum (ETH) or any other supported tokens to your wallet’s public address.
Step 3: Open Uniswap
Visit the Uniswap website (https://app.uniswap.org/) or the decentralized exchange (DEX) platform of your choice that is built on the Uniswap protocol.
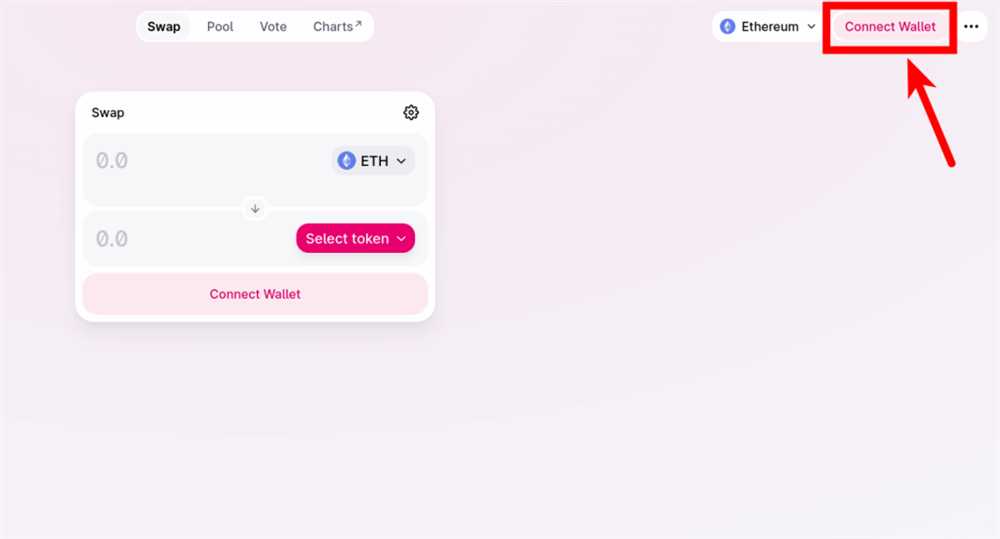
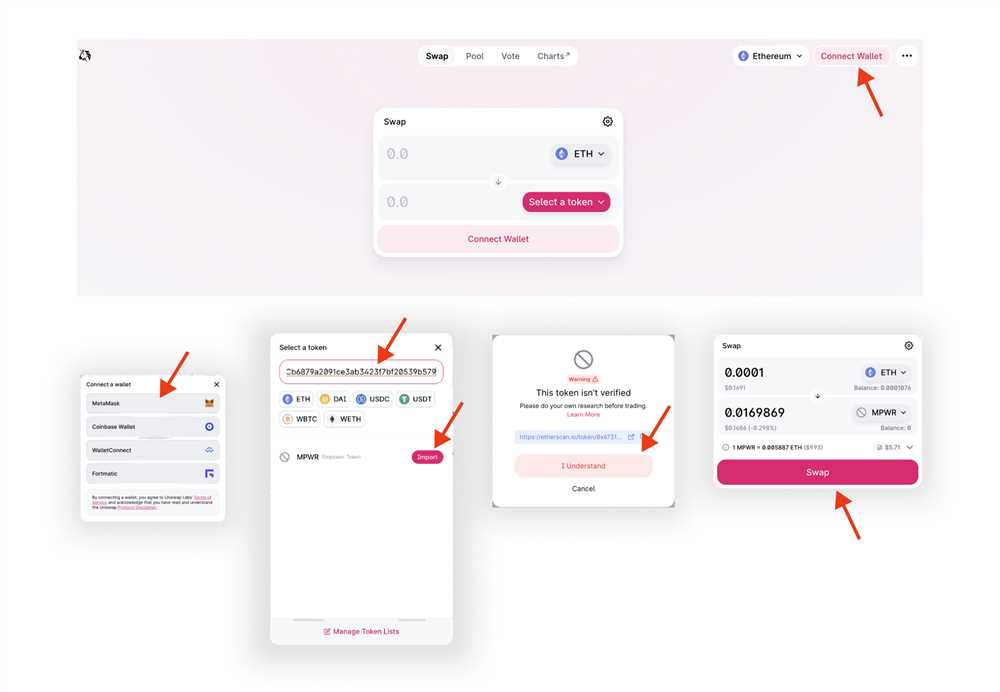
Step 4: Connect Metamask
Click on the “Connect Wallet” or similar button on the Uniswap interface. A pop-up menu will appear, showing available wallet options. Select “Metamask” from the list.
Step 5: Authorize Uniswap
After selecting Metamask, you’ll be prompted to authorize the connection between your wallet and Uniswap. Review the permissions requested, such as the ability to view and manage your wallet balance, and click “Connect” to proceed.
Step 6: Confirm the Connection
Metamask will pop up, asking you to confirm the connection to Uniswap. Review the details, such as the website URL, and click “Connect” to establish the connection.
Step 7: Start Trading on Uniswap
With Metamask successfully connected to Uniswap, you can now start trading on the platform. You’ll have access to various trading pairs, liquidity pools, and other features offered by Uniswap and its associated DEXs.
Remember to always exercise caution when using DeFi platforms and only invest what you can afford to lose. Stay informed about the latest developments and security best practices to protect your assets.
Disclaimer: The instructions provided in this guide are for informational purposes only and do not constitute financial advice. Always do your own research and consult with a professional before making any investment decisions.
Frequently Asked Questions:
What is Metamask?
Metamask is a browser extension that serves as a digital wallet, allowing users to manage and interact with decentralized applications on the Ethereum blockchain.
How do I install Metamask?
To install Metamask, you need to go to the official website and download the extension for your preferred browser. Once downloaded, follow the installation instructions provided by Metamask.
+ There are no comments
Add yours