


Welcome to the Beginner’s Guide to Connecting and Using Metamask! If you are new to the world of blockchain, cryptocurrencies, and decentralized applications, Metamask is a great tool to get started. Whether you want to interact with decentralized exchanges, play blockchain games, or participate in token sales, Metamask is the gateway to the Ethereum ecosystem.
What is Metamask?
Metamask is a browser extension that allows you to manage your Ethereum wallet and interact with decentralized applications (DApps) directly from your web browser. It acts as a bridge between your browser and the Ethereum network, providing you with a secure and user-friendly way to connect to the decentralized web.
Connecting Metamask to your browser:
To start using Metamask, the first step is to install the extension on your preferred web browser. Metamask is available for Chrome, Firefox, Brave, and other popular browsers. Once installed, you will see the Metamask icon in your browser’s toolbar.
Creating a new wallet:
To use Metamask, you need to create a wallet. Click on the Metamask icon in your browser’s toolbar and follow the prompts to create a new wallet. Make sure to store your recovery phrase in a safe and offline location. This recovery phrase is the key to restoring your wallet in case you lose access to your device.
Connecting Metamask to Your Browser
To start using Metamask, you need to download and install it as an extension in your browser. Metamask currently supports Chrome, Firefox, Brave, and Edge. Here’s how you can connect Metamask to your browser:
- Open your browser and go to the official Metamask website.
- Click on the “Download” button to download the extension for your browser.
- Once the download is complete, click on the extension file to install Metamask.
- A pop-up window will appear asking for permission to add the extension to your browser. Click “Add Extension” to proceed.
- Once installed, you will see the Metamask icon added to your browser’s toolbar.
- Click on the Metamask icon to launch the extension.
- A welcome screen will appear with options to either import an existing wallet or create a new one.
- If you already have a wallet, click on “Import Wallet” and enter your recovery phrase or private key. If not, choose “Create a Wallet” to generate a new wallet.
- Follow the on-screen instructions to complete the wallet set up process.
Once you have successfully connected Metamask to your browser, you can start using it to access and interact with decentralized applications (dApps) on the Ethereum network. Make sure to keep your recovery phrase or private key secure, as it is the only way to access your wallet and funds.
Using Metamask for Ethereum Transactions
If you are new to Ethereum and want to start making transactions, Metamask is a great tool to use. With Metamask, you can easily connect to the Ethereum blockchain and interact with decentralized applications (dApps).
Here are the steps to use Metamask for Ethereum transactions:
- Install Metamask: First, you need to install the Metamask extension in your web browser. You can find the extension in the Chrome Web Store or Firefox Add-ons.
- Create a Metamask Account: Once Metamask is installed, click on the extension icon and follow the instructions to create a new account. Make sure to save your seed phrase and password in a secure place.
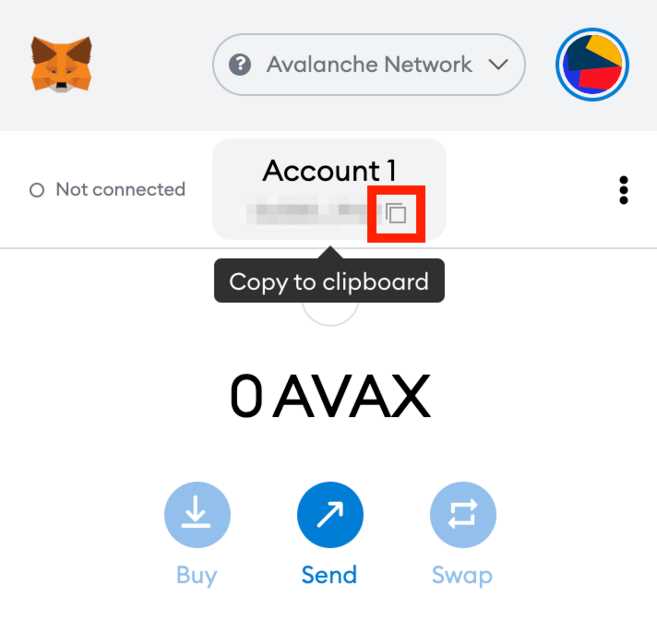
- Connect Metamask to a Network: After creating an account, you need to connect Metamask to the Ethereum network. Click on the network dropdown in the top center of the Metamask popup and select “Main Ethereum Network” to connect to the mainnet.
- Add Ethereum: To make transactions, you need to have Ethereum in your Metamask wallet. You can add Ethereum by clicking on the account dropdown in the top right corner of the Metamask popup and selecting “Buy” or “Deposit” to add funds.
- Interact with dApps: Once you have Ethereum in your Metamask wallet, you can start using decentralized applications. When you visit a dApp that requires Ethereum transactions, Metamask will automatically detect it and prompt you to confirm the transaction.
- Confirm Transactions: When prompted, review the transaction details carefully, including the recipient address and the amount of Ethereum being sent. Once you confirm the transaction, Metamask will sign it and broadcast it to the Ethereum network.
Using Metamask for Ethereum transactions is a convenient and secure way to interact with the Ethereum blockchain and participate in the decentralized ecosystem. Just remember to keep your seed phrase and password safe, as they are crucial for accessing your Metamask account.
Frequently Asked Questions:
Why do I need to use Metamask?
Metamask is a browser extension that allows you to interact with Ethereum-based applications, such as decentralized exchanges and dApps. It provides a convenient way to manage your Ethereum wallet and securely sign transactions.
How do I install Metamask?
To install Metamask, you need to go to the official Metamask website and download the extension for your preferred browser. Once downloaded, follow the installation instructions provided by the Metamask wizard.
How do I connect Metamask to a dApp?
To connect Metamask to a dApp, first make sure you have the Metamask extension installed and set up. Then, open the dApp in a supported browser (such as Chrome) and click on the Metamask icon in your browser toolbar. You will need to authorize the dApp to connect to your Metamask wallet, and you can then interact with the dApp using Metamask.
What should I do if I forget my Metamask password?
If you forget your Metamask password, unfortunately, there is no way to recover it. Metamask does not store or have access to your password or seed phrase. However, if you have your seed phrase backed up, you can restore your wallet by clicking on “Import using account seed phrase” on the Metamask login screen.
+ There are no comments
Add yours