


If you’re a cryptocurrency enthusiast, chances are you’re familiar with the popular Ethereum wallet, Metamask. With its user-friendly interface and robust security features, it has become a go-to choice for many individuals looking to store and manage their digital assets.
But what happens when you want to transfer your funds from Metamask to another platform, such as Coinbase? In this comprehensive guide, we’ll walk you through the step-by-step process of transferring your funds seamlessly and securely.
Step 1: Set up a Coinbase Account
Before you can transfer your funds from Metamask to Coinbase, you’ll need to create an account with Coinbase. Simply head to their website and click on the “Sign Up” button. Follow the prompts to provide your basic information, such as your name, email address, and password. Once you’ve successfully created your account, you’re ready to move on to the next step.
Note: Coinbase may require additional verification steps, such as providing a photo ID, to comply with KYC (Know Your Customer) regulations.
Step 2: Connect Metamask to Coinbase
Now that you have a Coinbase account, it’s time to connect it to your Metamask wallet. Open the Metamask extension in your browser and click on the account icon, usually located in the top right corner. From the dropdown menu, click on “Connect Wallet” and select “Coinbase Wallet.” Follow the prompts to complete the connection process.
Step 3: Transfer Funds from Metamask to Coinbase
With your Metamask and Coinbase accounts connected, you can now initiate the transfer of your funds. In your Metamask wallet, click on the “Send” button and enter your Coinbase wallet address as the recipient. Double-check the address to ensure it’s correct, as cryptocurrency transactions are irreversible.
Enter the amount of funds you wish to transfer and review the transaction details. Keep in mind that there may be network fees associated with the transfer, so it’s important to consider them when selecting the amount.
Once you’re satisfied with the transaction details, click on “Confirm” to initiate the transfer. Depending on network congestion, it may take some time for the transaction to be confirmed and reflected in your Coinbase wallet.
Step 4: Verify the Transfer
After the transfer is complete, it’s crucial to verify that the funds have successfully arrived in your Coinbase wallet. Open your Coinbase account and navigate to the wallet where you expect the funds to be. Check the balance to ensure it matches the amount you transferred from Metamask.
Congratulations! You’ve successfully transferred your funds from Metamask to Coinbase. Remember to keep your wallets and private keys secure at all times, as they grant access to your digital assets.
Disclaimer: This guide is for informational purposes only and should not be considered financial or investment advice. Always do your own research and consult with a qualified professional before making any financial decisions.
Step-by-Step Guide
Transferring funds from Metamask to Coinbase is a simple process that can be completed in a few easy steps. Follow this step-by-step guide to ensure a smooth transfer:
Step 1: Open Metamask
Make sure you have the Metamask browser extension installed and open it in your web browser.
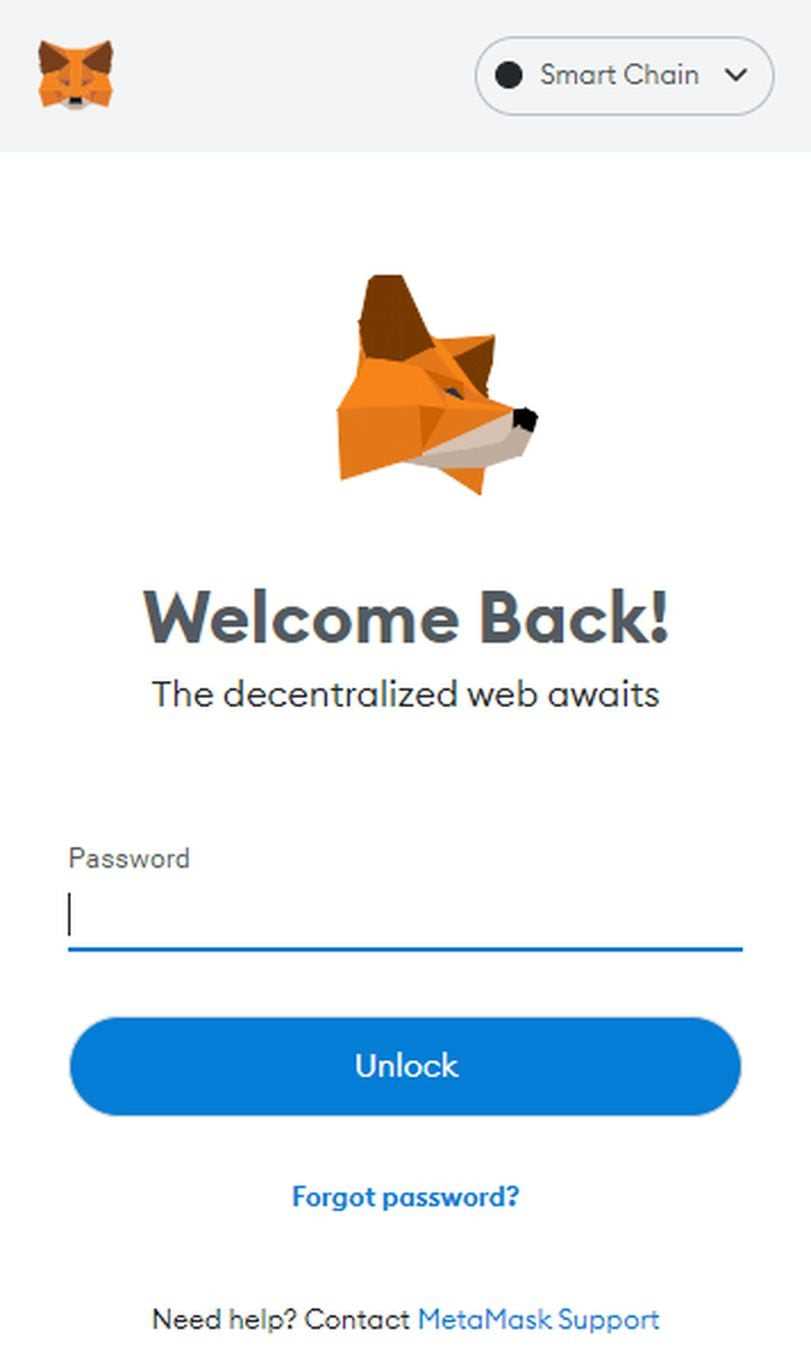
Step 2: Sign in and Unlock Your Wallet
Sign in to your Metamask wallet and unlock it using your password or other preferred authentication method.
Step 3: Navigate to the Send/Transfer Page
In the Metamask interface, locate and click on the “Send” or “Transfer” button to go to the transfer page.
Step 4: Enter the Recipient Address
On the transfer page, enter the recipient’s wallet address. If you are transferring funds to your Coinbase account, you can find the wallet address within your Coinbase account.
Step 5: Choose the Amount and Confirm the Transfer
Enter the amount of cryptocurrency you want to transfer and review the details of the transaction. Once you are satisfied with the information, click on the “Confirm” or “Send” button to initiate the transfer.
Step 6: Confirm the Transaction in Metamask
A pop-up window will appear in your Metamask wallet, asking you to confirm the transaction. Verify that the details are correct, including the recipient address and the amount, then click “Confirm” to proceed with the transfer.
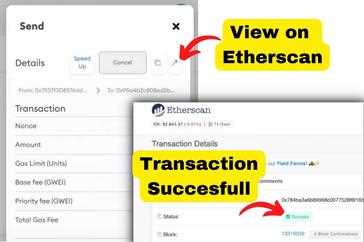
Step 7: Wait for Confirmation
After confirming the transaction, you will need to wait for the network to process it. This may take a few minutes to complete. You can monitor the progress of the transfer by checking the transaction details in your Metamask wallet.
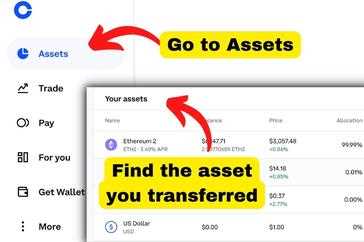
Step 8: Check Your Coinbase Account
Once the transfer is complete, check your Coinbase account to ensure that the funds have arrived. The transferred amount should now be available in your Coinbase wallet.
| Step | Description |
|---|---|
| Step 1 | Open Metamask |
| Step 2 | Sign in and Unlock Your Wallet |
| Step 3 | Navigate to the Send/Transfer Page |
| Step 4 | Enter the Recipient Address |
| Step 5 | Choose the Amount and Confirm the Transfer |
| Step 6 | Confirm the Transaction in Metamask |
| Step 7 | Wait for Confirmation |
| Step 8 | Check Your Coinbase Account |
Step 1: Connect Metamask to Coinbase
To transfer funds from your Metamask wallet to Coinbase, you first need to connect your Metamask wallet to your Coinbase account. Follow the steps below to complete this process:
- Install Metamask Extension: If you haven’t already, install the Metamask extension for your preferred browser.
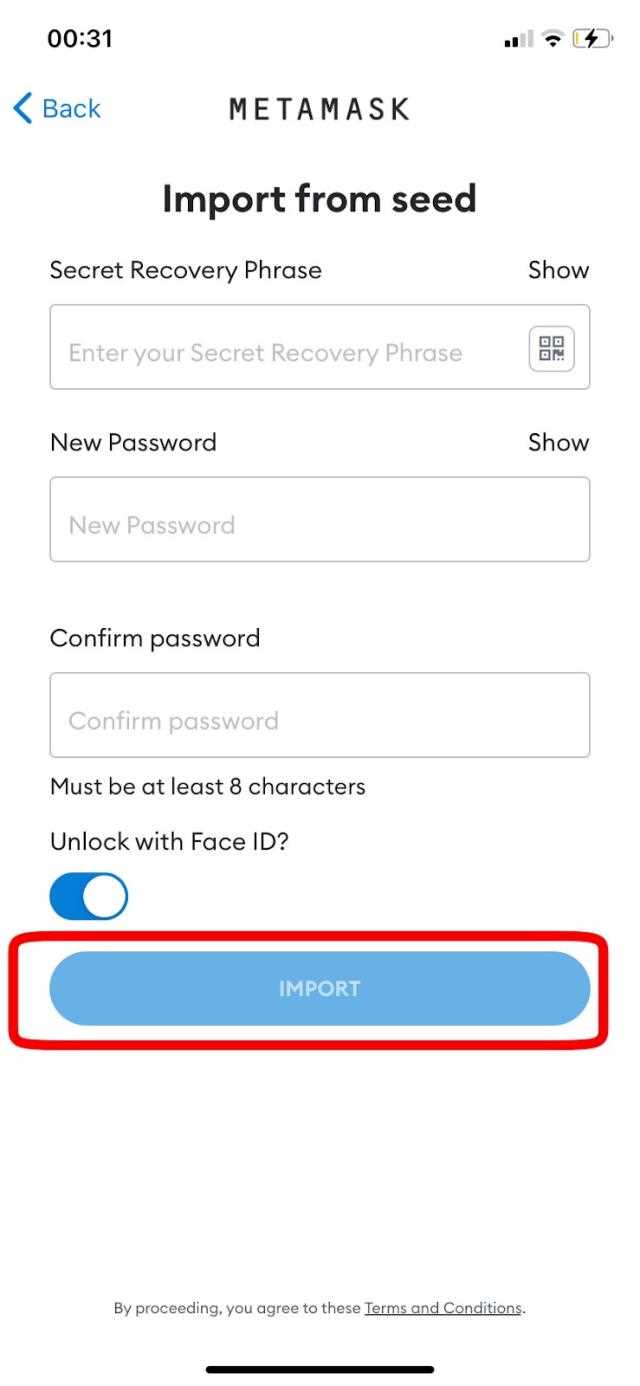
- Create a Metamask Wallet: Open Metamask and create a new wallet or import an existing one using your seed phrase.
- Access Coinbase: Log in to your Coinbase account.
- Go to Settings: In Coinbase, click on your profile picture in the top-right corner and select “Settings” from the dropdown menu.
- Choose Connected Accounts: In the Coinbase Settings, click on “Connected Accounts” from the left sidebar.
- Click on Connect Wallet: Under the “Connect Wallet” section, click on “Connect” next to Metamask.
- Authorize Connection: A pop-up window will appear from Metamask asking for authorization to connect. Click “Connect” to proceed.
- Confirm Connection in Metamask: Metamask will open and prompt you to confirm the connection. Click “Connect” to complete the process.
- Connection Successful: Once the connection is established, you will see a success message in both Coinbase and Metamask, confirming that they are now connected.
By following these steps, you have now successfully connected your Metamask wallet to your Coinbase account. You can now proceed with transferring funds from Metamask to Coinbase using the connected accounts.
Step 2: Verify Your Identity
Before you can transfer funds from your Metamask wallet to your Coinbase account, you’ll need to verify your identity on Coinbase. This is a standard procedure to ensure the security and compliance of their platform.
To verify your identity, follow these steps:
| 1. | Log in to your Coinbase account. |
| 2. | Click on your account name in the top right corner and select “Settings” from the dropdown menu. |
| 3. | Navigate to the “Identity Verification” section. |
| 4. | Click on the “Start Verification” button. |
| 5. | Follow the instructions on the screen to complete the verification process. |
During the verification process, you may be asked to provide personal information such as your full name, address, date of birth, and social security number. Coinbase takes privacy and security seriously, ensuring that your information is protected.
Once your identity is verified, you’ll be able to proceed with the fund transfer process from your Metamask wallet to your Coinbase account.
Step 3: Transfer Funds from Metamask to Coinbase
Once you have successfully set up your Metamask wallet and connected it to Coinbase, you are ready to transfer funds from Metamask to Coinbase. This step is crucial if you want to convert your cryptocurrencies into fiat currency or simply want to move your assets to a more centralized exchange.
3.1 Generate a Wallet Address on Coinbase
The first thing you need to do is generate a wallet address on Coinbase. This will serve as the destination address where you will send your funds from Metamask.
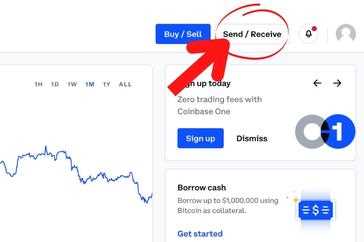
- Go to your Coinbase account and navigate to the “Accounts” tab.
- Select the cryptocurrency you want to transfer from Metamask.
- Click on the “Receive” button.
- A unique wallet address will be generated, which you can copy or scan using the QR code.
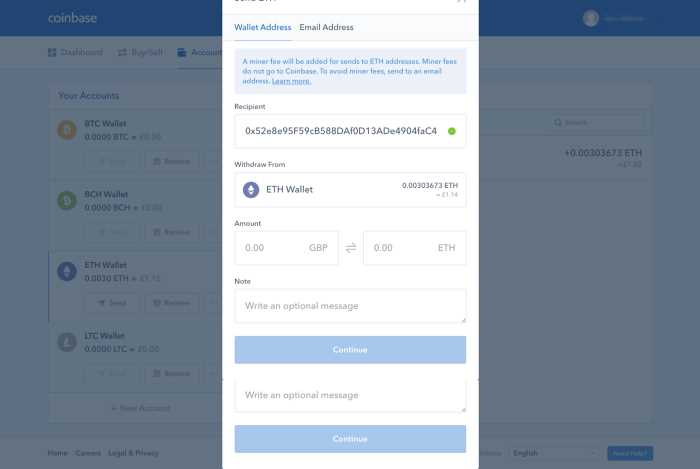
3.2 Transfer Funds from Metamask to Coinbase
Now that you have the wallet address from Coinbase, you can proceed to transfer your funds from Metamask.
- Open your Metamask wallet extension or app.
- Click on the “Send” button.
- Paste the Coinbase wallet address in the “Recipient Address” field.
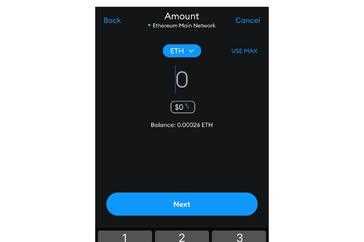
- Enter the amount of cryptocurrency you want to transfer.
- Double-check the wallet address and the amount to ensure accuracy.
- Review and confirm the transaction.
- Wait for the transaction to be confirmed on the blockchain.
- Once the transaction is confirmed, you will see the transferred funds in your Coinbase account.
It’s important to note that the transfer may take some time, depending on the network congestion and transaction fees. Make sure to keep an eye on the transaction status and confirmations.
That’s it! You have successfully transferred funds from Metamask to Coinbase. You can now choose to convert your cryptocurrencies into fiat currency or explore other trading options available on Coinbase.
Step 4: Confirm the Transaction
After reviewing all the details of your transaction, it’s important to confirm it before proceeding further. Take a moment to ensure that the recipient address and the amount you want to transfer are correct.
Follow these steps to confirm the transaction:
- On the transaction confirmation screen, carefully review all the details provided.
- Double-check the recipient address to make sure it matches the address of your Coinbase wallet.
- Verify that the transfer amount is accurate and reflects the funds you want to send.
- Check the gas fee associated with the transaction and ensure it’s reasonable.
- If everything looks good, click on the “Confirm” button to initiate the transfer.
It’s crucial to verify all the information and be certain of your actions before confirming the transaction. Once confirmed, the transfer cannot be reversed, and you’ll be responsible for any funds sent to the specified address.
Note: The confirmation process may vary slightly depending on the version of Metamask you’re using. However, the overall steps and information to review remain the same.
Tips and Considerations
When transferring funds from Metamask to Coinbase, there are a few tips and considerations to keep in mind:
- Double-check the addresses: Before initiating the transfer, make sure you have the correct addresses for both your Metamask wallet and your Coinbase account. Transferring funds to the wrong address can result in irreversible loss of funds.
- Check network fees: Ethereum network fees can fluctuate, so it’s advisable to check the current gas fees before initiating the transfer. Higher network fees can result in more expensive transactions.
- Consider transaction speed: Depending on the network congestion, the transfer from Metamask to Coinbase may take some time. If you need the funds to be available immediately, it’s important to factor in the transaction speed before initiating the transfer.
- Follow security best practices: Take the necessary security precautions, such as using a hardware wallet or ensuring that your computer is free from malware, to protect your funds during the transfer process.
- Keep track of transaction history: It’s a good practice to keep a record of your transaction history, including the transaction hash, date, and amount transferred. This can be useful for future reference or for troubleshooting in case of any issues.
- Consider tax implications: Depending on your jurisdiction, transferring funds between wallets or exchanges may have tax implications. It’s advisable to consult with a tax professional to understand the potential tax consequences before making any transfers.
By keeping these tips and considerations in mind, you can ensure a smooth and secure transfer of funds from Metamask to Coinbase.
Frequently Asked Questions:
What is Metamask?
Metamask is a digital wallet that allows users to store, manage, and interact with their Ethereum-based assets. It is also a browser extension that serves as a bridge between the user’s browser and the Ethereum blockchain.
How do I transfer funds from Metamask to Coinbase?
To transfer funds from Metamask to Coinbase, you first need to log in to your Metamask account and click on the “Send” button. Then, enter your Coinbase wallet address and the amount you want to transfer. Review the details and confirm the transaction. The funds will be sent to your Coinbase account.
What are the transaction fees for transferring funds from Metamask to Coinbase?
The transaction fees for transferring funds from Metamask to Coinbase depend on the current network congestion and the gas price you set for the transaction. Gas prices are typically measured in Gwei, and higher gas prices result in faster transaction confirmations but also higher fees. You can adjust the gas price in the Metamask settings to suit your needs.

+ There are no comments
Add yours