


If you are new to the world of cryptocurrency and are looking to send USDT to your Metamask wallet, you’ve come to the right place. Metamask is a popular digital wallet that allows you to securely store your Ethereum-based tokens, such as USDT. In this step-by-step guide, we will walk you through the process of sending USDT to your Metamask wallet.
Step 1: Ensure that you have a Metamask wallet set up and have your wallet address handy. If you don’t have a Metamask wallet, you can easily install it as a browser extension for Chrome or Firefox. Once installed, create a new wallet and securely store your wallet seed phrase.
Step 2: Find a reliable exchange or platform where you can buy USDT. There are several popular exchanges that support USDT, such as Binance, Coinbase, or Kraken. Sign up for an account and complete the necessary verification process.
Step 3: Deposit USDT into your exchange account. Depending on the platform, you may need to navigate to the “Deposit” section and select USDT as the currency. Follow the instructions provided to generate a deposit address for USDT.
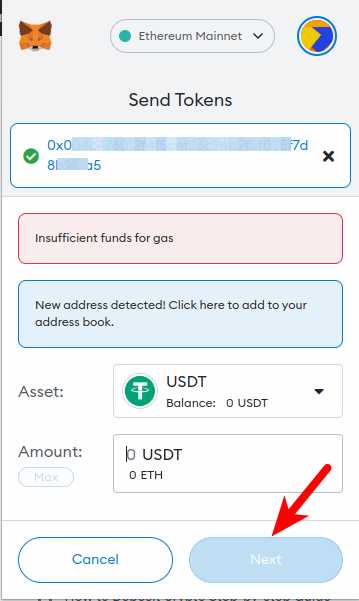
Step 4: Withdraw USDT from the exchange to your Metamask wallet. Go to the “Withdraw” or “Send” section of the exchange platform and choose USDT as the currency. Paste your Metamask wallet address in the appropriate field and specify the amount of USDT you wish to send. Double-check the address to ensure accuracy.
Step 5: Confirm the transaction. Before finalizing the transaction, the exchange may require you to verify your identity or enter a 2FA code. Once everything is in order, confirm the transaction and wait for the USDT to be sent to your Metamask wallet. This process can take some time, so be patient.
That’s it! You have successfully sent USDT to your Metamask wallet. You can now use your USDT for various transactions within the Ethereum ecosystem. Remember to always exercise caution when handling cryptocurrency and keep your wallet and seed phrase secure.
Step 1: Create a Metamask Wallet
The first step in sending USDT to your Metamask Wallet is to create a Metamask Wallet itself. Metamask is a popular Ethereum wallet that allows you to securely store and manage your cryptocurrencies.
To create a Metamask Wallet, follow these simple steps:
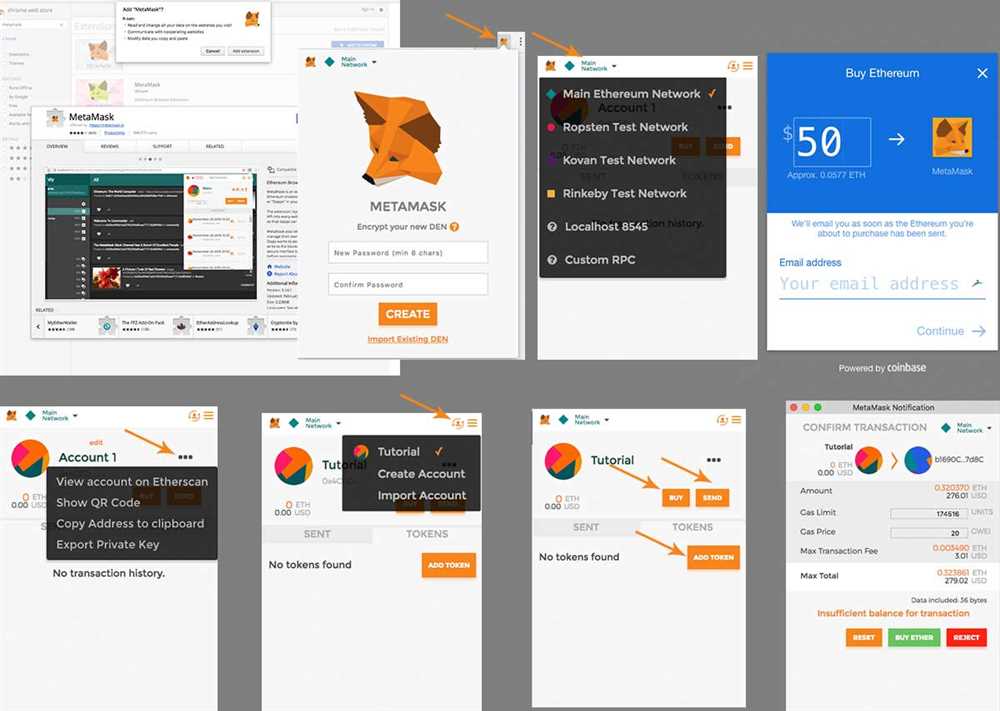
- Install the Metamask extension on your browser. Metamask is available for Chrome, Firefox, Brave, and Opera browsers. Simply go to the respective browser’s extension store and search for “Metamask”. Click on the “Add to [browser name]” button to install it.
- After the installation is complete, click on the Metamask extension icon, which usually appears as a colorful fox head. This will open a new tab with the Metamask setup wizard.
- On the setup wizard, click on the “Get Started” button to begin the wallet creation process.
- You will be presented with two options: “Create a Wallet” or “Import Wallet”. Choose the “Create a Wallet” option to create a new wallet.
- Enter a strong password for your wallet. Make sure to use a combination of uppercase and lowercase letters, numbers, and special characters to increase the security of your wallet.
- Click on the “Next” button to proceed.
- You will be presented with a secret backup phrase. This is a 12 or 24-word phrase that can be used to restore your wallet in case you lose access to it. It is crucial to write down this phrase and store it in a safe place. Click on the “Next” button after saving your backup phrase.
- On the next screen, you will be asked to confirm your backup phrase by selecting the correct words in the correct order. This is done to ensure that you have properly saved your backup phrase. Select the words as prompted and click on the “Confirm” button.
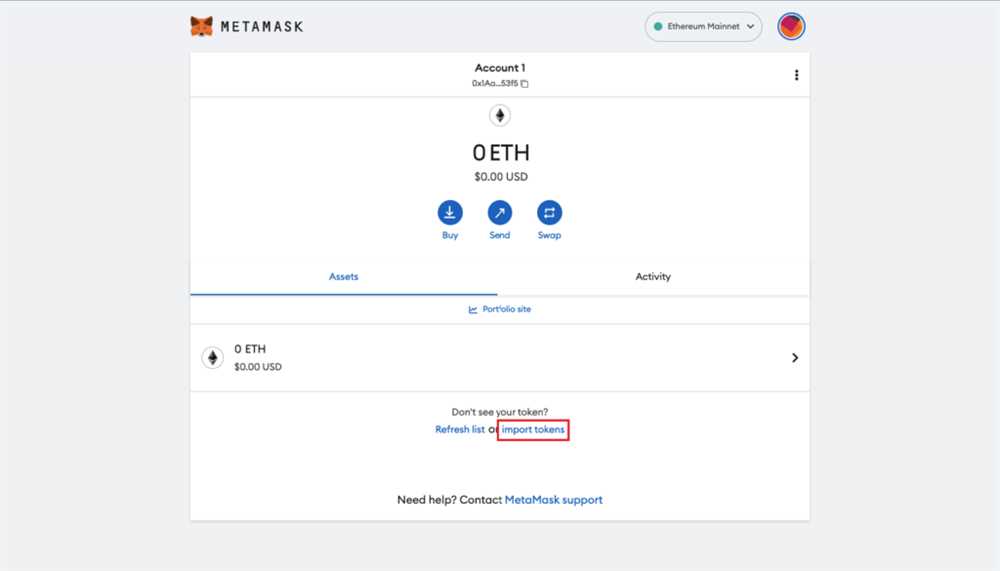
- Congratulations! You have successfully created your Metamask Wallet. You will now have access to your wallet dashboard, where you can view your account balance, send and receive cryptocurrencies, and perform various other wallet-related actions.
Once your Metamask Wallet is created, you can proceed to the next step of sending USDT to your wallet.
Step 2: Obtain USDT Tokens
Before you can send USDT to your Metamask wallet, you will need to obtain USDT tokens. Here are the steps to do so:
- Create an account on a cryptocurrency exchange: Choose a reputable cryptocurrency exchange that supports USDT. Some popular options include Binance, Coinbase, and Kraken. Follow the registration process and complete any necessary verification steps.
- Deposit funds: Once your account is set up, deposit funds into your exchange wallet. This can typically be done by transferring funds from your bank account or by depositing other cryptocurrencies and converting them to USDT.
- Buy USDT: Use the funds in your exchange wallet to purchase USDT. Look for the USDT trading pair on the exchange and place a buy order. Specify the desired amount of USDT you want to purchase and confirm the transaction.
- Withdraw USDT to your Metamask wallet: After your USDT purchase is complete, navigate to your exchange wallet and initiate a withdrawal. Enter your Metamask wallet address as the destination for the USDT tokens. Confirm the withdrawal and wait for the transaction to be processed.
Once the withdrawal is completed and the USDT tokens are successfully transferred to your Metamask wallet, you can proceed to the next step of sending USDT to your intended recipient.
Step 3: Transfer USDT to Metamask Wallet
Once you have successfully linked your Binance account to your Metamask wallet, you can proceed to transfer USDT to your Metamask wallet. Follow the steps below to transfer USDT:
- Open your Binance account and navigate to the “Wallet” section.
- Click on “Spot Wallet” and then select “USDT” from the list of available coins.
- Click on “Withdraw” next to the USDT balance.
- Enter your Metamask wallet address in the “Recipient’s USDT Address” field. Make sure to double-check the address to avoid any mistakes.
- Choose the desired network for the transaction. Metamask supports various networks, such as Ethereum and Binance Smart Chain. Select the network that matches your Metamask wallet.
- Enter the amount of USDT you wish to transfer to your Metamask wallet.
- Review the transaction details and click on “Submit” to initiate the withdrawal.
- Wait for the transaction to be confirmed on the blockchain. This process may take a few minutes, depending on the network congestion.
- Once the transaction is confirmed, you will see the USDT balance reflected in your Metamask wallet.
It is important to note that transaction fees may apply when transferring USDT from Binance to your Metamask wallet. Make sure to review the fee details before proceeding with the transfer.
Now that you have successfully transferred USDT to your Metamask wallet, you can proceed to use it within the Metamask ecosystem for various purposes, such as swapping for other cryptocurrencies or participating in decentralized finance (DeFi) protocols.
Frequently Asked Questions:
What is USDT?
USDT (Tether) is a type of cryptocurrency that is pegged to the value of the US dollar. It is commonly used as a stablecoin in the cryptocurrency world.
Why would I want to send USDT to my Metamask wallet?
Sending USDT to your Metamask wallet allows you to store and manage your USDT in a secure and convenient way. It also enables you to use your USDT for transactions and interactions with various decentralized applications (dApps) on the Ethereum network.
+ There are no comments
Add yours