


Welcome to the Guide to Setting Up BSC Metamask! In this tutorial, we will walk you through the step-by-step process of setting up your Metamask wallet to interact with the Binance Smart Chain (BSC). Metamask is a popular browser extension wallet that allows you to securely manage and interact with decentralized applications (dApps) on the Ethereum network, and with a few simple steps, you can configure it to work with BSC as well!
Why would you want to do this? Well, BSC offers several advantages over Ethereum, including lower transaction fees and faster confirmation times. By setting up Metamask for BSC, you can take advantage of these benefits and access a wide range of dApps and services that are being built on the BSC ecosystem.
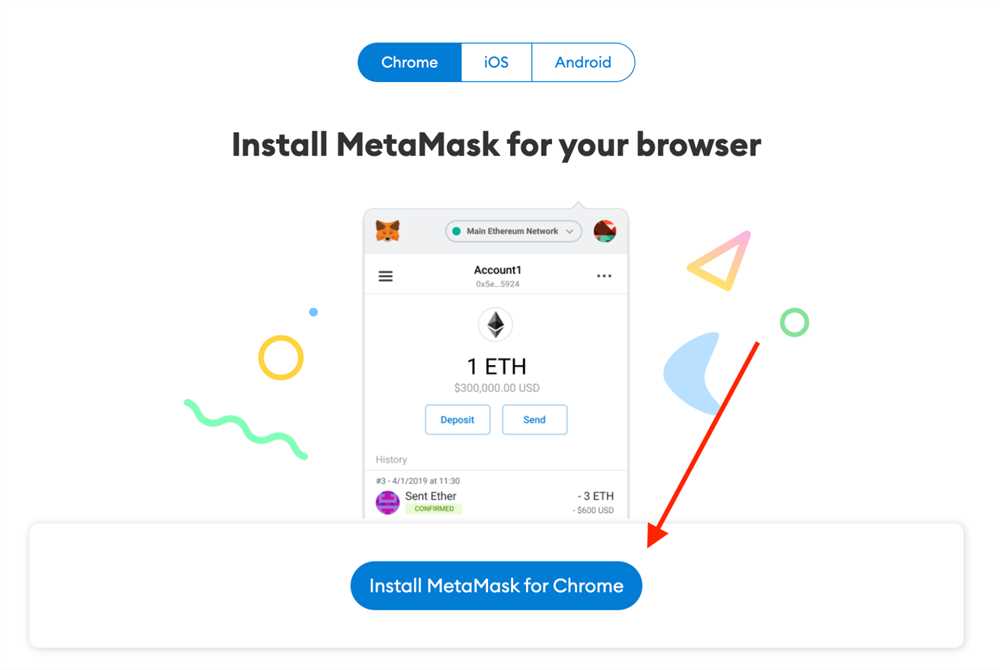
To get started, you will need to have Metamask installed in your browser. If you don’t already have it, you can download it from the official Metamask website and follow the installation instructions for your specific browser.
Once you have Metamask installed, you will need to configure it to connect to the BSC network. Don’t worry, it’s a straightforward process, and we will guide you through each step. Let’s dive in!
A Step-by-Step Guide on How to Set Up BSC Metamask
Setting up BSC Metamask is a crucial step for anyone looking to interact with the Binance Smart Chain (BSC) ecosystem. This guide will walk you through the process of setting up BSC Metamask on your computer.
Step 1: Install the Metamask Browser Extension
Before you can set up BSC Metamask, you’ll need to have the Metamask browser extension installed on your computer. Visit the Metamask website and download the extension for your preferred web browser. Once the extension is installed, click on the Metamask icon in your browser toolbar to open the extension.
Step 2: Create or Import a Wallet
After opening the Metamask extension, you’ll be prompted to either create a new wallet or import an existing one. If you don’t have a wallet, click on “Create a Wallet” and follow the instructions to set up a new wallet. If you already have a Metamask wallet and want to import it, click on “Import Wallet” and enter your seed phrase or private key.
Step 3: Connect Metamask to the Binance Smart Chain
With your wallet set up or imported, you’re now ready to connect Metamask to the Binance Smart Chain. In the Metamask extension, click on the network dropdown menu located at the top of the window and choose “Custom RPC.” In the RPC URL field, enter “https://bsc-dataseed1.binance.org” and click “Save.”
Step 4: Add Binance Smart Chain Tokens
After connecting Metamask to the Binance Smart Chain, you’ll need to add BSC tokens to your wallet. Click on the “Add Token” button in the Metamask extension, and in the token contract address field, enter the contract address of the BSC token you want to add. Once the token is added, you’ll be able to see your BSC tokens in your Metamask wallet.
Step 5: Test the Connection

Before you start using BSC Metamask for transactions or interacting with dApps on the Binance Smart Chain, it’s important to test the connection. Visit a BSC testnet dApp or website, such as PancakeSwap on the BSC Testnet, and make sure you can connect your Metamask wallet and perform basic functions like checking your wallet balance.
That’s it! You’ve now successfully set up BSC Metamask on your computer. You can now begin exploring the Binance Smart Chain ecosystem and enjoying the benefits it has to offer.
Installing Metamask
To start using the Binance Smart Chain (BSC) with your browser, you first need to install the Metamask wallet extension. Metamask is a popular web3 wallet that allows you to interact with decentralized applications (DApps) on the Ethereum network and now on the BSC network as well.
Step 1: Install the Metamask Extension
- Open your preferred web browser (Metamask supports Chrome, Firefox, Brave, and Edge).
- Go to the official Metamask website at https://metamask.io.
- Click on the “Get Chrome Extension” or “Get Firefox Extension” button, depending on your browser.
- Follow the on-screen instructions to install the Metamask extension.
- After the installation is complete, you will see the Metamask icon added to your browser’s toolbar.
Step 2: Set Up Metamask
Once you have installed the Metamask extension, follow these steps to set it up:
- Click on the Metamask icon in your browser’s toolbar.
- A new tab will open with the Metamask welcome screen. Click on the “Get Started” button.
- You will be presented with two options: “Import Wallet” or “Create a Wallet.” Choose the option that suits you best.
- If you choose to create a new wallet, follow the prompts to create a strong password and write down the secret backup phrase.
- If you choose to import an existing wallet, enter your recovery phrase or private key when prompted.
- Once you have set up or imported your wallet, you can customize your account name and profile picture.
- Review and accept the terms of use.
- Congratulations! You have successfully installed and set up Metamask.
With Metamask installed, you can now connect it to the Binance Smart Chain network and start making transactions and interacting with BSC DApps.
Creating a Wallet
In order to set up a BSC Metamask wallet, you will need to follow these steps:
- Open your browser and go to the Metamask website.
- Click on the “Get Chrome Extension” button.
- Click on the “Add to Chrome” button to add the Metamask extension to your browser.
- Once the extension is added, you will see the Metamask fox icon in your browser toolbar. Click on the icon to open Metamask.
- Click on the “Get Started” button to begin the wallet creation process.
- Read and accept the terms of use by clicking on the “Accept” button.
- Create a strong and unique password for your wallet. Make sure to save this password in a safe place, as it cannot be recovered if lost.
- Click on the “Create” button to proceed.
- You will be presented with a secret backup phrase. This backup phrase is extremely important as it can be used to restore your wallet in case of device loss or failure. Write down the backup phrase and keep it in a safe and secure location.
- Confirm the backup phrase by selecting the words in the correct order.
- Click on the “Confirm” button to finalize the backup phrase setup.
- Your wallet is now set up and ready to be used. You can now proceed to fund your wallet and start using it for BSC transactions.
It’s important to note that setting up a wallet requires careful attention to security measures. Make sure to follow best practices such as enabling two-factor authentication and regularly updating your password to ensure the safety of your funds.
Connecting to Binance Smart Chain
In order to connect your MetaMask wallet to the Binance Smart Chain (BSC), you will need to follow these steps:
Step 1: Install MetaMask Extension
If you haven’t already, download and install the MetaMask browser extension from the official website. Once installed, create a new MetaMask wallet or import an existing one.
Step 2: Switch Network to BSC Mainnet

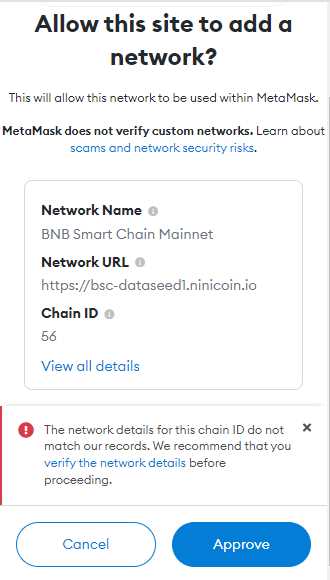
Open your MetaMask wallet and click on the network selection dropdown (usually displaying “Ethereum Mainnet”). Scroll down and click on “Custom RPC”.
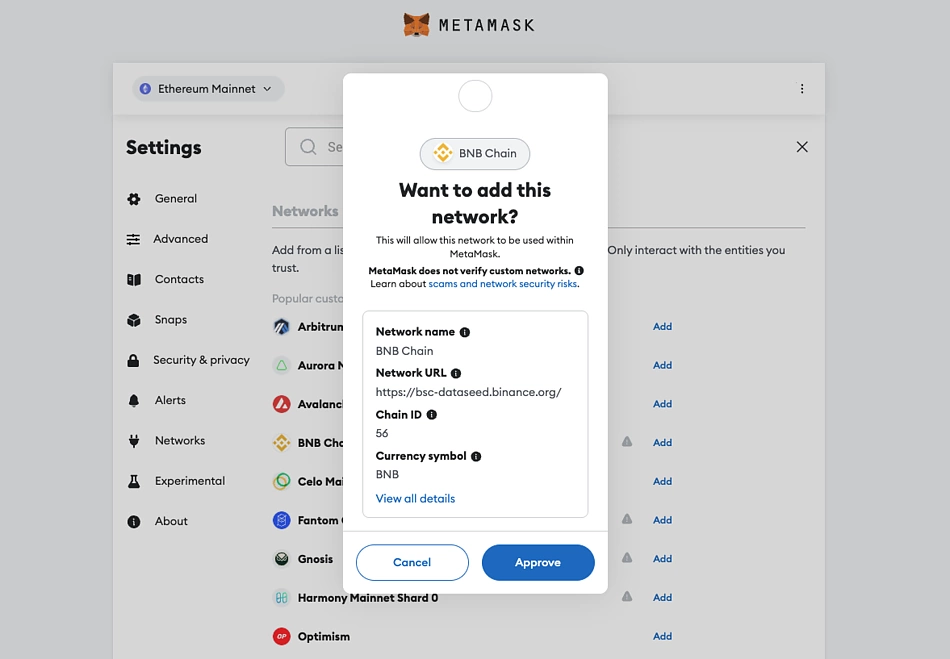
Now, fill in the following information to connect to the BSC Mainnet:
- Network Name: Binance Smart Chain
- New RPC URL: https://bsc-dataseed1.binance.org/ (or choose any other available RPC URL)
- ChainID: 56
- Symbol: BNB
- Block Explorer URL: https://bscscan.com/
Click “Save” to finish adding the BSC Mainnet to your MetaMask wallet.
Step 3: Add BNB to Your Wallet
In order to interact with the Binance Smart Chain, you will need some BNB (Binance Coin) in your wallet. You can obtain BNB by purchasing it on a cryptocurrency exchange and sending it to your MetaMask wallet address on the BSC network.
Once you have completed these steps, your MetaMask wallet will be connected to the Binance Smart Chain. You can now start interacting with the various decentralized applications (Dapps) and tokens available on the BSC network.
Adding BSC Tokens to Metamask
Once you have set up Metamask on the Binance Smart Chain (BSC) network, you can start adding BSC tokens to your Metamask wallet. Here’s how:
- Open your Metamask wallet extension in your browser.
- Click on the network dropdown menu at the top of the page and select “Binance Smart Chain” if it’s not already selected.
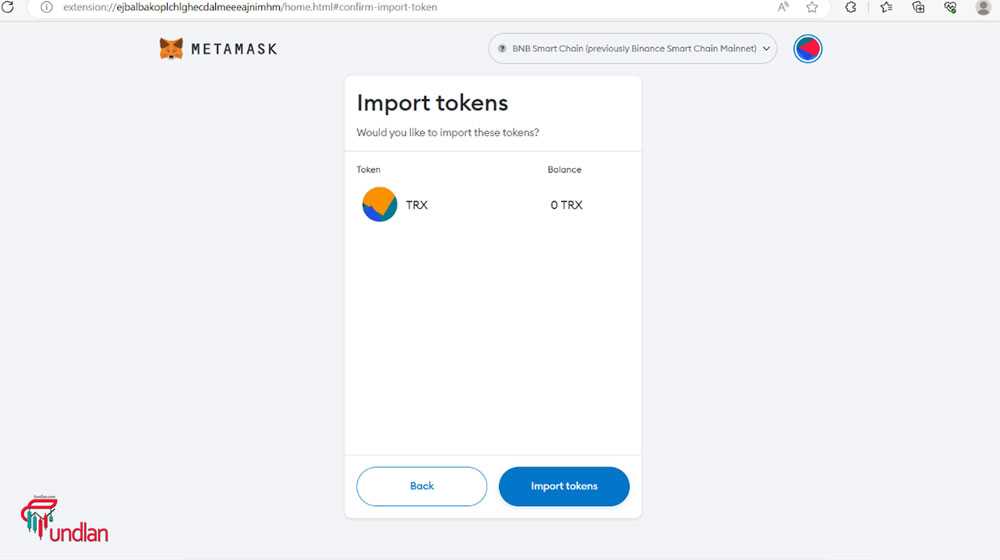
- Click on the “Add Token” button on the main wallet page.
- A new window will pop up. Choose the “Custom Token” tab.
- In the “Token Contract Address” field, enter the contract address of the BSC token you want to add. You can find this address on the token’s website or through a token explorer like BscScan.
- Metamask will automatically fill in the token details like token symbol and decimal places. If it doesn’t, you can manually enter this information. Then click on the “Next” button.
- Review the token details and click on the “Add Tokens” button.
- The BSC token will now appear in your Metamask wallet under the “Assets” tab.
Repeat these steps for each BSC token you want to add to your Metamask wallet. Adding BSC tokens allows you to easily manage and interact with your BSC assets within Metamask.
Frequently Asked Questions:
What is BSC Metamask?
BSC Metamask is a browser extension that allows users to interact with the Binance Smart Chain (BSC). It allows users to securely store their BSC assets and execute transactions on the BSC network.
How do I set up BSC Metamask?
To set up BSC Metamask, you first need to install the Metamask browser extension. Once installed, create a new wallet or import an existing one. Then, click on the network selection dropdown and select “Custom RPC.” Enter the BSC network details, including the RPC URL and Chain ID. Finally, click “Save” to save the BSC network settings.
What are the benefits of using BSC Metamask?
There are several benefits of using BSC Metamask. First, it allows users to connect with the Binance Smart Chain, which offers lower transaction fees compared to Ethereum. Second, it provides a secure wallet to store BSC assets. Third, BSC Metamask supports various decentralized applications (DApps) on the BSC network, allowing users to easily interact with them. Overall, BSC Metamask enhances the user experience and functionality when using the Binance Smart Chain.
+ There are no comments
Add yours