


Are you a website owner looking to expand your payment options and attract more customers? With the rising popularity of cryptocurrencies, integrating Metamask support into your website can open up a whole new world of possibilities. In this simple guide, we will walk you through the process of adding Metamask support to your website for seamless crypto transactions.
What is Metamask?
Metamask is a browser extension that allows users to manage their Ethereum wallet and interact with decentralized applications on the Ethereum blockchain. It provides a secure and user-friendly interface for storing, sending, and receiving Ether and ERC-20 tokens. By adding Metamask support to your website, you enable your users to make crypto transactions directly from their wallets, without the need for any third-party intermediaries.
Why should you add Metamask support to your website?
There are several reasons why adding Metamask support to your website is beneficial. Firstly, it allows you to tap into the growing crypto market and cater to users who prefer making transactions with cryptocurrencies. By offering this payment option, you can attract a wider audience and potentially increase your customer base.
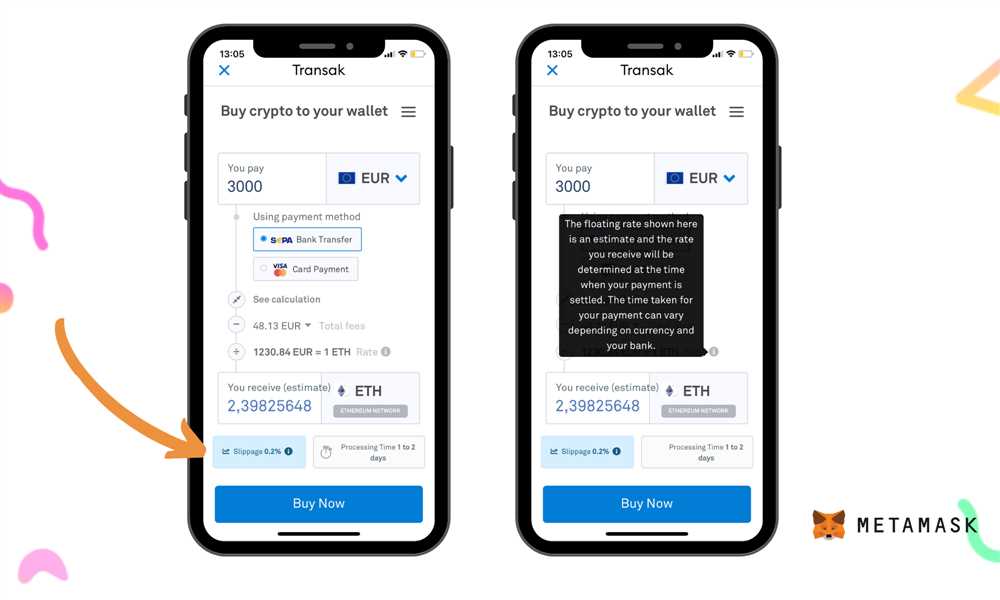
In addition, integrating Metamask support simplifies the payment process for your users. They can make transactions directly from their wallets, eliminating the need to enter credit card details or other sensitive information. This enhances security and privacy, giving your users peace of mind when making payments on your website.
Ready to get started with adding Metamask support to your website? Stay tuned for our next installment, where we will guide you through the step-by-step process!
The Importance of Metamask Support for Crypto Transactions
Metamask support is essential for facilitating secure and convenient crypto transactions on your website. As the popularity of cryptocurrencies continues to rise, so does the need for a reliable and user-friendly way for individuals to interact with these digital assets.
By integrating Metamask into your website, you enable users to connect their Ethereum wallets directly to your platform. This eliminates the need for users to manually copy and paste wallet addresses or use external wallet applications.
Enhanced Security
One of the primary benefits of integrating Metamask support is enhanced security. Metamask provides users with a secure environment to manage their private keys and interact with dApps (decentralized applications). With Metamask, users can authenticate transactions by approving them within the extension, significantly reducing the risk of fraudulent activities.
By utilizing Metamask, you can minimize the chances of phishing attacks or malware compromising sensitive information. Users can rest assured that their wallet details and transactions remain private as they engage with your website.
Improved User Experience
Metamask simplifies the crypto transaction process by streamlining the user experience. With Metamask, users can easily connect their Ethereum wallets to your website without the hassle of manual input or multiple authentication steps.
By eliminating the barriers to entry, you make it more convenient for users to transact on your platform. This frictionless experience can lead to increased user adoption and engagement.
| Benefits of Metamask Support |
|---|
| Enhanced security |
| Streamlined user experience |
| Reduced potential for errors |
| Seamless integration with dApps |
| Increased trust and credibility |
By incorporating Metamask support into your website, you demonstrate your commitment to providing a secure and user-friendly environment for crypto transactions. This can help build trust among your users and establish your platform as a reputable destination for engaging with cryptocurrencies.
Understanding Metamask and its Benefits

Metamask is a popular browser extension that enables users to interact with decentralized applications (DApps) on the Ethereum blockchain. It acts as a digital wallet, allowing users to store, manage, and transfer their cryptocurrency assets securely.
One of the main benefits of using Metamask is its ease of use. It provides a user-friendly interface that simplifies the process of interacting with DApps. With just a few clicks, users can connect their wallets to a website and start engaging in various crypto transactions.
Metamask also prioritizes security. It utilizes a hierarchical deterministic (HD) wallet approach, meaning that a single seed phrase can generate multiple unique addresses. This helps protect users’ funds by minimizing the risk of address reuse and making it harder for hackers to gain unauthorized access.
In addition to security, Metamask offers privacy. It allows users to browse the decentralized web without revealing their identity or personal information. When making transactions or interacting with DApps, users have control over what data is shared, ensuring their privacy is maintained.
Another notable benefit of Metamask is its compatibility with various DApps and decentralized exchanges (DEXs). By supporting standards like ERC-20 and ERC-721, Metamask enables users to participate in token sales, trade different cryptocurrencies, and access a wide range of decentralized services.
Furthermore, Metamask empowers developers by providing them with an API that allows them to integrate Metamask functionalities into their own applications. This makes it easier for developers to create DApps and enables seamless integration with Metamask wallets.
In conclusion, Metamask is a powerful tool that simplifies the process of interacting with the Ethereum blockchain. Its ease of use, security, privacy features, and compatibility with DApps make it a popular choice among crypto enthusiasts and developers alike.
Step-by-Step Guide to Adding Metamask Support to Your Website
If you want to integrate Metamask into your website for crypto transactions, follow these steps:
Step 1: Install Metamask
The first step is to ensure that both you and your users have Metamask installed. Metamask is a browser extension that allows users to interact with the Ethereum blockchain. To install it, go to the Metamask website and follow the instructions for your browser.
Step 2: Set Up a Web3 Provider
Once Metamask is installed, you need to set up a Web3 provider. Web3 is a JavaScript library that allows your website to interact with the Ethereum blockchain through Metamask. To set up a Web3 provider, include the following code snippet in the head section of your HTML:
<script src="https://cdn.jsdelivr.net/npm/web3@1.2.9/dist/web3.js"></script>
<script>
window.addEventListener('load', function() {
if (typeof web3 !== 'undefined') {
web3 = new Web3(web3.currentProvider);
} else {
// Handle the case where the user doesn't have Metamask installed
alert('Please install Metamask to use this feature');
}
});
</script>
Step 3: Connect to the Metamask Wallet
In order for your website to interact with the user’s Metamask wallet, you need to connect your website to it. Add a button or a link that triggers the connection process. When the user clicks on this button, call the ethereum.enable() method to request access to the user’s wallet. Here’s an example:
<button onclick="connectWallet()">Connect Metamask Wallet</button>
<script>
async function connectWallet() {
if (typeof ethereum !== 'undefined') {
try {
await ethereum.enable();
// The user has connected their wallet successfully
} catch (error) {
// Handle connection error
alert('An error occurred while connecting to the wallet');
}
} else {
// Handle the case where the user doesn't have Metamask installed
alert('Please install Metamask to use this feature');
}
}
</script>
Step 4: Handle Transactions
Now that your website is connected to the user’s Metamask wallet, you can handle transactions. When the user triggers a transaction, call the ethereum.send() method to send the transaction to the Ethereum blockchain. Here’s an example:
<button onclick="sendTransaction()">Send Transaction</button>
<script>
async function sendTransaction() {
if (typeof ethereum !== 'undefined') {
try {
const result = await ethereum.send({
method: 'eth_sendTransaction',
params: [{
from: ethereum.selectedAddress,
to: '0x...',
value: '0x...',
}],
});
// Transaction sent successfully
} catch (error) {
// Handle transaction error
alert('An error occurred while sending the transaction');
}
} else {
// Handle the case where the user doesn't have Metamask installed
alert('Please install Metamask to use this feature');
}
}
</script>
Step 5: Test and Deploy
Test your website with Metamask using the Rinkeby test network to ensure everything is functioning correctly. Once you’re satisfied with the results, deploy your website and make it available to your users.
Congratulations! You have successfully added Metamask support to your website for crypto transactions.
Testing and Troubleshooting Metamask Integration
Once you have integrated Metamask support into your website, it is important to thoroughly test and troubleshoot the integration to ensure a seamless user experience. Here are some steps you can follow:
1. Test with different browsers:
Metamask works best with certain browsers like Chrome and Firefox. Make sure to test your website’s Metamask integration on multiple browsers to ensure compatibility.
2. Check for error messages:
If something goes wrong during the Metamask integration process, it is important to check for any error messages. Metamask usually provides detailed error messages that can help you identify and fix the issue.
3. Confirm account connection:
Make sure that the user’s Metamask wallet is successfully connected to your website. You can display the wallet address or any other relevant information to confirm successful connection.
4. Test transactions:
Try initiating different types of transactions through your website, such as sending tokens or interacting with smart contracts. This will help you identify any issues with transaction handling or gas fee estimation.
5. Test error handling:
Simulate different error scenarios, such as insufficient funds or a failed transaction, to ensure that your website handles errors gracefully. Display informative messages to the user, guiding them on how to resolve the issue.
6. Seek community support:
If you are facing any difficulties or have questions regarding Metamask integration, don’t hesitate to reach out to the community. Metamask has an active community of developers who can provide guidance and support.
7. Keep up with updates:
Metamask frequently releases updates to improve security and functionality. Stay updated with the latest version of Metamask and make necessary adjustments to your integration accordingly.
Remember, testing and troubleshooting are crucial steps in ensuring a smooth user experience for your website’s Metamask integration. By thoroughly testing and addressing any issues that may arise, you can provide a seamless transaction experience for your users.
Best Practices for Ensuring a Smooth User Experience with Metamask
When integrating Metamask support into your website for crypto transactions, it’s important to consider the user experience to ensure a smooth and seamless process. Here are some best practices to follow:
- Provide clear instructions: Make sure to provide clear and concise instructions on how to install and set up Metamask. Include step-by-step guides or video tutorials to help users understand the process.
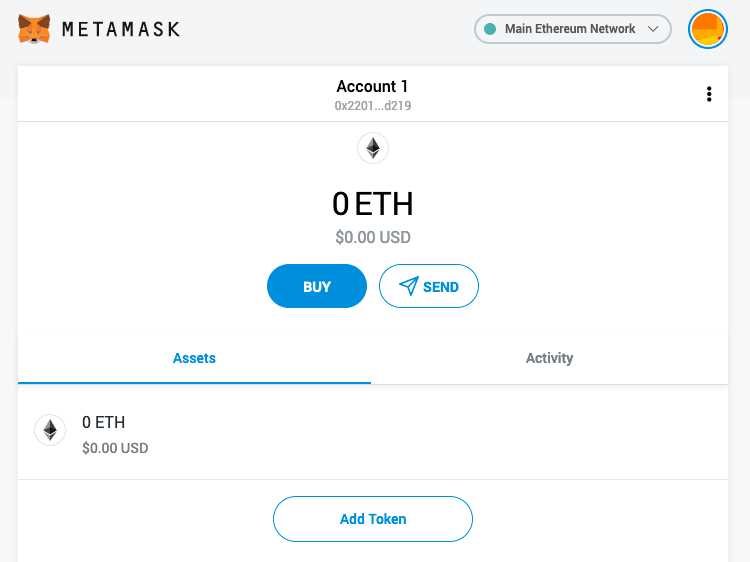
- Display relevant information: Show important information such as the current wallet address, balance, and transaction history. This keeps users informed about their account status and enhances transparency.
- Handle errors gracefully: Anticipate potential errors and handle them with informative error messages. Provide guidance on how to fix common issues, such as insufficient funds or network congestion.
- Perform regular testing: Test your website’s integration with Metamask on different browsers and devices to ensure compatibility and a consistent user experience. Fix any bugs or glitches that may arise.
- Optimize for mobile devices: Ensure that your website is mobile-friendly and responsive, so users can easily access and use Metamask on their smartphones or tablets. Adapt the layout and design to provide a seamless experience across all devices.
- Streamline the transaction process: Simplify the transaction process as much as possible. Minimize the number of steps required to complete a transaction and provide clear instructions on each step.
- Provide customer support: Offer support channels, such as email or live chat, where users can reach out for assistance. Promptly respond to inquiries and troubleshoot any issues to enhance user satisfaction.
- Educate users on security: Remind users about the importance of keeping their account secure. Provide information on best practices, such as enabling two-factor authentication and regularly updating passwords.
- Stay up to date with Metamask updates: Keep track of any updates or new features released by the Metamask team. Stay informed about changes to ensure that your integration remains compatible and up to date.
- Seek user feedback: Actively seek feedback from users to understand their experience with Metamask on your website. Utilize their input to make improvements and address any pain points they may encounter.
By following these best practices, you can create a user-friendly and seamless experience for your website users when using Metamask for crypto transactions.
Frequently Asked Questions:
What is Metamask?
Metamask is a cryptocurrency wallet that allows users to manage their digital assets and interact with decentralized applications (DApps) on the Ethereum blockchain.
How can I add Metamask support to my website?
To add Metamask support to your website, you need to integrate the Metamask JavaScript library and handle the logic for interacting with Ethereum and the user’s wallet.
+ There are no comments
Add yours