


Welcome to the step-by-step guide on how to add Avalanche, a decentralized platform for launching highly scalable and interoperable blockchains, to your Metamask wallet. By adding Avalanche to your wallet, you will have access to a wide range of applications and tokens built on the Avalanche network, allowing you to take advantage of its fast transactions and low fees.
Before we begin, please make sure you have the latest version of the Metamask wallet installed on your browser. If you haven’t installed Metamask yet, simply visit the official Metamask website and follow the instructions to set up your wallet. Once you have Metamask installed and set up, you’re ready to proceed with adding Avalanche.
To add Avalanche to your Metamask wallet, follow these simple steps:
Step 1: Launch your Metamask wallet by clicking on the extension icon in your browser toolbar. If you’re using Metamask on a mobile device, open the app.
Step 2: Once in your Metamask wallet, click on the network selection dropdown menu, usually located at the top of the interface. Select “Custom RPC” to manually add a new network.
Step 3: In the “New RPC URL” field, enter the following Avalanche network URL: https://api.avax.network/ext/bc/C/rpc. This URL will connect your wallet to the Avalanche network.
Step 4: Fill in the remaining fields with the following information:
- Chain ID: 43114
- Symbol: AVAX
- Block Explorer URL: https://cchain.explorer.avax.network/
Step 5: Click on the “Save” button to save the network settings and add Avalanche to your Metamask wallet. You should now see the Avalanche network listed in the network selection dropdown menu.
That’s it! You’ve successfully added Avalanche to your Metamask wallet. You can now start exploring the exciting world of Avalanche by interacting with Avalanche-based decentralized applications (dApps) and tokens. Enjoy the fast and secure transactions that Avalanche provides!
Why You Should Add Avalanche to Your Metamask Wallet
If you’re a cryptocurrency enthusiast, adding Avalanche to your Metamask wallet is definitely something you should consider. Here are a few reasons why:
1. Access to the Avalanche Ecosystem
By adding Avalanche to your Metamask wallet, you gain access to the Avalanche ecosystem. Avalanche is a fast, highly scalable blockchain platform that offers a wide range of decentralized applications (dApps) and financial services. By integrating Avalanche with your Metamask wallet, you can seamlessly interact with the Avalanche network and explore all that this ecosystem has to offer.
2. Diversify Your Portfolio

Adding Avalanche to your Metamask wallet allows you to diversify your cryptocurrency portfolio. Cryptocurrencies are known for their volatility, and having a diversified portfolio helps to minimize risk. By adding Avalanche, you can expose yourself to a different blockchain network and potentially benefit from the growth and success of Avalanche’s native token, AVAX.
3. Seamless Cross-Chain Interactions
Avalanche’s integration with Metamask enables seamless cross-chain interactions. With Avalanche added to your wallet, you can easily transfer assets between different blockchain networks directly from your Metamask interface. This makes it convenient to participate in various DeFi protocols and interact with dApps on both the Ethereum and Avalanche blockchains.
Adding Avalanche to your Metamask wallet is a simple process that can greatly expand your cryptocurrency horizons. It opens up opportunities to access new decentralized applications, diversify your portfolio, and enjoy seamless cross-chain interactions. So, why not get started and add Avalanche to your Metamask wallet today?
Step 1: Download and Install the Metamask Extension
To add Avalanche to your Metamask wallet, the first step is to download and install the Metamask extension. Metamask is a browser extension that allows you to interact with decentralized applications (dApps) on the blockchain.
To download and install the Metamask extension, follow these steps:
- Launch your preferred web browser.
- Navigate to the official Metamask website.
- Click on the “Get Chrome Extension” or “Get Firefox Extension” button, depending on your browser.
- You will be redirected to the Chrome Web Store or the Firefox Add-ons page.
- Click on the “Add to Chrome” or “Add to Firefox” button to initiate the installation process.
- Review the permissions and click on the “Add Extension” button.
- The Metamask extension will be added to your browser, and the Metamask icon will appear in the browser toolbar.
- Click on the Metamask icon to launch the extension.
- A welcome screen will appear. Read the terms and conditions, and then click on the “Accept” button to continue.
- Create a new wallet or import an existing wallet using your seed phrase or private key.
- Set a strong password to protect your wallet.
- Confirm your password, and you will be redirected to the main Metamask interface.
Congratulations! You have successfully downloaded and installed the Metamask extension. Next, you’ll need to configure Metamask to work with the Avalanche network.
Step 2: Create or Import an Avalanche-Compatible Wallet

Before you can start using Avalanche with your MetaMask wallet, you need to create or import an Avalanche-compatible wallet. Here are the steps to follow:
Create a New Avalanche Wallet
If you don’t have an Avalanche wallet yet, you can create one by following these steps:
- Open the MetaMask extension in your browser and make sure you are on the main screen.
- Click on the account avatar in the top right corner and select “Create Account.”
- Choose “Avalanche” as the network.
- A new wallet address will be generated for you automatically. Make sure to back up the recovery phrase provided by MetaMask to secure your wallet.
Import an Existing Avalanche Wallet
If you already have an Avalanche wallet and want to import it into MetaMask, follow these steps:
- Open the MetaMask extension in your browser and make sure you are on the main screen.
- Click on the account avatar in the top right corner and select “Import Account.”
- Select the option to import using a recovery phrase or private key.
- Enter your Avalanche recovery phrase or private key in the provided field.
- Choose a password for your imported wallet.
- Click on “Import” and your Avalanche wallet will be imported into MetaMask.
Once you have created or imported an Avalanche-compatible wallet into MetaMask, you can proceed to the next step to add Avalanche as a custom network.
Step 3: Connect Metamask to the Avalanche Network
Once you have installed the Metamask browser extension and created your wallet, the next step is to connect Metamask to the Avalanche network. This will allow you to interact with Avalanche decentralized applications (dApps) and manage your Avalanche assets.
Step 3.1: Open Metamask Settings
To connect Metamask to the Avalanche network, you need to open the Metamask settings. Click on the Metamask extension icon in your browser toolbar to open the Metamask window. Then, click on the profile icon at the top right corner of the Metamask window and select “Settings” from the dropdown menu.
Step 3.2: Network Selection
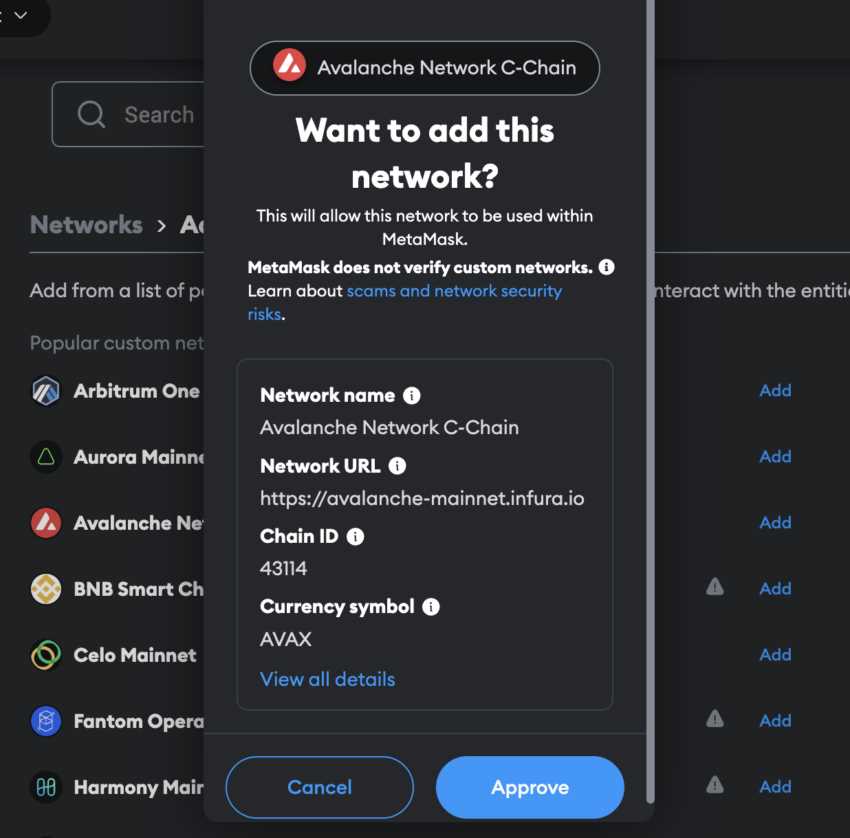
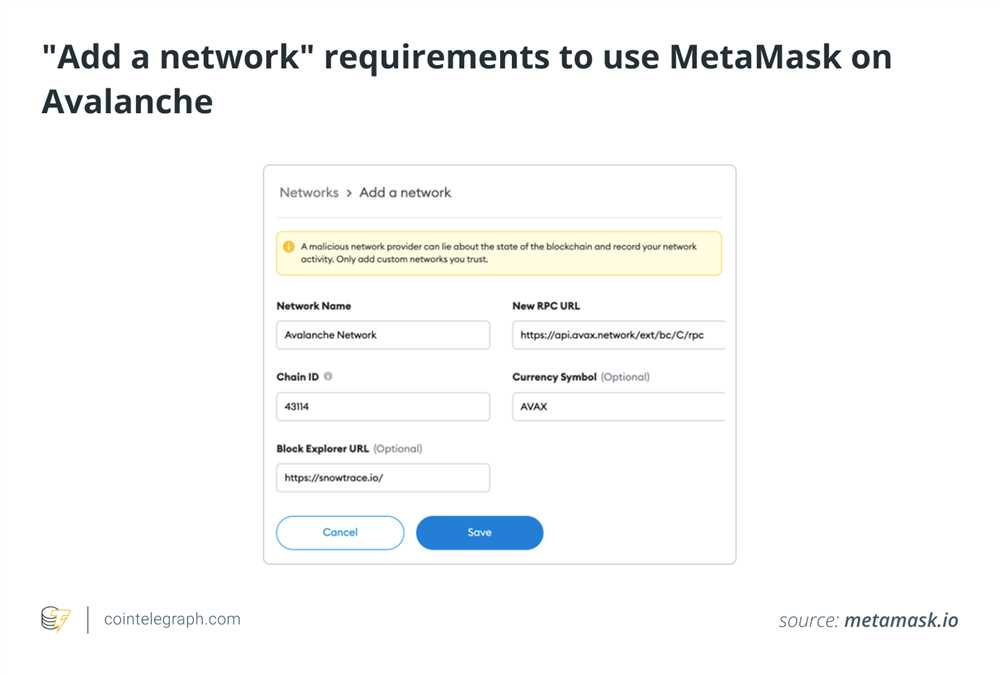
In the Metamask settings, click on the “Networks” tab. Here, you will see a list of blockchain networks that are supported by Metamask. To connect to the Avalanche network, scroll down and click on the “Add Network” button to open the network setup page.
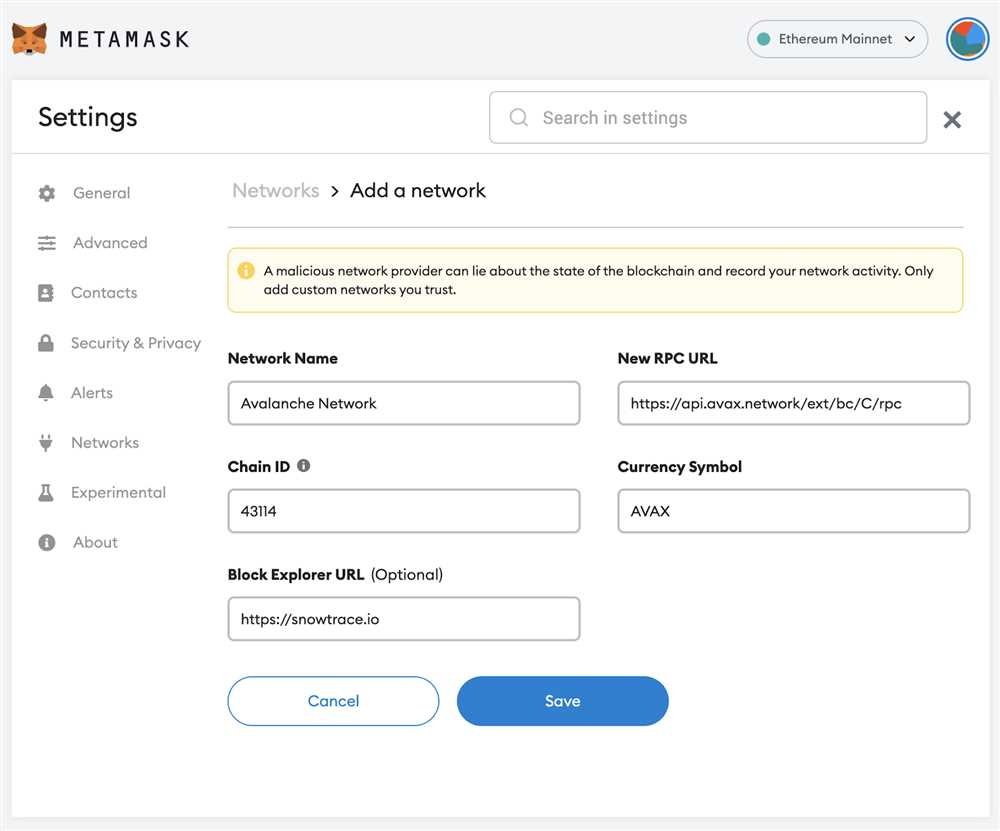
On the network setup page, fill in the following information:
- Network Name: Avalanche
- New RPC URL: https://api.avax.network/ext/bc/C/rpc
- Chain ID: 43114
- Currency Symbol: AVAX
Double-check that the information you entered is correct, and then click on the “Save” button to add Avalanche as a network in Metamask.
Step 3.3: Switch Networks
After adding the Avalanche network, it will appear in the list of networks in the Metamask settings. To connect to the Avalanche network, click on the dropdown menu in the Metamask window and select “Avalanche” as the active network.
Congratulations! You have successfully connected Metamask to the Avalanche network. You can now start using your Metamask wallet to interact with Avalanche dApps and manage your Avalanche assets.
Step 4: Transfer and Manage Your Avalanche Assets
Now that you have successfully added Avalanche to your Metamask wallet, it’s time to transfer and manage your assets on the Avalanche network. Here are the steps:
- Open your Metamask wallet and ensure that you are on the Avalanche network.
- Click on the “Assets” tab to view your Avalanche assets.
- To transfer assets, click on the “Send” button. Enter the recipient’s wallet address and the amount you want to send. Click “Next” and review the transaction details. Finally, click “Confirm” to complete the transfer.
- To receive assets, you need to provide the sender with your Avalanche wallet address. You can find your Avalanche wallet address by clicking on the account icon in the top right corner and selecting “Copy Address”.
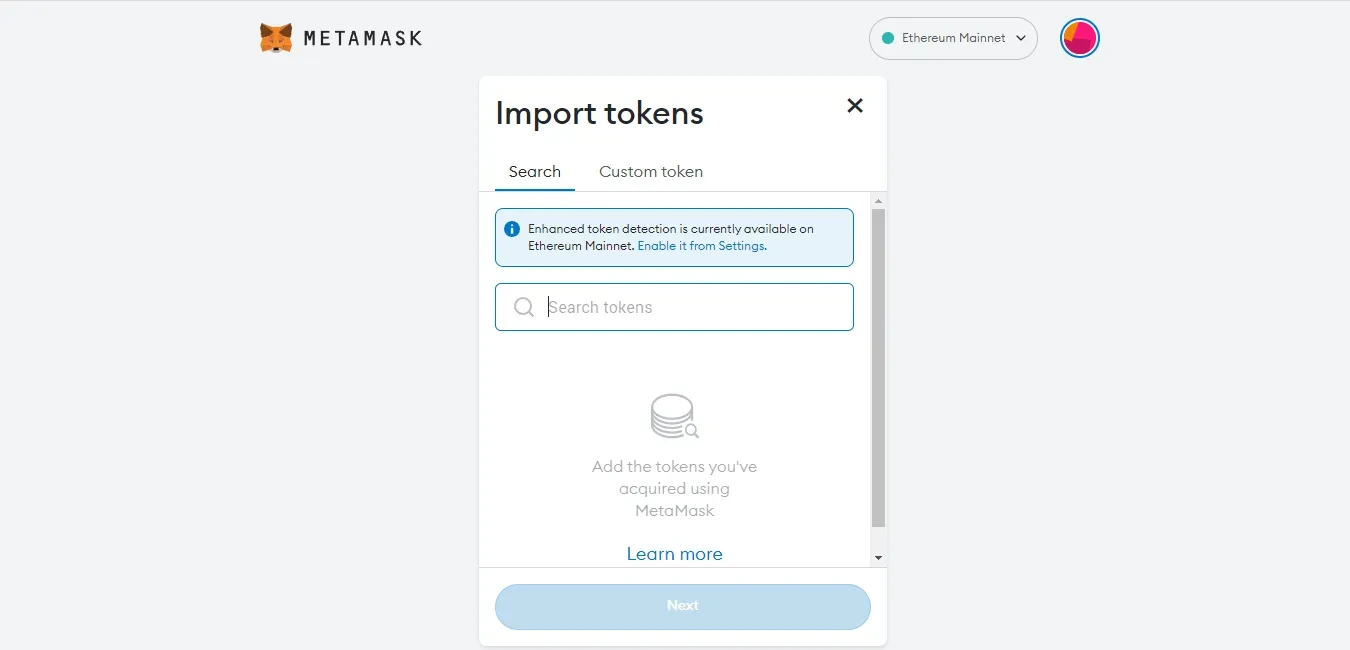
- In the “Assets” tab, you can also add custom tokens by clicking on the “Add Token” button. Enter the contract address of the token you want to add and click “Next”. The token’s details will be displayed, and you can click “Add Tokens” to finalize the process.
- Managing your assets is easy with the Avalanche network. You can view your asset balances, transaction history, and details of each token by clicking on the respective asset in the “Assets” tab.
- Remember to always double-check transaction details before confirming. Transactions on the Avalanche network cannot be reversed, so it’s essential to be cautious.
Congratulations! You are now ready to transfer and manage your assets on the Avalanche network. You can explore different dApps, DeFi platforms, and other services that support Avalanche and make the most out of your digital assets.
Q&A:
What is Avalanche?
Avalanche is a platform for building decentralized applications (dApps) and blockchain networks. It aims to provide developers with high performance, low cost, and scalable solutions.
Why should I add Avalanche to my Metamask wallet?
Adding Avalanche to your Metamask wallet allows you to interact with Avalanche-based dApps and perform transactions on the Avalanche network. It gives you access to the features and functionalities of the Avalanche platform, including decentralized finance (DeFi) applications, token transfers, and smart contract interactions.
Are there any risks involved in adding Avalanche to my Metamask wallet?
While adding Avalanche to your Metamask wallet is generally safe, there are some risks to consider. These include the possibility of interacting with malicious dApps or scam projects on the Avalanche network, the potential for loss of funds if you make mistakes in transactions or configurations, and the risk of phishing or hacking attacks. It is important to exercise caution, do your own research, and follow best security practices when using any blockchain wallet.
+ There are no comments
Add yours