


Welcome to our beginner’s guide on how to add Arbitrum to Metamask! If you’re looking to explore the world of decentralized finance (DeFi) and take advantage of the benefits offered by Arbitrum, this guide is for you. By following these simple steps, you’ll be able to seamlessly integrate Arbitrum into your Metamask wallet and unlock a whole new range of possibilities.
Step 1: Install Metamask
The first step in adding Arbitrum to Metamask is to have the wallet itself. If you haven’t already installed Metamask, head to their official website and download the extension for your preferred browser. Once installed, create a new wallet or import an existing one to get started.
Step 2: Access the Metamask Settings
After setting up your Metamask wallet, click on the extension icon in your browser’s toolbar to open the menu. From there, click on the “Settings” option to access the settings page of your Metamask wallet. This is where you’ll make the necessary adjustments to add Arbitrum.
Step 3: Add the Arbitrum Network
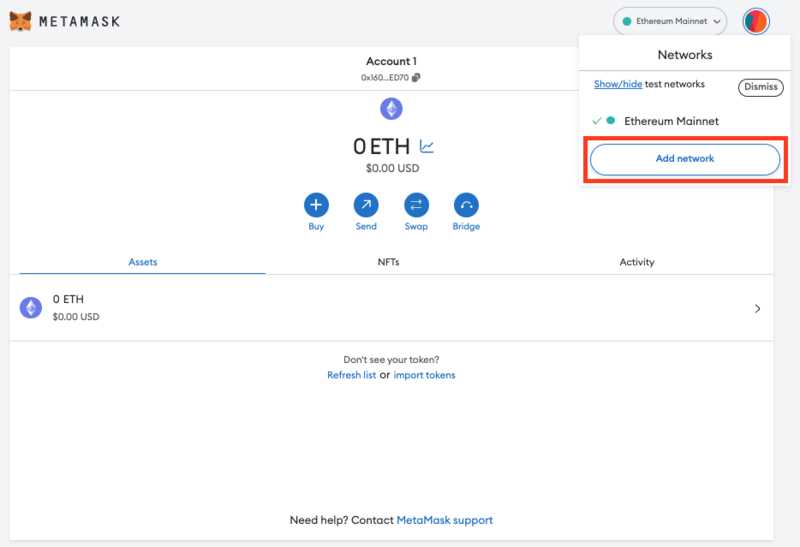
In the settings page of your Metamask wallet, click on the “Networks” tab. Here, you’ll see a list of existing networks, including the Ethereum mainnet. Scroll down to the bottom and click on the “Add Network” button. A form will appear, where you’ll enter the details to add the Arbitrum network.
Step 4: Enter the Arbitrum Network Details
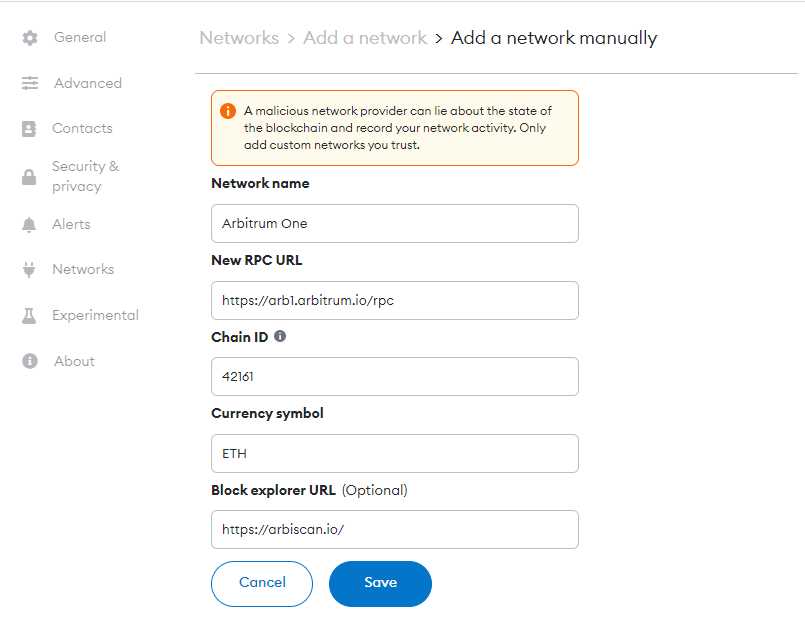
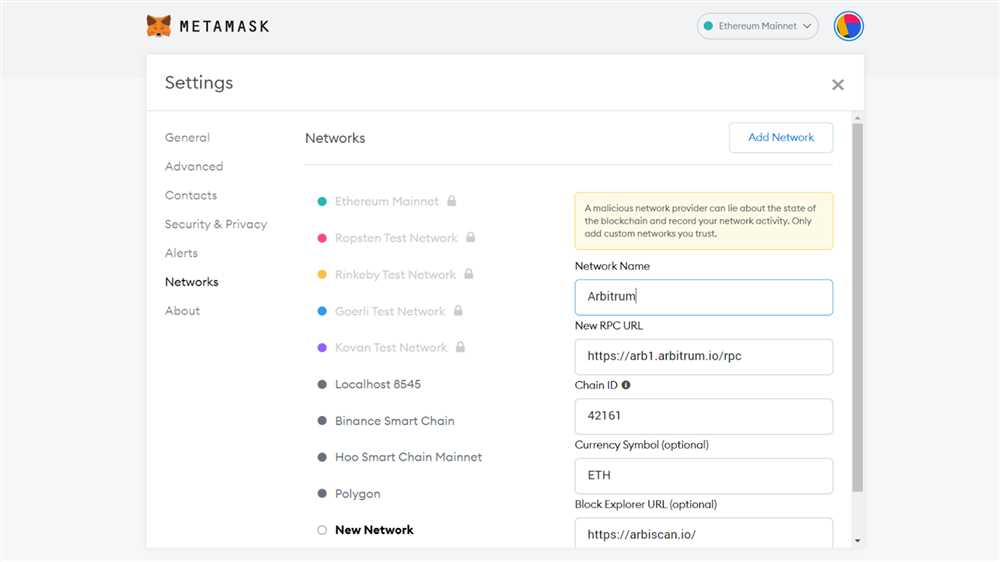
In the form to add the Arbitrum network, fill in the following details:
Network Name: Arbitrum (or any name of your choice)
New RPC URL: https://arbitrum-mainnet.infura.io/v3/YOUR_INFURA_ID
Chain ID: 42161
Currency Symbol: ETH
Block Explorer URL: https://arbiscan.io/ (optional)
Make sure to replace “YOUR_INFURA_ID” in the RPC URL with your actual Infura ID, which you can obtain by signing up for an account on the Infura website.
Step 5: Save and Connect to the Arbitrum Network
After filling in the Arbitrum network details, click on the “Save” button to add the network to your Metamask. Once saved, you’ll see the newly added Arbitrum network listed among the other networks. Click on the network name to connect to it.
Congratulations! You have successfully added Arbitrum to Metamask. You can now explore the world of decentralized applications (dApps) and utilize the benefits of Arbitrum’s high-speed, low-cost transactions. Remember to be cautious and do your research before interacting with any dApps, and always secure your wallet with strong passwords and backup phrases. Happy exploring!
Step-by-Step Guide to Adding Arbitrum to Metamask
If you want to start using Arbitrum on your Metamask wallet, you’ll need to follow these simple steps:
Step 1:
Open your Metamask wallet and click on the network selection dropdown located at the top of the interface.
Step 2:
Scroll down and click on the “Custom RPC” option at the bottom of the network selection dropdown.
Step 3:
In the “New Network” section, you’ll need to fill out the following details:
- Network Name: Arbitrum
- New RPC URL: https://rpc.arbitrum.io/rpc
- Chain ID: 42161
- Currency Symbol: ETH
Step 4:
Click on “Save” to add the Arbitrum network to your Metamask wallet.
Step 5:
After saving, you’ll be redirected to the network selection dropdown. Select “Arbitrum” from the list to switch to the Arbitrum network.
Step 6:
Congratulations! You’ve successfully added Arbitrum to your Metamask wallet. Now you can start using dApps and interacting with the Arbitrum network.
Please note that the Arbitrum network is a Layer 2 solution built on top of the Ethereum network. Make sure you have ETH in your wallet to cover transaction fees on both networks.
Disclaimer: Adding and using the Arbitrum network on your Metamask wallet requires caution, as it involves interacting with decentralized applications and smart contracts. Please do your own research and exercise due diligence before making any transactions.
Install Metamask Extension
To get started with adding Arbitrum to your Metamask wallet, the first step is to install the Metamask extension in your browser. Follow the steps below to install Metamask:
| 1. | Open your web browser and go to the Metamask website. |
| 2. | Click on the “Get Chrome Extension” or “Get Firefox Extension” button, depending on the browser you are using. |
| 3. | The browser will redirect you to the respective extension store (Chrome Web Store or Firefox Add-ons). |
| 4. | Click on the “Add to Chrome” or “Add to Firefox” button to start the installation process. |
| 5. | A pop-up window will appear asking for confirmation to add the extension. Click on “Add extension” to continue. |
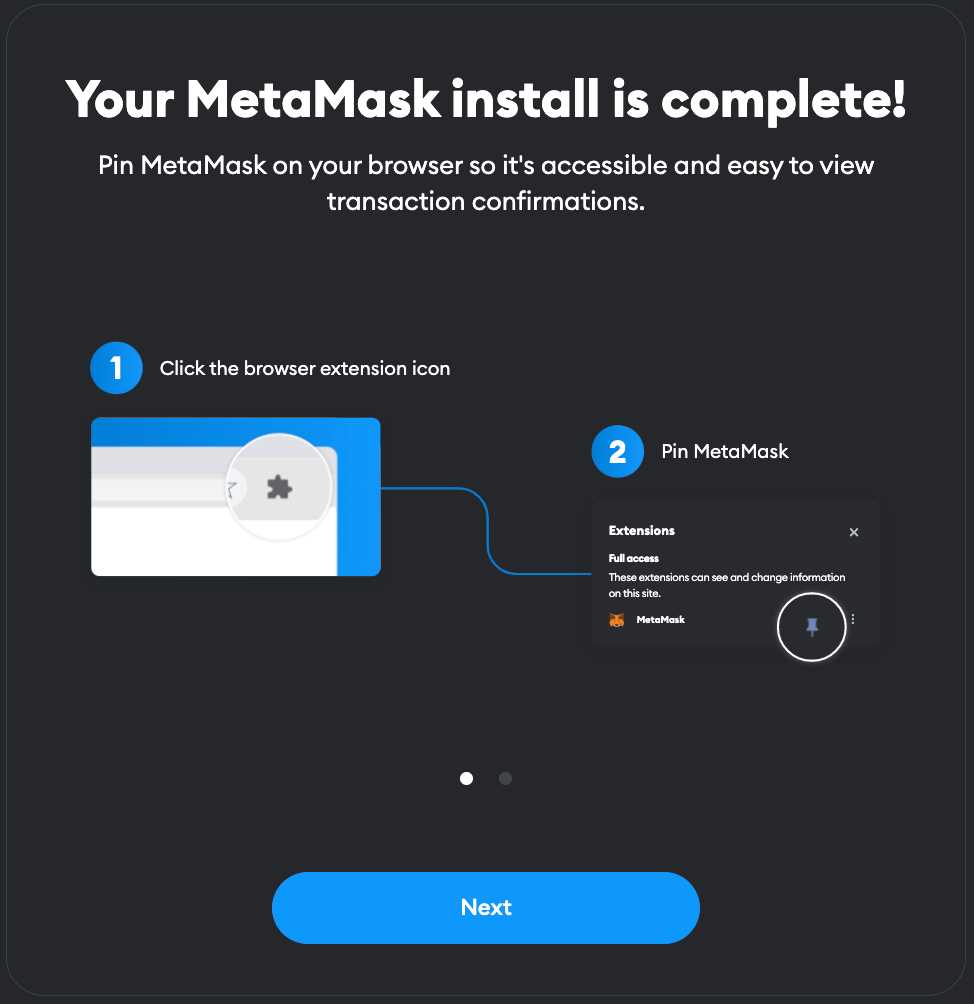
| 6. | After the installation is complete, you will see the Metamask icon added to your browser’s toolbar. |
Now that you have successfully installed the Metamask extension, you can proceed to the next steps to add Arbitrum to your wallet.
Access Metamask on Your Browser
To use Metamask on your browser, follow these steps:
- Open your preferred browser (Google Chrome, Firefox, etc.)
- Install the Metamask extension by searching for “Metamask” in the respective browser’s extension store.
- Once installed, click on the Metamask icon located in the browser toolbar.
- If you already have a Metamask account, click on the “Import Account” option and enter your password and recovery phrase.
- If you are new to Metamask, click on the “Create a Wallet” option and follow the on-screen instructions to set up your account.
- After creating/importing your account, you will now have access to your Metamask wallet in your browser.
Make sure to keep your password and recovery phrase secure, as they provide access to your funds stored in Metamask.
Note: When using Metamask with a new browser or device, you will need to import your account or create a new one. Your Metamask wallet is not tied to any specific browser.
Import or Create a New Wallet

If you already have a wallet that you use with Metamask, you can skip this step. Otherwise, let’s start by creating a new wallet or importing an existing one.
Create a New Wallet
If you don’t have a wallet yet, you can easily create one by following these steps:
- Open the Metamask application on your computer or mobile device.
- Click on the “Create a Wallet” button.
- Follow the instructions to set a strong password for your wallet.
- Write down and keep your secret twelve-word recovery phrase in a safe place. This is crucial to recovering your wallet in case you forget your password or lose access to your device.
- Confirm your recovery phrase by selecting the words in the correct order.
- Congratulations! You have successfully created a new wallet.
Make sure to keep your password and recovery phrase secure and never share them with anyone. With your new wallet created, you can now proceed to the next step.
Import an Existing Wallet
If you already have an existing wallet that you want to use with Metamask, you can import it by following these steps:
- Open the Metamask application on your computer or mobile device.
- Click on the “Import Wallet” button.
- Enter your twelve-word recovery phrase or your private key into the designated field.
- Set a new password to secure your wallet.
- Your wallet will be imported, and you will have access to your funds and transactions.
It’s important to note that when importing an existing wallet, your funds and transaction history will be available, but you will not be able to access any specific features or functionalities that are exclusive to wallets created within Metamask.
Whether you choose to create a new wallet or import an existing one, you are now ready to move on to the next step and add Arbitrum to your Metamask wallet.
Add Arbitrum Network to Metamask
Adding the Arbitrum network to your Metamask wallet allows you to interact with decentralized applications (DApps) that are built on the Arbitrum protocol. Follow these simple steps to add the Arbitrum network to your Metamask:
| Step | Description |
|---|---|
| 1 | Open your Metamask wallet and click on the network selection dropdown. |
| 2 | Scroll down and click on “Custom RPC” to manually add a network. |
| 3 | In the “New RPC URL” field, enter the following URL: https://arb1.arbitrum.io/rpc |
| 4 | Set the network name to “Arbitrum” or any other name you prefer. |
| 5 | Enter the following information for the network: |
| Chain ID: 42161 | |
| Symbol: ETH | |
Block Explorer URL: https://arbiscan.io |
|
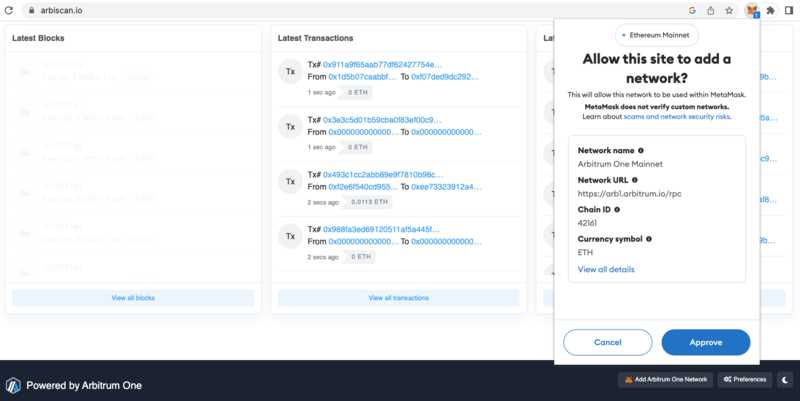
| 6 | Click on “Save” to add the Arbitrum network to your Metamask. |
Once the Arbitrum network is added, you can switch to it by selecting “Arbitrum” from the network selection dropdown in Metamask. This will allow you to interact with DApps on the Arbitrum network and perform transactions using the Arbitrum protocol.
Frequently Asked Questions:
What is Arbitrum?
Arbitrum is a layer 2 scaling solution for Ethereum. It aims to reduce transaction costs and increase transaction throughput.
What is Metamask?
Metamask is a cryptocurrency wallet that allows users to manage their Ethereum assets and interact with decentralized applications (dApps) on the Ethereum network.
Why would I want to add Arbitrum to Metamask?
Adding Arbitrum to Metamask allows you to access and interact with dApps and tokens that are built on the Arbitrum network. It also enables you to take advantage of the benefits of using a layer 2 solution, such as lower fees and faster transactions.

+ There are no comments
Add yours