


If you’re a cryptocurrency enthusiast, you’re probably familiar with Binance, one of the most popular cryptocurrency exchanges. And if you’re someone who values security and privacy, you most likely use MetaMask, a widely used cryptocurrency wallet. Connecting Binance to MetaMask can streamline your trading activities and enhance the security of your funds. In this step-by-step guide, we will walk you through the process of connecting your Binance account to MetaMask.
Step 1: Install and Set Up MetaMask
The first step is to install MetaMask by visiting the official MetaMask website and downloading the extension for your preferred browser. Once installed, open MetaMask and create a new wallet or import an existing one using the provided recovery phrase. Set a strong password and make sure to back up your recovery phrase in a safe place.
Step 2: Add Binance Smart Chain Network to MetaMask
After setting up MetaMask, you need to add the Binance Smart Chain network to your wallet. To do this, click on the network dropdown list in the top right corner of the MetaMask interface and select “Custom RPC.” Enter the following details:
Network Name: Binance Smart Chain
New RPC URL: https://bsc-dataseed1.binance.org
Chain ID: 56
Symbol: BNB
Block Explorer URL: https://bscscan.com
Note: Make sure you are connected to the Binance Smart Chain network in MetaMask before proceeding to the next step.
Step 3: Obtain Your Binance Smart Chain Wallet Address
In this step, you need to obtain your Binance Smart Chain wallet address. Open your Binance account and navigate to the “Wallet” page. Click on “Overview” and select “Binance Smart Chain.” If you don’t have a Binance Smart Chain wallet yet, click on “Create Wallet” and follow the instructions. Once you have your wallet, copy the address to your clipboard.
Step 4: Add Binance Smart Chain Network to MetaMask
Go back to your MetaMask interface and click on the account icon. From the dropdown list, select “Import Account.” Paste the Binance Smart Chain wallet address you copied earlier into the provided field, give it a name, and click on “Import.”
Congratulations! You have successfully connected your Binance account to MetaMask. You can now transfer funds from your Binance account to your MetaMask wallet and enjoy the additional security and flexibility it provides for your crypto trading activities.
A Simple Guide to Connecting Binance to MetaMask

Connecting your Binance account to MetaMask can provide you with additional flexibility and convenience when managing your digital assets. By linking these two platforms, you can easily access and use your Binance funds within the MetaMask wallet. Follow these steps to connect Binance to MetaMask:
- Make sure you have both a Binance account and MetaMask wallet set up.
- Launch the MetaMask extension in your web browser and make sure you are signed in.
- Click on the account icon at the top right corner of the MetaMask wallet screen and select “Connect Hardware Wallet”.
- In the dropdown menu, select “Binance Chain” as the network.
- Connect your Binance account to MetaMask by clicking on the “Connect” button.
- You will be redirected to Binance’s login page. Enter your Binance account credentials and log in.
- Authorize the connection by following the prompts on the Binance authorization page.
- After completing the authorization process, you will be redirected back to MetaMask. Your Binance account should now be linked and visible in the MetaMask wallet interface.
Once your Binance account is connected to MetaMask, you can easily manage and transfer your Binance funds within the MetaMask wallet. This integration enables you to seamlessly interact with Binance’s ecosystem while enjoying the benefits of MetaMask’s user-friendly interface and additional features.
Note that connecting Binance to MetaMask requires giving permission and may involve certain risks. Make sure to thoroughly research and understand the consequences before proceeding with the integration. Always exercise caution when managing your digital assets and only connect trusted and secure platforms.
Step 1: Create a Binance Account
To connect Binance to MetaMask, the first step is to create an account on the Binance exchange. Binance is a popular cryptocurrency exchange that allows users to buy, sell, and trade various digital assets. To create a Binance account, follow the steps below:
- Go to the Binance website (https://www.binance.com) and click on the “Register” button.
- Fill in the required information, including your email address and a secure password. Make sure to use a strong password that is not easily guessable.
- Agree to the terms of use and click on the “Create account” button to proceed.
- Check your email inbox for a verification email from Binance. Click on the verification link provided in the email to verify your account.
- Once your account is verified, you can log in to your Binance account using your email address and password.
- Enable two-factor authentication (2FA) for added security. This will require you to enter a verification code generated by an authentication app on your mobile device each time you log in.
By following these steps, you will have successfully created a Binance account, which is necessary for connecting it to your MetaMask wallet.
Step 2: Install MetaMask Browser Extension
In order to connect Binance to MetaMask, you’ll need to install the MetaMask browser extension on your preferred web browser. MetaMask is a popular Ethereum wallet and browser extension that allows you to manage your digital assets and interact with decentralized applications (dApps) on the Ethereum blockchain.
Here’s a step-by-step guide on how to install MetaMask browser extension:
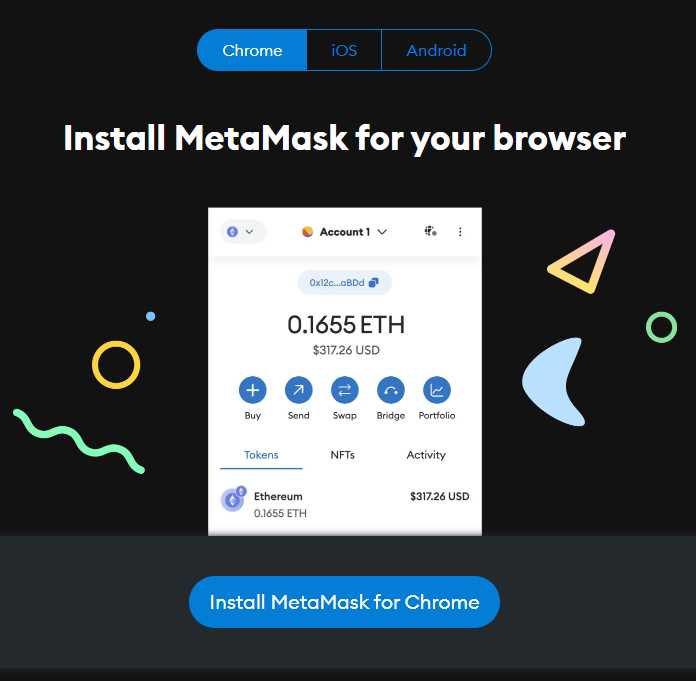
- Open your web browser (compatible with Chrome, Firefox, Brave, and Edge).
- Visit the official MetaMask website or search for the MetaMask extension in your browser’s extension store.
- Click on the “Add to [Browser Name]” or “Install” button to begin the installation process.
- Follow the on-screen instructions to complete the installation. You may be prompted to review and approve the permissions requested by the extension.
- Once the installation is complete, you should see the MetaMask icon added to your browser’s toolbar.
- Click on the MetaMask icon to open the extension.
- If you are a new user, you will be prompted to create a new wallet. Follow the instructions to set up a unique password and backup your seed phrase. Make sure to store your seed phrase in a secure location.
- If you already have a MetaMask wallet, you can import it using your existing seed phrase or private key.
- After setting up or importing your wallet, you will be greeted with the MetaMask interface, where you can manage your account and view your current balance.
Congratulations! You have successfully installed the MetaMask browser extension. Now you’re ready to connect it to Binance and start interacting with decentralized finance (DeFi) applications.
Step 3: Set Up MetaMask Wallet
Once you’ve successfully installed the MetaMask extension in your browser, follow these steps to set up your MetaMask wallet:
1. Launch MetaMask: Click on the MetaMask icon in your browser toolbar to open the extension.
2. Get Started: On the initial MetaMask screen, click on the “Get Started” button.
3. Create a Wallet: Choose the “Create a Wallet” option to create a new MetaMask wallet. Make sure to read and agree to the terms of service.
4. Create a New Password: Enter a strong password for your wallet. Make sure it’s easy for you to remember but hard for others to guess. Confirm the password and click on the “Create” button.
5. Backup Secret Phrase: MetaMask will now provide you with a secret phrase, consisting of 12 words. It’s crucial to back up this phrase as it will be the only way to restore your wallet if you lose your device. Write down the secret phrase and click on “Next”.
6. Confirm Secret Phrase: In the next step, MetaMask will ask you to confirm your secret phrase. Select the words in the correct order to proceed.
7. Wallet Created: Once you’ve successfully confirmed your secret phrase, MetaMask will inform you that your wallet has been created. Click on “All Done” to finish the setup process.
8. Account Selection: By default, MetaMask will have one account created for you. You can switch between multiple accounts by clicking on the account dropdown menu in the top right corner of the MetaMask extension.
9. Connect MetaMask to Binance: Now that your MetaMask wallet is set up, you can proceed to the next step and connect it to Binance using the instructions provided.
Setting up your MetaMask wallet is an essential step to ensure the security and accessibility of your funds. Make sure to keep your password and secret phrase safe and secure.
Step 4: Connect Binance to MetaMask

Now that you have set up MetaMask and created your Binance Smart Chain wallet, it’s time to connect Binance to MetaMask. This step is crucial in order to access your Binance assets and perform transactions directly from your MetaMask wallet.
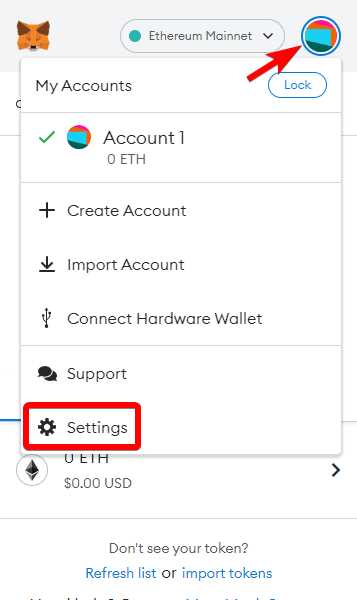
- Open the MetaMask extension on your browser.
- Click on the account icon at the top right corner of the extension.
- From the dropdown menu, select “Settings”.
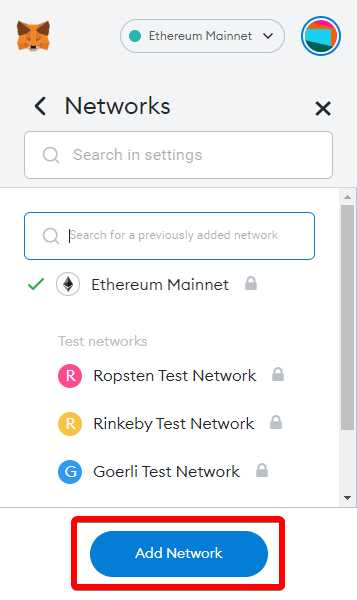
- In the Settings menu, click on “Networks”.
- Scroll down to the bottom and click on “Add Network”.
- Fill in the following network details:
- Network Name: Binance Smart Chain
- New RPC URL: https://bsc-dataseed.binance.org/
- Chain ID: 56
- Symbol: BNB
- Block Explorer URL: https://bscscan.com
- Click on “Save” to add Binance Smart Chain to MetaMask.
Congratulations! You have successfully connected Binance to MetaMask. You can now view and manage your Binance assets within the MetaMask wallet interface, and easily transfer funds between Binance and other compatible decentralized applications (dApps).
Frequently Asked Questions:
What is Binance?
Binance is one of the largest cryptocurrency exchanges in the world. It provides a platform for users to buy, sell, and trade a wide range of cryptocurrencies.
What is MetaMask?
MetaMask is a cryptocurrency wallet and browser extension that allows users to manage and interact with decentralized applications (dApps) on the Ethereum blockchain.
Why would I want to connect Binance to MetaMask?
Connecting Binance to MetaMask allows you to access and manage your Binance account directly through the MetaMask interface. It makes it easier to interact with decentralized applications and trade cryptocurrencies using your Binance funds.
How do I connect Binance to MetaMask?
To connect Binance to MetaMask, you need to add the Binance Smart Chain network to your MetaMask settings and import your Binance account using the account seed phrase. The article provides a step-by-step guide on how to do this.
Can I connect multiple Binance accounts to MetaMask?
Yes, you can connect multiple Binance accounts to MetaMask by importing each account’s seed phrase separately. However, you can only have one account active at a time in MetaMask.
+ There are no comments
Add yours