


Welcome to the world of Cronos Metamask! If you are new to the exciting world of cryptocurrencies and blockchain, this guide is perfect for you. Whether you are a beginner or have some knowledge, we will take you through everything you need to know about Cronos Metamask, from installation to advanced features.
Cronos Metamask is a powerful browser extension that allows you to securely store, manage, and interact with your digital assets. It is compatible with the Cronos network, a layer 2 scaling solution for Ethereum. With Cronos Metamask, you can seamlessly bridge between Ethereum and Cronos, enabling faster and cheaper transactions.
Installing Cronos Metamask is a breeze! Simply visit the Chrome or Firefox extension store and search for “Cronos Metamask.” Click on the “Add to Chrome” or “Add to Firefox” button, and you’re done. Once installed, you will see the Cronos Metamask icon in your browser toolbar, ready to be used.
Now that you have Cronos Metamask installed, let’s dive into some of its key features. You can create a new wallet or import an existing one using your seed phrase. Managing multiple wallets is also a breeze with Cronos Metamask, as you can easily switch between them with just a few clicks. Additionally, you can explore the Cronos network, view your transaction history, and interact with decentralized applications (dApps) right from the extension.
Whether you’re an investor, trader, or simply a crypto enthusiast, Cronos Metamask is an essential tool in your arsenal. So, buckle up and get ready to explore the world of decentralized finance (DeFi) with Cronos Metamask – the ultimate user manual is at your fingertips!
Getting Started with Cronos Metamask
If you are new to Cronos Metamask, this guide will help you get started with the platform. Cronos Metamask is a user-friendly interface that allows you to interact with the Cronos blockchain.
Step 1: Installing Cronos Metamask
To begin, you need to install the Cronos Metamsk extension in your web browser. It is available for Chrome, Firefox, Brave, and other major browsers. Simply search for “Cronos Metamask” in your browser’s extension store and follow the installation process.
Step 2: Creating a Wallet
Once you have installed Cronos Metamask, you need to create a wallet. Open the extension and click on the “Create New Wallet” button. Follow the instructions to set up your wallet, including creating a strong password and saving your seed phrase securely.
Step 3: Connecting to Cronos Network
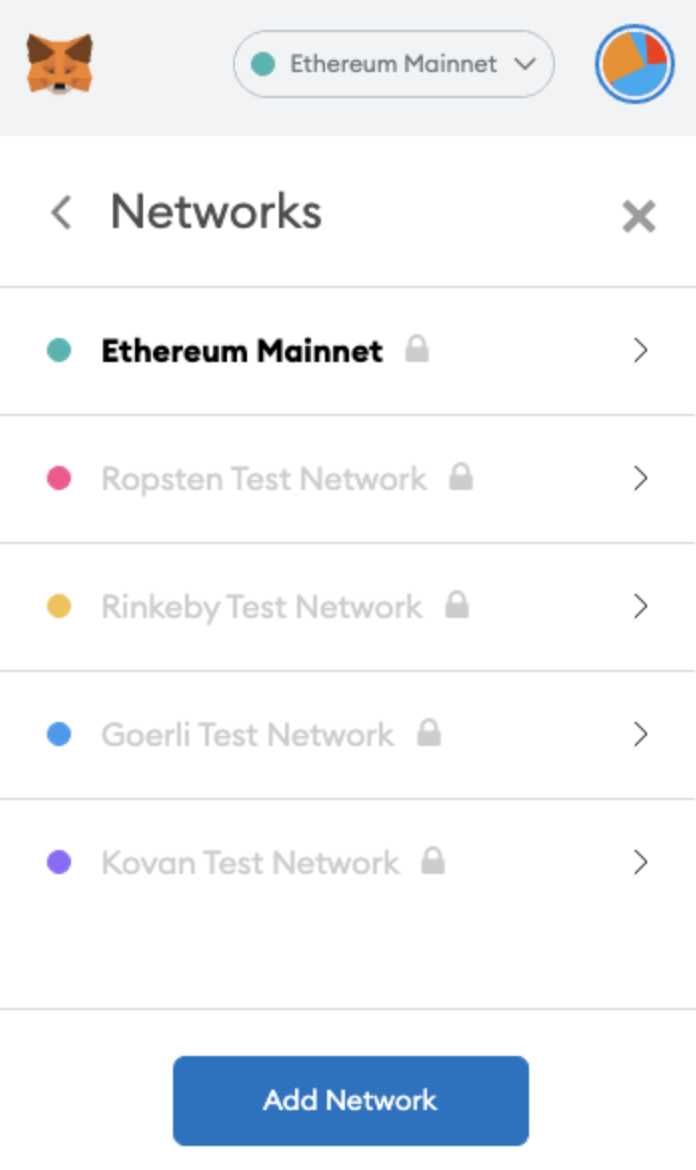
After creating your wallet, you need to connect to the Cronos network. In the Metamask extension, click on the network dropdown menu and select “Custom RPC”. Enter the Cronos network details, including the RPC URL. You can find the RPC URL in the Cronos documentation or from an official source.
Note: Make sure you select the correct network to avoid any transaction errors or loss of funds.
Step 4: Importing Account
If you already have an existing account, you can import it into your Cronos Metamask wallet. Click on the account icon in the Metamask extension and select “Import Account”. Enter your private key or JSON file to import your account.
Step 5: Exploring Cronos Metamask Features
Once you have successfully set up your wallet and connected to the Cronos network, you can start exploring the features of Cronos Metamask. Some of the key features include:
- Viewing your account balance and transaction history.
- Sending and receiving Cronos tokens.
- Interacting with decentralized applications (DApps) on the Cronos network.
- Managing your account settings and security.
Take your time to familiarize yourself with the interface and functionalities of Cronos Metamask. You can also refer to the official documentation for more detailed information.
Remember to always exercise caution while using decentralized applications and managing your funds. Keep your wallet password and seed phrase secure, and only interact with trusted applications and contracts.
Setting up Cronos Metamask Wallet and Account
Before you can start using Cronos Metamask, you need to set up a Cronos Metamask wallet and account. Follow these steps to get started:
Step 1: Install Metamask Extension
If you haven’t already, install the Metamask browser extension on your preferred web browser. Metamask is available for Chrome, Firefox, and Brave. Simply search for “Metamask” in the extension store and click “Install”.
Step 2: Create a New Metamask Account
- Once Metamask is installed, click on the Metamask extension icon in your browser toolbar to open Metamask.
- Click on “Create a Wallet” to start the account creation process.
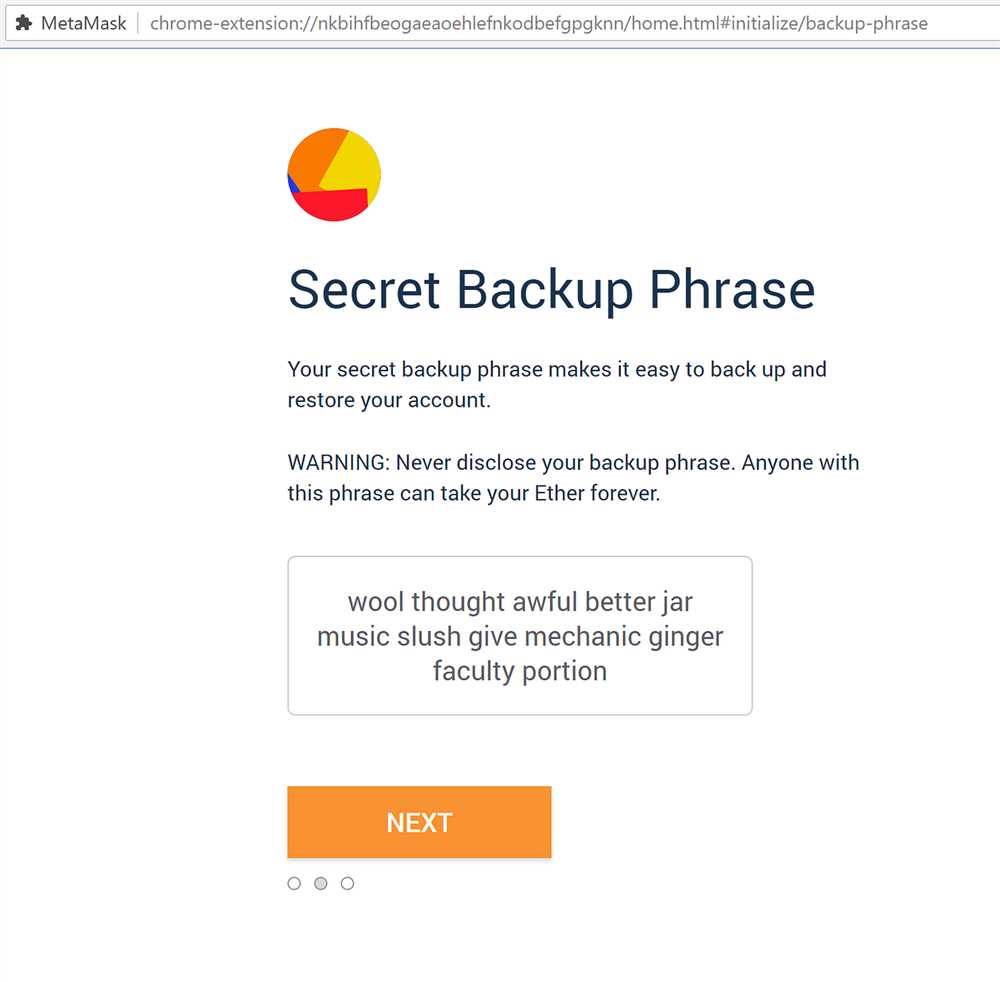
- You will be prompted to create a new password. Choose a strong password and make sure to remember it.
- Next, you will be given a set of 12-word mnemonic seed phrase. Write down these words and keep them safe. This seed phrase is your backup in case you forget your password or need to recover your account.
- Confirm the seed phrase by selecting the words in the correct order.
- Finally, set a password for your account. This password will be required each time you access your wallet.
Step 3: Switch to Cronos Testnet
- Once your account is created, you will be automatically logged into the Ethereum mainnet. However, we want to switch to the Cronos Testnet to use the Cronos blockchain.
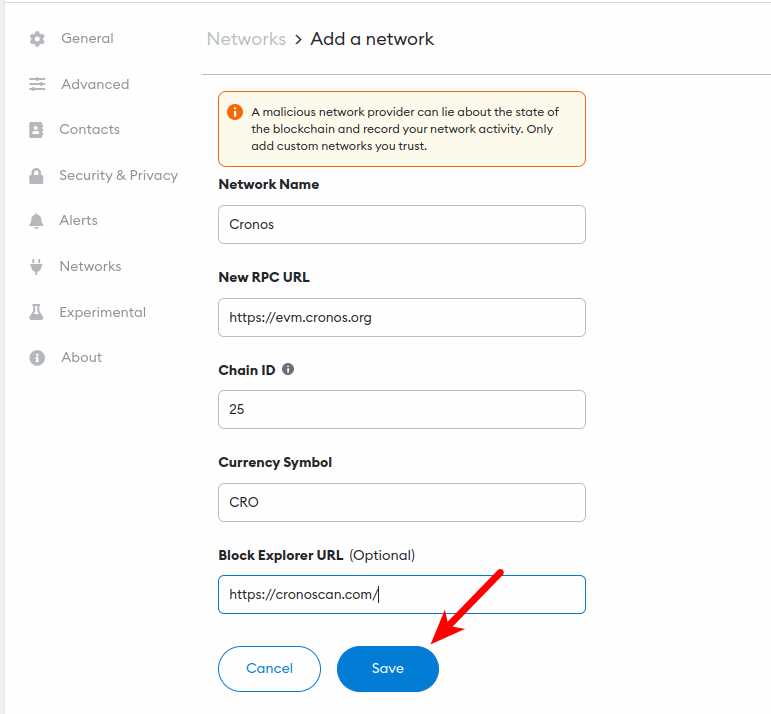
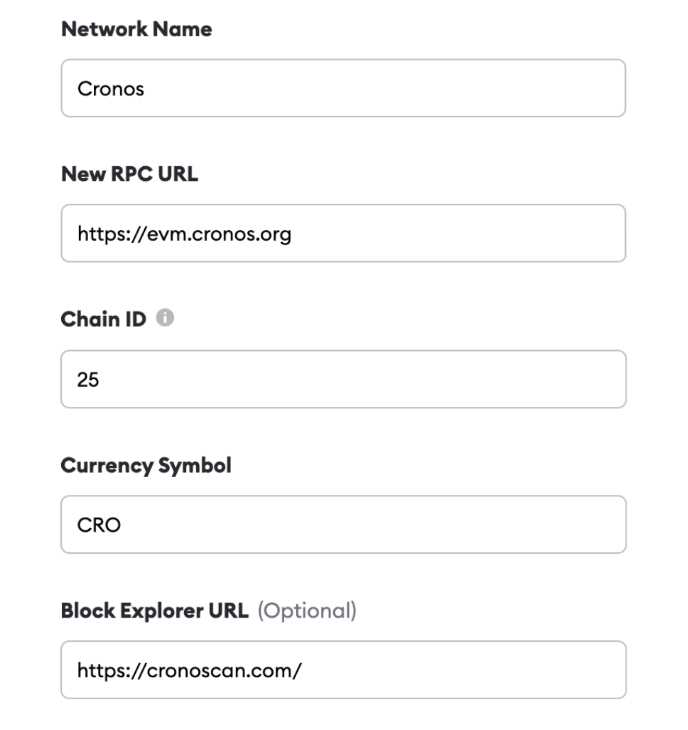
- Click on the network selection dropdown at the top of the Metamask window and select “Custom RPC” to add a custom network.
- In the “New RPC URL” field, enter the Cronos Testnet RPC endpoint: https://cronos-testnet.crypto.org:8545
- Give the network a name, such as “Cronos Testnet”.
- Click “Save” to save the custom network.
- Once saved, select the Cronos Testnet from the network selection dropdown. You are now connected to the Cronos Testnet.
Congratulations! You have successfully set up your Cronos Metamask wallet and account. You are now ready to start using Cronos and explore its features.
Navigating the Cronos Metamask Interface
Once you have installed the Cronos Metamask extension in your browser, you will be greeted with the Cronos Metamask interface. This interface serves as your gateway to the Cronos blockchain, allowing you to manage your accounts, send and receive transactions, and interact with Cronos dApps.
The main components of the Cronos Metamask interface include:
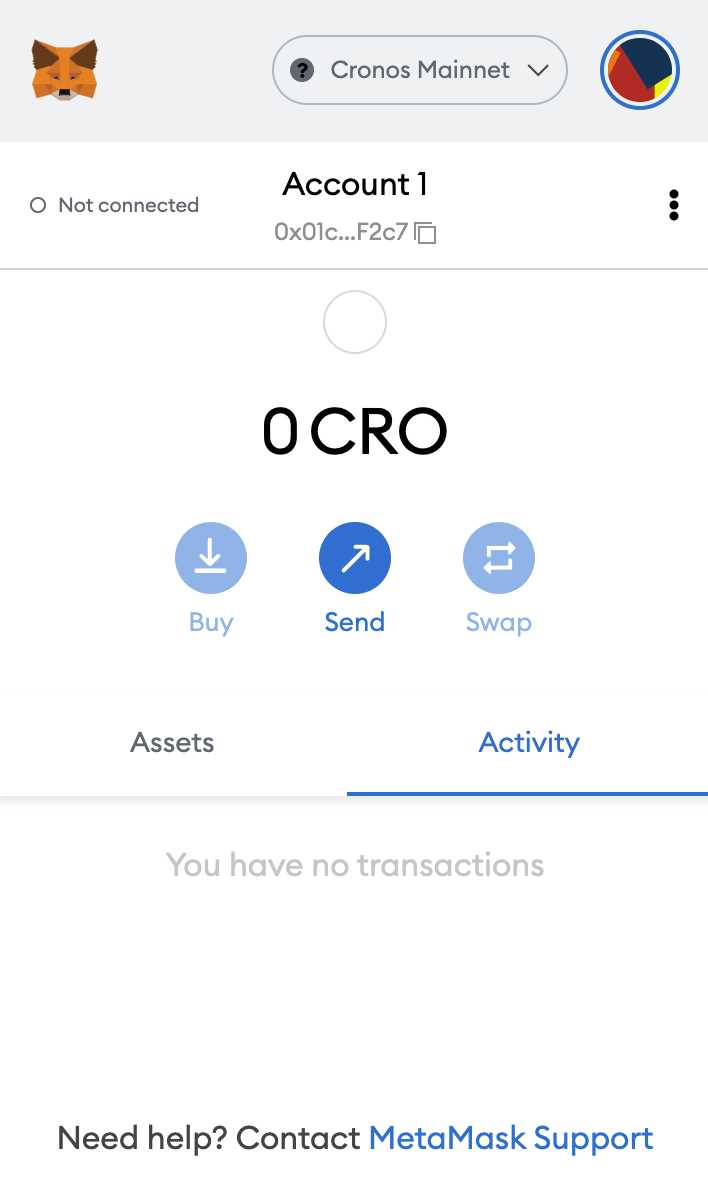
1. Account Overview: Located at the top of the interface, the account overview displays your account balance in Cronos native tokens. It also shows the account address, which you can share with others to receive funds.
2. Network Selector: Found next to the account overview, the network selector allows you to switch between different Cronos networks. You can choose from test networks like cronos-testnet or main networks like cronos-mainnet.
3. Menus: On the left-hand side of the interface, you will find a series of menus. These menus provide access to different features and functionalities of Cronos Metamask, such as account management, transaction history, and settings.
4. Main Content Area: The main content area is located in the center of the interface. This is where you will see information and prompts related to your current activity, such as confirming transactions or interacting with dApps.
5. Transaction History: At the bottom of the interface, you will find the transaction history section. This section displays a list of your recent transactions, including details like transaction hash, recipient address, and amount sent or received.
Overall, the Cronos Metamask interface is designed to be intuitive and user-friendly. By familiarizing yourself with its various components, you will be able to navigate the interface confidently and carry out your desired actions on the Cronos blockchain.
Advanced Features of Cronos Metamask
Once you have familiarized yourself with the basics of Cronos Metamask, you can explore its advanced features to enhance your experience in the Cronos ecosystem. Here are some of the advanced features that you can leverage:
1. Custom Networks
Cronos Metamask allows you to add custom networks, enabling you to connect to different blockchain networks other than the default ones. To add a custom network, go to the network dropdown on the top toolbar, select “Custom RPC”, and enter the network details including the RPC URL, chain ID, symbol, and block explorer URL if available.
2. Gas Fee Customization
With Cronos Metamask, you have the option to customize the gas fees for your transactions. On the transaction popup, click on “Edit” next to the gas fee to manually adjust the gas limit and gas price. This allows you to prioritize transaction speed or cost depending on your requirements.
3. ENS Integration
Ethereum Name Service (ENS) integration is available in Cronos Metamask, enabling you to use human-readable domain names instead of long addresses. You can register your own domain names or interact with existing ENS domains within the Cronos ecosystem.
ENS domains make sending and receiving transactions more user-friendly and convenient. For example, instead of sending funds to “0xABC123…”, you can send them to “mywallet.eth”. This feature simplifies the user experience and reduces the chances of errors when entering long addresses.
Enabling ENS integration in Cronos Metamask involves configuring the ENS network in your settings and connecting to it.
4. Smart Contract Interactions
Cronos Metamask allows you to interact with smart contracts deployed on the Cronos blockchain. You can send transactions to deploy or interact with smart contracts directly through the user interface. This opens up a wide range of possibilities, from participating in decentralized finance (DeFi) protocols to building and deploying your own decentralized applications (dApps).
5. Security Features
Cronos Metamask offers various security features to protect your funds and personal information. You can secure your wallet with a password, set up biometric authentication (such as fingerprint or facial recognition), and create multiple accounts within the same wallet. Additionally, Cronos Metamask integrates with hardware wallets for enhanced security.
By leveraging these advanced features of Cronos Metamask, you can make the most out of your experience in the Cronos ecosystem and explore the vast possibilities of blockchain technology.
Frequently Asked Questions:
What is Cronos Metamask?
Cronos Metamask is a blockchain network developed by Crypto.com that is compatible with Ethereum’s network. It allows users to interact with decentralized applications (DApps) and smart contracts on the Cronos network.
How do I install Cronos Metamask?
To install Cronos Metamask, you need to download and install the Metamask extension for your web browser. Then, you can connect to the Cronos network by selecting it as a custom network in the Metamask settings.
Can I use my existing Ethereum Metamask wallet on Cronos Metamask?
Yes, you can use your existing Ethereum Metamask wallet on Cronos Metamask. You simply need to connect to the Cronos network using the custom network configuration in your Metamask settings. Your wallet address and funds will remain the same.
What are the benefits of using Cronos Metamask?
Using Cronos Metamask comes with several benefits. First, it provides lower transaction fees compared to Ethereum’s network. Second, it offers faster transaction confirmations. Lastly, it allows users to access and use DApps and smart contracts on the Cronos network.
Can I transfer my assets from the Ethereum network to the Cronos network?
Yes, you can transfer your assets from the Ethereum network to the Cronos network. However, this process requires using the Crypto.com Bridge and following the necessary steps to bridge your assets across the two networks.
+ There are no comments
Add yours