


Are you a developer or tester looking to explore Ethereum and develop decentralized applications (DApps)? If so, you’ll need to set up and use a test network to avoid using real Ethereum tokens and transactions during development. Rinkeby is a popular test network for Ethereum, and with the help of Metamask, you can easily configure it for your development and testing needs.
Metamask is a browser extension wallet that allows you to interact with the Ethereum blockchain. It provides a user-friendly interface for managing accounts, signing transactions, and connecting to different Ethereum networks. By setting up Rinkeby network on Metamask, you can access test Ether and test tokens for free, experiment with your DApps, and ensure they function as expected before deploying them on the main Ethereum network.
To get started, first make sure you have the Metamask extension installed on your browser. You can find and install Metamask directly from the extension store of your preferred browser. Once installed, create a new Metamask account or import an existing one using your private key or seed phrase. Make sure you save your seed phrase or private key in a secure location, as it grants access to your Ethereum accounts.
Next, click on the Metamask extension icon in your browser to open the wallet. You’ll see a small fox icon in your browser toolbar indicating that Metamask is active. Click on the icon and it will open a pop-up window with various options. In this window, click on the account settings icon (the person-shaped icon) to navigate to the account settings section.
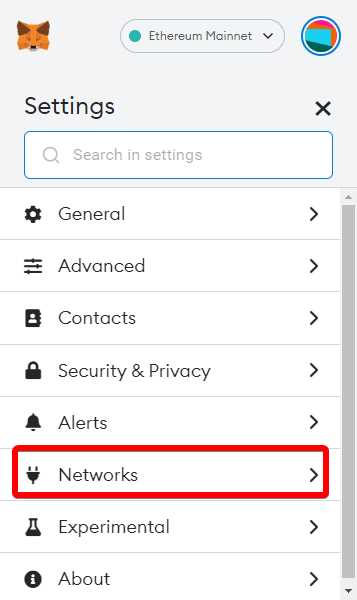
In the account settings section, scroll down to the “Networks” section, where you’ll find the option to add a custom RPC network. Rinkeby is a custom network, so you’ll need to add it manually. Click on the “Add Network” button and fill in the required details. For the network name, enter “Rinkeby” and for the RPC URL, enter “https://rinkeby.infura.io/v3/YOUR_INFURA_PROJECT_ID”. You’ll need to sign up for an Infura account and create a new project to obtain your Infura project ID.
Once you’ve filled in the details, click “Save” to add the Rinkeby network to Metamask. Now, you should be able to select the Rinkeby network from the network dropdown in Metamask. After selecting the Rinkeby network, you’ll need to get some test Ether to start developing and testing your DApps. You can obtain test Ether for free from various Rinkeby faucet websites by providing your Rinkeby account address.
Now that you have the Rinkeby network set up on Metamask and some test Ether in your account, you’re ready to start developing and testing your Ethereum DApps. Remember to switch to the Rinkeby network whenever you want to interact with the test network, and switch back to the main Ethereum network when you’re ready to deploy your DApps to the public. Happy Ethereum development and testing!
Installing and Setting Up Metamask
Metamask is a popular Ethereum wallet and browser extension that allows users to interact with decentralized applications (dApps) on the Ethereum network. To start using Rinkeby network on Metamask for Ethereum development and testing, follow the steps below to install and set up Metamask:
- Visit the Metamask website at https://metamask.io/.
- Click on the “Get Chrome Extension” button to download and install the Metamask extension for Chrome.
- Once the extension is installed, you will see the Metamask icon at the top-right corner of your browser.
- Click on the Metamask icon to open the extension.
- A welcome screen will appear, click on the “Get Started” button.
- You will be presented with the terms of service, read them and click on the “Accept” button.
- Create a new wallet by clicking on the “Create a Wallet” button.
- Choose a strong password for your wallet and click on the “Create” button.
- You will be presented with a secret backup phrase. Write down this phrase and keep it in a secure place. This phrase can be used to restore your wallet if you lose access to your device.
- Confirm the secret backup phrase by selecting the words in the correct order.
- Once the backup phrase is confirmed, your wallet will be created.
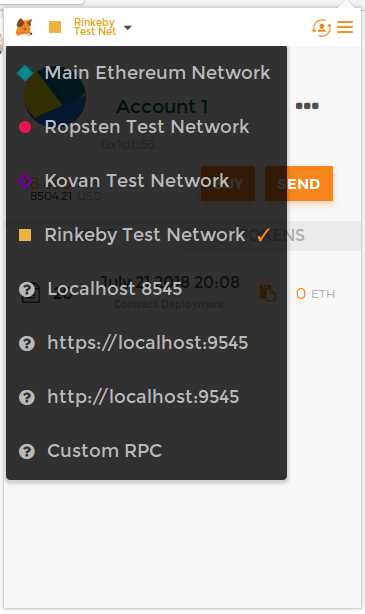
- Now you can choose the network you want to connect to. Click on the network dropdown menu and select “Rinkeby Test Network”.
- If you do not see “Rinkeby Test Network” in the network list, click on “Custom RPC” and enter the Rinkeby network URL: https://rinkeby.infura.io/v3/your_infura_project_id
- Click on the “Save” button to save the network settings.
- You can now use Metamask on the Rinkeby network for Ethereum development and testing.
With Metamask installed and set up, you can now deploy and interact with smart contracts on the Rinkeby network, test your dApps, and perform other tasks related to Ethereum development.
Creating a Wallet and Obtaining Test Ether on Rinkeby Network
To get started with Rinkeby Network on Metamask, you will need to create a new wallet and obtain test Ether. Follow the steps below:
- Install the Metamask extension on your preferred browser.
- Click on the Metamask icon to launch the extension.
- If you already have a Metamask wallet, log in using your credentials. Otherwise, click on “Create a Wallet”.
- Follow the instructions to set up a new wallet. Make sure to securely backup your seed phrase.
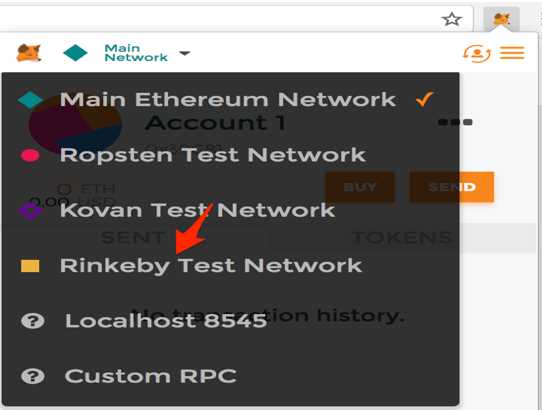
- Once your wallet is created, you will be automatically redirected to the Main Network.
- Click on the network dropdown at the top of the Metamask window and select “Rinkeby Test Network”.
- To obtain test Ether on Rinkeby Network, you will need to use a faucet. You can find a faucet URL by searching for “Rinkeby faucet” online.
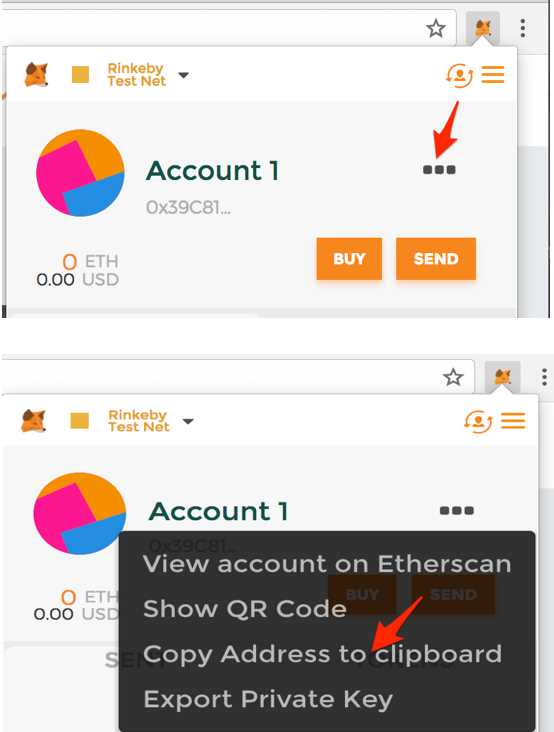
- Copy your Rinkeby address from the Metamask dropdown menu under your wallet name.
- Visit the faucet URL and follow their instructions to request test Ether.
- Provide your Rinkeby address when prompted and submit the request.
- In a few moments, you should receive test Ether in your Rinkeby wallet.
Now you are ready to start developing and testing your Ethereum applications on Rinkeby Network using Metamask!
Connecting Metamask to Rinkeby Network for Ethereum Development and Testing
If you’re a developer or a tester working with Ethereum, it’s important to have a reliable test network for your development and testing purposes. The Rinkeby network, a proof-of-authority (PoA) test network, serves as an ideal environment to test and deploy your smart contracts without using real Ether.
In order to connect Metamask to the Rinkeby network, follow these steps:
- Install the MetaMask extension for your preferred web browser (e.g. Chrome, Firefox, or Brave) if you haven’t done so already.
- Click on the MetaMask icon in your browser’s toolbar to open the extension.
- If you already have a MetaMask wallet, sign in with your credentials. Otherwise, click on “Create a Wallet” and follow the steps to create a new wallet.
- Once you’re signed in, click on the network dropdown (usually displayed as “Main Ethereum Network” or “Ethereum Mainnet”) and select “Custom RPC”.
- In the “New RPC URL” field, enter the following Rinkeby network URL:
https://rinkeby.infura.io/v3/YOUR_INFURA_API_KEY. ReplaceYOUR_INFURA_API_KEYwith your own Infura API key. If you don’t have one, you can sign up for free on the Infura website. - Click on “Save” to apply the changes and connect MetaMask to the Rinkeby network.
- To obtain Rinkeby Ether for testing, visit the Rinkeby Faucet website (https://faucet.rinkeby.io/) and follow the instructions to receive Ether to your Rinkeby address.
Now, you have successfully connected Metamask to the Rinkeby network for Ethereum development and testing. You can now deploy and test your smart contracts on this network without using real Ether. Remember to switch back to the main Ethereum network when you’re done with development and testing to avoid using up your Rinkeby Ether.
Frequently Asked Questions:
What is Rinkeby network?
Rinkeby is a test network for the Ethereum blockchain. It allows developers to test their smart contracts and decentralized applications without using real Ether.
How do I set up Rinkeby network on Metamask?
To set up the Rinkeby network on Metamask, you need to open the extension and click on the network selection dropdown. From there, you can click “Custom RPC” and enter the Rinkeby network details, such as the URL and the Chain ID.
Can I use Rinkeby network for production deployment?
No, Rinkeby is a test network and should not be used for production deployments. It is meant for development and testing purposes only.

+ There are no comments
Add yours