


Metamask is a popular browser extension that allows users to interact with decentralized applications and manage their cryptocurrency wallets. By default, Metamask supports the Ethereum network, but did you know that you can also add custom networks to your Metamask account? This can be useful if you want to connect to a specific blockchain network or explore new decentralized applications.
In this step-by-step guide, we will walk you through the process of adding a new network to your Metamask account. Whether you’re a developer looking to test your dApp on a different network or a user interested in exploring other blockchain networks, this guide will help you expand your options.
To get started, open your Metamask extension and click on the network dropdown menu. You will see a list of supported networks, including Ethereum Mainnet, Rinkeby, and Kovan. At the bottom of this list, click on the “Custom RPC” option. This will allow you to add a new custom network to your Metamask account.
Next, you will need to provide the details of the network you want to add. You will need to specify the network name, the RPC URL, the ChainID, and the currency symbol. The network name can be anything you like, but make sure it’s descriptive enough to help you identify the network later. The RPC URL is the endpoint that your Metamask extension will use to connect to the network. You can usually find this information on the website or documentation of the network you want to connect to. The ChainID is a unique identifier for the network, and the currency symbol is the symbol used to represent the native currency of the network.
Once you have entered all the details, click on the “Save” button to add the new network to your Metamask account. You will now see the new network listed in the dropdown menu, along with the other supported networks. You can switch between networks by simply selecting the one you want to use.
Adding a new network to your Metamask account opens up a world of possibilities. Whether you’re a developer looking to test your dApp on a different network or a user interested in exploring other blockchain networks, this guide has shown you how easy it is to expand your options with Metamask.
How to Add a New Network to Metamask
Metamask is a popular digital wallet for managing cryptocurrency, and it allows users to interact with decentralized applications on the Ethereum blockchain. By default, Metamask is set up to connect to the Ethereum Mainnet. However, if you want to access a different blockchain or test network, you can easily add a new network to Metamask. Here’s how you can do it:
1. Open the Metamask extension in your web browser by clicking on the extension icon.
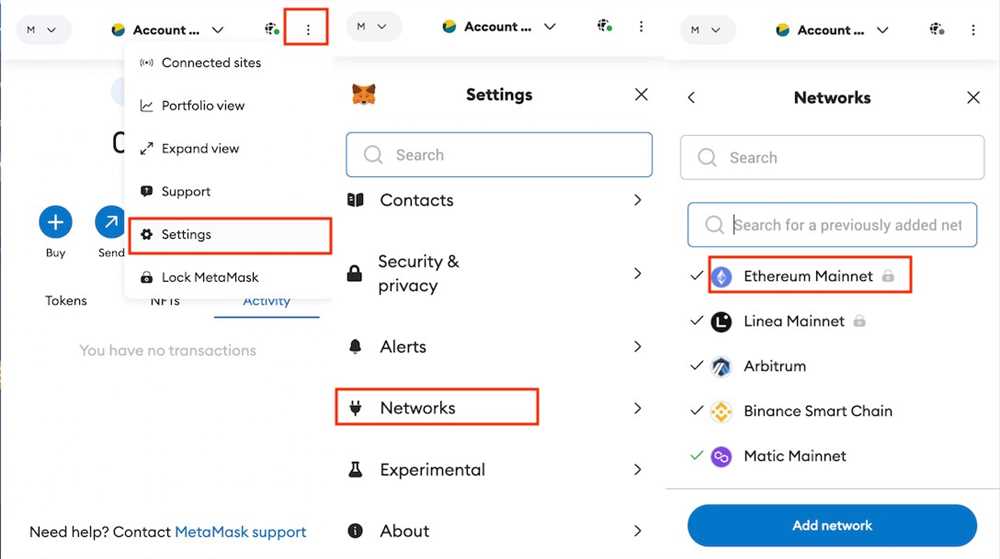
2. In the Metamask window, click on the menu icon in the top right corner (the three horizontal lines) and select “Settings” from the dropdown menu.
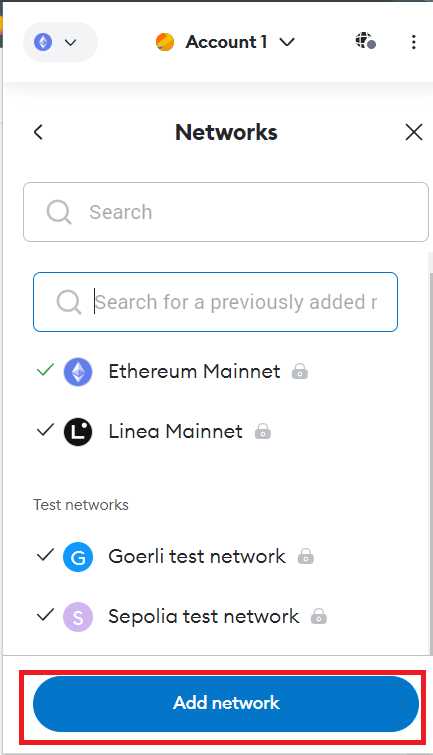
3. In the Settings menu, click on the “Networks” tab.
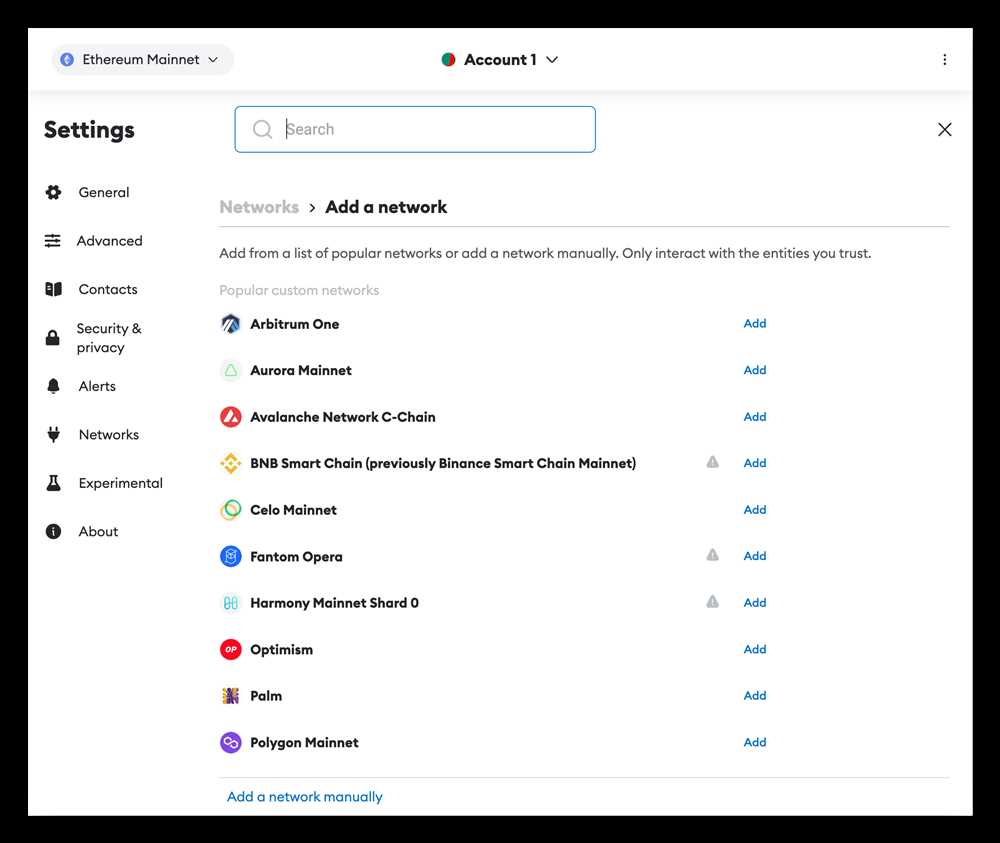
4. At the bottom of the Networks tab, click on the “Add Network” button.
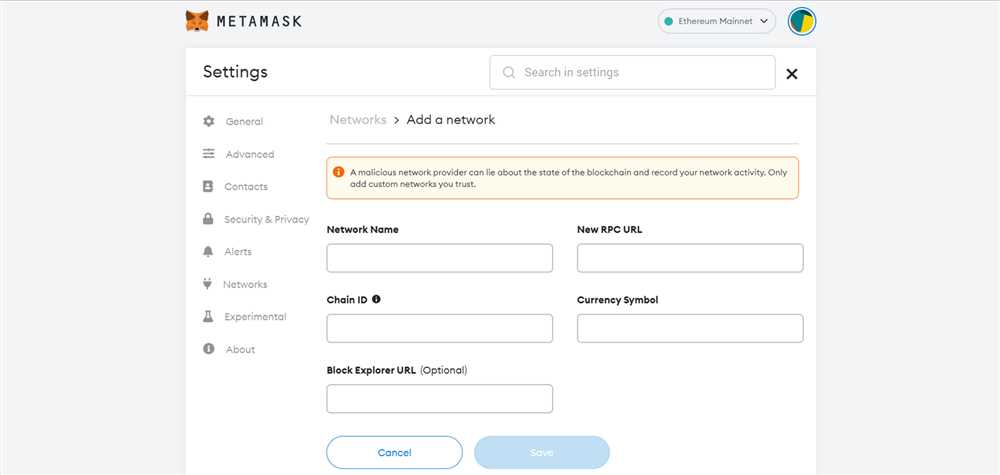
5. In the “New Network” form, you’ll need to fill in the following details:
– Network Name: Enter a name for the new network (e.g., “My Custom Network”).
– New RPC URL: Enter the URL for the blockchain network you want to add (e.g., “https://example-network.com”).
– Chain ID: Enter the chain ID for the network you want to add (this is a unique identifier for each blockchain network).
– Symbol (optional): Enter the symbol for the network’s native currency (e.g., “ETH” for Ethereum).
– Block Explorer URL (optional): Enter the URL for a block explorer that supports the network (this allows you to view transaction details on the blockchain).
6. Click on the “Save” button to add the new network to Metamask.
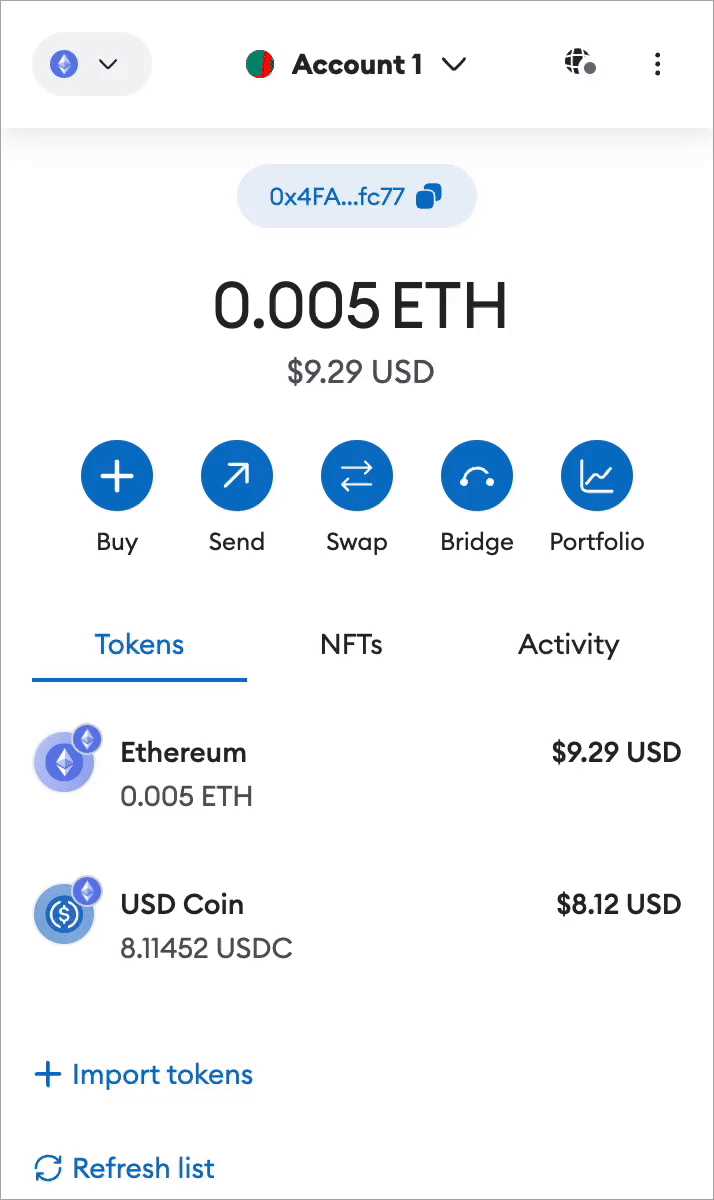
Once the network is added, you can switch between different networks by clicking on the network name in the top left corner of the Metamask window. You can also change the default network by going back to the Networks tab in the Settings menu.
Adding a new network to Metamask allows you to access different blockchain networks and test networks, which can be useful for developers or anyone who wants to explore different decentralized applications and cryptocurrencies.
Step 1: Open Metamask Extension
Before you can add a new network to Metamask, you need to open the Metamask extension in your web browser. The extension is available for Chrome, Firefox, Opera, and Brave browsers.
For Chrome and Brave Users:
If you are using Chrome or Brave, look for the Metamask icon in the top-right corner of your browser toolbar. It looks like a fox’s head with a mask. Click on the icon to open the Metamask extension.
For Firefox Users:
If you are using Firefox, click on the hamburger menu in the top-right corner of your browser toolbar. From the dropdown menu, click on the Metamask icon to open the extension.
If you don’t see the Metamask icon in your browser toolbar, you may need to pin it. Right-click on the toolbar, select “Customize”, and drag the Metamask icon to your desired spot on the toolbar.
If you don’t have the Metamask extension installed, you can download it from the official Metamask website or from the respective extension stores for your browser.
Once you have opened the Metamask extension, you are ready to proceed to the next step of adding a new network to Metamask.
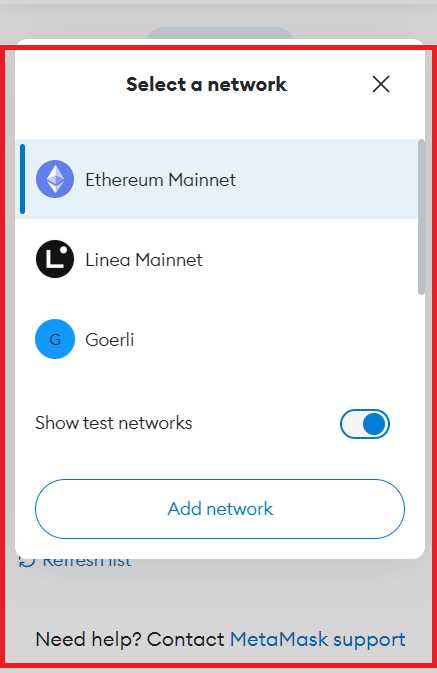
Step 2: Click on the Network Dropdown
Once you have successfully installed and opened Metamask, you will see a small fox icon in the top right corner of your browser. Click on the fox icon to open the Metamask extension.
After opening the extension, you will be taken to the Metamask main screen. Here, you will see various options and settings. Look for the network dropdown menu, usually located in the top center of the screen.
Click on the network dropdown menu to reveal a list of available networks. You will see options such as “Main Ethereum Network,” “Ropsten Test Network,” and others. This is where you can select the network you want to add to Metamask.
Make sure to choose the correct network that corresponds to the blockchain or network you want to connect to. For example, if you are adding a custom or private network, select the “Custom RPC” option.
If the network you want to add is not listed, you can select the “Custom RPC” option and manually enter the network’s details, such as the network name, URL, and chain ID. This allows you to add any compatible Ethereum network to Metamask.
Note: It is important to be cautious when connecting to custom or unfamiliar networks, as they may not have the same level of security and trust as the main Ethereum network.
Step 3: Select “Custom RPC”
Once you have opened your Metamask extension, you will see a small fox icon on the top right corner. Click on the icon to open the Metamask menu.
In the Metamask menu, you will see a list of networks. By default, the “Main Ethereum Network” is selected. To add a new network, select “Custom RPC” at the bottom of the list.
A new dialog box will appear, allowing you to enter the details of the new network you want to add.
In the “Network Name” field, enter a name for the network. This can be anything you want, but it’s recommended to use a name that identifies the specific network you are adding.
In the “New RPC URL” field, enter the RPC URL for the network. This URL contains the endpoint for the network’s blockchain API. Make sure the URL is correct and up to date.
You can also enter the chain ID for the network in the “Chain ID” field, if you know it. This is an optional field and can be left blank.
Once you have entered all the details, click on the “Save” button to add the new network to Metamask.
Congratulations! You have successfully selected “Custom RPC” and added a new network to Metamask. You can now use this network to interact with decentralized applications and perform transactions.
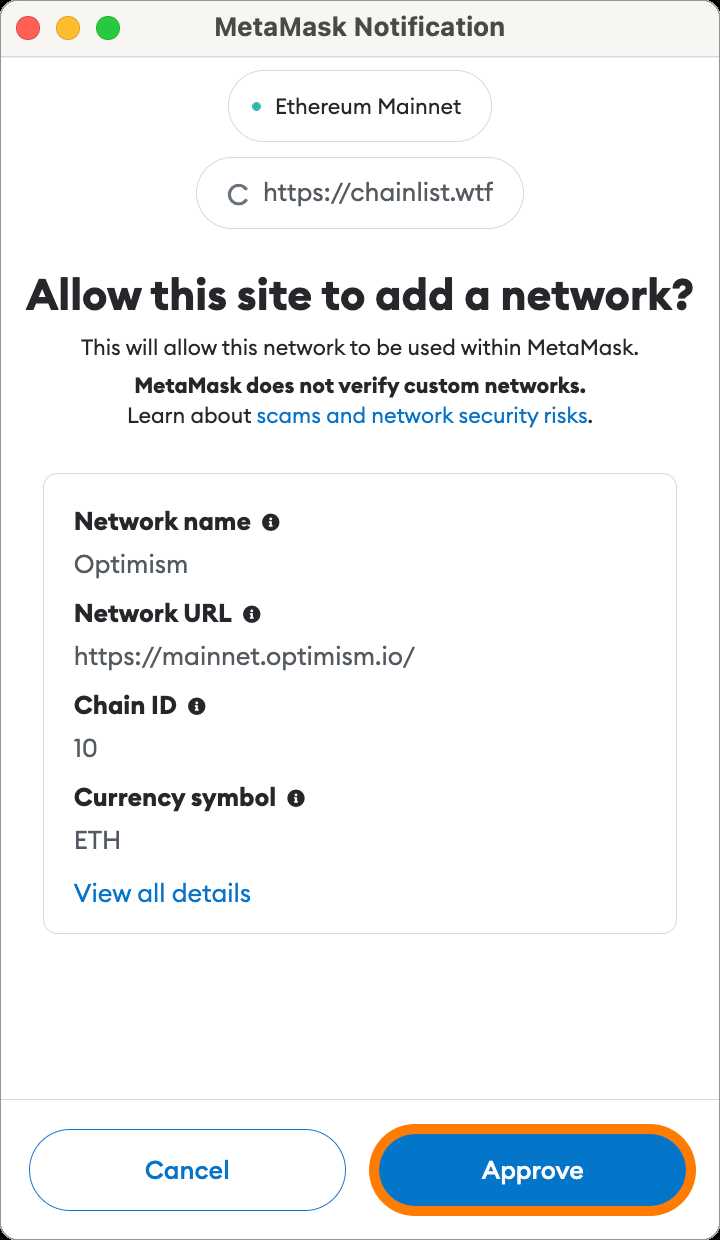
Step 4: Fill in the Network Details
Once you have selected the Custom RPC option, you will need to fill in the details for the new network that you want to add to Metamask. This includes the Network Name, New RPC URL, ChainID, Symbol, and Block Explorer URL. Follow the steps below to complete this process:
Network Name
Enter a unique name for the network. This could be the name of the blockchain, organization, or project that the network is associated with. Make sure to choose a name that is easy to remember.
New RPC URL
Copy and paste the RPC URL for the network into this field. The RPC URL is the endpoint that Metamask will use to connect to the network. You can usually find this information on the network’s website or documentation.
Note: Make sure the RPC URL is accurate and up-to-date, as an incorrect URL can prevent Metamask from functioning properly.
ChainID
The ChainID is a unique identifier for the network. It helps Metamask differentiate between different networks and ensure that transactions are sent to the correct chain. Double-check the ChainID provided by the network and enter it into this field.
Symbol
The Symbol refers to the currency or token symbol associated with the network. For example, “ETH” for Ethereum or “BNB” for Binance Smart Chain. Enter the symbol into this field.
Block Explorer URL
Add the URL for the block explorer associated with the network, if available. This will allow you to easily view transaction and block details directly from Metamask. If the network does not have a block explorer, you can leave this field blank.
| Field | Description |
|---|---|
| Network Name | Enter a unique name for the network |
| New RPC URL | Copy and paste the RPC URL for the network |
| ChainID | Enter the unique identifier for the network |
| Symbol | Enter the currency or token symbol associated with the network |
| Block Explorer URL | Add the URL for the block explorer, if available |
Once you have filled in the network details, click on the “Save” button to add the new network to Metamask. You should now see the network listed in your network options and be able to select it when interacting with decentralized applications on that network.
Frequently Asked Questions:
What is Metamask?
Metamask is a cryptocurrency wallet and browser extension that allows users to interact with the Ethereum blockchain. It enables users to store, receive, and send Ethereum and ERC-20 tokens, as well as access decentralized applications (dApps) on the Ethereum network.
Why would I want to add a new network to Metamask?
Adding a new network to Metamask allows you to connect to a different blockchain network and interact with dApps and tokens that are not on the Ethereum mainnet. This is useful if you want to explore other blockchain networks or participate in token sales and projects on different networks.
What should I enter for the network details when adding a new network?
When adding a new network, you will need to enter the network name, RPC URL, chain ID, symbol, and block explorer URL. The network name can be any name you choose, such as “Testnet” or “Custom Network”. The RPC URL is the URL of the network’s Ethereum node. The chain ID is a unique identifier for the network. The symbol is the currency symbol of the network’s native token. The block explorer URL is the URL of a blockchain explorer for the network, where you can view transaction and block information.
Can I connect to a network that is not listed in the Metamask dropdown?
Yes, you can connect to a network that is not listed in the Metamask dropdown by selecting “Custom RPC” and entering the network details. This allows you to connect to any Ethereum-compatible network, including private networks or networks that are not widely supported.


+ There are no comments
Add yours