


Are you interested in investing in Binance Coin (BNB)? If you are, then you’ll need to have a secure digital wallet where you can store your BNB safely. Metamask is an excellent choice when it comes to storing and managing BNB and other cryptocurrencies. This step-by-step guide will walk you through the process of getting BNB on Metamask, so you can start investing in Binance Coin with confidence.
Step 1: Install the Metamask Extension
To start, you’ll need to have the Metamask wallet installed in your web browser. If you haven’t done so already, head over to the Metamask website and follow the instructions to install the browser extension. Once you’ve installed it, you’ll see the Metamask icon in your browser toolbar.
Step 2: Create a New Metamask Wallet
After installing the Metamask extension, click on the icon in your browser toolbar to open the wallet. If you’re opening Metamask for the first time, you’ll be prompted to create a new wallet. Follow the instructions to set up a strong password and securely back up your wallet’s seed phrase. Remember to keep this seed phrase in a safe place, as it can be used to restore your wallet if you ever lose access to it.
Step 3: Add Binance Smart Chain Network
Once you’ve created your Metamask wallet, the next step is to add the Binance Smart Chain network. Click on the network dropdown menu at the top of the Metamask window and select “Custom RPC.” In the “New RPC URL” field, enter the following URL: “https://bsc-dataseed.binance.org/” and click “Save.” This will add the Binance Smart Chain network to your Metamask wallet.
Step 4: Get BNB on a Cryptocurrency Exchange
Now that you have your Metamask wallet set up with the Binance Smart Chain network, it’s time to get some BNB. Head over to a trusted cryptocurrency exchange that supports BNB and create an account if you don’t have one already. Deposit the desired amount of funds into your exchange account and purchase BNB. Once you have BNB in your exchange account, you’re ready to move on to the next step.
Step 5: Transfer BNB to Your Metamask Wallet
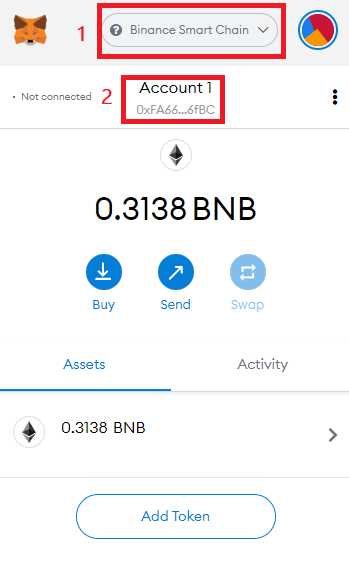
To transfer BNB from your cryptocurrency exchange account to your Metamask wallet, you’ll need your wallet’s address. Open Metamask and click on the account avatar at the top right corner of the wallet window. Select the account you want to receive BNB and copy its address. Go back to your cryptocurrency exchange, navigate to the withdrawal section, and enter your Metamask wallet address as the destination. Confirm the withdrawal and wait for the transaction to be processed. Once the transaction is confirmed, you’ll see your BNB balance in your Metamask wallet.
Now that you have BNB on your Metamask wallet, you can start exploring the world of decentralized finance (DeFi) and participate in various Binance Smart Chain projects. Just remember to do your research and exercise caution when investing in cryptocurrencies.
Setting up Metamask Wallet
Metamask is a popular cryptocurrency wallet that integrates with your browser, allowing you to securely store, manage, and interact with your digital assets. Here is a step-by-step guide on how to set up a Metamask wallet to facilitate the process of getting BNB.
Step 1: Install Metamask Extension
The first step is to install the Metamask extension in your browser. Metamask supports various browsers such as Chrome, Firefox, Brave, and Edge. Go to the extension store of your preferred browser and search for Metamask. Click on the install button to add the extension to your browser.
Step 2: Create a New Wallet
After installing the Metamask extension, click on the Metamask icon in your browser toolbar to launch the wallet. A welcome screen will appear, and you can click on “Get Started” to begin the wallet creation process.
Next, you will be prompted to create a new wallet. Choose a strong password for your wallet and click on “Create” to proceed. Make sure to remember your password as it cannot be recovered if lost.
Step 3: Backup Your Seed Phrase
After creating your wallet, you will be presented with a seed phrase. This seed phrase is a set of 12 or 24 words that can be used to recover your wallet if you forget your password. It is crucial to write down this seed phrase and store it in a safe place. Do not store it digitally or share it with anyone.
Step 4: Confirm Your Seed Phrase
To ensure that you have accurately written down your seed phrase, Metamask will ask you to confirm some of the words in a specific order. This verification process helps to prevent any mistakes in noting down the seed phrase. Select the words as prompted, and click on “Confirm” when done.
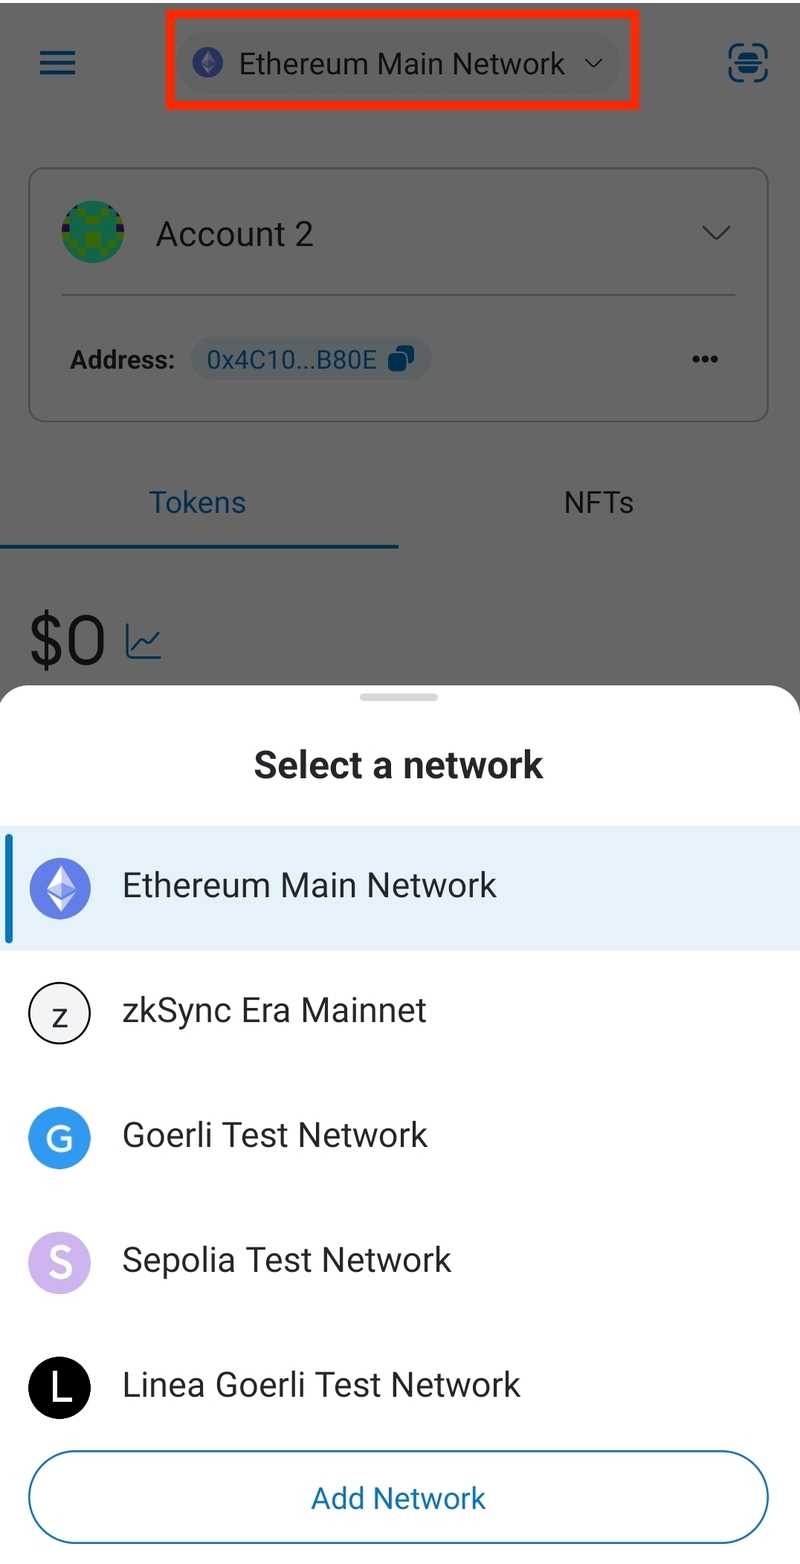
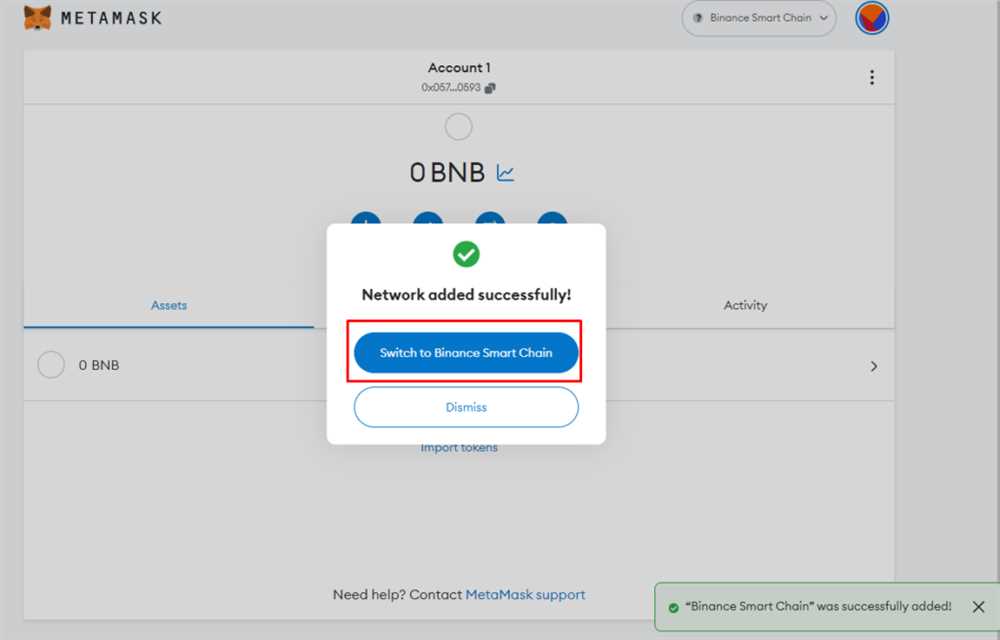
Step 5: Connect to the Binance Smart Chain Network
Now that your wallet is set up, you need to connect it to the Binance Smart Chain (BSC) network to interact with BNB. Click on the network dropdown in the Metamask interface and select “Custom RPC.”
In the network settings, enter the following details:
Network Name: Binance Smart Chain
New RPC URL: https://bsc-dataseed1.binance.org/
Chain ID: 56
Symbol: BNB
Block Explorer URL: https://bscscan.com/
Once you have entered the details, click on the “Save” button to connect to the BSC network.
Congratulations! You have successfully set up your Metamask wallet and connected it to the Binance Smart Chain network. Now you can proceed with the process of getting BNB on Metamask and start exploring the world of decentralized finance.
Purchasing BNB on a Cryptocurrency Exchange
If you don’t already have BNB (Binance Coin) in your Metamask wallet, you’ll need to purchase it on a cryptocurrency exchange. Here is a step-by-step guide on how to do that:
Step 1: Choose an Exchange
There are several reputable cryptocurrency exchanges where you can buy BNB, such as Binance, Coinbase, and Kraken. Research these exchanges and choose one that suits your needs in terms of fees, security, and user interface.
Step 2: Create an Account
Once you’ve chosen an exchange, you’ll need to create an account. This usually involves providing your email address, setting up a password, and in some cases, completing a verification process.
Step 3: Deposit Funds
After creating an account, you’ll need to deposit funds into your exchange account. This is usually done by transferring funds from your bank account or another cryptocurrency wallet. Follow the instructions provided by the exchange to complete this step.
Step 4: Find BNB
Once your funds are deposited, navigate to the market section of the exchange and search for BNB. You may need to enter the trading pair, such as BNB/USD or BNB/BTC, depending on the exchange. Choose the appropriate trading pair and proceed to the next step.
Step 5: Place an Order
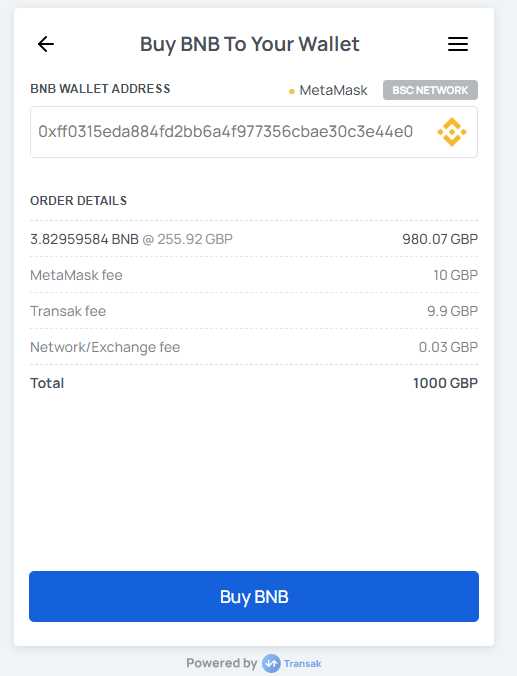
Now that you’ve found the BNB market, you can place an order to purchase BNB. You can choose between a market order, which buys BNB at the current market price, or a limit order, which allows you to set a specific price at which you want to buy BNB.
Note: Pay attention to the trading fees and any additional charges that may apply when placing an order.
Step 6: Confirm and Execute
Review your order details, including the quantity of BNB you want to purchase and the total cost. Once you’re satisfied, confirm the order and execute it. The BNB will be credited to your exchange account.
It’s important to note that cryptocurrency prices are volatile and can change rapidly. Be mindful of the market conditions when placing your order.
Once you have successfully purchased BNB on the cryptocurrency exchange, you can transfer it to your Metamask wallet by following the steps outlined in the previous section.
By following these steps, you’ll be able to purchase BNB on a cryptocurrency exchange and start using it in your Metamask wallet.
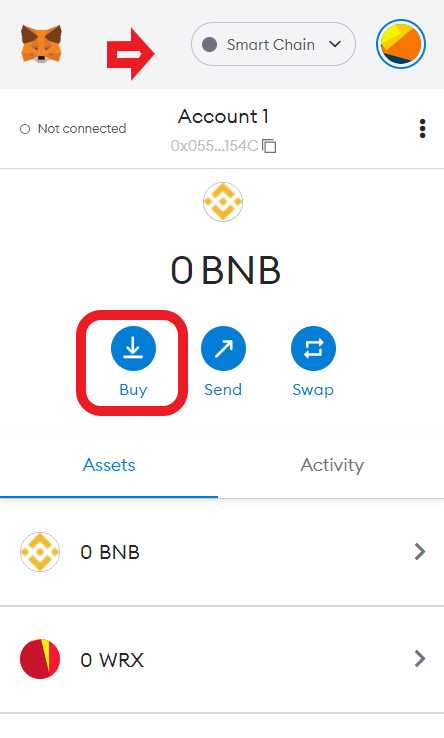
Transferring BNB to Metamask Wallet
Once you have set up your Metamask wallet and connected it to the Binance Smart Chain, the next step is to transfer BNB to your wallet. Follow the step-by-step guide below to transfer BNB to your Metamask wallet:
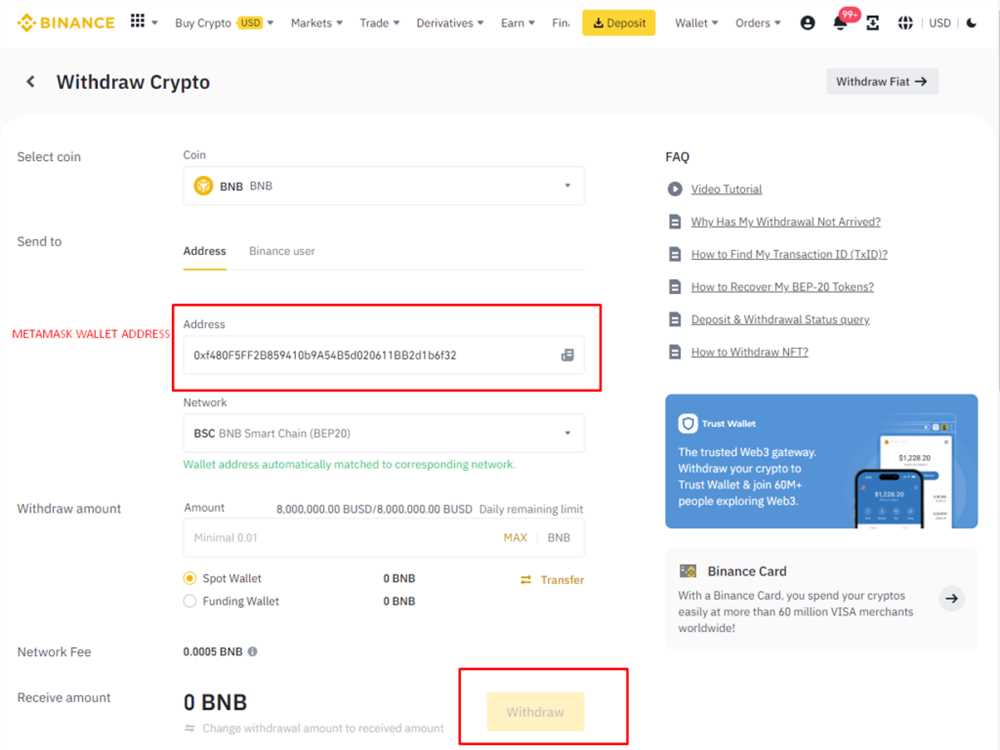
- Open your Binance account and navigate to the BNB withdrawal page.
- Enter the amount of BNB you want to transfer and select the Binance Smart Chain (BSC) network.
- Copy your Metamask wallet address by clicking on the account icon and selecting “Copy Address”.
- Paste your Metamask wallet address into the “Recipient Address” field on the Binance withdrawal page.
- Review the withdrawal details and confirm the transaction.
- Wait for the transaction to be processed. This may take a few minutes depending on network congestion.
- Once the transaction is completed, you will see the BNB balance in your Metamask wallet.
It is important to double-check the recipient address before confirming the transaction to avoid any loss of funds. Additionally, ensure that you have enough BNB in your Binance account to cover the withdrawal fee.
Now that you have successfully transferred BNB to your Metamask wallet, you can use it to interact with decentralized applications (dApps) on the Binance Smart Chain or trade it for other tokens.
Frequently Asked Questions:
What is BNB?
BNB is the native cryptocurrency of the Binance exchange, which is one of the largest and most popular cryptocurrency exchanges in the world. BNB can be used for various purposes on the Binance platform, including trading fees, participation in token sales, and more.
What is Metamask?
MetaMask is a cryptocurrency wallet and browser extension that allows users to interact with decentralized applications (dapps) on the Ethereum network. It provides a user-friendly interface for managing Ethereum-based assets and interacting with smart contracts.
How can I get BNB on Metamask?
To get BNB on Metamask, you first need to have BNB tokens in your Binance account. Once you have BNB on Binance, you can withdraw them to your Metamask wallet address. To do this, go to the “Wallet” section on Binance, select BNB, click on “Withdraw,” enter your Metamask wallet address, and confirm the transaction. After the withdrawal is completed, you will see BNB in your Metamask wallet.
Can I use any other cryptocurrency wallet instead of Metamask to get BNB?
Yes, you can use other Ethereum-compatible wallets, such as Trust Wallet or MyEtherWallet, to get BNB. The process of getting BNB on these wallets is similar to the process described for Metamask. However, please note that not all wallets support BNB, so make sure to choose a wallet that is compatible with BNB.
What are the advantages of getting BNB on Metamask?
Getting BNB on Metamask allows you to easily manage and use BNB tokens within the Ethereum ecosystem. With BNB on Metamask, you can participate in decentralized finance (DeFi) applications, interact with Ethereum-based smart contracts, and take advantage of various opportunities available in the Ethereum ecosystem. Additionally, having BNB on Metamask provides you with full control and ownership of your tokens.

+ There are no comments
Add yours