


If you’re a fan of cryptocurrency and have recently discovered Dogecoin, you might be wondering how to add it to your Metamask wallet. Dogecoin, with its cute Shiba Inu mascot and viral memes, has become a popular cryptocurrency in recent years. Fortunately, adding Dogecoin to your Metamask wallet is a straightforward process that can be done in just a few simple steps.
First, make sure you have the Metamask extension installed on your preferred web browser. Metamask is a popular wallet used by many cryptocurrency enthusiasts and provides a user-friendly interface for managing your digital assets. Once you have Metamask installed, open the extension and follow the on-screen prompts to set up your wallet. This will include creating a password and agreeing to the terms and conditions.
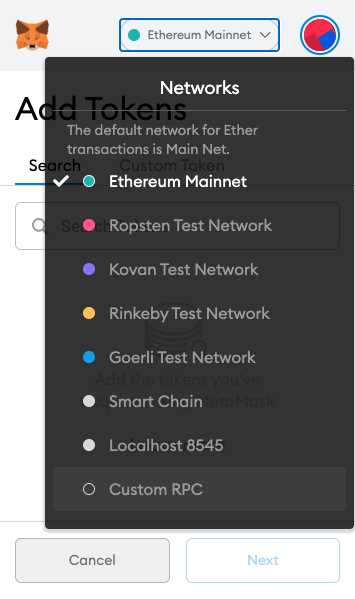
With your Metamask wallet set up, you’ll need to add the Dogecoin network to your wallet. To do this, click on the network selection dropdown in the top right corner of the Metamask extension and select “Custom RPC.” In the popup window, enter the following details:
Network Name: Dogecoin
New RPC URL: https://doge-rpc.shibetoshi.org/
ChainID: 1
Symbol: DOGE
Block Explorer URL: https://doge.tokenview.com/
After entering the details, click “Save” to add the Dogecoin network to your Metamask wallet. You should now see Dogecoin listed among the available networks in the network selection dropdown. To finalize the process, you’ll need to import your Dogecoin wallet into Metamask.
To import your Dogecoin wallet into Metamask, click on the Metamask extension icon and select “Import Account.” In the import window, select “Private Key” as the method of import and paste your Dogecoin wallet’s private key into the provided field. You can find your Dogecoin wallet’s private key in your existing wallet or through your Dogecoin wallet provider. Once you’ve entered your private key, click “Import” to import your Dogecoin wallet into Metamask.
Congratulations, you’ve successfully added Dogecoin to your Metamask wallet! You can now use your Metamask wallet to send, receive, and manage your Dogecoin holdings. Remember to always keep your private key safe and secure, as it provides access to your digital assets. Enjoy the world of Dogecoin and explore the many possibilities this fun and vibrant cryptocurrency has to offer!
Adding Dogecoin to Metamask: A Simple Guide
Metamask is a popular cryptocurrency wallet that allows users to securely store and manage their digital assets. While Metamask supports a wide range of cryptocurrencies, including Ethereum and ERC-20 tokens, adding Dogecoin requires some additional steps. This simple guide will walk you through the process of adding Dogecoin to your Metamask wallet.
Step 1: Install Metamask
If you haven’t installed Metamask already, you can do so by visiting the official Metamask website and following the instructions for your preferred browser. Metamask is available for Chrome, Firefox, Brave, and Edge.
Step 2: Create or Import Wallet
Once you have Metamask installed, launch the extension and either create a new wallet or import an existing one. Follow the on-screen instructions and make sure to securely backup your wallet’s seed phrase.
Step 3: Add Dogecoin Network
Now that your wallet is set up, you need to add the Dogecoin network. Click on the network dropdown in the top-right corner of the Metamask interface and select “Custom RPC.”
Step 4: Fill in Network Details
In the “New RPC URL” field, enter “https://doge-rpc.shibedoge.com”. Set the “Chain ID” to 1, and “Symbol” and “Block Explorer URL” to “DOGE”. Click “Save” to add the Dogecoin network to your Metamask.
Step 5: Add DOGE Token
To add the DOGE token to your Metamask wallet, click on the Metamask extension icon in your browser and select the wallet you added the Dogecoin network to. Click on “Add Token” and enter the following contract address: “0xbA2aE424d960c26247Dd6c32edC70B295c744C43”. Metamask should automatically populate the “Token Symbol” and “Decimals of Precision” fields. Click “Next” and then “Add Tokens” to complete the process.
Step 6: Manage Your Dogecoin
You’ve successfully added Dogecoin to your Metamask wallet! You can now send, receive, and manage your DOGE tokens through the Metamask interface. Make sure to always double-check addresses and exercise caution when handling cryptocurrencies.
Remember that cryptocurrencies are highly volatile and market conditions can change rapidly. It’s important to stay informed and make educated decisions when dealing with digital assets.
Note: The guide provided here is for informational purposes only and should not be considered financial or investment advice. Always do your own research and consult with a professional before making any investment decisions.
Step 1: Install Metamask Extension
To start using Dogecoin with Metamask, you need to have the Metamask extension installed on your web browser. Metamask is a crypto wallet that allows you to securely store and manage your Dogecoins.
Here are the step-by-step instructions to install Metamask:
- Open your preferred web browser (e.g. Google Chrome, Mozilla Firefox, Brave).
- Visit the Metamask website at https://metamask.io.
- Click on the “Get Chrome Extension” button if you are using Google Chrome or “Get Firefox Extension” if you are using Mozilla Firefox.
- Once the extension is added to your browser, click on the Metamask logo in the top right corner of your browser window.
- Choose the option to create a new wallet and set up a strong password for your wallet.
- Read and agree to the terms and conditions.
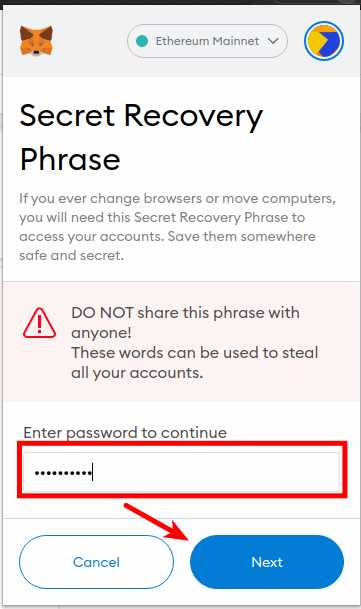
- Store the secret backup phrase provided by Metamask in a safe and secure location. This backup phrase can be used to recover your wallet if you ever lose access to it.
- Click on the Metamask logo again and click “Import Wallet” if you already have an existing Metamask wallet and want to connect it to your browser.
- Enter your secret backup phrase to import your existing wallet.
- Once your wallet is created or imported, you are now ready to add Dogecoin to your Metamask wallet.
By following these steps, you will have successfully installed the Metamask extension and set up your wallet. Now you can move on to the next step and add Dogecoin to your Metamask wallet.
Step 2: Create or Import your Metamask Wallet
Metamask is a popular digital wallet that allows users to securely store and manage their cryptocurrencies. To add Dogecoin to your Metamask wallet, you first need to create a new wallet or import an existing one. Follow these steps to get started:
Create a New Wallet:
- Download and install the Metamask extension for your preferred web browser.
- Launch Metamask and click on the “Get Started” button.
- Click on the “Create a Wallet” option.
- Set a strong password for your wallet. Make sure to use a combination of uppercase and lowercase letters, numbers, and symbols.
- Click on the “Create” button.
- Metamask will generate a unique 12-word recovery phrase. This phrase is used to restore your wallet if you ever lose access to it. Write down this phrase and keep it in a safe place.
- Confirm your recovery phrase by selecting the correct words in the given order.
- Once you have confirmed your recovery phrase, your new wallet will be created.
Import an Existing Wallet:
- Launch Metamask and click on the “Get Started” button.
- Click on the “Import Wallet” option.
- Enter your recovery phrase (12-word seed phrase) in the designated field.
- Set a strong password for your imported wallet.
- Click on the “Import” button.
- Your existing wallet will be imported into Metamask, and you’ll have access to all your funds and transactions.
Once you have created or imported your Metamask wallet, you are ready to proceed to the next step and add Dogecoin to it.
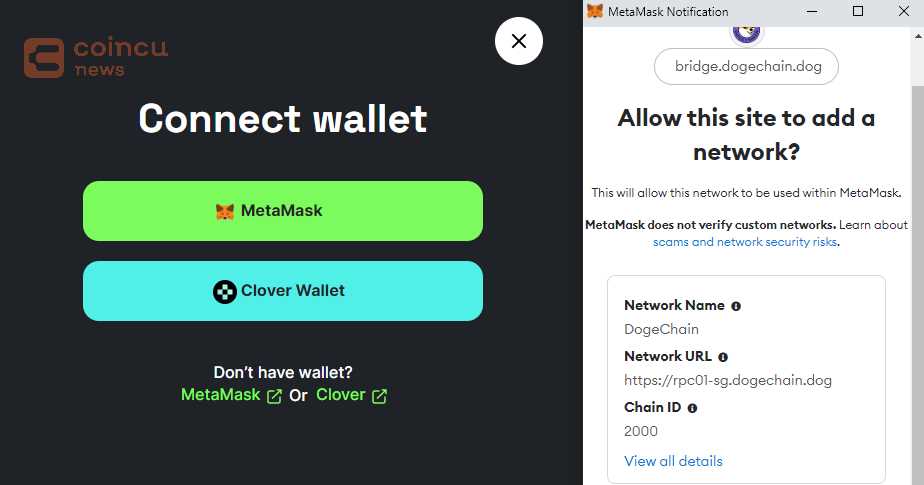
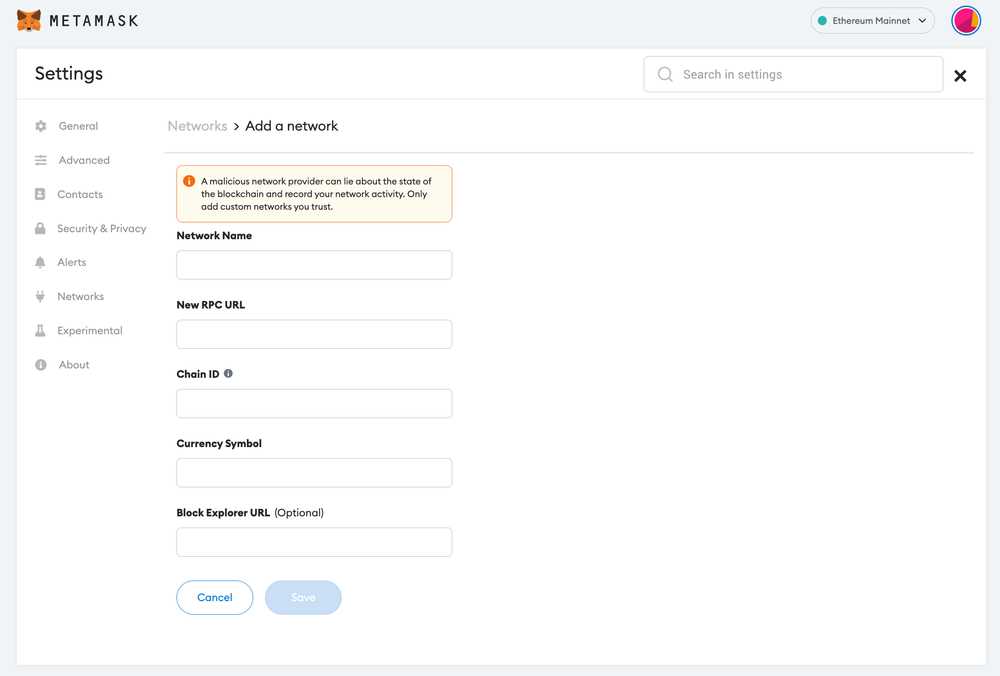
Step 3: Add Dogecoin Network to Metamask

Once you have installed the MetaMask extension and created your wallet, the next step is to add the Dogecoin network to your MetaMask wallet.
To add the Dogecoin network to MetaMask, follow these simple steps:
Step 1: Open MetaMask
Open the MetaMask extension by clicking on the MetaMask icon in your browser toolbar. This will open the MetaMask wallet interface.
Step 2: Access Network Options
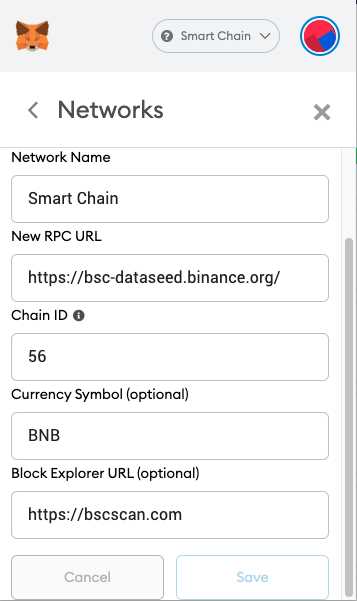
In the MetaMask wallet interface, locate and click on the network selection button. This is usually found in the top right corner of the interface and looks like a network name or logo.
Step 3: Add Custom Network
In the network selection menu, click on “Custom RPC” or “Custom Network” to add a Dogecoin network manually.
Step 4: Fill in Network Details
In the custom network settings, fill in the following details:
- Network Name: Enter a name for the network, such as “Dogecoin”.
- New RPC URL: Enter the RPC URL for the Dogecoin network. You can find this information from trusted sources or Dogecoin community websites.
- Chain ID: Enter the chain ID for the Dogecoin network. Again, this information can be found from trusted sources or Dogecoin community websites.
- Symbol: Enter the symbol for the currency used in the Dogecoin network, which is “DOGE”.
- Block Explorer URL: Optionally, you can enter the URL of a block explorer for the Dogecoin network. This will allow you to easily view transaction details.
Once you have entered the network details, click on the “Save” button to add the Dogecoin network to MetaMask.
Congratulations! You have successfully added the Dogecoin network to your MetaMask wallet. You can now switch to the Dogecoin network and start managing your Dogecoin assets within MetaMask.
Step 4: Add DOGE tokens to your Metamask Wallet
Once you have set up your Metamask wallet and connected it to the network, it’s time to add DOGE tokens to your wallet. Adding DOGE tokens to your wallet will allow you to send, receive, and manage Dogecoins.
Here are the step-by-step instructions to add DOGE tokens to your Metamask wallet:
- Open your Metamask extension or mobile app and make sure you are logged in.
- Click on ‘Assets’ located at the bottom of the screen.
- Scroll and click on ‘Add Token’.
- Select ‘Custom Token’.
- In the ‘Token Contract Address’ field, enter the DOGE token contract address: [insert DOGE token contract address here].
- The ‘Token Symbol’ and ‘Decimals of Precision’ fields should automatically populate with ‘DOGE’ and ‘8’ respectively. If not, enter ‘DOGE’ in the ‘Token Symbol’ field and ‘8’ in the ‘Decimals of Precision’ field.
- Click on ‘Next’.
- Review the details and click on ‘Add Tokens’ to add DOGE tokens to your Metamask wallet.
Once you have completed these steps, the DOGE tokens should appear in your Metamask wallet under the ‘Assets’ section. Now you can use your Metamask wallet to send and receive DOGE tokens just like any other cryptocurrency.
Frequently Asked Questions:
Can I add Dogecoin to my Metamask wallet?
Yes, you can add Dogecoin to your Metamask wallet by following a simple guide with step-by-step instructions. It allows you to manage your DOGE tokens along with your other cryptocurrencies in one place.
Why should I add Dogecoin to my Metamask wallet?
Adding Dogecoin to your Metamask wallet enables you to have quick and convenient access to your DOGE tokens. It also allows you to easily track and manage all your cryptocurrencies in one wallet, making it more convenient to keep track of your investments.
+ There are no comments
Add yours