


If you’re a developer or a crypto enthusiast, you’ve probably encountered the need to connect different dApps and smart contracts to your Metamask wallet. One of the most popular decentralized applications is Chainlist, which allows users to list, buy, and sell tokens in a decentralized marketplace.
Connecting Chainlist with Metamask is a simple process that can be done in just a few steps. First, make sure you have the Metamask extension installed in your browser. Metamask is a digital wallet that allows you to interact with the Ethereum blockchain and access decentralized applications.
Once you have Metamask installed, open the Chainlist app in your browser. On the Chainlist homepage, you will see a button that says “Connect to Metamask”. Click on this button to initiate the connection. A popup will appear asking you to confirm the connection between Chainlist and Metamask. Click “Connect” to proceed.
After connecting Chainlist with Metamask, you will be able to see your wallet address and balance on the Chainlist app. You can now start listing, buying, and selling tokens on the decentralized marketplace. When you make a transaction on Chainlist, Metamask will automatically open and prompt you to confirm the transaction.
Connecting Chainlist with Metamask is essential for anyone looking to participate in the decentralized finance (DeFi) ecosystem. By connecting your wallet, you can securely interact with smart contracts, trade tokens, and participate in decentralized applications. The integration of Chainlist and Metamask provides a seamless and user-friendly experience for users who want to explore the world of decentralized finance.
Overview: What is Chainlist?
Chainlist is a decentralized application (DApp) that serves as a platform for buying and selling cryptocurrency domain names. It aims to provide a user-friendly and secure way for users to easily connect with other individuals who are interested in trading digital assets.
Within the Chainlist DApp, users can create listings for their domain names, specifying details such as the name, price, and description. Other users can then browse through the available listings and purchase the domain names they are interested in using the cryptocurrency of their choice.
One of the key features of Chainlist is its integration with the Metamask wallet. Metamask is a popular cryptocurrency wallet that allows users to manage their digital assets and interact with DApps on the Ethereum blockchain. By connecting Chainlist to their Metamask wallet, users can securely and conveniently make transactions within the DApp.
How does Chainlist work?
Chainlist utilizes smart contracts on the Ethereum blockchain to facilitate the buying and selling of domain names. When a user creates a listing, a smart contract is deployed that holds the details of the listing and manages the transfer of ownership when a purchase is made.
When a user purchases a domain name, they send the specified cryptocurrency to the smart contract address associated with the listing. Once the transaction is confirmed on the blockchain, the ownership of the domain name is transferred to the buyer, and the seller receives the payment.
Chainlist provides an intuitive interface for users to view and manage their listings and transactions. Users can easily track the status of their listings, view their transaction history, and interact with other users through a messaging system built into the DApp.
Benefits of using Chainlist
By utilizing Chainlist, users can experience several benefits:
- Decentralization: Chainlist operates on the Ethereum blockchain, which is a decentralized network. This means that there is no central authority controlling the transactions and ownership of domain names.
- Secure transactions: The use of smart contracts ensures that the transactions on Chainlist are secure and transparent. The contract code is publicly available and verifiable, eliminating the need to trust a third party.
- Efficient and cost-effective: Chainlist eliminates the need for intermediaries in domain name transactions, resulting in lower fees and faster processing times.
- Wide selection: The Chainlist platform connects users from all around the world, providing a diverse and extensive selection of domain names available for purchase.
Overall, Chainlist offers a user-friendly and secure platform for buying and selling cryptocurrency domain names, providing a seamless experience for both buyers and sellers in the decentralized marketplace.
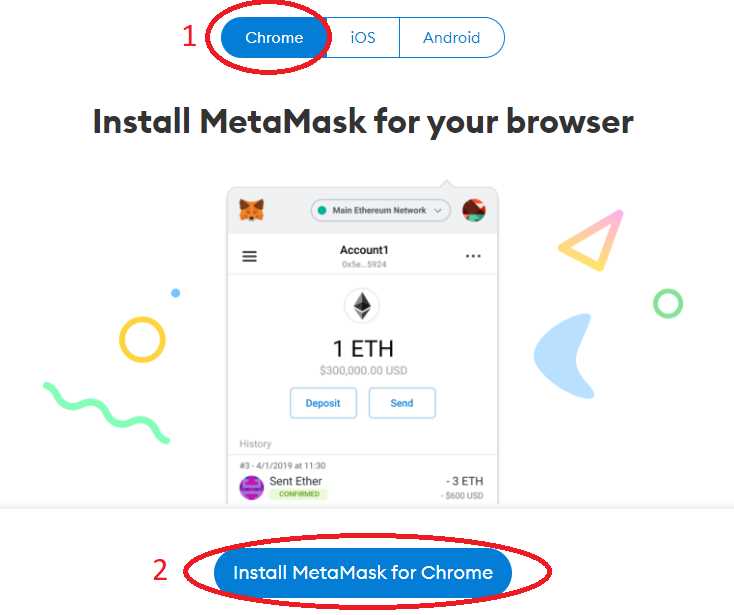
Step 1: Install and Set Up Metamask
If you want to connect Chainlink with Metamask, you first need to install and set up the Metamask extension in your web browser. Metamask is a cryptocurrency wallet and a gateway to the decentralized web.
Install Metamask

To install Metamask, follow these steps:
- Open your web browser and go to the Metamask website.
- Click on the “Get Chrome Extension” button if you are using Google Chrome, or “Get Firefox Add-on” button if you are using Mozilla Firefox.
- Click “Add to Chrome” or “Add to Firefox” to start the installation process.
- Once installed, you will see a new fox icon in the top right corner of your browser.
Set Up Metamask
Now that you have installed Metamask, you need to set it up with your Ethereum wallet. Follow these steps to get started:
- Click on the Metamask icon in your browser to open the extension.
- Click “Get Started” and then “Import wallet” if you already have a wallet with an existing seed phrase. If not, you can create a new wallet by clicking “Create a Wallet”.
- If you chose to import a wallet, enter your seed phrase and set a strong password.
- If you chose to create a new wallet, the extension will generate a new seed phrase for you. Make sure to write it down and keep it in a safe place.
- Read and accept the terms of use and privacy policy.
- You will be prompted to create a password for your wallet. Make sure it is strong and secure.
- Click “Create” to finish the setup process.
Once you have completed these steps, you have successfully installed and set up Metamask. You are now ready to connect it with Chainlink and start using the decentralized web!
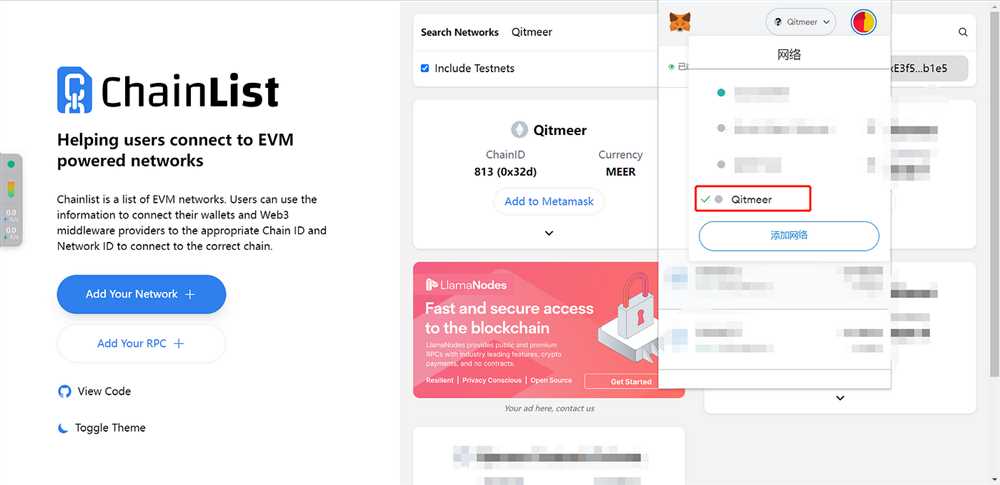
Step 2: Connect Metamask with Chainlist
Now that you have installed Metamask and created an account, the next step is to connect Metamask with Chainlist. Follow the steps below to complete the connection:
- Open the Metamask extension in your browser.
- Click on the menu icon (the three horizontal lines) in the top-right corner of the extension window.
- Select “Settings” from the dropdown menu.
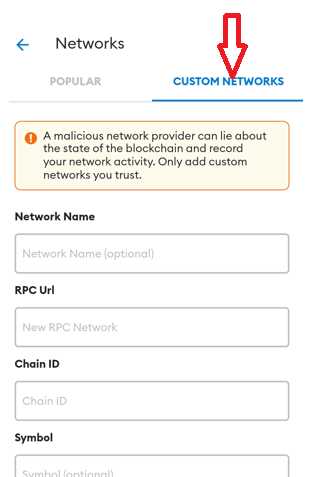
- Scroll down to the “Networks” section and click on “Add Network”.
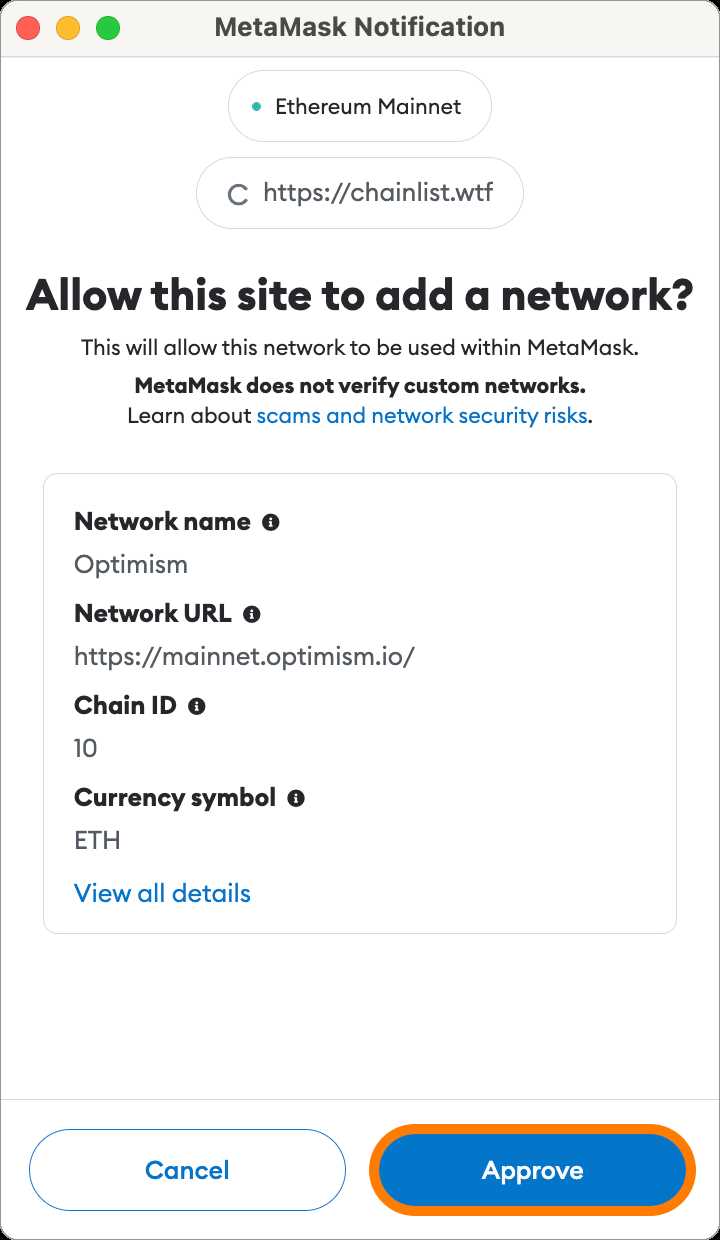
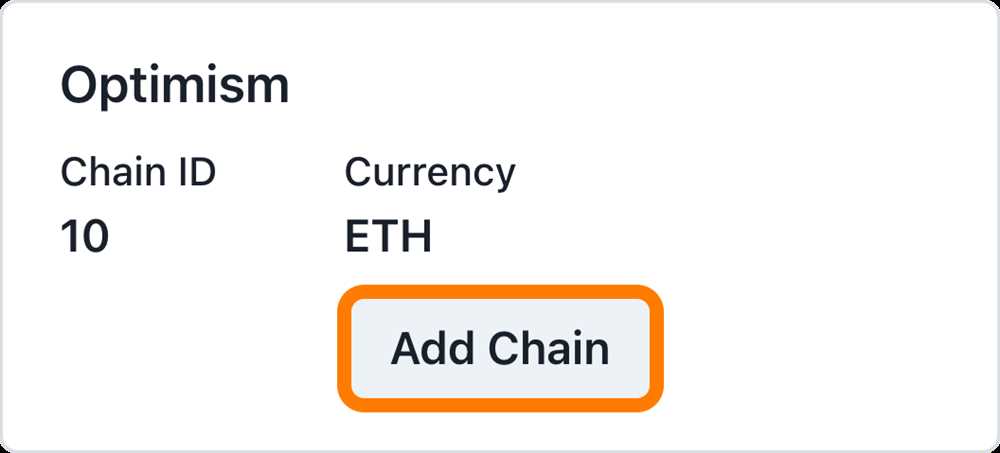
- In the “Network Name” field, enter “Chainlist” or any other desired name.
- In the “New RPC URL” field, enter the RPC URL provided by Chainlist. This URL is used to connect to the Chainlist network.
- In the “Chain ID” field, enter the Chain ID provided by Chainlist. This ID is used to identify the Chainlist network.
- Click on “Save” to add the Chainlist network to Metamask.
Once you have completed these steps, Metamask will be connected to Chainlist and you will be able to interact with the Chainlist decentralized application (dApp).
It is important to note that you should only connect to networks and dApps that you trust. Be cautious when entering any sensitive information or interacting with unfamiliar applications.
| Tip: | Make sure to double-check the RPC URL and Chain ID provided by Chainlist to ensure you are connecting to the correct network. |
|---|
Step 3: Confirm Connection and Start Using Chainlist with MetaMask
Once you have connected your MetaMask wallet to Chainlist, you are ready to start using Chainlist to buy, sell, and manage domain names.
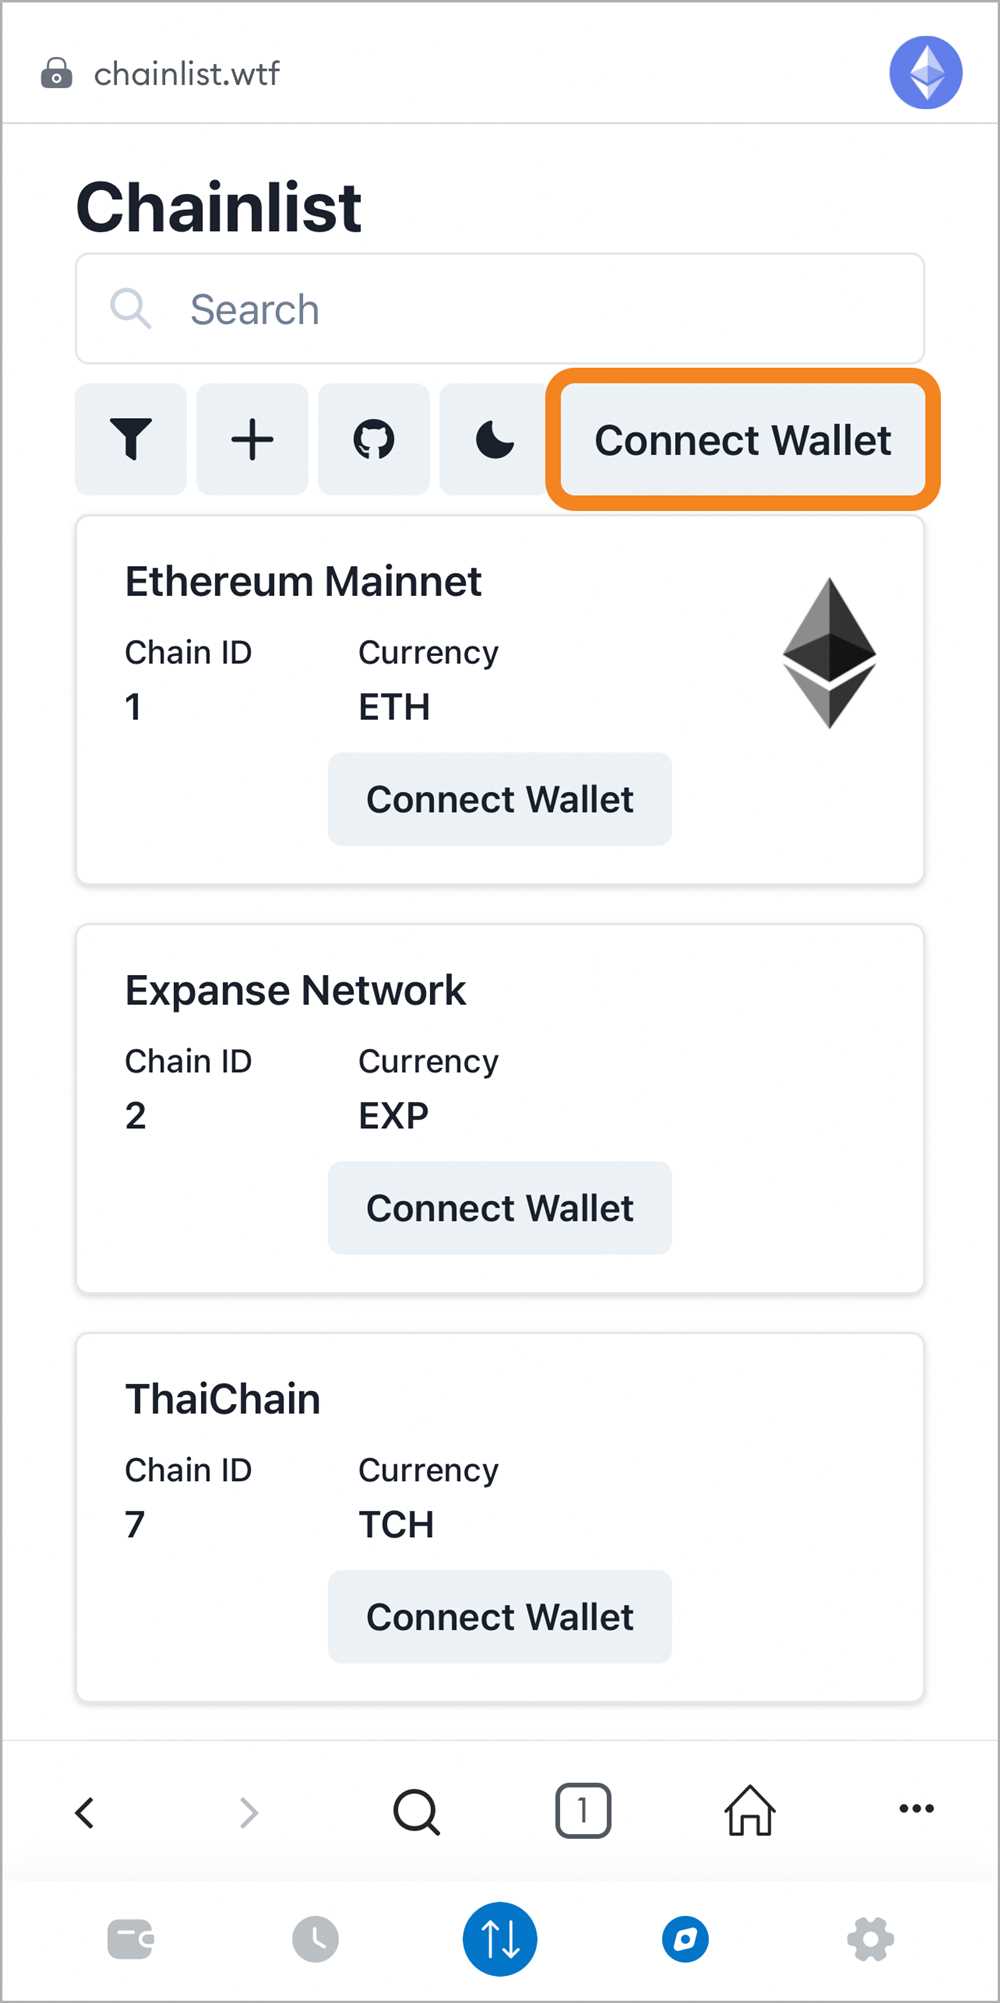
Confirming your Connection
Before you start using Chainlist with MetaMask, it’s important to confirm that your wallet is successfully connected to the Chainlist platform.
- Click on the MetaMask extension in your browser’s toolbar.
- If your wallet is connected, you will see a green dot indicating that you are connected to the blockchain network.
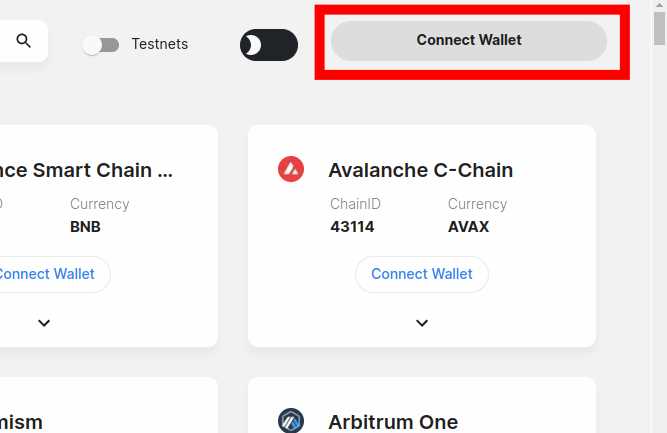
- If you are not connected, click on the “Connect” button and select the appropriate wallet from the available options.
Starting to Use Chainlist
Once your MetaMask wallet is successfully connected to Chainlist, you can start using the platform to buy, sell, and manage domain names.
- Explore the available domain names on the Chainlist platform. You can use the search bar or browse through the listings.
- When you find a domain name you want to purchase, click on it to view more details.
- Click on the “Buy Now” button if you are ready to make a purchase.
- Follow the on-screen prompts to confirm the transaction through MetaMask.
- Once the transaction is confirmed, the domain name will be transferred to your ownership.
- If you want to sell a domain name, go to the “My Domain Names” section and click on the domain name you want to sell.
- Click on the “Sell” button and follow the on-screen prompts to set a price and list the domain name for sale.
Remember to always double-check the transaction details and confirmations before proceeding with any transactions on Chainlist to ensure the security of your assets.
Now that you know how to confirm your connection and start using Chainlist with MetaMask, you can dive into the world of decentralized domain name management and trading with confidence.
Frequently Asked Questions:
1. What is Chainlist?
Chainlist is a decentralized application (dapp) that allows users to discover and connect to various blockchain networks.
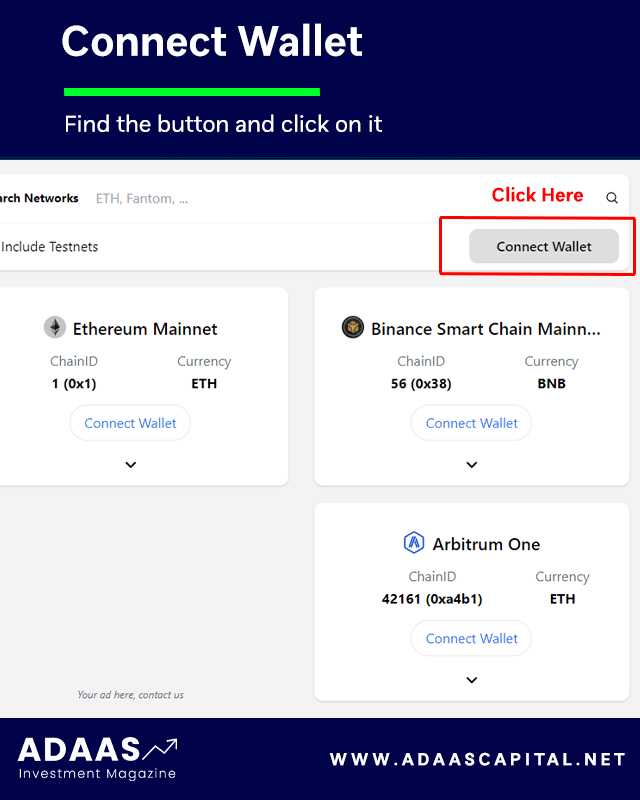
2. How do I connect Chainlist with Metamask?
To connect Chainlist with Metamask, you need to first install and set up the Metamask browser extension. Once installed, open the Metamask extension and sign in to your wallet. After that, visit the Chainlist website and click on the “Connect Wallet” button. Metamask will then prompt you to connect your wallet to Chainlist. Click “Connect” and you will be successfully connected.
3. Can I use Chainlist with other wallets besides Metamask?
Yes, you can use Chainlist with other wallets besides Metamask. Chainlist supports various wallet providers, including WalletConnect, Coinbase Wallet, and Fortmatic. When you visit the Chainlist website, you can choose the wallet provider you prefer and follow the instructions to connect your wallet.
4. Are there any fees associated with using Chainlist?
Yes, there may be fees associated with using Chainlist. These fees can vary depending on the blockchain network you are connecting to and the specific actions you take on the platform. It’s important to review the fee structure of the blockchain network and any additional fees mentioned on the Chainlist website before using the service.
5. Can I add custom networks to Chainlist?
Yes, you can add custom networks to Chainlist. This allows you to connect to blockchain networks that are not natively supported by the platform. To add a custom network, open the Metamask extension and click on the network dropdown. From there, select “Custom RPC” and enter the details of the network you wish to add. Once added, you will be able to connect to the custom network through Chainlist.

+ There are no comments
Add yours