


Welcome to our step-by-step guide on creating and managing an ETH address with MetaMask! If you are new to the world of cryptocurrency and want to start using Ethereum, MetaMask is an essential tool that will allow you to securely store and manage your ETH and other ERC-20 tokens.
MetaMask is a decentralized wallet and a browser extension that acts as a bridge between your browser and the Ethereum blockchain. By using MetaMask, you can easily create and manage your own Ethereum addresses without needing to download the full blockchain or run a node.
In this guide, we will walk you through the process of creating a new ETH address with MetaMask, downloading and installing the extension, and taking the necessary steps to ensure the security of your funds. Whether you are a beginner or an experienced user, this guide will provide you with all the information you need to get started.
So, let’s dive in and learn how to create and manage your first ETH address with MetaMask!
Step-by-Step Guide: Creating and Managing ETH Address with MetaMask
In this step-by-step guide, we will walk you through the process of creating and managing an Ethereum (ETH) address using MetaMask, a popular cryptocurrency wallet and decentralized application (dApp) browser extension. By following these steps, you will be able to securely store and manage your ETH, as well as interact with various decentralized applications on the Ethereum blockchain.
Step 1: Install MetaMask
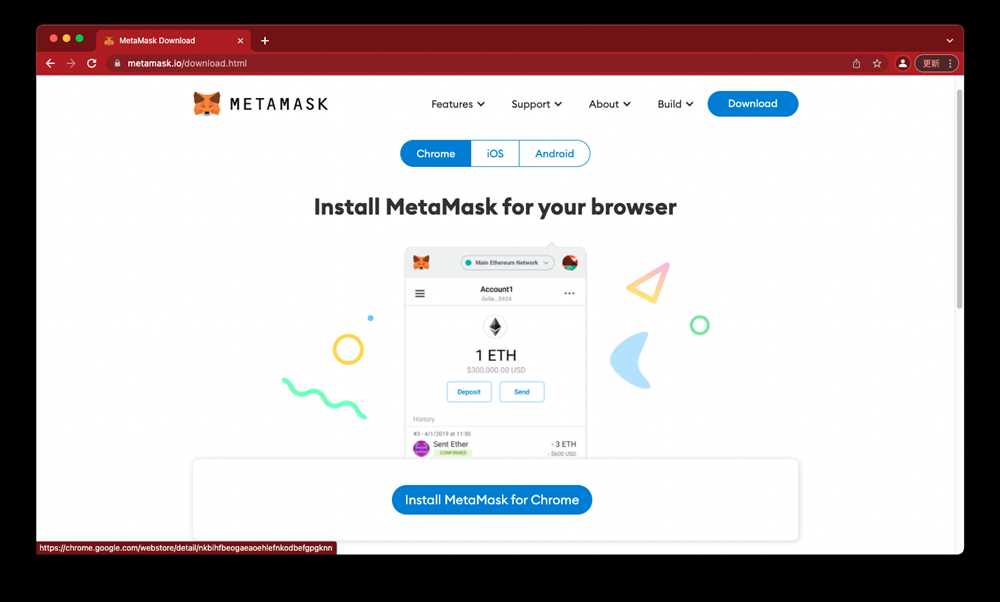
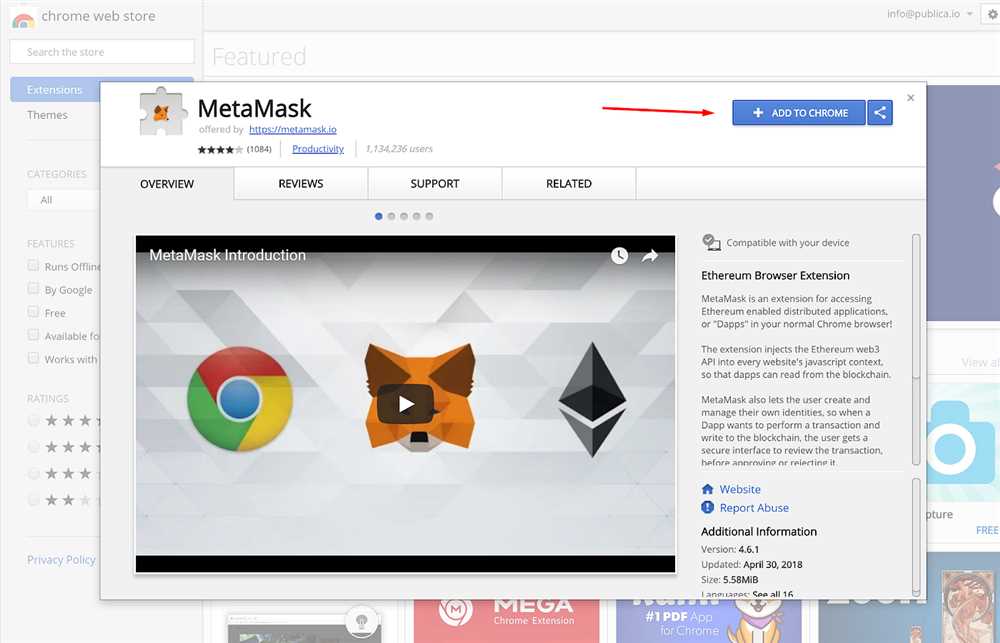
- Start by installing the MetaMask extension on your preferred web browser. You can find the extension on the official MetaMask website or through your browser’s extension store.
- Once installed, create a new MetaMask account by setting up a strong password and agreeing to the terms of use.
Step 2: Backup Your Seed Phrase
- After creating your MetaMask account, you will be presented with a unique 12-word seed phrase. This phrase acts as a backup for your account and can be used to recover your funds in case of theft or hardware failure.
- Write down the seed phrase and store it in a safe place. Avoid storing it digitally or sharing it with anyone, as it grants access to your funds.
Step 3: Fund Your MetaMask Account
- To manage ETH, you need to have some in your MetaMask wallet. You can either receive ETH from someone else or purchase it from a cryptocurrency exchange and transfer it to your MetaMask address.
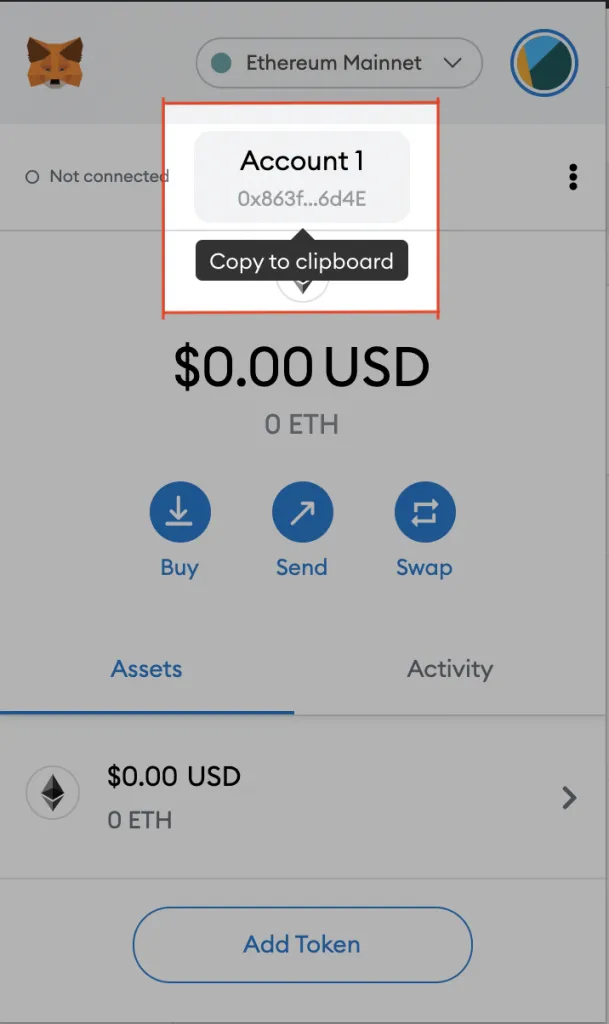
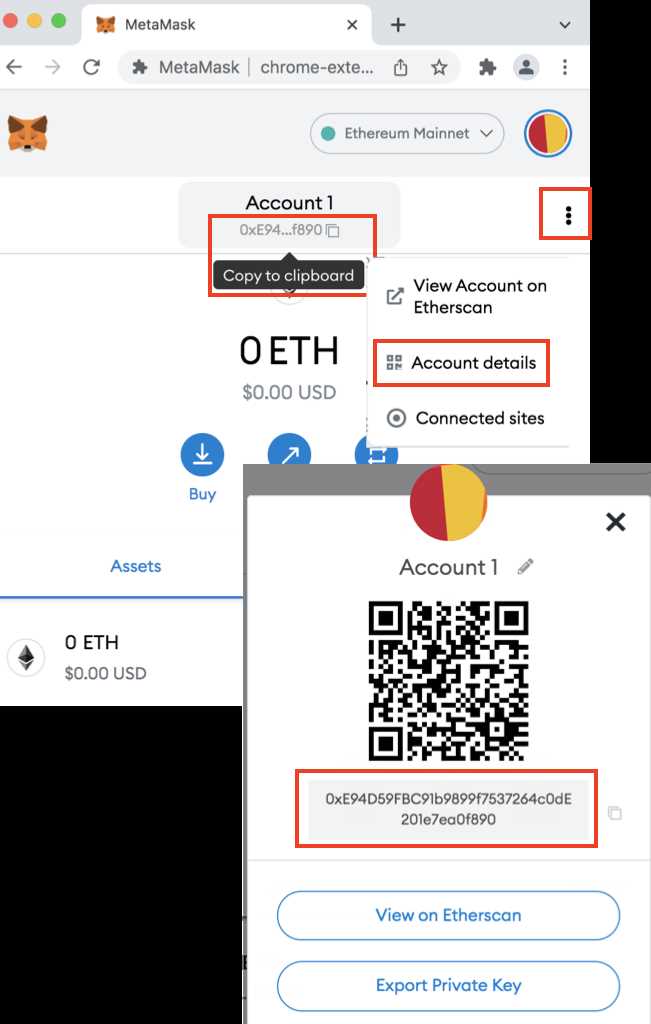
- Click on the MetaMask extension icon in your browser’s toolbar and select “Deposit” or “Receive” to obtain your MetaMask address.
- Share the provided address with the person sending you ETH or use it to initiate a transfer from your exchange.
Step 4: Use Your MetaMask Wallet
- Now that you have funded your MetaMask wallet, you can start managing your ETH and interacting with decentralized applications.
- Visit any dApp website that supports MetaMask and click on the MetaMask icon to connect your wallet.
- You will be prompted to confirm any transactions or interactions with the dApp using your MetaMask wallet.
Congratulations! You have successfully created and managed your ETH address with MetaMask. Make sure to keep your seed phrase safe and only interact with trusted dApps and websites. Always exercise caution when managing your cryptocurrency assets.
What is MetaMask?
MetaMask is a browser extension that allows users to interact with the Ethereum blockchain. It serves as a digital wallet for storing and managing Ethereum addresses, as well as a gateway to decentralized applications (DApps).
MetaMask acts as a bridge between traditional web browsers and the Ethereum network, making it easy for users to access and interact with decentralized applications directly from their browsers. It provides a secure environment for managing Ethereum addresses and signing transactions.
With MetaMask, users can create multiple Ethereum addresses, import existing ones, and switch between them seamlessly. This allows for greater flexibility and control over their digital assets.
Key Features of MetaMask:
- Secure Wallet: MetaMask provides a secure digital wallet for storing and managing Ethereum addresses. Private keys are encrypted and stored locally on the user’s device.
- DApp Integration: MetaMask seamlessly integrates with decentralized applications (DApps), allowing users to interact with them directly from their browsers.
- Multiple Addresses: Users can create, import, and manage multiple Ethereum addresses within MetaMask, providing flexibility and control over their digital assets.
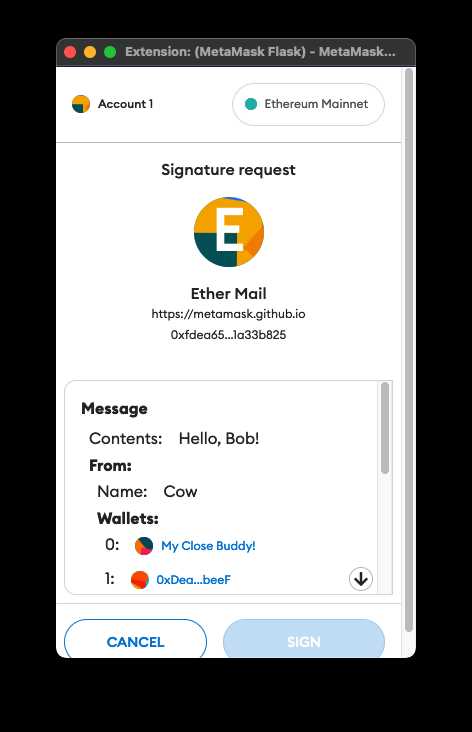
- Transaction Signing: MetaMask allows users to securely sign transactions before broadcasting them to the Ethereum network, ensuring the authenticity and integrity of their actions.
- Network Configuration: MetaMask supports multiple Ethereum networks, including the main Ethereum network, test networks, and custom networks, enabling users to switch between them as needed.
Overall, MetaMask is a powerful tool for interacting with the Ethereum blockchain and participating in the decentralized web. Its user-friendly interface and robust features make it an essential extension for anyone looking to navigate the world of Ethereum and decentralized applications.
How to Create an Ethereum Address with MetaMask
If you want to create an Ethereum address, MetaMask is a great option. Here is a step-by-step guide on how to do it:
- Install MetaMask: First, you need to install the MetaMask browser extension. You can find it on the official MetaMask website or in the Chrome Web Store.
- Create a new wallet: After installing MetaMask, open it by clicking on the extension icon in your browser. Click “Get Started” and then “Create a Wallet” to begin.
- Set a strong password: Choose a strong password to secure your wallet. Make sure to use a combination of letters, numbers, and special characters.
- Backup your seed phrase: MetaMask will provide you with a seed phrase. This is a unique sequence of 12 or 24 words that can be used to restore your wallet. Write it down and keep it in a safe place.
- Confirm your seed phrase: To ensure that you have correctly recorded your seed phrase, MetaMask will ask you to select the words in the correct order. This is to prevent any potential typos or mistakes.
- Complete the setup: Once you have confirmed your seed phrase, your MetaMask wallet will be ready to use. You can now access your Ethereum address and start managing your funds.
Creating an Ethereum address with MetaMask is a straightforward process that only takes a few minutes. It is important to keep your seed phrase secure, as it is the only way to recover your wallet if you lose access to it. With MetaMask, you can easily manage your ETH address and interact with decentralized applications on the Ethereum network.
Managing Your ETH Address with MetaMask
Once you have created your ETH address with MetaMask, you are ready to start managing it. MetaMask is a powerful tool that allows you to securely store, send, and receive Ethereum.
Accessing Your ETH Address
To access your ETH address in MetaMask, simply click on the MetaMask extension icon in your browser. This will open the MetaMask wallet interface, where you can see your account balance and recent transactions.
If you have multiple ETH addresses, you can switch between them by clicking on the account dropdown menu.
Sending and Receiving ETH
To send ETH from your MetaMask wallet, click on the “Send” button in the MetaMask interface. Enter the recipient’s ETH address, the amount you want to send, and any additional information required. Confirm the transaction and wait for it to be processed on the Ethereum network.
Receiving ETH is just as easy. Simply share your ETH address with the sender, and they can send ETH to your address.
Remember to always double-check the recipient’s address before sending any ETH to avoid losing your funds.
Managing Security
MetaMask provides several security features to help protect your ETH address. Make sure to enable two-factor authentication (2FA) and a strong password for your MetaMask account.
Additionally, back up your MetaMask seed phrase in a secure location. This seed phrase can be used to recover your ETH address in case you lose access to your MetaMask account.
It is important to stay vigilant and avoid sharing your MetaMask seed phrase or private key with anyone.
By following these steps, you can manage your ETH address with MetaMask securely and confidently.
Security Tips for MetaMask Users
MetaMask is a popular browser extension that allows users to interact with decentralized applications on the Ethereum network. While it provides convenience and ease-of-use, it also presents certain security risks. Here are some tips to help you secure your MetaMask account:
1. Enable Two-Factor Authentication (2FA)
Enabling 2FA adds an extra layer of security to your MetaMask account. You can use a mobile authenticator app like Google Authenticator or Authy to generate a unique code to be entered during the login process.
2. Use a Strong and Unique Password
Ensure that your MetaMask account is protected by a strong, unique password. Avoid using easily guessable or commonly used passwords, and consider utilizing a password manager to securely store your login credentials.
3. Keep Your Seed Phrase Secure
The seed phrase is a series of words that can be used to restore access to your MetaMask account. It is crucial to keep this phrase secure and never share it with anyone. Consider storing it offline in a secure location, such as a hardware wallet or a password-protected encrypted file.
4. Be Mindful of Phishing Attempts
Be cautious of phishing attempts that try to trick you into giving away your MetaMask login credentials. Always double-check the URL of the website you are visiting and ensure that it is the legitimate MetaMask website. Avoid clicking on suspicious links sent via email or social media.
5. Keep Your Software Updated
Regularly update both your browser and MetaMask extension to ensure you have the latest security patches and improvements. Developers often release updates to address any vulnerabilities or bugs that may have been discovered.
6. Avoid Using Untrusted DApps
Be cautious with the decentralized applications (DApps) you interact with through MetaMask. Stick to well-known, reputable DApps and exercise caution before granting any permissions or sending funds.
7. Enable Password Prompt for Transactions
Enable the password prompt for transactions in MetaMask to prevent unauthorized transactions from being executed. This adds an extra layer of security by requiring your password to be entered before any transactions can take place.
8. Enable Auto-Lock
Consider enabling the auto-lock feature in MetaMask, which locks your account after a certain period of inactivity. This helps protect your account in case you forget to manually lock it or step away from your computer.
9. Regularly Check and Verify Transactions
Review your transaction history periodically to ensure that all transactions are accurate and authorized. If you notice any suspicious activity or unauthorized transactions, take immediate action by contacting the MetaMask support team.
10. Educate Yourself
Stay informed about the latest security best practices and trends in the cryptocurrency space. Educate yourself on how to identify and mitigate potential security risks, and always exercise caution when dealing with your MetaMask account.
By following these security tips, you can enhance the protection of your MetaMask account and minimize the risk of unauthorized access or loss of funds.
Frequently Asked Questions:
What is MetaMask?
MetaMask is a cryptocurrency wallet and browser extension that allows users to interact with decentralized applications on the Ethereum network. It provides a convenient and secure way to manage Ethereum addresses and interact with Ethereum smart contracts.
How do I create a new ETH address with MetaMask?
To create a new ETH address with MetaMask, you first need to install the MetaMask extension in your web browser. After installing, click on the MetaMask icon and follow the setup instructions. You will be prompted to create a new wallet by setting a password and generating a seed phrase. Make sure to write down the seed phrase and keep it in a secure place. Once your wallet is created, you will have a new ETH address associated with it.
Can I import an existing ETH address into MetaMask?
Yes, you can import an existing ETH address into MetaMask. To do this, click on the MetaMask icon, select “Import Account”, and then choose the type of wallet you want to import from (e.g., seed phrase, JSON file, private key). Follow the prompts to import your existing ETH address and it will be added to your MetaMask wallet.
How do I manage multiple ETH addresses with MetaMask?
MetaMask allows you to easily manage multiple ETH addresses. To add a new address, click on the MetaMask icon, select “Create Account”, and follow the setup instructions. This will generate a new ETH address associated with your existing MetaMask wallet. To switch between addresses, click on the account icon in the top right corner of the MetaMask interface and select the address you want to interact with. You can also rename your addresses for easier identification.
Is MetaMask safe for managing ETH addresses?
MetaMask is considered to be a secure option for managing ETH addresses. However, it’s important to follow best practices to ensure the safety of your funds. This includes setting a strong password, enabling two-factor authentication, and keeping your seed phrase and private keys secure. Additionally, be cautious of phishing attempts and only download MetaMask from the official website or trusted sources.

+ There are no comments
Add yours