


If you’re new to the world of cryptocurrency and looking to explore the opportunities it offers, you might have come across Binance and Metamask as popular platforms to trade and store your digital assets. Binance is a leading cryptocurrency exchange offering a wide range of trading options, while Metamask is a popular wallet that allows you to store and manage your digital tokens securely. In this step-by-step guide, we’ll walk you through the process of transferring BNB (Binance Coin) from your Binance account to your Metamask wallet.
Step 1: Set up your Metamask Wallet
To transfer BNB from Binance to Metamask, you’ll need to have a Metamask wallet set up. If you haven’t done so already, you can download and install the Metamask extension for your web browser. Once installed, create a new wallet by following the prompts and securely save your seed phrase. Make sure to write it down and keep it in a safe place, as it is the key to accessing your wallet.
Step 2: Generate your BNB Deposit Address
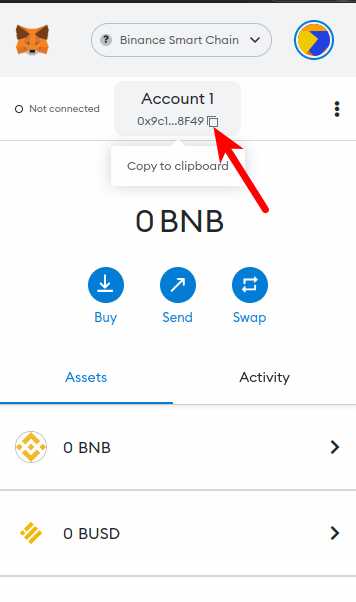
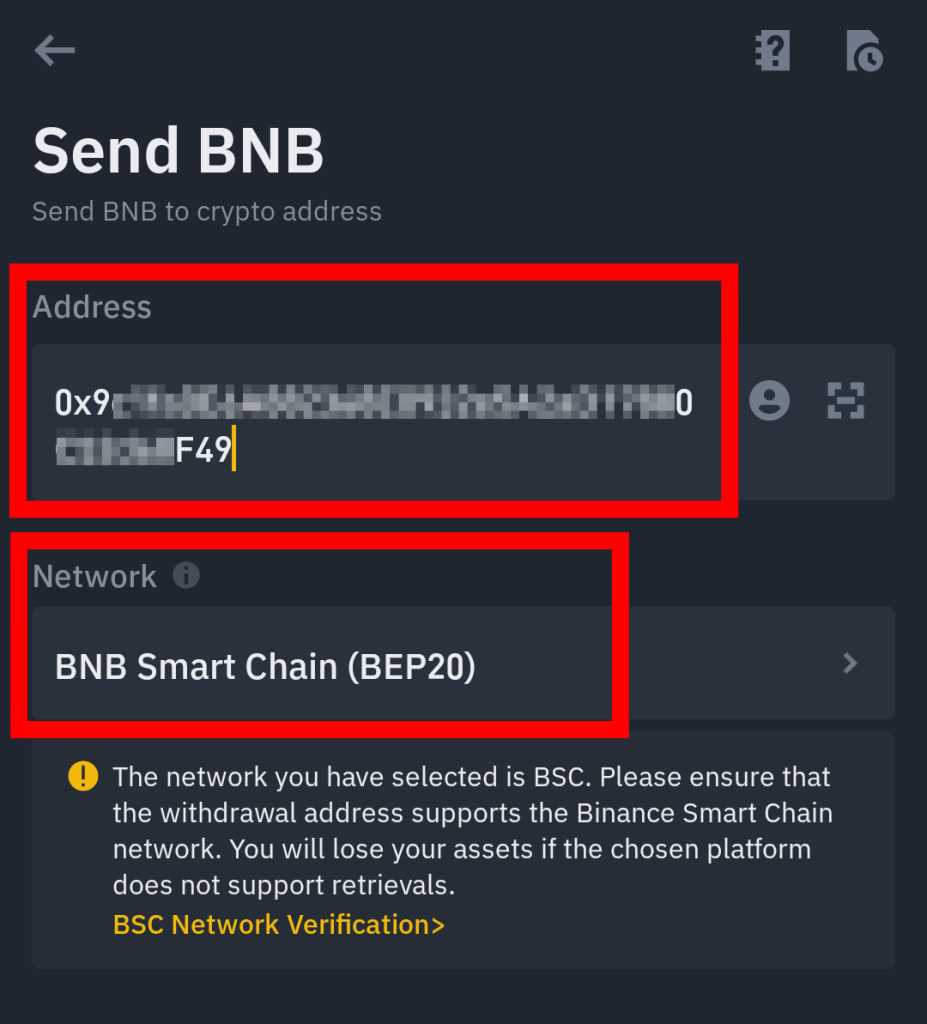
Once your Metamask wallet is set up, you’ll need to generate a BNB deposit address. To do this, open your Metamask wallet and click on the “Receive” button. You will see your BNB deposit address as a long string of characters. Copy this address to your clipboard, as you’ll need it for the next step.
Step 3: Withdraw BNB from Binance
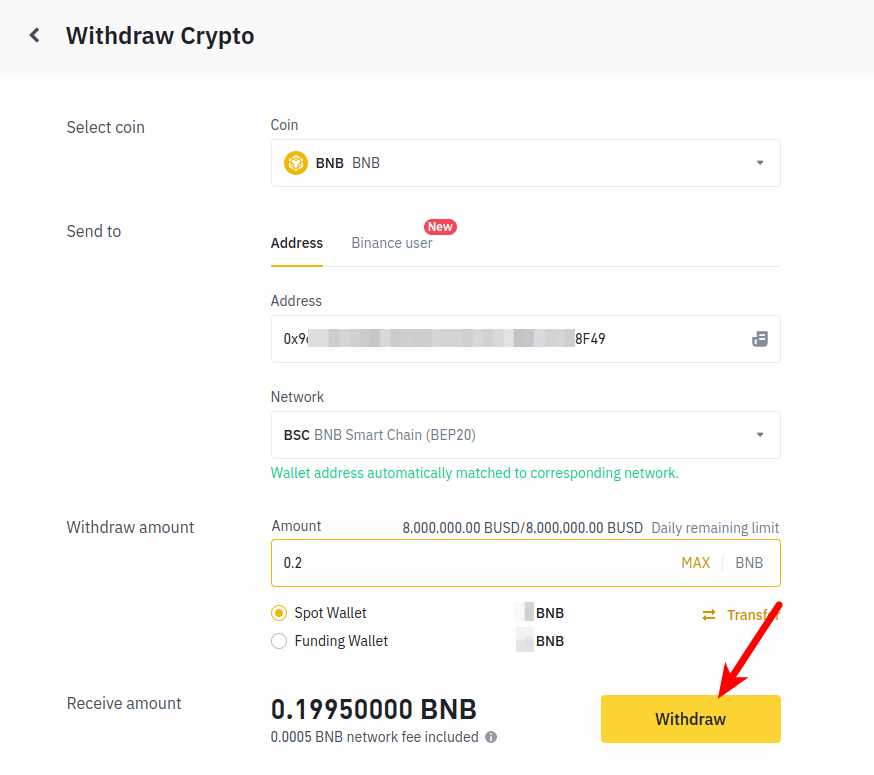
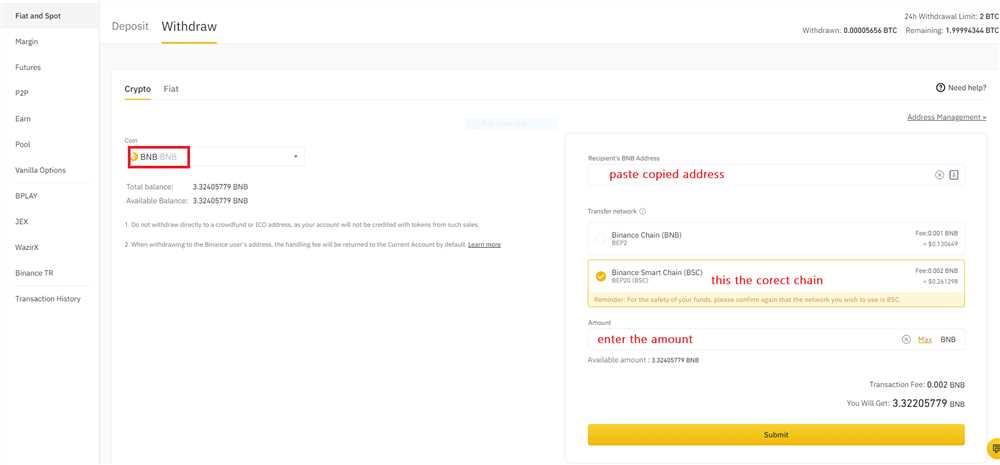
Log in to your Binance account and navigate to the “Wallet” tab. Click on “Fiat and Spot” and then select “Withdraw”. In the dropdown menu, choose BNB as the cryptocurrency you want to withdraw. Paste the BNB deposit address you copied from Metamask into the destination address field. Enter the amount of BNB you want to transfer and review the withdrawal details. Double-check that the address is correct before confirming the withdrawal.
Step 4: Wait for the Transfer to Complete
After confirming the withdrawal on Binance, you will need to wait for the transfer to complete. This process may take a few minutes or longer, depending on network congestion. Keep an eye on your Metamask wallet to see when the BNB arrives.
Note: Make sure you have some Ethereum (ETH) in your Metamask wallet to cover the gas fees required for the transfer.
Step 5: Verify the BNB Balance in your Metamask Wallet
Once the transfer is complete, navigate to your Metamask wallet and click on the “Assets” tab. Here, you should see the BNB token listed with the correct balance. Congratulations! You have successfully transferred BNB from Binance to Metamask.
Now that you have BNB in your Metamask wallet, you can explore various DeFi platforms, participate in token sales, or simply HODL your BNB for potential future gains. Remember to always exercise caution and do thorough research before engaging in any financial transactions involving cryptocurrencies.
Planning the Transfer
Before you start the process of transferring BNB from Binance to Metamask, it’s important to plan out your transfer to ensure a smooth and successful transaction.
Create a Metamask Wallet
If you don’t already have a Metamask wallet, you’ll need to create one. Metamask is a popular web browser extension that allows you to interact with decentralized applications on the Ethereum blockchain. You can download and install Metamask from the official website and then set up your wallet by following the provided instructions.
Check the Binance Account Requirements
Before transferring BNB from Binance, make sure your Binance account meets the requirements. Ensure that your account is verified and has completed the necessary KYC (Know Your Customer) procedures. Without meeting these requirements, you may face limitations or restrictions on your Binance account, which could hinder your ability to transfer BNB to Metamask.
Ensure Sufficient BNB Balance in Binance
Before initiating the transfer, check your BNB balance in your Binance account. Make sure you have enough BNB to cover the transaction fees and any other associated costs. It’s always good practice to leave a small buffer amount in your Binance account to account for any fluctuations in gas fees or unexpected expenses.
Choose the Transfer Amount
Determine the amount of BNB you want to transfer from Binance to Metamask. Consider factors such as your transaction needs, gas fees, and any other relevant considerations. It’s essential to double-check the amount you enter during the transfer process to avoid any errors or mistakes.
Be Prepared for Gas Fees
Gas fees are the transaction fees associated with Ethereum-based blockchain transfers. When transferring BNB from Binance to Metamask, you’ll need to pay gas fees to complete the transaction. Gas fees can vary depending on network congestion and other factors. It’s important to have a sufficient balance of ETH in your Metamask wallet to cover the gas fees associated with the transfer.
Create a Wallet on Binance
The first step to transfer BNB from Binance to Metamask is to create a wallet on Binance. If you already have a Binance account, you can skip this step and proceed to the next section.
To create a wallet on Binance, follow the steps below:
Step 1: Sign up for a Binance account
If you don’t have a Binance account yet, visit the Binance website and click on the “Register” button. Provide your email address and create a strong password. Agree to the terms of use and click on “Create Account” to proceed.
Step 2: Verify your email
Once you have completed the registration process, Binance will send a verification email to the email address you provided. Go to your email inbox, find the email from Binance, and click on the verification link to verify your email address. If you can’t find the email, check your spam or junk folder.
Step 3: Set up two-factor authentication (2FA)
After verifying your email, it is highly recommended to set up two-factor authentication (2FA) for added security. To do this, log in to your Binance account, go to “Account” and click on “Google Authentication”. Follow the instructions to set up Google Authenticator or another 2FA app on your mobile device. Enable 2FA by scanning the QR code or manually entering the key provided by Binance.
Once you have completed these steps, you have successfully created a wallet on Binance and secured it with two-factor authentication. You are now ready to transfer BNB from Binance to your Metamask wallet.
Install and Set Up Metamask

The first step is to install the Metamask extension for your preferred web browser. Metamask is available for Chrome, Firefox, and Brave browsers. Simply go to the web store for your browser and search for “Metamask”. Click on the “Add to Chrome/Firefox/Brave” button and follow the instructions to install the extension.
After installing the Metamask extension, you will see a new icon in your browser toolbar. Click on the icon and a pop-up window will appear. Click on the “Get Started” button to begin the setup process.
In the setup process, you will be asked to create a new wallet or import an existing one. If you already have a Metamask wallet, you can choose the import option and enter your seed phrase. Otherwise, select the create option and choose a strong password. Make sure to write down and store your seed phrase and password in a secure location.
Once you have created or imported your wallet, you will be prompted to choose a network. Select the Ethereum Mainnet network for transferring BNB from Binance. If the Ethereum Mainnet network is not listed, click on the network dropdown menu and select “Custom RPC”. In the custom RPC settings, enter “https://mainnet.infura.io/v3/YOUR_INFURA_API_KEY” as the RPC URL, replacing “YOUR_INFURA_API_KEY” with your own Infura API key.
After selecting the network, your Metamask wallet will be set up and ready to use. You will see your account address and balance displayed in the Metamask pop-up window. You can also access your wallet by clicking on the Metamask icon in the browser toolbar.
Remember to keep your Metamask wallet secure and protect your seed phrase and password. With Metamask set up, you can now proceed to the next steps to transfer BNB from Binance.
Link Binance and Metamask
In order to transfer BNB from Binance to Metamask, you will first need to link your Binance account with your Metamask wallet. Here are the steps to do so:
- Open Binance and log in to your account.
- Click on your profile icon and select “API Management” from the drop-down menu.
- Create a new API key by entering a name and clicking on the “Create” button.
- Enable the following permissions for the API key: “Spot & Margin Trading” and “Wallet”.
- Once the API key is created, Binance will provide you with an API key and a secret key. Make sure to save both of them in a safe place.
- Open Metamask and click on the account icon at the top right corner of the screen.
- Select “Import Account” from the drop-down menu.
- Choose “Private Key” as the import method.
- Copy and paste your Binance secret key into the “Private Key” field.
- Click on the “Import” button.
- Your Binance account is now linked with Metamask. You can now proceed to transfer BNB from Binance to Metamask.
Make sure to follow these steps carefully to ensure a successful link between your Binance account and Metamask wallet.
Transferring BNB
To transfer BNB from Binance to Metamask, follow these step-by-step instructions:
Step 1: Obtain your BNB address on Metamask
1. Open Metamask and ensure you are on the Ethereum Mainnet.
2. Click on your profile icon and select “Copy Address to Clipboard” to copy your BNB address.
Step 2: Withdraw BNB from Binance
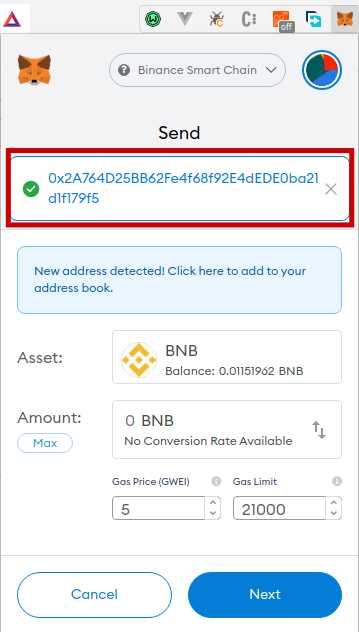
-
Log in to your Binance account and go to the Wallets page.
-
In the search bar, type “BNB” to locate your BNB wallet.
-
Click on “Withdraw” next to your BNB wallet.
-
Paste the BNB address you copied from Metamask into the “Recipient’s BNB Address” field.
-
Enter the amount of BNB you want to transfer in the “Amount” field.
-
Ensure you have selected the BEP20 (BSC) network for the BNB withdrawal.
-
Click on “Submit” to initiate the withdrawal.
Step 3: Verify the transaction in Metamask
-
Wait for the BNB withdrawal to be processed, which usually takes a few minutes.
-
Open Metamask and click on the “Activity” tab.
-
Look for the incoming transaction with the corresponding amount of BNB.
-
Click on the transaction to view the details and ensure it is confirmed.
Congratulations! You have successfully transferred BNB from Binance to Metamask.
Frequently Asked Questions:
What is Binance?
Binance is a popular cryptocurrency exchange that allows users to buy, sell, and trade various digital assets.
What is Metamask?
Metamask is a cryptocurrency wallet and a browser extension that allows users to interact with Ethereum blockchain-based applications.
How do I transfer BNB from Binance to Metamask?
To transfer BNB from Binance to Metamask, you need to first generate a Binance Chain wallet address on Metamask. Then, on Binance, go to your BNB wallet, select “Withdraw,” paste your Binance Chain wallet address, enter the amount of BNB you want to transfer, and confirm the transaction. Finally, the BNB will be transferred to your Metamask wallet.
+ There are no comments
Add yours