


If you are a cryptocurrency enthusiast, chances are you have heard about Solana. Solana is a high-performance blockchain network built for decentralized applications and digital assets. With its lightning-fast transaction speed and low fees, Solana has become a popular choice for developers and users alike.
But how do you access the Solana network and unlock its full potential? This is where Metamask comes in. Metamask is a popular cryptocurrency wallet and browser extension that allows users to securely manage and interact with decentralized applications, or dApps, on the Ethereum network. And now, with the power of Metamask, you can also integrate Solana into your wallet and gain access to the vast ecosystem of decentralized finance (DeFi) applications.
In this guide, we will walk you through the process of integrating Solana with Metamask, step by step. We will start by installing the necessary extensions and wallets, and then guide you through the setup and configuration. By the end of this guide, you will have a fully functional Solana wallet integrated with Metamask, ready to explore and participate in the exciting world of Solana dApps and DeFi.
So, whether you are a seasoned crypto user or just getting started, this guide will provide you with all the information you need to unlock the Solana network and take advantage of its fast and secure blockchain platform. Get ready to dive into the world of Solana and experience the future of decentralized finance!
Integrate Solana with Metamask
Connecting the Solana network to your Metamask wallet can open up a world of opportunities for decentralized applications (dApps), decentralized finance (DeFi), and other blockchain-based functionalities. By integrating Solana with Metamask, you can seamlessly interact with the Solana ecosystem using the familiar Metamask interface.
Here are the steps to integrate Solana with Metamask:
- Install Metamask: If you haven’t already, download and install the Metamask browser extension for your preferred browser.
- Open Metamask: Once installed, click on the Metamask extension icon in your browser toolbar to launch it.
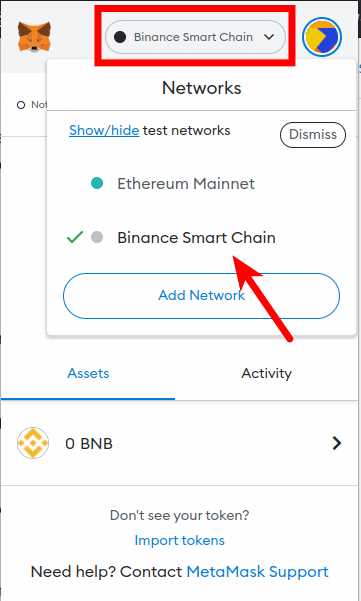
- Switch to the Solana Network: Click on the network selection dropdown in Metamask and choose “Custom RPC”.
- Add the Solana RPC URL: In the RPC URL field, enter the RPC URL for the Solana network. The RPC URL typically looks like “https://api.mainnet-beta.solana.com”.
- Save the Network: After entering the RPC URL, click on the “Save” button to save the Solana network configuration.
- Connect Metamask to Solana: You should now see the Solana network listed in the network selection dropdown. Select the Solana network to connect your Metamask wallet to Solana.
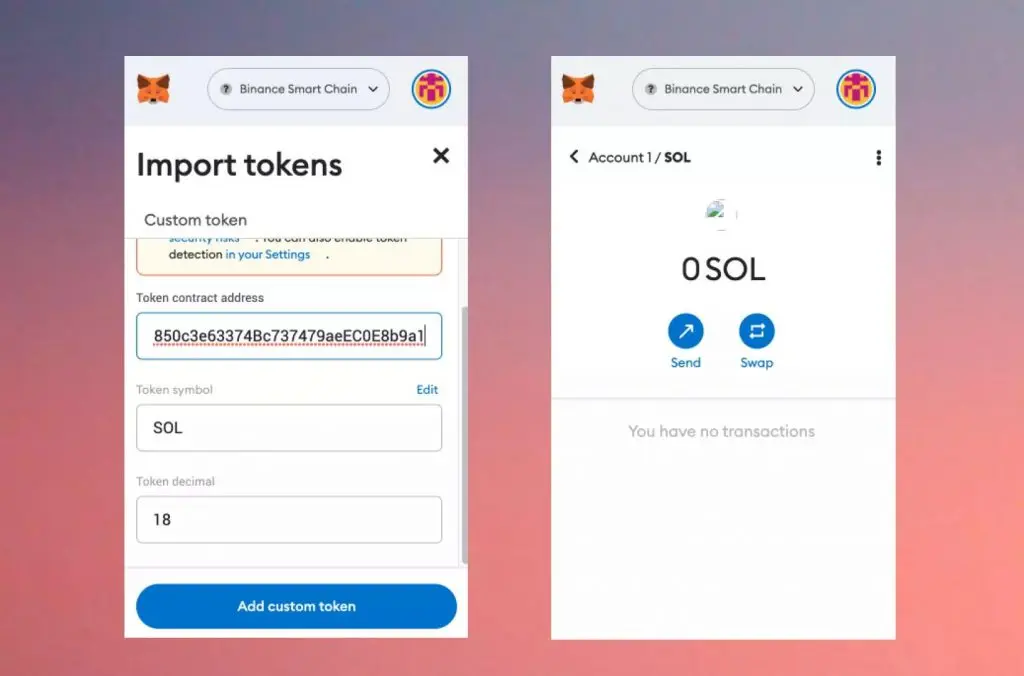
- Import Solana Accounts: To import your Solana accounts into Metamask, click on the Metamask extension icon and go to the account settings. From there, click on “Import Account” and enter your Solana account’s private key or seed phrase.
- Start Using Solana with Metamask: Congratulations! You have successfully integrated Solana with Metamask. You can now start using Solana dApps, interact with smart contracts, trade tokens, and more using your Metamask wallet on the Solana network.
Remember to exercise caution when interacting with decentralized applications and always verify the legitimacy of the projects and contracts you interact with. Enjoy exploring the Solana ecosystem with the power and convenience of Metamask!
A Guide to Unlocking the Solana Network
If you are looking to unlock the potential of the Solana network, this guide is for you. Solana is a high-performance blockchain platform that offers fast, secure, and scalable solutions for decentralized applications (dApps). By integrating Solana with Metamask, you can access the power of this robust network and participate in the growing ecosystem of projects and opportunities.
To begin, you will need to ensure that you have the latest version of Metamask installed on your browser. If you haven’t already, head over to the Metamask website and follow the instructions to set up the extension. Once you have successfully installed Metamask, you can continue with the steps below.
Step 1: Configure Metamask for Solana

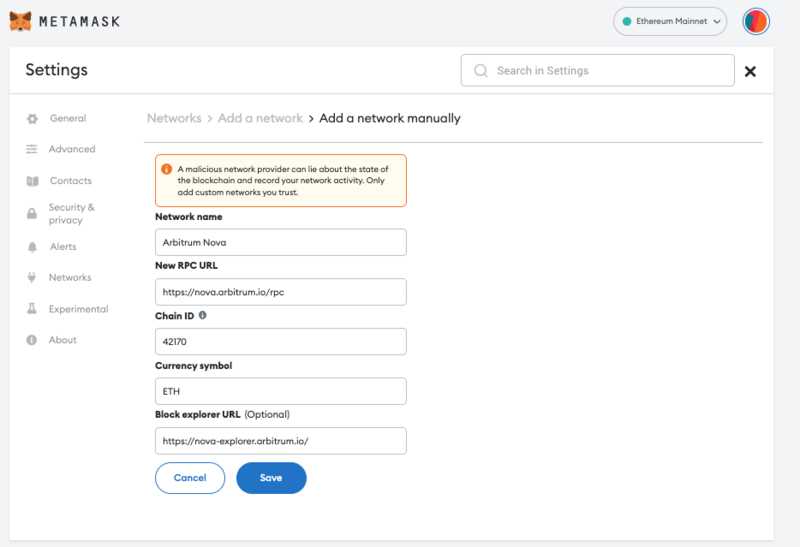
Open your Metamask extension and make sure you are logged in. Click on the account dropdown at the top right corner and select “Settings”. In the settings menu, click on “Networks” and then click on “Add Network”.
In the network configuration form, enter the following details:
Network Name: Solana
New RPC URL: https://api.mainnet-beta.solana.com/
ChainID: 101
Leave the “Symbol” and “Block Explorer URL” fields blank. Once you have entered the necessary information, click on “Save”.
Step 2: Import Solana Wallet
To unlock the Solana network, you will need to import your Solana wallet into Metamask. To do this, click on the account dropdown at the top right corner and select “Import Account”.
In the import account form, you will see an option to enter a private key or seed phrase. If you have a Solana private key or seed phrase, enter it here. If not, you will need to set up a Solana wallet and obtain the private key or seed phrase.
Once you have entered the private key or seed phrase, click on “Import” to import your Solana wallet into Metamask. Your Solana wallet should now be visible in your Metamask interface.
Step 3: Connect to the Solana Network
Now that you have configured Metamask for Solana and imported your Solana wallet, you are ready to connect to the Solana network. To do this, click on the account dropdown at the top right corner and select your Solana wallet from the list of available accounts.
Once you have selected your Solana wallet, you should see the Solana network in the dropdown menu. Click on the Solana network to connect to it. Metamask will prompt you to confirm the connection. Click on “Connect” to establish the connection.
Congratulations! You have successfully unlocked the Solana network using Metamask. You can now explore and interact with the various dApps and projects built on Solana. Keep in mind that some dApps may require additional configuration or permissions to access certain features or execute transactions.
Remember to stay cautious while using dApps on any blockchain network and only interact with trusted projects and contracts. Keep your private keys or seed phrases secure and do not share them with anyone. Enjoy your journey into the exciting world of Solana!
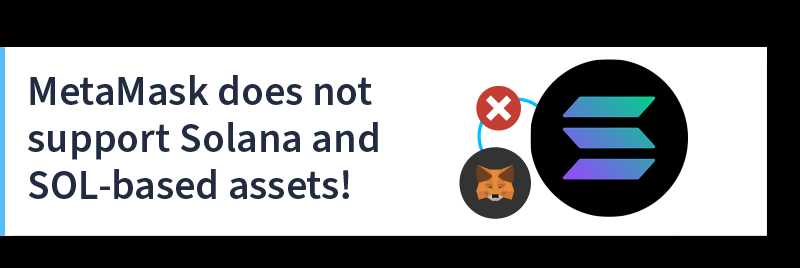
Why Integrate Solana with Metamask?
Metamask is one of the most popular cryptocurrency wallets and browser extensions that allows users to interact with the Ethereum blockchain. However, as the market for decentralized applications (DApps) expands, there is a need for cross-chain compatibility to connect with other blockchains.
Solana is a high-performance and scalable blockchain platform that offers fast transaction speeds and low fees. By integrating Solana with Metamask, users can access and interact with Solana-based DApps directly from their Metamask wallet, providing a seamless user experience.
Benefits of Integrating Solana with Metamask
1. Expanded DApp Access: By integrating Solana with Metamask, users can access a wider range of DApps and take advantage of the growing Solana ecosystem.
2. Cross-Chain Compatibility: Integration allows users to easily switch between Ethereum and Solana networks, providing flexibility and interoperability.
3. Seamless User Experience: Users can interact with Solana-based DApps directly from their Metamask wallet, eliminating the need for separate wallets or applications.
4. Enhanced Security: Metamask’s robust security features ensure that users’ funds and private keys remain secure, even when interacting with the Solana network.
Overall, integrating Solana with Metamask opens up new opportunities for users to access and interact with the Solana network, while benefiting from the convenience and security provided by Metamask.
Benefits of Connecting Solana to Metamask
Connecting Solana to Metamask opens up a range of benefits for both developers and users:
- Access to Solana DApps: By connecting Solana to Metamask, users can easily access and interact with decentralized applications (DApps) built on the Solana blockchain. This provides a seamless user experience and allows users to take advantage of the features and functionalities offered by Solana DApps.
- Easy Wallet Management: Metamask serves as a wallet manager that allows users to manage their Solana holdings alongside other supported cryptocurrencies. With a single interface, users can view their Solana tokens, track transactions, and perform wallet operations.
- Enhanced Security: Metamask offers a secure and trusted environment for managing Solana assets. By leveraging the robust security features provided by Metamask, users can protect their private keys and control access to their funds.
- Broad Ecosystem Support: Metamask is widely supported by various blockchain projects and services. By connecting Solana to Metamask, users can participate in a larger ecosystem of decentralized finance (DeFi) applications, NFT marketplaces, and other blockchain-based platforms.
Overall, integrating Solana with Metamask brings convenience, security, and broader opportunities for users to engage with the Solana network and its growing ecosystem of decentralized applications.
How to Integrate Solana with Metamask
If you want to unlock the Solana network and be able to use decentralized applications built on the Solana blockchain, you will need to integrate Solana with Metamask. This guide will walk you through the steps to do just that.
- First, make sure you have the latest version of Metamask installed in your browser. You can download it from the official Metamask website.
- Once you have Metamask installed, open the extension and create or import a wallet.
- Next, click on the network selection dropdown in Metamask and choose “Custom RPC”.
- In the “New RPC URL” field, enter the URL for the Solana network. This URL will depend on the Solana network you want to connect to, so make sure to find the correct URL.
- In the “Chain ID” field, enter the chain ID for the Solana network. Again, this will depend on the specific Solana network you want to connect to.
- Click “Save” to save the settings.
- Your Metamask wallet is now connected to the Solana network! You can now use your Metamask wallet to interact with decentralized applications on the Solana blockchain.
Integrating Solana with Metamask allows you to easily access the features and capabilities of the Solana network using the familiar interface of Metamask. This opens up a world of possibilities for decentralized finance, gaming, and other decentralized applications built on the Solana blockchain. Enjoy exploring the Solana ecosystem with Metamask!
Step-by-Step Guide to Connect Solana and Metamask
Connecting Solana and Metamask allows you to interact with the Solana network using the familiar interface of Metamask. Follow these steps to integrate Solana with Metamask:
Step 1: Install Metamask

If you haven’t already, install the Metamask extension in your web browser. Metamask is available for Chrome, Firefox, Brave, and Edge.
Step 2: Create or Import a Solana Wallet
Once you have Metamask installed, open the extension and click on the “Create a Wallet” button if you don’t have an existing wallet, or select “Import Wallet” if you already have a Solana wallet. Follow the prompts to set up or import your wallet.
Step 3: Connect Metamask to Solana
After setting up or importing your Solana wallet, click on the network selection dropdown from the Metamask extension and select “Custom RPC” to manually add a network. Enter the following details to connect to the Solana network:
- Network Name: Solana
- New RPC URL: Enter the RPC URL for the Solana network
- Chain ID: Enter the Chain ID for the Solana network
- Symbol: SOL
- Block Explorer URL: Enter the Block Explorer URL for the Solana network
Step 4: Save and Connect
Click on the “Save” button to save the network settings. Metamask will now be connected to the Solana network. You can verify this by checking that the network name on Metamask is set to “Solana” and that your Solana wallet address is displayed.
Step 5: Access Solana DApps
With Metamask connected to the Solana network, you can now access and interact with Solana decentralized applications (DApps) directly from your Metamask interface. Simply browse supported DApps and start using them with your Solana account.
By following these steps, you have successfully integrated Solana with Metamask, enabling you to access and transact on the Solana network using the convenience of Metamask’s user interface.
Frequently Asked Questions:
What is Solana?
Solana is a highly scalable and fast blockchain network designed for decentralized applications and cryptocurrencies. It aims to solve the scalability issues faced by other blockchain networks by using a combination of innovative technologies.
How can I integrate Solana with Metamask?
To integrate Solana with Metamask, you need to install the Solana network on your Metamask wallet. This can be done by adding a custom RPC network with the following details: Network Name: Solana, RPC URL: https://api.mainnet-beta.solana.com, Chain ID: 101.
+ There are no comments
Add yours