


Hello, fellow crypto enthusiasts! Are you looking for a simple and straightforward way to add USDT (Tether) to your wallet using Metamask? Look no further, as we have got you covered! In this easy guide, we will walk you through the step-by-step process of adding USDT to your Metamask wallet.
Step 1: Install and Set Up Metamask
The first thing you need to do is install the Metamask extension on your preferred web browser. Once installed, set up your wallet by creating a strong password and securely backing up your seed phrase. Remember to keep your seed phrase safe, as it is the key to accessing your wallet.
Step 2: Open Your Metamask Wallet
After successfully setting up your Metamask wallet, open the extension and enter your password to access your account. Once you are inside your wallet, you will see your account balance and transaction history.
Step 3: Add USDT to Your Wallet
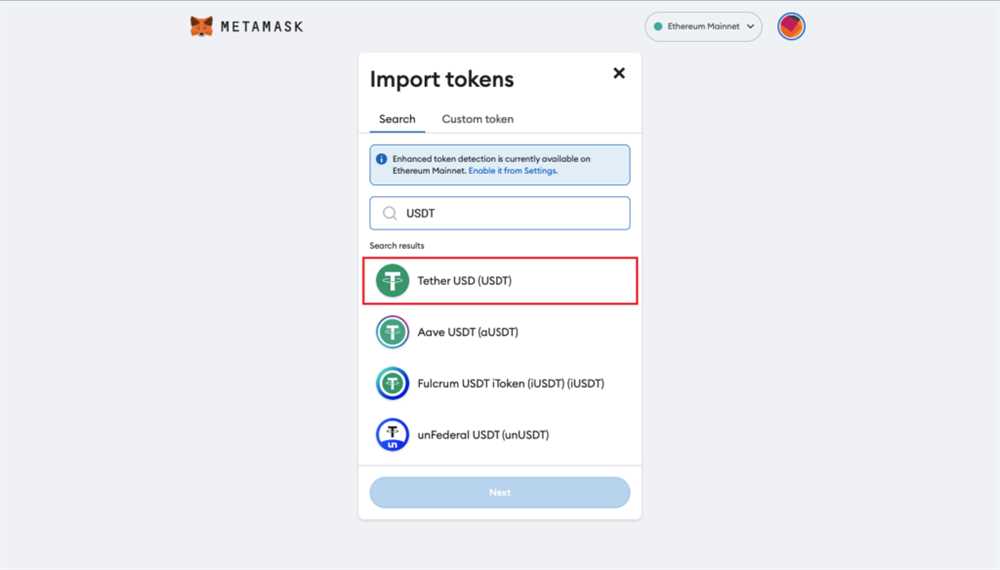
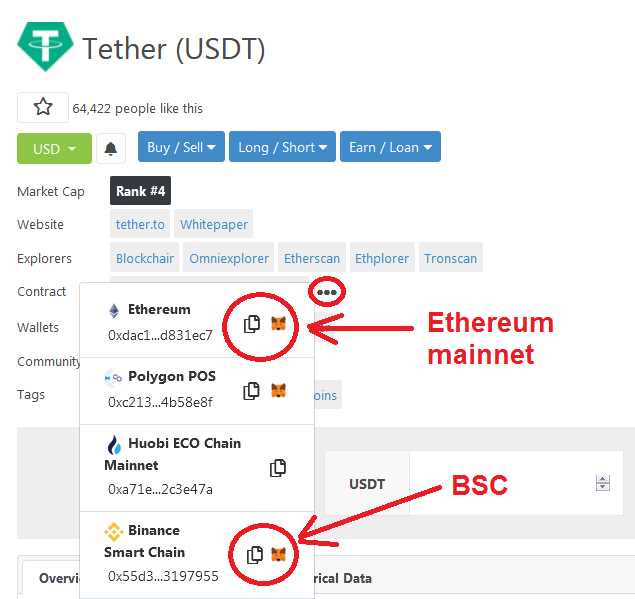
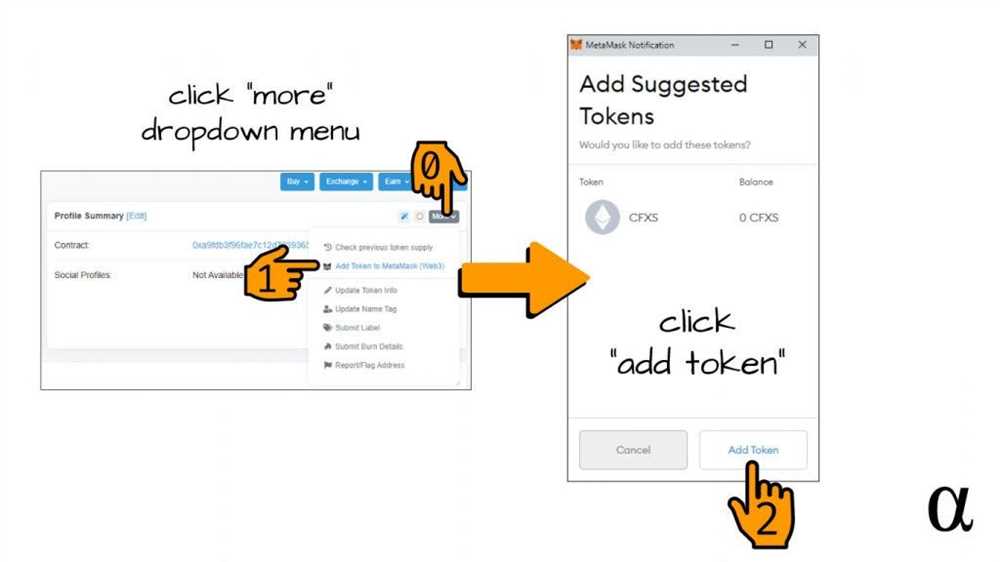
To add USDT to your wallet, click on the “Assets” tab. Next, click on the “Add Token” button. A new window will appear, prompting you to enter the contract address of USDT. You can find the contract address on the Tether website or by searching for it on a trusted cryptocurrency information platform.
Step 4: Confirm and Complete the Process
Double-check that you have entered the correct contract address for USDT. Once you are certain, click on the “Next” button. Metamask will now display the USDT token details. Click on the “Add Token” button to confirm the addition of USDT to your wallet.
Congratulations! You have successfully added USDT to your wallet using Metamask. Now you can conveniently manage and use your USDT for various purposes within the Metamask ecosystem. Please note that when making transactions or interacting with USDT, be aware of gas fees and always double-check the recipient’s address.
We hope this easy guide has helped you in adding USDT to your wallet using Metamask. If you have any further questions or need assistance, feel free to reach out to our friendly crypto community. Happy hodling!
Step-by-Step Guide to Add USDT to Your Wallet Using Metamask
Adding USDT to your wallet using Metamask is a simple process. Follow the steps below to ensure a successful transfer:
- Step 1: Install Metamask
- Step 2: Fund Your Metamask Wallet
- Step 3: Connect Metamask to a Supported Exchange or Wallet
- Step 4: Verify the Address
- Step 5: Initiate the Transfer
- Step 6: Wait for Confirmation
- Step 7: Verify the Transfer
- Step 8: Use Your USDT
If you haven’t already, install the Metamask extension for your preferred browser. Create a new account or import an existing one by following the setup instructions.
Make sure you have some Ethereum (ETH) in your Metamask wallet to cover transaction fees. You will need to pay gas fees to transfer USDT.
Connect your Metamask wallet to a supported exchange or wallet that allows USDT transfers. This may require granting permission to access your wallet.
Double-check the address where you are sending USDT. Any mistakes in the address may result in the permanent loss of your funds. Verify the address with the exchange or wallet you are using.
Once you have verified the address, initiate the transfer. Enter the amount of USDT you want to send and confirm the transaction. Be aware of any gas fees associated with the transfer.
After initiating the transfer, wait for the transaction to be confirmed on the blockchain. This may take some time, depending on network congestion.
Once the transaction is confirmed, verify that the USDT has been successfully added to your Metamask wallet. Check your wallet balance to ensure the transfer was completed.
Now that you have USDT in your Metamask wallet, you can use it for various purposes, such as trading, investing, or making purchases.
Remember to exercise caution when transferring or using cryptocurrency. Always double-check addresses, keep your private keys secure, and be aware of potential scams.
Download and Install Metamask Extension

To add USDT to your wallet using Metamask, you first need to download and install the Metamask extension. Follow the steps below to get started:
Step 1: Open your browser
Open your preferred web browser (such as Google Chrome, Firefox, or Brave) and navigate to the official Metamask website.
Step 2: Click on “Get Chrome Extension” or “Get Firefox Extension”

On the Metamask website, you will see buttons for different browser extensions. Click on the button that corresponds to your browser. For example, if you are using Google Chrome, click on “Get Chrome Extension”. This will redirect you to the appropriate extension marketplace.
Step 3: Add Metamask to your browser
Once you are on the extension marketplace page, click on the “Add to Chrome” or “Add to Firefox” button to start the installation process. A pop-up window will appear, asking for confirmation to add the extension. Click “Add” to proceed.
Step 4: Set up a Metamask account
After the extension is successfully added to your browser, the Metamask icon will appear next to the address bar. Click on the icon to open Metamask. A new tab will open, prompting you to create a new account.
Step 5: Create a new account
Follow the instructions on the Metamask tab to create a new account. This typically involves setting up a password and agreeing to the terms of service. Make sure to store your recovery seed phrase in a safe place, as it is the only way to restore access to your account if you forget your password.
| Note: | It is important to download Metamask from the official website or trusted sources to ensure the integrity of the extension and avoid malicious versions. |
Once you have successfully downloaded and installed the Metamask extension, you are ready to add USDT to your wallet. Continue following the next steps in the guide to complete the process.
Create a New Wallet or Import an Existing Wallet
To add USDT to your Metamask wallet, you first need to have a wallet. If you already have a Metamask wallet, you can skip this step and proceed to the next section.
Create a New Wallet:
To create a new wallet, follow these steps:
- Install the Metamask extension for your browser by visiting the official Metamask website or the browser extension store.
- Click on the Metamask icon in your browser toolbar to open the extension.
- Click on the “Get Started” button to begin the wallet creation process.
- Read and accept the Terms of Use and Privacy Policy.
- Click on the “Create a Wallet” button.
- Enter a strong password and confirm it.
- Click on the “Create” button.
- Follow the instructions provided by Metamask to backup your wallet seed phrase. This is crucial as it will allow you to restore your wallet and access your funds in case you forget your password or lose access to your device.
- Once your wallet is created and secured, you will be directed to the wallet interface, where you can proceed to the next section to add USDT.
Import an Existing Wallet:
If you already have an existing Metamask wallet or another wallet that you would like to import, you can follow these steps to import it into Metamask:
- Install the Metamask extension for your browser by visiting the official Metamask website or the browser extension store.
- Click on the Metamask icon in your browser toolbar to open the extension.
- Click on the “Import Wallet” button.
- Enter your wallet’s seed phrase or private key and click on the “Import” button.
- Follow the instructions provided by Metamask to complete the wallet import process.
- Once your wallet is imported and secured, you will be directed to the wallet interface, where you can proceed to the next section to add USDT.
Now that you have a Metamask wallet, you are ready to add USDT to it.
Connect Metamask to the USDT Network

To start using the USDT (Tether) stablecoin with your Metamask wallet, you need to connect Metamask to the USDT network. Follow the steps below:
Step 1: Open the Metamask browser extension by clicking on the Metamask icon in your browser toolbar.
Step 2: If you haven’t already, create or import your Metamask wallet. Make sure you have some ETH (Ethereum) in your wallet to cover gas fees.
Step 3: Once your wallet is set up, click on the network selection dropdown in the Metamask interface. By default, it should display “Main Ethereum Network”.
Step 4: Scroll down the list of available networks and click on “Custom RPC”. This will allow you to add a custom network.
Step 5: In the “New RPC URL” field, enter the following URL: https://mainnet.usdt.org.
Step 6: In the “Chain ID” field, enter 100.
Step 7: Optionally, you can enter a name and symbol for the network. For example, you can enter “USDT Network” as the name and “USDT” as the symbol.
Step 8: Click “Save” to add the USDT network to your Metamask wallet.
Step 9: After saving, you should see the newly added network in the network selection dropdown. Select the “USDT Network” from the list.
Step 10: You are now connected to the USDT network with your Metamask wallet. You can send, receive, and view your USDT balances using Metamask.
Note: Make sure you are connected to the correct network when performing any transactions. Sending USDT on the wrong network can result in permanent loss of funds.
Add USDT to Your Metamask Wallet
If you want to add USDT (Tether) to your Metamask wallet, here’s a step-by-step guide on how to do it:
Step 1: Open your Metamask wallet and make sure you’re connected to the Ethereum network.
Step 2: Click on the “Add Token” button in the wallet interface.
Step 3: A new window will pop up asking for the token contract address. Paste the USDT contract address: [contract address].
Step 4: Metamask will automatically fetch the token symbol and decimals for USDT. Review the details and click on the “Add” button
Step 5: USDT should now be added to your Metamask wallet. You can check your token balance by clicking the “Assets” tab in the wallet interface.
Note: Make sure you’re using the correct USDT contract address to avoid losing your funds.
Adding USDT to your Metamask wallet is a simple process that allows you to easily manage and use your USDT tokens on the Ethereum network.
Frequently Asked Questions:
What is USDT?
USDT (Tether) is a popular stablecoin that is pegged to the US dollar. It is commonly used in cryptocurrency trading as a way to quickly convert cryptocurrencies to a stable value.
What is Metamask?
Metamask is a browser extension wallet that allows you to manage your Ethereum-based tokens and interact with decentralized applications (dApps). It is a widely used wallet in the Ethereum ecosystem.
Can I use Metamask with other blockchains?
Yes, Metamask supports multiple blockchains including Ethereum, Binance Smart Chain, and Polygon. You can switch between different blockchains within the Metamask interface by clicking on the network dropdown menu and selecting the desired blockchain.
+ There are no comments
Add yours