


Welcome to our comprehensive tutorial on setting up Metamask, the popular digital wallet for Ethereum and other blockchain networks. Whether you’re new to the world of cryptocurrencies or just getting started with Ethereum, Metamask is an essential tool that allows you to manage your digital assets securely and interact with decentralized applications (dApps) seamlessly.
In this step-by-step guide, we’ll walk you through the process of installing and configuring Metamask on your preferred web browser, creating a new wallet, and exploring its various features. By the end of this tutorial, you’ll have a solid understanding of how to use Metamask to securely store your cryptocurrencies and engage with the exciting world of decentralized finance (DeFi).
Metamask provides a user-friendly interface that simplifies the complex world of blockchain technology, making it accessible to beginners and experienced users alike. With Metamask, you can easily connect to Ethereum networks, manage multiple wallets, and securely store your private keys – the secret codes that allow you to access your digital assets.
So let’s get started with our Metamask setup tutorial and take the first steps towards becoming a part of the decentralized future!
Metamask Setup Made Easy
Metamask is a popular Ethereum wallet and browser extension that allows users to interact with decentralized applications (dApps) on the Ethereum blockchain. In this tutorial, we will guide you through the process of setting up Metamask step by step, making it easy for beginners to get started with this powerful tool.
Step 1: Installation and Account Creation
The first step is to install the Metamask extension in your preferred web browser. Visit the Metamask website and click on the “Get Chrome Extension” button if you are using Google Chrome, or choose the appropriate option for your browser.
Once the extension is installed, click on the Metamask icon in your browser toolbar and follow the prompts to create a new account. Make sure to choose a strong and unique password, as your account will hold your valuable cryptocurrencies.
Step 2: Backing Up Your Seed Phrase
After creating your account, Metamask will display a seed phrase consisting of 12 or 24 words. This seed phrase is crucial for recovering your account if you ever lose access to it. Write down the seed phrase on a piece of paper and keep it in a safe place. Do not store it digitally, as it could be hacked.
During this step, Metamask will also ask you to confirm the words of your seed phrase in the correct order, which ensures that you have written it down correctly.
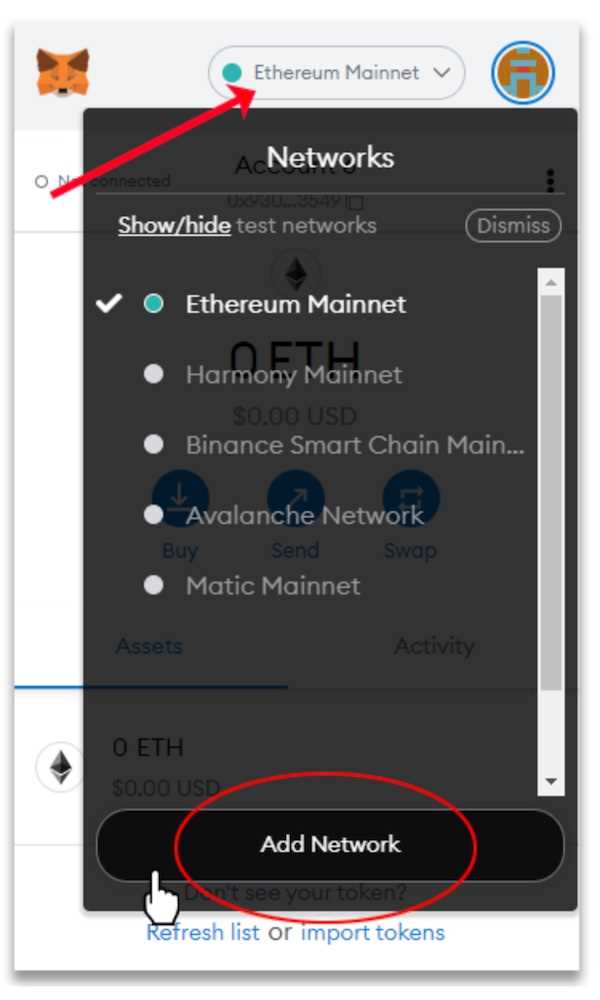
Step 3: Connecting to a Network
Once your account is set up and your seed phrase securely stored, you need to connect Metamask to a network. By default, it is connected to the Ethereum mainnet. However, you can switch between different Ethereum networks or add custom networks.
To switch networks, click on the network name at the top of the Metamask window and choose from the available options. For example, you can switch to the Ropsten test network for testing purposes.
Step 4: Funding Your Account
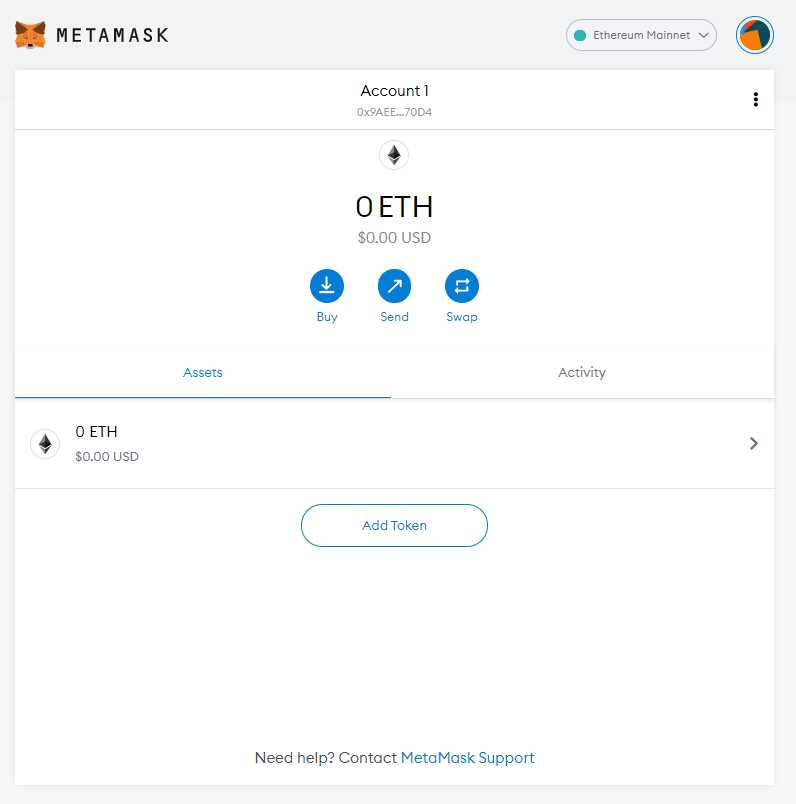
To start using Metamask, you need to have some Ethereum in your account. There are several ways to fund your account, including purchasing Ethereum from a cryptocurrency exchange and sending it to your Metamask address, or receiving Ethereum from someone else.
To receive Ethereum, you can click on the account address at the top of the Metamask window and copy it. Share this address with the person who wants to send you Ethereum, and they can send it directly to your account.
Step 5: Using Metamask with dApps
Now that your Metamask account is set up and funded, you can start using it with decentralized applications (dApps). Many dApps require you to connect your wallet to interact with them.
When using a dApp, you will often see a “Connect Wallet” button. Click on it, and Metamask will ask for your permission to connect. Once connected, you can use the dApp with your Metamask account, such as trading tokens on a decentralized exchange or participating in a decentralized finance protocol.
Congratulations! You have successfully set up Metamask and are ready to explore the world of decentralized applications on the Ethereum blockchain. Remember to always keep your seed phrase safe and avoid sharing it with anyone.
| Pros | Cons |
|---|---|
| Easy to use and set up | Requires an internet connection |
| Secure storage of cryptocurrencies | Seed phrase can be lost or stolen |
| Compatible with a wide range of dApps | Potential for phishing attacks |
A Comprehensive Tutorial

Welcome to this comprehensive tutorial on setting up Metamask! Whether you are a beginner or have some experience with cryptocurrency, this guide will walk you through the process step by step. By the end of this tutorial, you will have a fully functional Metamask wallet that you can use to interact with decentralized applications (DApps) on the Ethereum blockchain.
The tutorial will cover the following topics:
- What is Metamask and why do you need it?
- How to install Metamask as a browser extension
- Creating a new Metamask wallet
- Backing up and securing your wallet
- Adding Ethereum to your wallet
- Exploring the Metamask interface and settings
- Interacting with DApps using Metamask
Each section will provide detailed instructions along with screenshots to make the process as easy as possible. Whether you are new to the world of cryptocurrencies or have been using them for a while, this tutorial will help you navigate the complexities of setting up and using Metamask. So let’s dive in and get started!
For Beginners
If you are new to the world of cryptocurrency and blockchain technology, setting up Metamask can seem overwhelming. However, with this comprehensive tutorial, we will break it down into easy steps that even beginners can follow.
Before diving into the setup process, let’s first understand what Metamask is. Metamask is a browser extension that serves as a digital wallet for Ethereum-based cryptocurrencies. It allows users to manage their blockchain assets, interact with decentralized applications (dApps), and securely store their private keys.
To begin, you will need to install the Metamask browser extension. Simply go to the Metamask website, select your preferred browser (such as Chrome, Firefox, or Brave), and follow the installation instructions. Once installed, you will see the Metamask icon in your browser’s toolbar.
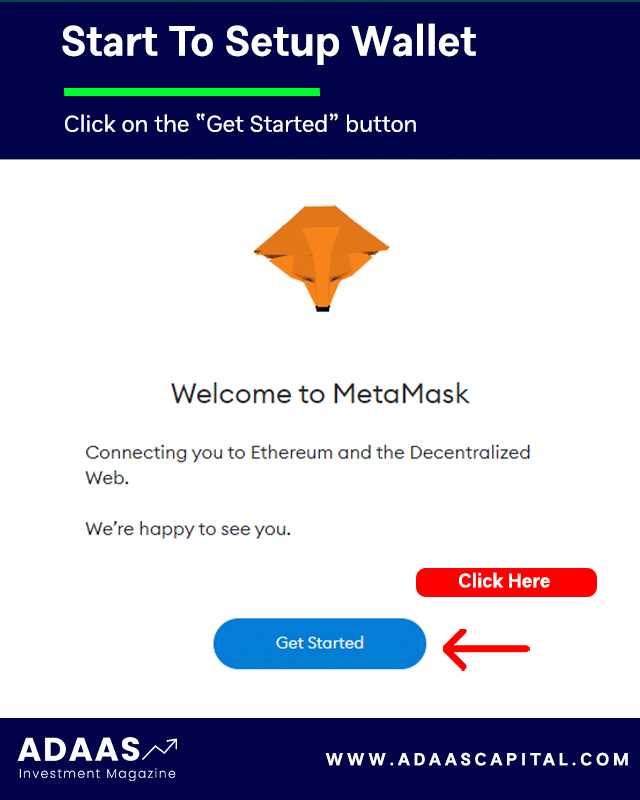
Next, open Metamask by clicking on the icon. You will be greeted with a welcome screen. Click on the “Get Started” button to create a new wallet or import an existing one.
If you are new to cryptocurrency, select the “Create a Wallet” option. Metamask will generate a unique 12-word seed phrase that you need to securely write down and store in a safe place. This seed phrase serves as a backup for your wallet and can be used to restore access to your funds if you ever lose your device or forget your password.
Once you have written down your seed phrase, click on “Next” and you will be asked to verify the words in the correct order. This step ensures that you have correctly recorded your seed phrase.
After verifying your seed phrase, you will be prompted to set a password for your Metamask wallet. Choose a strong and secure password that you can remember but others cannot easily guess. Confirm your password and click “Create” to finalize the wallet creation process.
Congratulations! You have successfully set up your Metamask wallet. You can now access your wallet by entering your password whenever you open the Metamask extension. In the next sections of this tutorial, we will explore how to use Metamask to send and receive Ethereum-based cryptocurrencies, interact with dApps, and explore the various features it offers.
Remember, as a beginner, it’s important to start with small amounts of cryptocurrency and gradually familiarize yourself with how Metamask works. Always practice good security measures such as keeping your seed phrase and password safe, enabling two-factor authentication, and only transacting with reputable sources.
Why You Should Use Metamask
Metamask is a cryptocurrency wallet and a browser extension that allows you to interact with the Ethereum blockchain. Here are several reasons why you should consider using Metamask:
1. Easy Access:
Metamask provides a convenient and user-friendly way to access decentralized applications (dApps) built on the Ethereum network. Instead of manually managing private keys or connecting to hardware wallets, you can securely store your Ethereum assets and interact with various dApps directly from your web browser.
2. Enhanced Security:
Metamask acts as a secure vault for your digital assets, protecting your private keys from potential phishing attacks or malicious websites. It includes built-in security features such as password protection and seed phrase backup, ensuring that only you have control over your funds.
3. Seamless Integration:
Metamask seamlessly integrates with popular web browsers like Chrome, Firefox, and Brave, making it easily accessible to a broad range of users. With just a few clicks, you can add Metamask as an extension to your browser and start interacting with Ethereum-based applications.
4. Transaction Management:
Metamask simplifies the process of sending and receiving Ethereum and ERC-20 tokens. It allows you to manage multiple accounts, view transaction history, set gas fees, and monitor the status of your transactions. With Metamask, you have full control over your interactions with the Ethereum blockchain.
5. Token Support:
Metamask supports a wide range of Ethereum tokens, including popular ones like Ether, ERC-20 tokens, and ERC-721 tokens. This enables you to participate in various token sales, decentralized exchanges, and other blockchain-based applications.
In conclusion, Metamask offers a user-friendly and secure way to interact with the Ethereum blockchain and access decentralized applications. Its ease of use, enhanced security, seamless integration, transaction management capabilities, and token support make it an excellent choice for anyone interested in exploring the world of decentralized finance.
Step-by-Step Guide to Metamask Setup
Metamask is a popular browser extension that allows users to interact with Ethereum-based decentralized applications (dApps) and manage their digital assets securely. Setting up Metamask is a simple process that can be completed in just a few steps. Follow this step-by-step guide to get started with Metamask:
Step 1: Install Metamask Extension
The first step is to install the Metamask extension on your preferred browser. Metamask is available for Google Chrome, Mozilla Firefox, and Brave. Simply search for “Metamask” in your browser’s extension store and click on “Add to Chrome” (or the equivalent for your browser).
Step 2: Create a New Wallet
After installing the extension, click on the Metamask icon in your browser’s toolbar. The Metamask interface will open, and you will be prompted to either import an existing wallet or create a new one. Choose “Create a Wallet” and click on “Get Started”.
Step 3: Set a Strong Password
Next, you will need to set a strong password for your Metamask wallet. Make sure to choose a password that is unique and not easily guessable. Enter your password and click on “Create”.
Step 4: Backup Seed Phrase
After setting a password, Metamask will generate a unique 12-word seed phrase that can be used to restore your wallet. This seed phrase is extremely important and should be kept securely. Write down the seed phrase and store it in a safe place. Click on “Next” once you have safely stored the seed phrase.
Step 5: Confirm Seed Phrase
To ensure that you have correctly written down the seed phrase, Metamask will ask you to confirm the words in the correct order. Select the words in the correct order from the dropdown menus and click on “Confirm”.
Step 6: Start Using Metamask
Once you have confirmed the seed phrase, your Metamask wallet will be created, and you will be able to access and manage your digital assets. You can now connect your wallet to dApps, send and receive Ethereum, and explore the decentralized finance (DeFi) ecosystem.
Remember to always keep your Metamask password and seed phrase secure. With Metamask, you have full control over your funds, but this also means that you are responsible for the safety and security of your wallet.
Now that you have completed the Metamask setup, you can start exploring the world of decentralized applications and take advantage of the benefits of blockchain technology.
Frequently Asked Questions:
What is Metamask and why should I use it?
Metamask is a cryptocurrency wallet and browser extension that allows users to interact with decentralized applications (dApps) on the Ethereum blockchain. It provides a secure and convenient way to manage your cryptocurrency holdings, interact with smart contracts, and send or receive Ethereum and other ERC-20 tokens. Using Metamask, you can participate in decentralized finance (DeFi), play blockchain games, and explore various other blockchain-based applications.

+ There are no comments
Add yours