


If you’re new to the world of cryptocurrency and blockchain technology, you’ve probably heard of Metamask. Metamask is a popular digital wallet that allows you to securely store, send, and receive Ethereum and other ERC-20 tokens. In this step-by-step guide, we’ll walk you through the process of sending BNB (Binance Coin) to your Metamask wallet.
Step 1: Set up and secure your Metamask wallet
Before you can send BNB to your Metamask wallet, you’ll need to download and install the Metamask extension for your web browser. Once installed, create a new wallet or import an existing one using your seed phrase. Make sure to set a strong password and enable two-factor authentication to enhance the security of your wallet.
Step 2: Obtain the BNB address
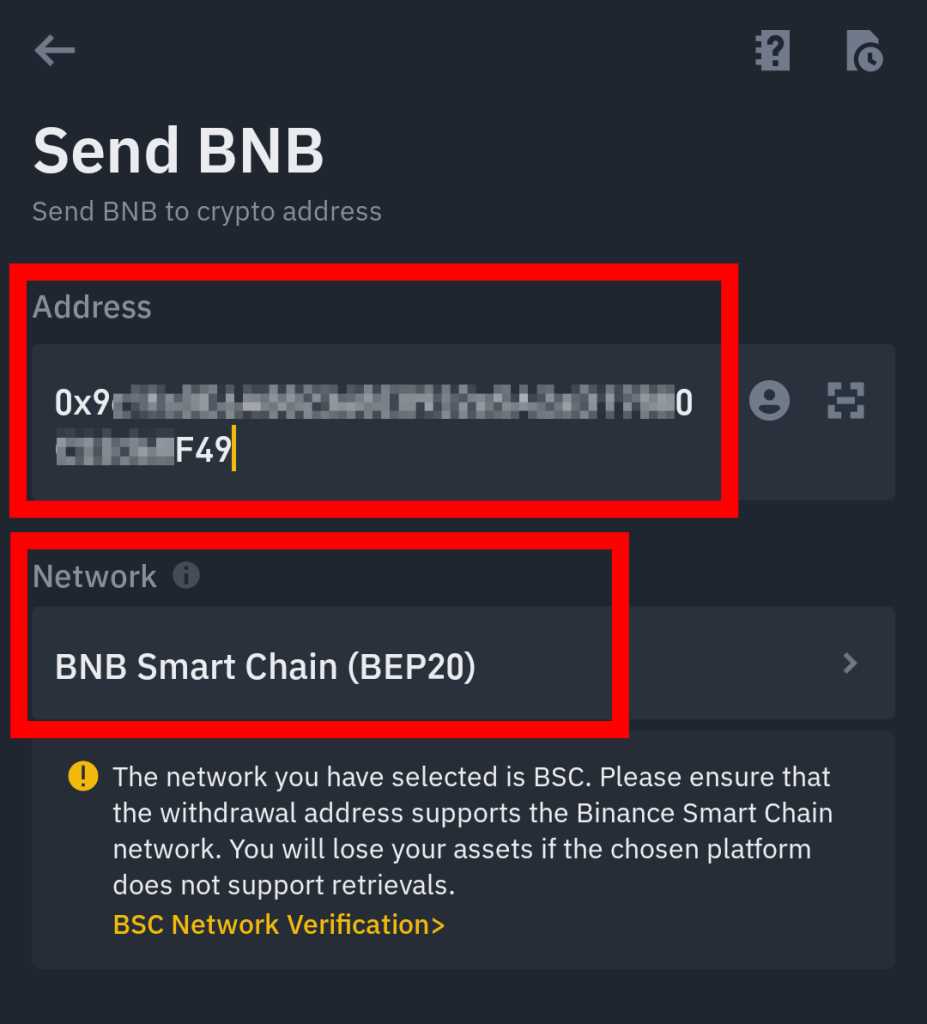
To send BNB to your Metamask wallet, you’ll need to obtain your BNB address. Open your Metamask wallet and click on the account icon. Select “Copy Address” to copy your BNB address to the clipboard.
Step 3: Purchase BNB on a cryptocurrency exchange
In order to send BNB to your Metamask wallet, you’ll first need to purchase BNB on a cryptocurrency exchange. Sign up for an account on a reputable exchange such as Binance and deposit funds into your account. Once your account is funded, navigate to the trading platform and search for the BNB trading pair. Place a buy order for the desired amount of BNB.
Step 4: Withdraw BNB from the exchange
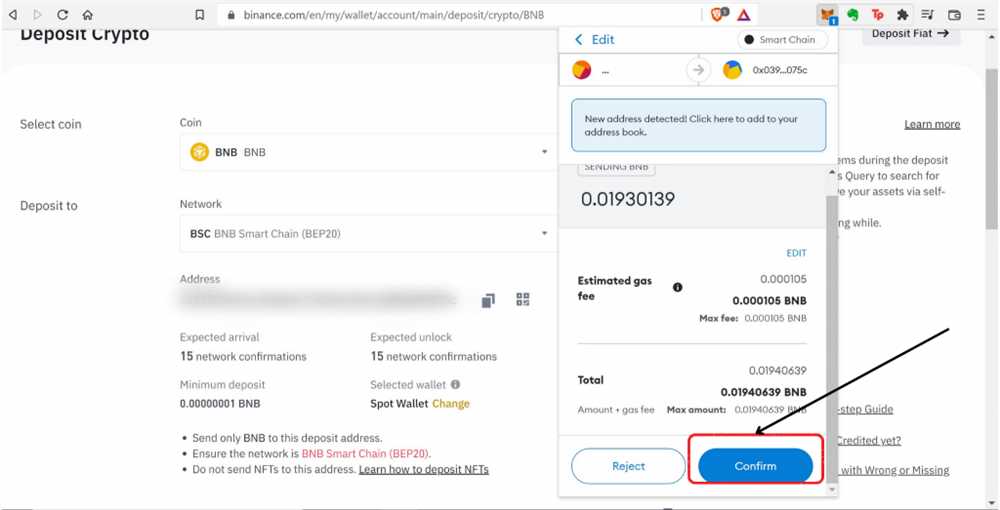
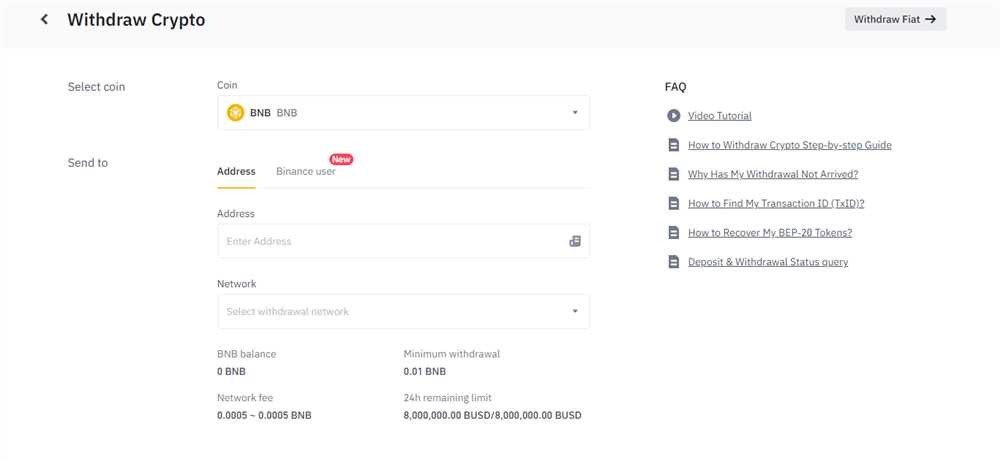
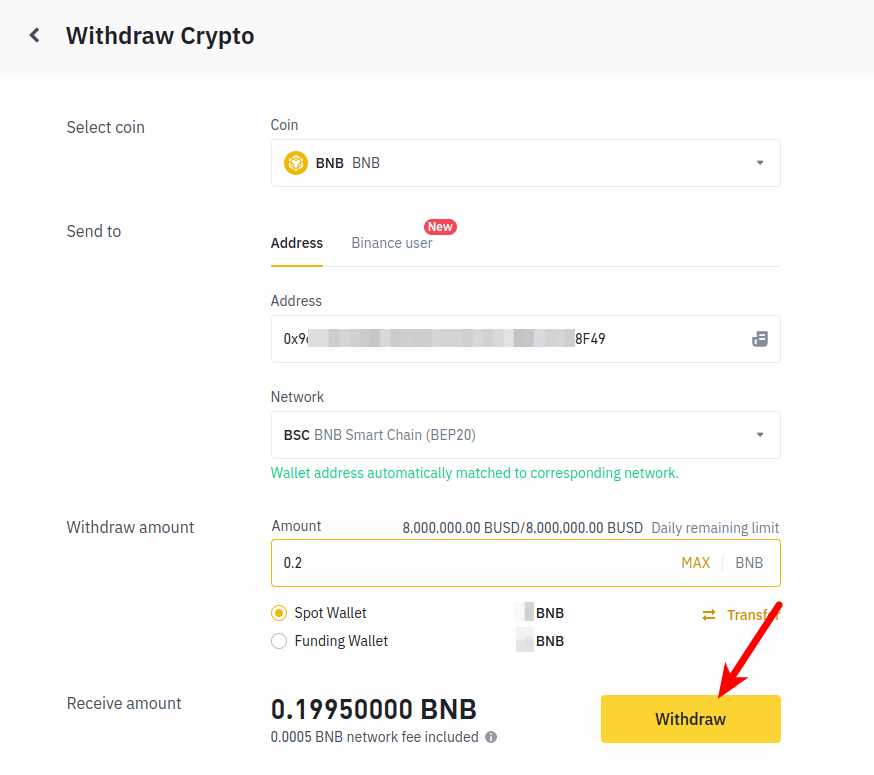
After purchasing BNB on the cryptocurrency exchange, you’ll need to withdraw the funds to your Metamask wallet. Locate the withdrawal or send function on the exchange and enter your BNB address. Double-check the address to ensure its accuracy, as any mistakes could result in lost funds. Confirm the transaction and wait for the withdrawal to be processed.
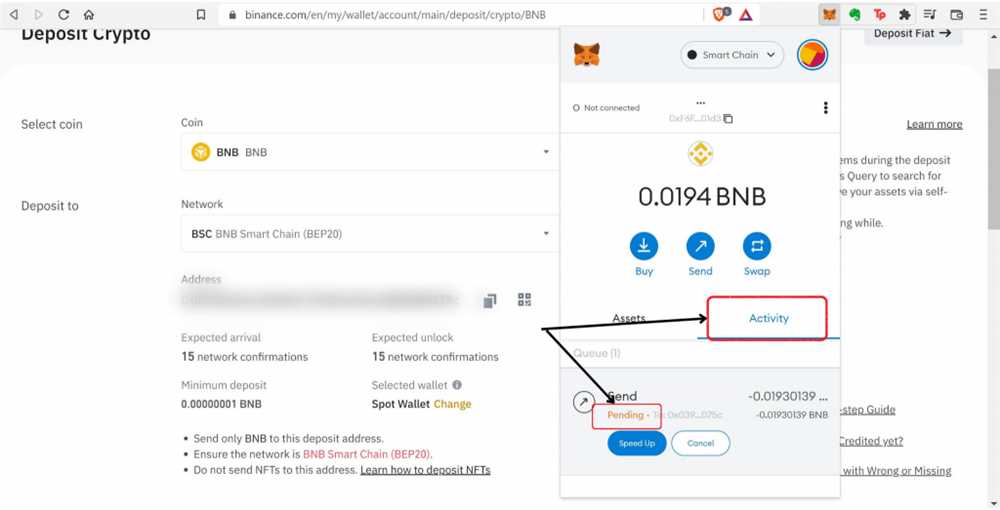
Step 5: Confirm the BNB transaction on Metamask
Once the BNB transaction has been processed by the cryptocurrency exchange, you should receive a notification in your Metamask wallet. Open your Metamask wallet and navigate to the “Activity” tab to view the transaction. Check the transaction details, including the amount and destination address, and click on “Confirm” to finalize the transfer.
Step 6: Verify the BNB balance in your Metamask wallet
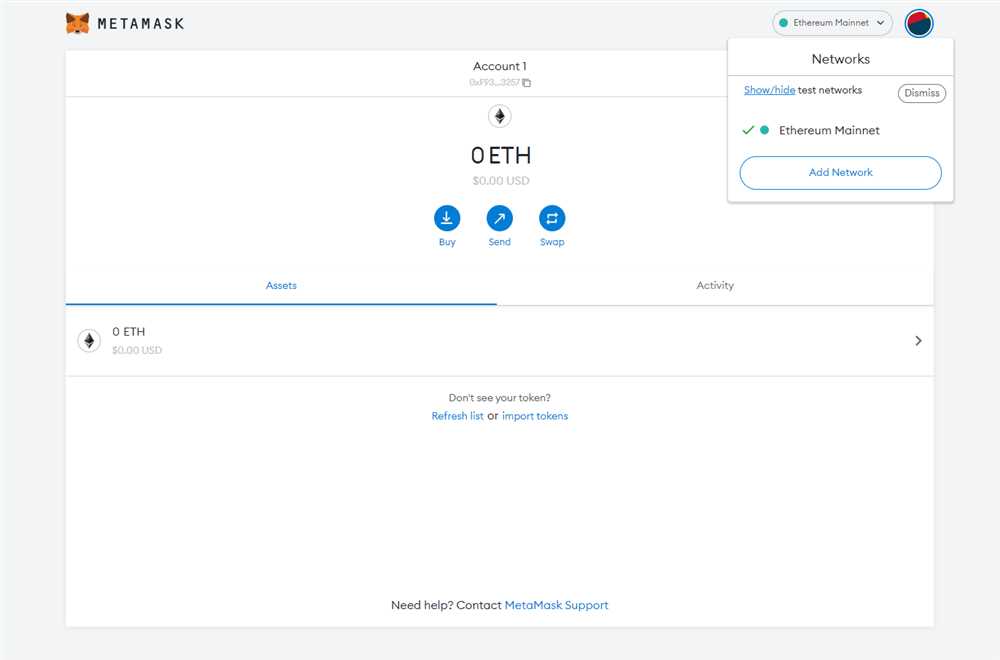
After confirming the BNB transaction, you should see the BNB balance reflected in your Metamask wallet. Click on the account icon and select the BNB account to view the balance. You can also view the transaction history to track the movement of your BNB tokens.
Congratulations! You have successfully sent BNB to your Metamask wallet. Now you can use your BNB tokens to participate in decentralized finance (DeFi) applications, trade on decentralized exchanges, or simply hold them as an investment.
Overview of BNB and Metamask
BNB (Binance Coin) is the native cryptocurrency of the Binance exchange, one of the largest cryptocurrency exchanges in the world. BNB is built on the Ethereum blockchain and its primary purpose is to be used as a trading fee on the Binance platform.
Metamask is a popular cryptocurrency wallet and browser extension that allows users to interact with the Ethereum blockchain. It serves as a bridge between web applications and the user’s Ethereum wallet, providing a seamless experience for dApp (decentralized application) users.
By linking your Metamask wallet to the Binance exchange, you can easily send BNB from your exchange account to your Metamask wallet. This enables you to use your BNB for various purposes such as participating in decentralized finance (DeFi) projects, investing in ICOs, or using dApps on the Ethereum network.
Metamask provides a user-friendly interface to manage your BNB and other ERC-20 tokens. With Metamask, you can securely store your BNB, send it to other wallets, or exchange it for other cryptocurrencies. It also allows you to interact with smart contracts and sign transactions on the Ethereum network.
Overall, the integration of BNB with Metamask opens up new possibilities and opportunities for BNB holders, providing them with easy access to the vast world of decentralized finance and the Ethereum ecosystem.
Step 1: Setting up Metamask Wallet
Before you can send BNB to your Metamask wallet, you first need to have a Metamask wallet set up on your device. Metamask is a popular cryptocurrency wallet that is compatible with many Ethereum-based tokens, including BNB.
1. Install Metamask Extension
To begin, you’ll need to install the Metamask extension in your web browser. Metamask is available for Chrome, Firefox, and Brave browsers. You can find the extension by searching for “Metamask” in your browser’s extension store, or you can visit the official Metamask website to download and install it.
2. Create a New Wallet
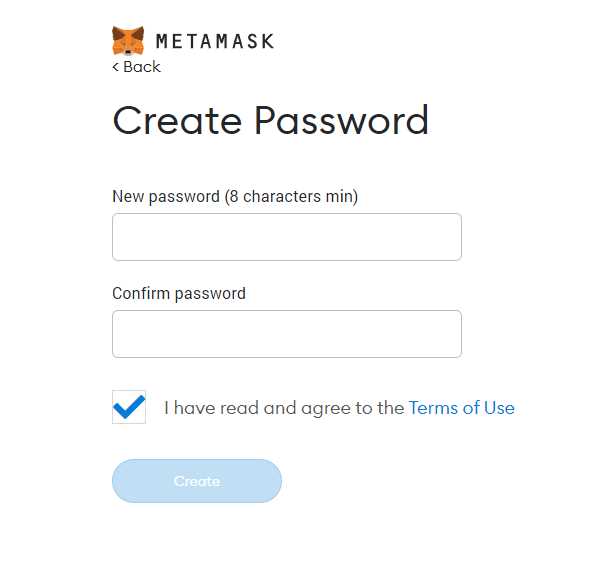
Once you have the Metamask extension installed, open the extension and click on the “Create a Wallet” button. Follow the on-screen instructions to set up a new wallet. Make sure to choose a strong password and write down the seed phrase that is provided. This seed phrase will be used to recover your wallet in case you forget your password or lose access to your device.
3. Secure Your Wallet
After creating your Metamask wallet, it’s important to take steps to secure it. Enable two-factor authentication (2FA) to add an extra layer of security to your wallet. You can also consider enabling a password for each transaction or setting up biometric authentication if your device supports it. Additionally, make sure to keep your seed phrase in a safe and secure location.
4. Connect to the Binance Smart Chain

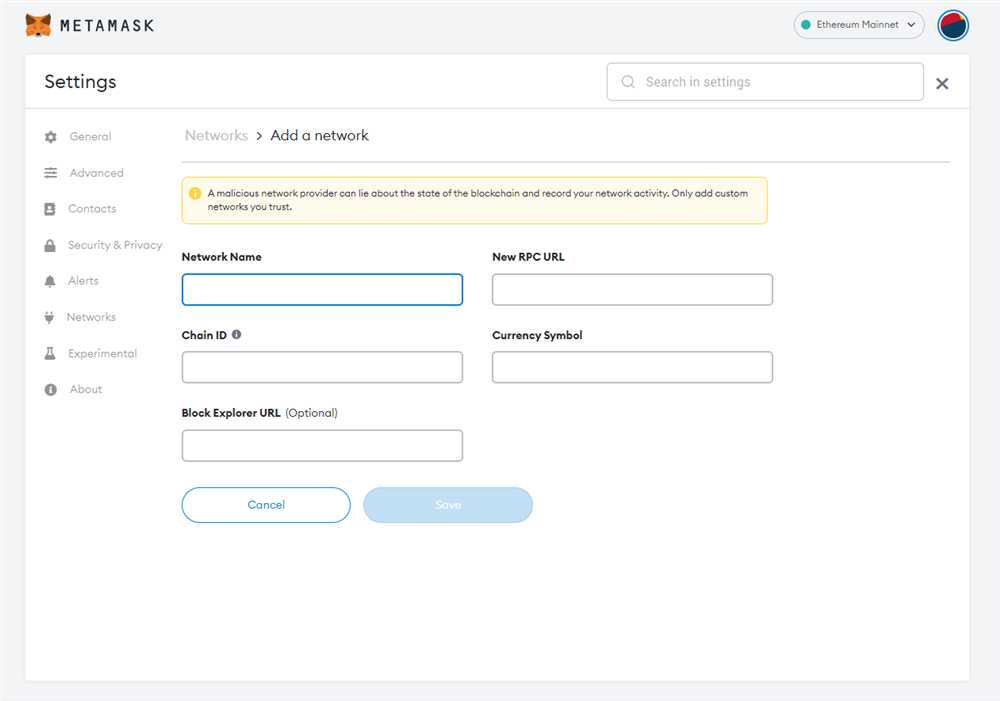
By default, Metamask is connected to the Ethereum network. To send BNB (which is on the Binance Smart Chain) to your Metamask wallet, you’ll need to connect Metamask to the Binance Smart Chain. In the Metamask extension, click on the network selection dropdown and choose “Custom RPC”. In the RPC URL field, enter the Binance Smart Chain RPC URL: https://bsc-dataseed.binance.org/. Save the changes and Metamask will now be connected to the Binance Smart Chain.
Once you have set up your Metamask wallet and connected it to the Binance Smart Chain, you are now ready to send BNB to your wallet and start using it for transactions and interactions with Binance Smart Chain-based platforms.
Downloading and Installing Metamask
Metamask is a digital wallet that allows you to store, send, and receive BNB and other Ethereum-based tokens. To get started with Metamask, follow the steps below:
Step 1: Visit the official Metamask website at https://metamask.io/.
Step 2: Click on the “Download” button to download the Metamask extension for your web browser of choice. Metamask is available for Chrome, Firefox, Brave, and Edge.
Step 3: After the extension is downloaded, click on the installation file to begin the installation process. Follow the prompts to complete the installation.
Step 4: Once the installation is complete, you will see the Metamask icon in your browser’s toolbar. Click on the icon to open Metamask.
Step 5: Set up a new Metamask wallet by clicking on the “Create a Wallet” button. Follow the instructions to set up a password and create a new wallet.
It is important to remember your password and keep it secure. Losing your password may result in permanent loss of access to your funds.
Step 6: After creating your wallet, you will be given a secret backup phrase. This phrase is your only way to restore your wallet if you forget your password or lose access to your device. Write down this phrase and store it somewhere safe and secure.
Step 7: Confirm your secret backup phrase by selecting the words in the correct order. This step ensures that you have properly written down and saved your backup phrase.
Step 8: Once your backup phrase is confirmed, your Metamask wallet is ready to use. You can now send and receive BNB and other Ethereum-based tokens using Metamask.
Remember to keep your Metamask extension up to date by regularly checking for updates. Keeping your software updated ensures that you have the latest security patches and features.
Creating a New Wallet
In order to send BNB to your MetaMask wallet, you first need to create a new wallet. Follow these steps to create a new MetaMask wallet:
1. Visit the MetaMask website at metamask.io and click on the “Download” button. This will redirect you to the MetaMask download page.
2. Choose the version of MetaMask that is compatible with your browser (Chrome, Firefox, Brave, etc.) and click on the “Install MetaMask” button. This will start the download and installation process.
3. Once the installation is complete, click on the MetaMask extension icon in your browser’s toolbar to open the MetaMask wallet.
4. Click on the “Create a Wallet” button to start the wallet creation process.
5. Enter a strong and unique password for your wallet. Make sure to remember this password, as you will need it to access your wallet in the future.
6. Read and accept the terms of use by clicking on the checkbox and then clicking on the “Create” button.
7. You will be shown a seed phrase consisting of 12 random words. This seed phrase is extremely important as it can be used to recover your wallet in case of loss or theft. Make sure to write down this seed phrase and keep it in a safe and secure place.
8. Confirm your seed phrase by selecting the words in the correct order and clicking on the “Confirm” button.
9. Congratulations! You have successfully created a new MetaMask wallet. You can now use this wallet to send and receive BNB and other cryptocurrencies.
Step 2: Adding BNB to Metamask
Once you have set up your Metamask wallet and have it connected to the Binance Smart Chain network, the next step is to add BNB (Binance Coin) to your wallet. BNB is the native cryptocurrency of the Binance exchange and is used for various purposes within the Binance Smart Chain ecosystem.
Here is a step-by-step guide to adding BNB to Metamask:
1. Open your Metamask wallet
Make sure you have your Metamask wallet extension installed in your browser and click on the extension icon to open the wallet.
2. Switch to the Binance Smart Chain network
Click on the network dropdown menu in the top center of the Metamask wallet interface and select “Binance Smart Chain”. This will switch your wallet to the Binance Smart Chain network.
3. Obtain BNB
You can obtain BNB by purchasing it on a cryptocurrency exchange like Binance or by receiving it from someone who already has BNB. Make sure you have an appropriate amount of BNB to add to your wallet.
4. Copy your BNB wallet address
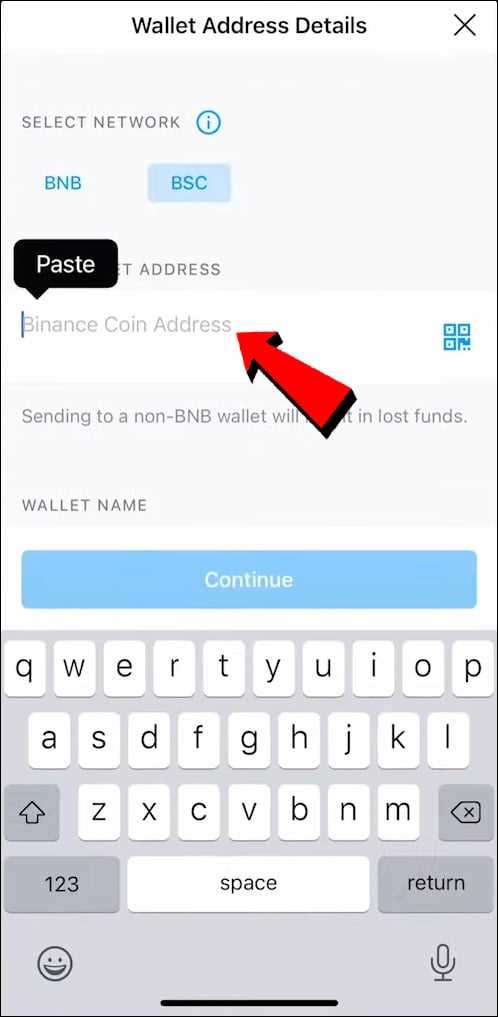
In your Metamask wallet, click on the account icon in the top right corner of the interface and select “Copy Address” to copy your BNB wallet address to your clipboard. This is the address where you will receive the BNB.
5. Send BNB to your Metamask wallet
Go to the platform or wallet where you have your BNB and initiate a transaction to send BNB to your Metamask wallet address. Paste your wallet address in the recipient field and specify the amount of BNB you want to send. Double-check the address to ensure it is correct.
6. Confirm the transaction
Follow the prompts on the platform or wallet to confirm the transaction. This may involve entering your Metamask password or using two-factor authentication if enabled. Once confirmed, the BNB will be sent to your Metamask wallet.
7. Check your BNB balance in Metamask
After the transaction is complete, you can check your BNB balance in your Metamask wallet by clicking on the account icon and selecting “View Account” or by navigating to the “Assets” tab in the wallet interface. You should see the added BNB in your wallet.
Note: Make sure to keep your Metamask wallet secure and never share your private key or wallet seed phrase with anyone. It is recommended to use hardware wallets for added security.
By following these steps, you can successfully add BNB to your Metamask wallet and start using it for various activities within the Binance Smart Chain ecosystem.
Obtaining BNB
If you don’t already have BNB (Binance Coin), you’ll need to acquire some before you can send it to your Metamask wallet. Here are a few ways you can obtain BNB:
1. Purchase BNB on a cryptocurrency exchange: BNB is listed on various cryptocurrency exchanges, including Binance. You can create an account, complete the necessary verification process, and deposit fiat currency or other cryptocurrencies to purchase BNB.
2. Use a peer-to-peer (P2P) trading platform: P2P trading platforms allow you to buy BNB directly from other individuals. You can browse available sellers, negotiate the price and terms, and complete the transaction using a secure escrow service provided by the platform.
3. Accept BNB as payment: If you provide goods or services online, consider accepting BNB as a form of payment. This way, you can earn BNB and use it to send to your Metamask wallet.
Remember to choose a reputable source when obtaining BNB and be cautious of potential scams. Once you have obtained BNB, you can proceed with sending it to your Metamask wallet following the steps outlined in this guide.
Frequently Asked Questions:
What is BNB?
BNB is the native cryptocurrency of the Binance chain and is commonly used for transactions on the Binance platform.
Why would I want to send BNB to Metamask?
By sending BNB to Metamask, you can use it to interact with decentralized applications (DApps) and perform various actions within the Ethereum ecosystem.
How do I send BNB to Metamask?
To send BNB to Metamask, you need to create a BSC (Binance Smart Chain) wallet in Metamask, obtain the BNB address associated with that wallet, and then send BNB from your Binance account or another wallet to that address.

+ There are no comments
Add yours