


Are you tired of high gas fees and slow transactions on the Ethereum network? Look no further than Polygon, a layer 2 scaling solution that aims to enhance user experience and make blockchain technology more accessible for everyone. By setting up the Polygon wallet on MetaMask, you can tap into the benefits of Polygon and enjoy faster, cheaper, and more efficient transactions.
MetaMask, a popular Ethereum wallet, recently added support for Polygon, allowing users to seamlessly connect to the Polygon network and explore the opportunities it offers. In this guide, we will walk you through the process of setting up the Polygon wallet on MetaMask, so you can start experiencing the advantages of this exciting layer 2 solution.
First, you will need to install the MetaMask browser extension if you haven’t done so already. Once installed, open MetaMask and click on the network dropdown menu. Select “Custom RPC” and enter the following details: Network Name – Polygon, RPC URL – https://rpc-mainnet.matic.network, Chain ID – 137. Click “Save” to save the changes.
Next, you will need to add a new account on MetaMask using the Polygon network. Click on the account icon on the top right corner of the MetaMask interface and select “Import Account”. Enter your Polygon wallet’s private key, seed phrase, or JSON file, and click on “Import”. Congratulations, you have successfully set up your Polygon wallet on MetaMask!
Now that your Polygon wallet is connected to MetaMask, you can start exploring the Polygon ecosystem and taking advantage of its features. From decentralized applications (dApps) to decentralized finance (DeFi) platforms, the possibilities are endless. Enjoy faster and cheaper transactions, seamless interoperability, and an enhanced user experience with Polygon and MetaMask!
Overview of MetaMask
MetaMask is a browser extension that allows users to access Ethereum blockchain and interact with decentralized applications (dApps). It serves as a virtual wallet that enables users to securely store their Ethereum-based cryptocurrencies and tokens. With MetaMask, users can manage their digital assets, view transaction history, and send or receive funds.
One of the key features of MetaMask is its compatibility with various Ethereum networks, including the Polygon Network. This allows users to easily switch between different networks and take advantage of the benefits offered by each one.
MetaMask provides a user-friendly interface for interacting with dApps. When a user visits a dApp, MetaMask automatically connects to it and prompts the user to approve transactions. This helps to streamline the user experience and simplify the process of interacting with blockchain-based applications.
Additionally, MetaMask offers enhanced security features, such as encryption and password protection. Users can also import or export their MetaMask accounts, providing flexibility and convenience.
Overall, MetaMask is a powerful tool for accessing and interacting with the Ethereum blockchain. Its user-friendly interface, compatibility with different networks, and robust security features make it a valuable asset for both beginners and experienced users in the cryptocurrency space.
Setting Up Polygon Wallet on MetaMask
MetaMask is a popular browser extension wallet that allows users to interact with decentralized applications (dApps) on the Ethereum network. With the increasing popularity of Polygon, a Layer 2 scaling solution for Ethereum, it is important to set up your MetaMask wallet to work with Polygon for enhanced user experience.
Follow these steps to set up your Polygon wallet on MetaMask:
- Install the MetaMask browser extension if you haven’t already.
- Open MetaMask and click on the account icon at the top-right corner of the screen.
- Select “Import Account” to restore an existing wallet or “Create Account” to create a new wallet.
- If you’re importing an existing wallet, enter your seed phrase and create a strong password.
- If you’re creating a new wallet, follow the instructions to generate a new seed phrase and set a password.
- Once your wallet is set up, click on the network dropdown at the top of the screen and select “Custom RPC”.
- Enter the following information:
- Network Name: Polygon
- New RPC URL: https://rpc-mainnet.maticvigil.com/ (for the Polygon mainnet)
- Chain ID: 137
- Symbol: MATIC
- Block Explorer URL: https://polygonscan.com/
- Click “Save” to add the Polygon network to your MetaMask wallet.
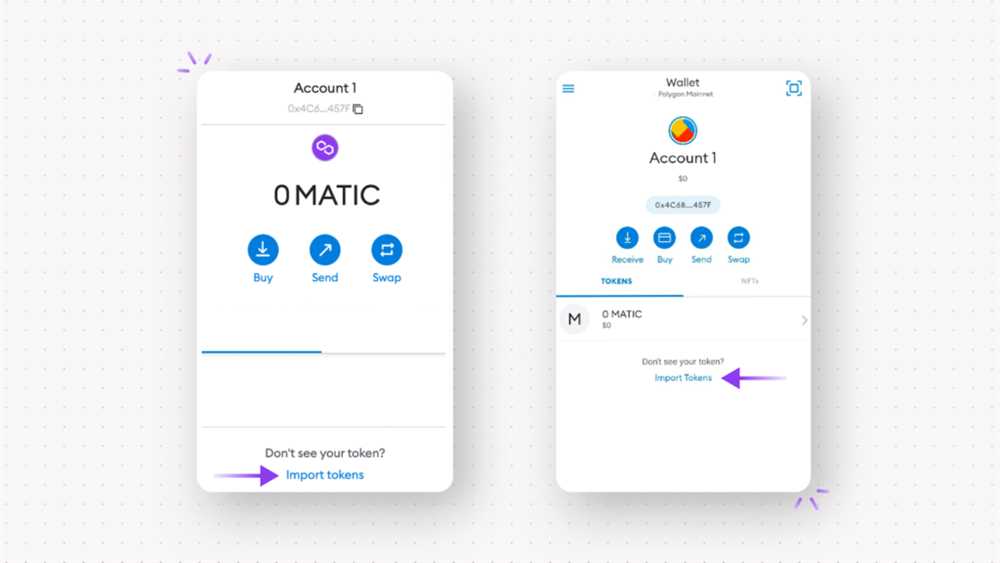
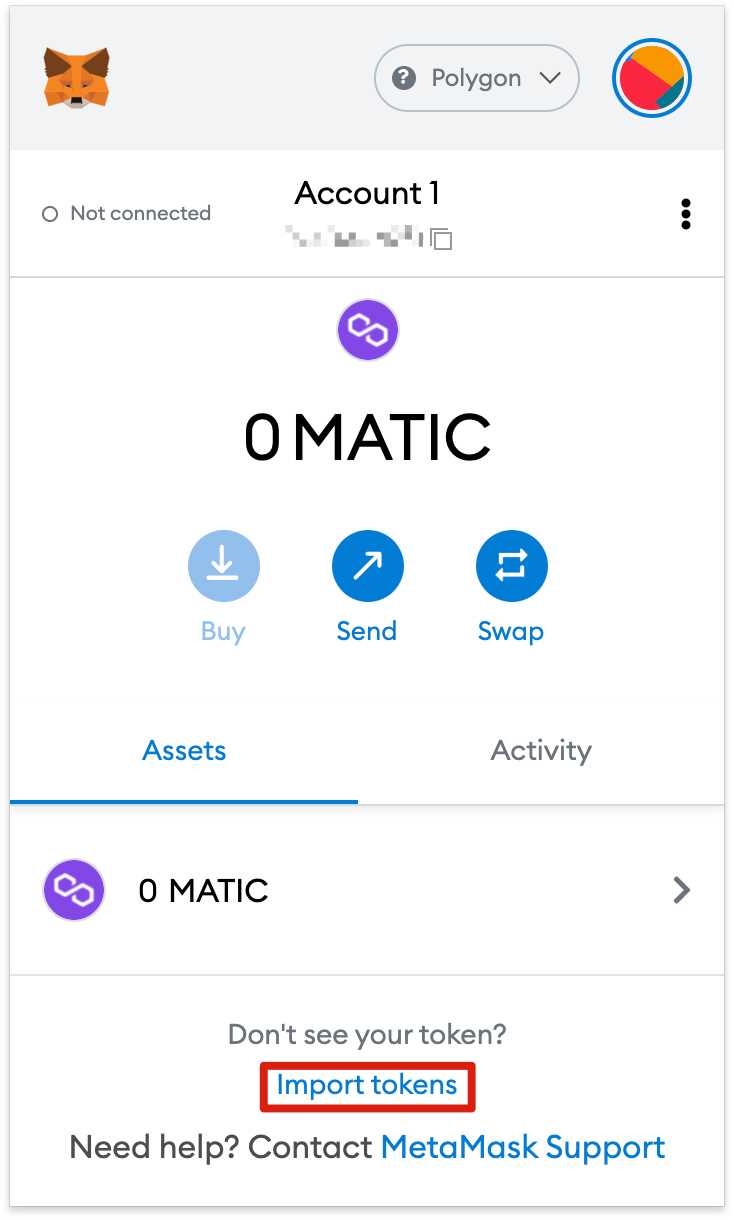
- Now you can use your MetaMask wallet to interact with dApps on the Polygon network.
Setting up your Polygon wallet on MetaMask is a simple process that allows you to take advantage of the benefits that Polygon offers, such as faster transactions and lower fees. Make sure to double-check the information you enter when adding the Polygon network to avoid any issues. Happy Polygon dApp exploring!
Install MetaMask Extension
To enhance your user experience on the Polygon network, you will need to install the MetaMask extension in your web browser. MetaMask is a digital wallet that allows you to store, manage, and interact with your cryptocurrencies and decentralized applications (DApps).
Follow the steps below to install MetaMask:
Step 1: Visit the MetaMask website
Open your preferred web browser and navigate to the MetaMask website.
Step 2: Download the extension
Click on the “Download” button on the MetaMask website. This will direct you to the browser’s extension store (e.g., Chrome Web Store or Firefox Add-ons).
Step 3: Add to your browser
Click on the “Add” or “Install” button in the extension store to add MetaMask to your browser.
Once MetaMask is successfully installed, you will see its icon in your browser’s toolbar. Click on the icon to open the MetaMask wallet and get started with setting up your Polygon wallet.
Creating a New Wallet
To enhance your user experience and interact with the Polygon network using MetaMask, you will need to create a new wallet. Follow these steps to get started:
- Open the MetaMask extension in your browser.
- If you already have a MetaMask account, click on the account icon and select “Create Account” to create a new wallet.
- If you don’t have MetaMask installed yet, click on the “Get Started” button and follow the installation instructions.
- Once MetaMask is installed, launch the extension and click on the “Create a Wallet” button.
- Create a strong password for your wallet and click on the “Create” button.
- You will be presented with a secret backup phrase. Make sure to write it down and store it in a safe place. This backup phrase is crucial for recovering your wallet if you ever lose access to it.
- Confirm your backup phrase by selecting the words in the correct order.
- Click on the “All done” button to complete the wallet creation process.
Congratulations! You have successfully created a new wallet on MetaMask. Now you can proceed to set up the Polygon network on your MetaMask wallet and start enjoying a seamless user experience.
Connecting MetaMask to Polygon
In order to enhance the user experience of using Polygon, it is essential to connect MetaMask to the Polygon network. This allows users to seamlessly interact with dApps and smart contracts on Polygon, without the need for additional wallets or identity verification.
Step 1: Install MetaMask
If you haven’t already, install the MetaMask extension on your preferred web browser. MetaMask is available for Chrome, Firefox, and Brave.
Step 2: Create or Import Account
Once MetaMask is installed, open the extension and either create a new account or import an existing one using the seed phrase or private key.
Step 3: Switch Network to Polygon
By default, MetaMask is connected to the Ethereum main network. To connect to Polygon, click on the network selection dropdown at the top of the MetaMask extension and select “Custom RPC”.
Step 4: Add Polygon Network Details
Now, you need to add the network details for Polygon. Fill in the following details:
| Network Name | Polygon |
|---|---|
| New RPC URL | https://rpc-mainnet.maticvigil.com/ |
| Chain ID | 137 |
| Symbol | MATIC |
| Block Explorer URL | https://polygonscan.com/ |
After filling in these details, click on “Save” to add the Polygon network to MetaMask.
Step 5: Connect to Polygon Network
Once the network details have been added, you will see “Polygon” as one of the available networks in the network selection dropdown. Select “Polygon” to connect MetaMask to the Polygon network.
Now you’re all set! MetaMask is now connected to Polygon, and you can start using dApps and interacting with smart contracts on the Polygon network.
Enhancing User Experience
When it comes to setting up Polygon Wallet on MetaMask, enhancing user experience should be a top priority. By providing a seamless and user-friendly interface, users will have a smoother onboarding process and a better overall experience with the platform.
One way to enhance the user experience is by simplifying the setup process. By breaking it down into clear and concise steps, users will be able to follow along easily without any confusion. Providing informative tooltips and error messages can also help users understand any issues they may encounter during setup.
Furthermore, customizing the interface to align with the brand and identity of the platform can greatly enhance the user experience. By using consistent colors, fonts, and imagery, users will feel more familiar and comfortable with the platform, increasing their trust and confidence in using it.
Another important aspect of enhancing user experience is providing helpful and accessible support options. This can include a comprehensive FAQ section, live chat support, or even video tutorials to guide users through the setup process. By offering multiple channels for users to seek assistance, they will feel supported and more likely to continue using the platform.
Lastly, continuously improving and updating the platform based on user feedback is vital to enhancing user experience. By listening to user suggestions and implementing updates accordingly, the platform can constantly evolve to meet the changing needs and preferences of its users. Regularly conducting user testing and gathering feedback can provide valuable insights for further enhancements.
In conclusion, enhancing user experience when setting up Polygon Wallet on MetaMask is crucial for ensuring a smooth and enjoyable onboarding process. By simplifying the setup steps, customizing the interface, providing accessible support options, and incorporating user feedback for continuous improvements, users will have a more positive experience and be more likely to become active and loyal users of the platform.
Frequently Asked Questions:
What is Polygon Wallet?
Polygon Wallet is a digital wallet that allows users to interact with the Polygon network, a layer 2 scaling solution for Ethereum. It enhances the user experience by providing fast and low-cost transactions on the Polygon network.
+ There are no comments
Add yours