


If you are using Metamask as your Ethereum wallet, you may need to change the RPC network at some point. The RPC network is responsible for connecting your wallet to the Ethereum blockchain, allowing you to interact with decentralized applications and make transactions. In this step-by-step guide, we will walk you through the process of changing the RPC network in Metamask, ensuring a smooth transition without any confusion.
Step 1: Open Metamask
First, open your Metamask wallet by clicking on the extension icon in your browser. This will open the Metamask interface, where you can manage your wallet settings and view your account balance.
Step 2: Access Network Settings
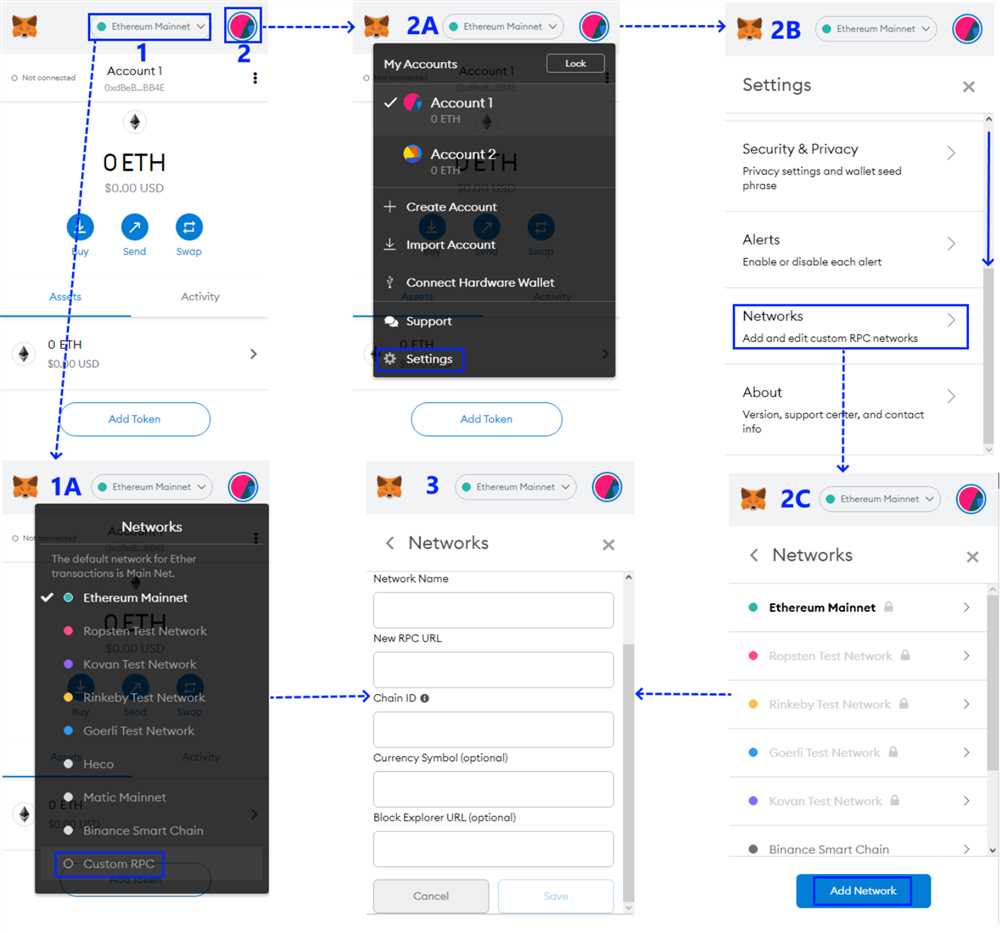
Next, click on the network dropdown menu located at the top of the Metamask interface. This will display a list of available networks, including the default Ethereum Mainnet. Select the network you want to switch to from the list, or click on “Custom RPC” if you want to add a custom network.
Step 3: Add or Edit Custom RPC
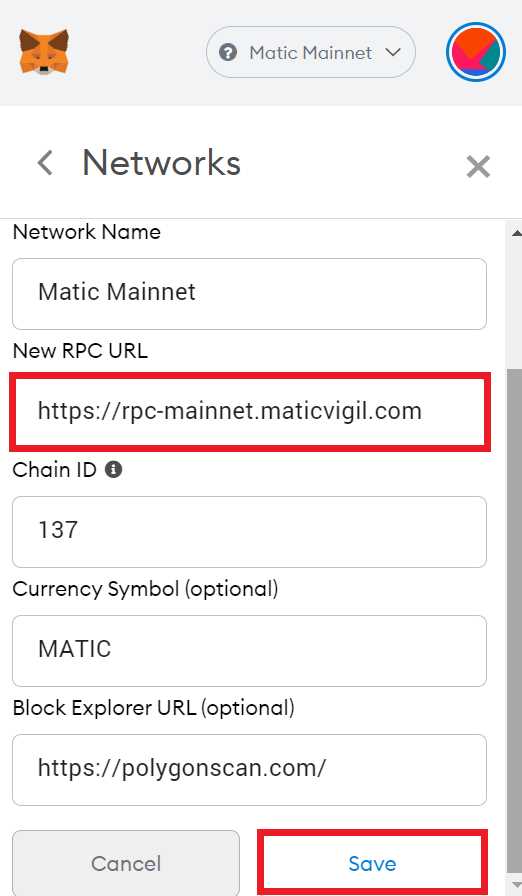
If you choose the “Custom RPC” option, a form will appear where you can enter the details of your custom network. This includes the network name, the RPC URL, and the chain ID. Make sure to enter the correct information provided by the network you want to connect to.
Step 4: Save Changes
After adding or editing the network details, click on the “Save” button to save your changes. Metamask will now connect to the new RPC network, allowing you to use your wallet on the selected network.
Step 5: Verify Connection
To verify that the connection was successful, you can check the network displayed at the top of the Metamask interface. It should reflect the network you have just switched to. Additionally, you can visit a decentralized application or perform a test transaction to ensure that everything is working correctly.
By following these step-by-step instructions, you can easily change the RPC network in Metamask and enjoy a seamless experience on the desired network. Remember to double-check the network details before saving your changes to avoid any issues.
The Importance of Changing the RPC Network in Metamask
Metamask is a popular cryptocurrency wallet and a gateway to the decentralized web. By default, Metamask is connected to the Ethereum network using the default RPC (Remote Procedure Call) network. However, there may be times when you need to change your RPC network for various reasons.
One of the primary reasons for changing the RPC network is to connect to a different blockchain network. There are several blockchain networks available, each with its own set of features and benefits. By changing the RPC network in Metamask, you can connect to a specific blockchain network and access its unique functionalities.
Another reason to change the RPC network is to improve the performance of Metamask. The default RPC network may experience high latency or congestion, resulting in slow transactions and increased fees. By switching to a different RPC network, you can potentially improve the speed and efficiency of your transactions, ensuring a smoother user experience.
Furthermore, changing the RPC network can also enhance your privacy and security. The default network may be more vulnerable to certain types of attacks or have fewer security measures in place. By connecting to a different RPC network, you can ensure that your transactions are more secure and that your personal information is better protected.
Changing the RPC network in Metamask is a relatively straightforward process that can be done in a few simple steps. By taking the time to change the RPC network, you can access different blockchain networks, improve performance, and enhance your security and privacy. It’s an essential step for anyone using Metamask to interact with the decentralized web.
Why you should consider changing the RPC network in Metamask
Metamask is a popular cryptocurrency wallet and browser extension that allows users to manage their digital assets and interact with decentralized applications on the Ethereum network. By default, Metamask connects to the Ethereum mainnet, but it also provides the option to switch to different Ethereum networks or custom RPC networks.
Changing the RPC network in Metamask can offer several benefits:
1. Access to different blockchain networks
By changing the RPC network, you can connect to alternative blockchain networks, such as testnets or private networks. This is particularly useful for developers who want to test their smart contracts or dApps on different networks before deploying them to the mainnet. It also allows users to access dApps that are deployed on specific networks other than the Ethereum mainnet.
2. Cost optimization
Transaction fees on the Ethereum mainnet can be quite high during periods of high demand. By switching to a different RPC network, you may be able to find a network with lower transaction fees, allowing you to save on transaction costs. This can be especially beneficial for frequent traders or users who interact with dApps that require multiple transactions.
It’s important to note that while alternative networks may have lower fees, they may also have different security measures and may be less secure than the Ethereum mainnet. Therefore, it’s crucial to conduct proper research and due diligence before using any alternative network.
3. Enhanced privacy and anonymity
The Ethereum mainnet is a public blockchain, meaning that transactions and addresses are publicly visible. By switching to a privacy-focused network, such as a private network or a privacy-centric Ethereum-based network, you can enhance your privacy and maintain a certain level of anonymity. This can be particularly appealing for users who value their privacy or are concerned about potential surveillance.
Keep in mind that privacy-focused networks may have limitations or trade-offs in terms of functionality or accessibility, so make sure to understand the implications before switching.
In conclusion, changing the RPC network in Metamask can offer you access to different blockchain networks, help optimize your transaction costs, and enhance your privacy and anonymity. However, it’s important to research and understand the characteristics and risks associated with each network before making any changes. Always exercise caution and consider your specific needs and requirements when choosing a network.
Step-by-Step Guide to Changing the RPC Network in Metamask
If you’re using Metamask, you may need to change the RPC (Remote Procedure Call) network to interact with different blockchains. Follow the step-by-step guide below to successfully change the RPC network in Metamask.
Step 1: Launch Metamask
Open the Metamask extension in your browser. If you don’t have Metamask installed, you can download it from the official website and set it up.
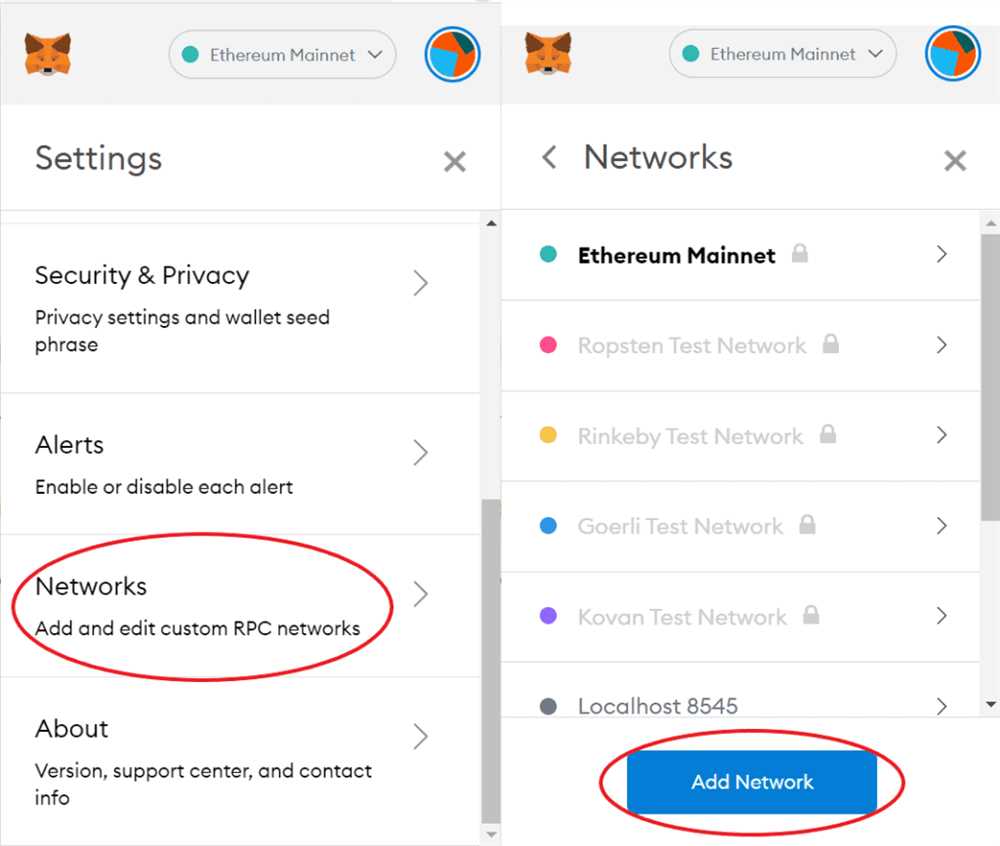
Step 2: Access the Settings
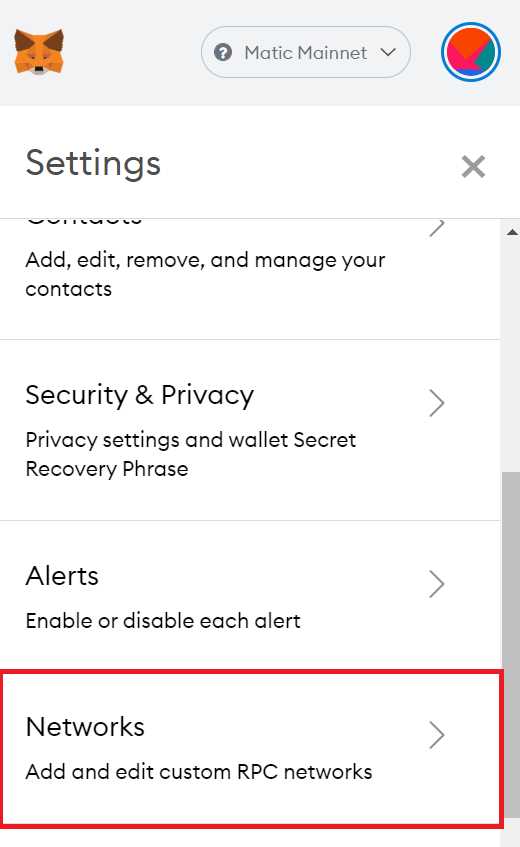
Click on the Metamask extension icon in your browser’s toolbar. A pop-up window will appear. Click on the gear icon, which represents the settings.
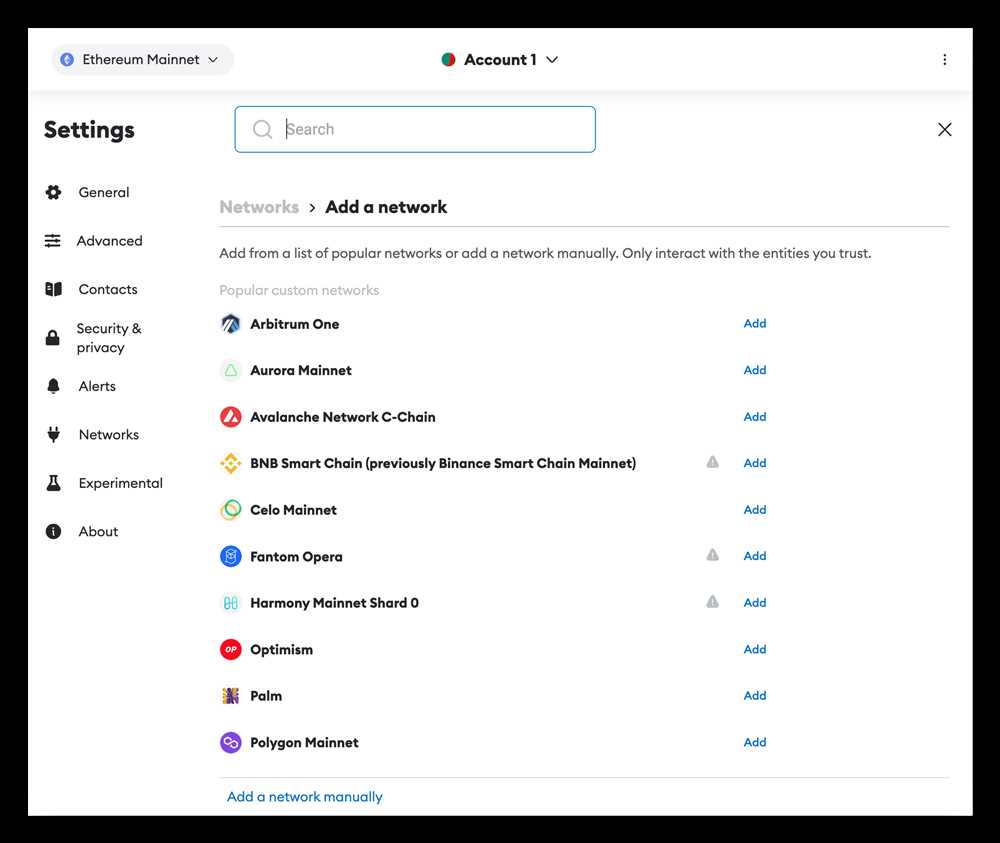
Step 3: Select Networks
In the settings menu, click on “Networks” to access the network configurations. Here, you’ll find a list of pre-defined networks and an option to add a custom network.
Step 4: Choose a Pre-defined Network
If the network you want to switch to is already listed, select it from the pre-defined networks. Metamask provides popular networks like Ethereum Mainnet, Rinkeby Test Network, and so on.
Step 5: Add a Custom Network
If the network you want to switch to is not listed, click on the “Custom RPC” button. Enter the network details, including the RPC URL, chain ID, symbol, and block explorer URL if applicable.
Step 6: Save the Changes
After selecting a pre-defined network or adding a custom network, click on the “Save” button to save the changes.
Step 7: Switch to the New Network
Once the changes are saved, you’ll see the newly added network in your network list. Click on it to switch to the new network.
Step 8: Confirm Network Switch
Metamask will prompt you to confirm the network switch. Verify the details once again and click on the “Switch” button to confirm the switch.
That’s it! You have successfully changed the RPC network in Metamask. You can now interact with different blockchains using the newly selected network.
How to change the RPC network in Metamask: a detailed tutorial
Metamask is a popular cryptocurrency wallet that allows users to interact with decentralized applications (dApps) on the Ethereum network. By default, Metamask is connected to the Ethereum Mainnet network, but users have the option to change the RPC (Remote Procedure Call) network to connect to different blockchains.
Step 1: Open Metamask
The first step is to open the Metamask extension in your web browser. It can be easily accessed by clicking on the Metamask icon located in the toolbar.
Step 2: Access Settings
Once Metamask is open, click on the menu icon in the top right corner of the extension window. From the dropdown menu, select “Settings”.
Step 3: Network Selection
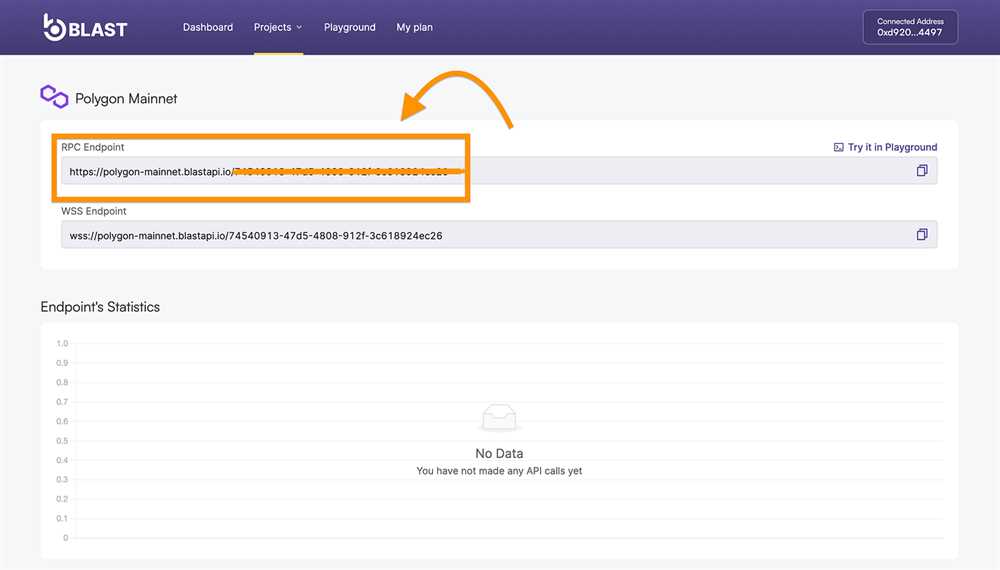
In the settings page, you will see a section titled “Networks”. Under this section, you will find the currently selected network. To change the RPC network, click on the dropdown menu next to “Networks” and select “Custom RPC”.
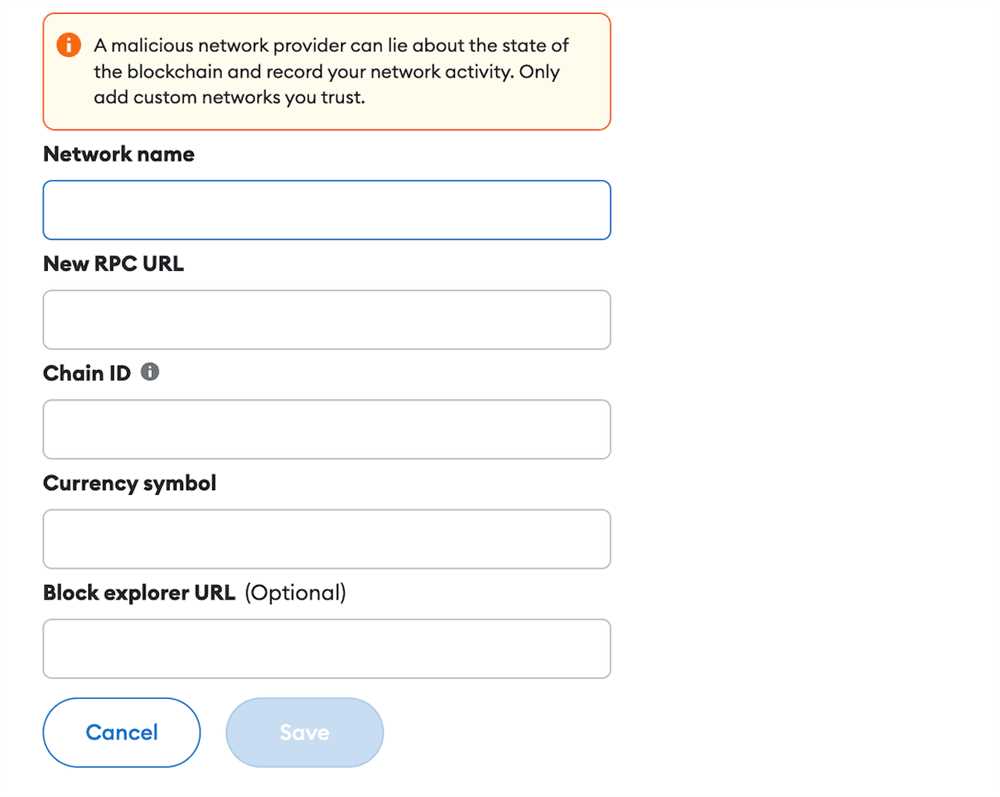
Step 4: Adding a Custom RPC Network
After selecting “Custom RPC”, you will see a form where you can enter the details of the new RPC network you want to connect to. Fill in the following fields:
- Network Name: Enter a name to identify the network (e.g., Avalanche, Binance Smart Chain, etc.)
- New RPC URL: Enter the URL provided by the blockchain network
- Chain ID: Enter the chain ID of the network
- Symbol (optional): Enter the symbol of the network’s native currency (e.g., ETH, BNB, etc.)
- Block Explorer URL (optional): Enter the URL of the block explorer for the network
Once you have filled in the required information, click on the “Save” button to add the custom RPC network. Metamask will now be connected to the new network.
It is important to note that adding custom RPC networks can be risky, as it involves interacting with networks that may not have the same level of security as the Ethereum Mainnet. Be cautious when using custom RPC networks and only connect to networks that you trust.
Best Practices for Choosing the Right RPC Network in Metamask
Metamask is a popular browser extension that allows users to interact with decentralized applications (dApps) on the Ethereum network. One of the key features of Metamask is the ability to change the RPC (Remote Procedure Call) network, which determines which blockchain network the extension is connected to.
Choosing the right RPC network is crucial for a seamless and secure dApp experience. Here are some best practices to consider when selecting an RPC network in Metamask:
1. Research the Network: Before selecting an RPC network, it is important to research and gather information about the network. Some key factors to consider include the network’s stability, security, transaction fees, and community support. It is recommended to choose a network that has a proven track record and is widely used by the dApp community.
2. Keep Security in Mind: Security should be a top priority when selecting an RPC network. Choose a network that has implemented the necessary security measures to protect user funds and sensitive information. Look for networks that have undergone security audits and have a strong reputation in the blockchain community.
3. Consider Transaction Fees: Different networks have different transaction fee structures. It is important to consider the transaction fees associated with each network, as they can impact the overall user experience. Choose a network that has reasonable transaction fees and offers a good balance between cost and speed.
4. Evaluate Network Performance: Network performance is another important factor to consider when selecting an RPC network. Slow network speeds and congested networks can negatively impact the user experience. Look for networks that have high throughput and low latency to ensure smooth and efficient dApp interactions.
5. Stay Updated on Network Upgrades: Blockchain networks are constantly evolving, with regular upgrades and protocol changes. It is important to stay updated on network upgrades and understand how they might affect the RPC network you are using. Choose a network that has an active development community and a roadmap for future upgrades and enhancements.
By following these best practices, you can choose the right RPC network in Metamask and ensure a seamless and secure dApp experience. Remember to always do your due diligence and research before connecting to a new RPC network.
Frequently Asked Questions:
What is the RPC network in Metamask?
The RPC network in Metamask stands for Remote Procedure Call network. It is a protocol that allows communication between a client and a server using a request-response model. In the context of Metamask, the RPC network refers to the blockchain network that the wallet is connected to.
+ There are no comments
Add yours