


Metamask and Ledger are two popular tools used by cryptocurrency enthusiasts to manage their digital assets securely. Metamask is a browser extension wallet that allows users to interact with decentralized applications (Dapps) on the Ethereum network. On the other hand, Ledger is a hardware wallet that provides a physical device to store cryptocurrencies offline. By connecting Metamask to Ledger, users can enhance the security of their digital funds and seamlessly manage their transactions. In this step-by-step guide, we will walk you through the process of connecting your Metamask wallet to Ledger.
Step 1: Install Metamask Extension
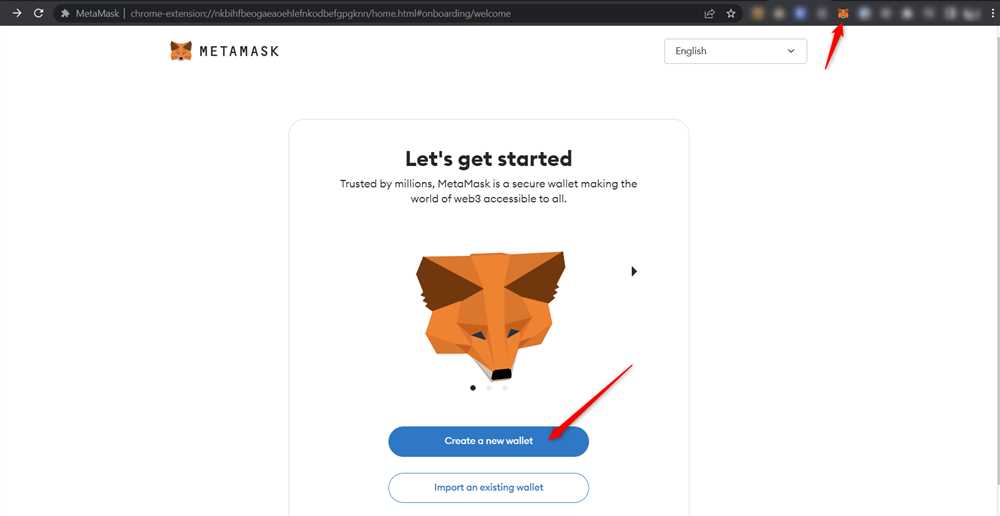
The first step is to install the Metamask browser extension. Open your preferred browser, such as Google Chrome or Mozilla Firefox, and visit the official Metamask website. Download and install the extension. Once installed, you will see the Metamask fox icon in your browser’s toolbar.
Step 2: Set Up your Metamask Wallet
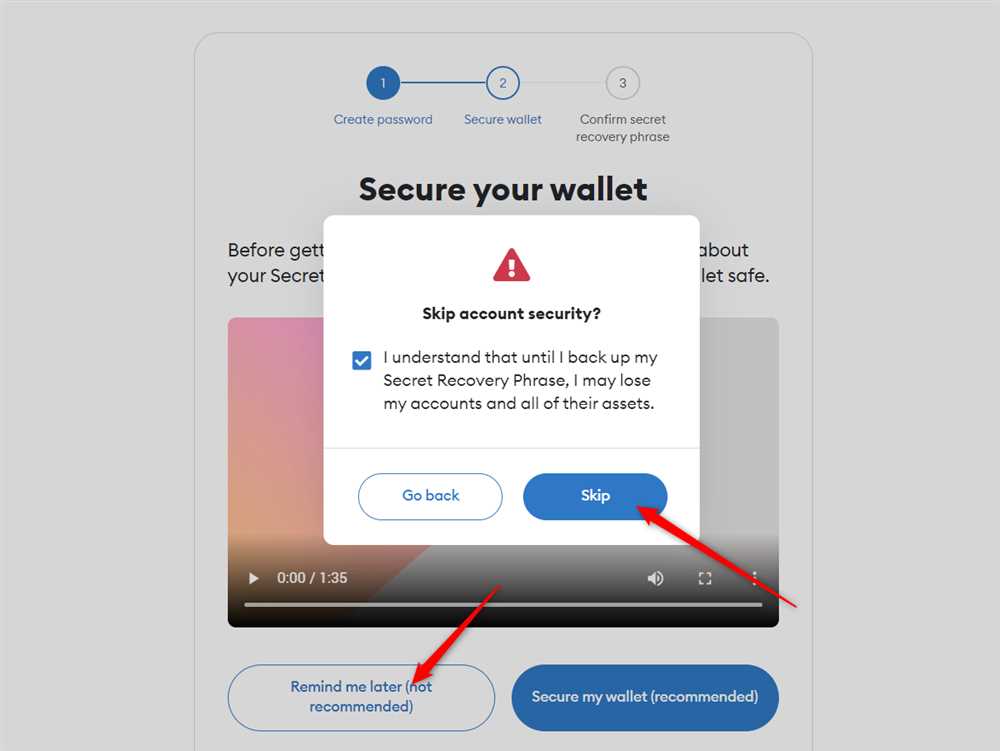
Click on the Metamask fox icon and follow the prompts to create a new wallet. Set up a strong password and save the mnemonic phrase provided by Metamask. Remember to write down the mnemonic phrase and store it securely as it is the only way to recover your wallet in case of loss or theft. You will also need to agree to the terms and conditions of using Metamask.
Step 3: Connect Ledger to Metamask
Connect your Ledger device to your computer using the USB cable provided. Unlock your Ledger device by entering your PIN code. On your computer, click on the Metamask fox icon and select the option to connect a hardware wallet. Choose Ledger as your hardware wallet type. Metamask will prompt you to install the Ethereum app on your Ledger device. Follow the instructions on your Ledger device’s screen to install the app.
Step 4: Confirm Connection on Ledger
Once the Ethereum app is installed on your Ledger device, confirm the connection on your device’s screen. Ledger will display a random word from your Metamask mnemonic phrase as a security measure. Ensure that the word displayed on your Ledger device matches the one shown on your computer’s screen. If they match, press the right button on your Ledger device to confirm the connection.
Step 5: Access Your Ledger Accounts on Metamask
After successfully confirming the connection, Metamask will display your Ledger accounts. You can manage these accounts and their associated Ethereum addresses directly from Metamask. Make sure to select the appropriate account before conducting any transactions or interacting with Dapps.
By following these five simple steps, you can connect your Metamask wallet to Ledger and enjoy the enhanced security and convenience it offers. Remember to keep your hardware wallet and mnemonic phrase safe to protect your digital assets from unauthorized access. Happy crypto managing!
Step 1: Install the Metamask Extension
To begin the process of connecting your Ledger device to Metamask, you will first need to install the Metamask extension on your preferred web browser. Here’s a step-by-step guide on how to do it:
- Open your web browser (such as Google Chrome or Firefox) and go to the browser’s extension store.
- Search for “Metamask” in the extension store’s search bar.
- Click on the Metamask extension from the search results.
- Click on the “Add to Chrome” or “Add to Firefox” button (depending on your web browser) to begin the installation process.
- A pop-up window will appear asking for confirmation to install the extension. Click on “Add Extension” to proceed.
- After the installation is complete, you will see the Metamask icon in the top right corner of your browser.
Once the Metamask extension is successfully installed on your browser, you can move on to the next step of connecting it to your Ledger device.
Learn how to download and install the Metamask extension for your preferred browser.
Step 1: Open your preferred browser and go to the Metamask website.
Step 2: On the Metamask website, you’ll find a download button. Click on it to start the download process.
Step 3: Once the download is complete, click on the downloaded file to open the installer.
Step 4: Follow the instructions provided by the installer to install the Metamask extension on your browser.
Step 5: After the installation is complete, you’ll see the Metamask logo in your browser toolbar.
Step 6: Click on the Metamask logo to launch the extension.
Step 7: You’ll be prompted to create a new Metamask wallet or import an existing one. Follow the on-screen instructions to set up your wallet.
Step 8: Once your wallet is set up, you can start using Metamask to connect to various blockchain networks and interact with decentralized applications (dApps).
Note: Make sure to keep your Metamask wallet secure by saving your seed phrase and setting up additional security measures like a password or biometrics.
Now that you have installed Metamask, you can safely and easily connect it to your Ledger device to enhance the security of your cryptocurrency transactions and interactions.
Step 2: Set Up Your Ledger Wallet
Before you can connect your Metamask wallet to your Ledger device, you need to make sure that your Ledger device is set up and ready to use. Follow these steps to set up your Ledger wallet:
1. Get the Ledger Live App
Start by downloading and installing the Ledger Live app on your computer. This app will serve as your main interface for managing your Ledger wallet.
2. Connect Your Ledger Device
Using the USB cable provided with your Ledger device, connect it to your computer. Make sure it is securely plugged in.
3. Set Up Your Ledger Device
Follow the on-screen instructions on the Ledger Live app to set up your Ledger device. This may involve creating a new wallet, setting a pin code, and recording your recovery phrase. Make sure to follow the instructions carefully and keep your recovery phrase in a safe place.
4. Install Ethereum App
Once your Ledger device is set up, you need to install the Ethereum app on it. Open the Manager section in the Ledger Live app, find the Ethereum app, and click on the “Install” button. Wait for the installation to complete.
5. Enable Browser Support
Next, you need to enable browser support on your Ledger device. Go to the Settings section in the Ledger Live app, navigate to the “Experimental Features” tab, and toggle on the “Web Support” option. This will allow you to connect your Ledger wallet to web-based applications like Metamask.
6. Update Firmware (Optional)
If there is a firmware update available for your Ledger device, it’s recommended to update it before proceeding. Go to the Manager section in the Ledger Live app and follow the instructions to update the firmware.
7. Verify Everything
Double-check that your Ledger device is set up correctly, the Ethereum app is installed, browser support is enabled, and the firmware is up to date. Once everything is verified, you are ready to connect your Metamask wallet to your Ledger device.
| Difficulty Level | Time Required |
|---|---|
| Easy | 15-30 minutes |
Discover the process of setting up your Ledger hardware wallet and installing the necessary apps.
Setting up your Ledger hardware wallet is an essential step to ensuring the security of your cryptocurrency holdings. This guide will walk you through the process and help you get started with your Ledger device.
1. Purchase and Unboxing
The first step is to purchase a Ledger hardware wallet. There are several models available, such as Ledger Nano S or Ledger Nano X. Once you receive your device, carefully unbox it and ensure that all the components are included.
2. Connect to a Computer
To begin the setup process, connect your Ledger hardware wallet to your computer using the provided USB cable. Make sure your computer is connected to the internet and has a compatible web browser installed.
3. Installing Ledger Live
In order to manage your cryptocurrency assets, you need to install the Ledger Live application. Visit the official Ledger website and download the Ledger Live app for your operating system. Once the download is complete, launch the installer and follow the on-screen instructions to install the app.
4. Initial Setup
After installing Ledger Live, open the application and follow the prompts to set up your Ledger hardware wallet. This process includes choosing your PIN code, writing down your recovery phrase, and verifying that you have correctly written down the recovery phrase.
5. Installing Necessary Apps
To interact with different cryptocurrencies, you need to install the necessary apps on your Ledger device. Ledger Live will automatically detect your connected hardware wallet and prompt you to install the corresponding app for the cryptocurrency you want to manage. Follow the prompts to install the desired app.
6. Adding Accounts
Once the app installation is complete, go back to the Ledger Live application on your computer. Click on “Add Account” and select the cryptocurrency app you just installed on your Ledger device. Follow the prompts to add the account for the chosen cryptocurrency to your Ledger Live dashboard.
Note: Repeat steps 5 and 6 for each cryptocurrency you want to manage with your Ledger device.
By following these steps, you can successfully set up your Ledger hardware wallet and install the necessary apps to securely manage your cryptocurrency holdings. Remember to keep your PIN code and recovery phrase safe as they are crucial for accessing and recovering your funds.
Step 3: Connect Metamask to Your Ledger Wallet
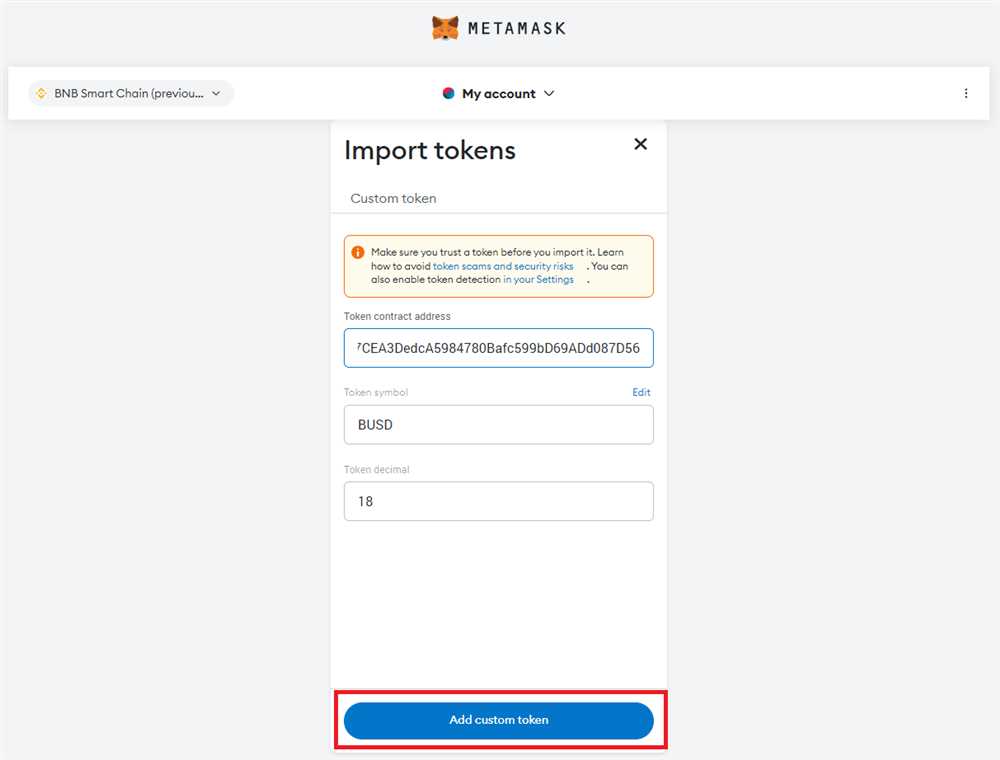
Once you have set up your Ledger wallet and installed the Metamask extension, you can now connect your Ledger wallet to Metamask to manage your Ethereum and other ERC-20 tokens.
To connect Metamask to your Ledger wallet, follow these steps:
Step 1: Open Metamask and Click on the Account Icon
Open the Metamask extension in your browser and click on the account icon located at the top right corner of the Metamask window. It looks like a circle with a person inside. This will open the account options menu.
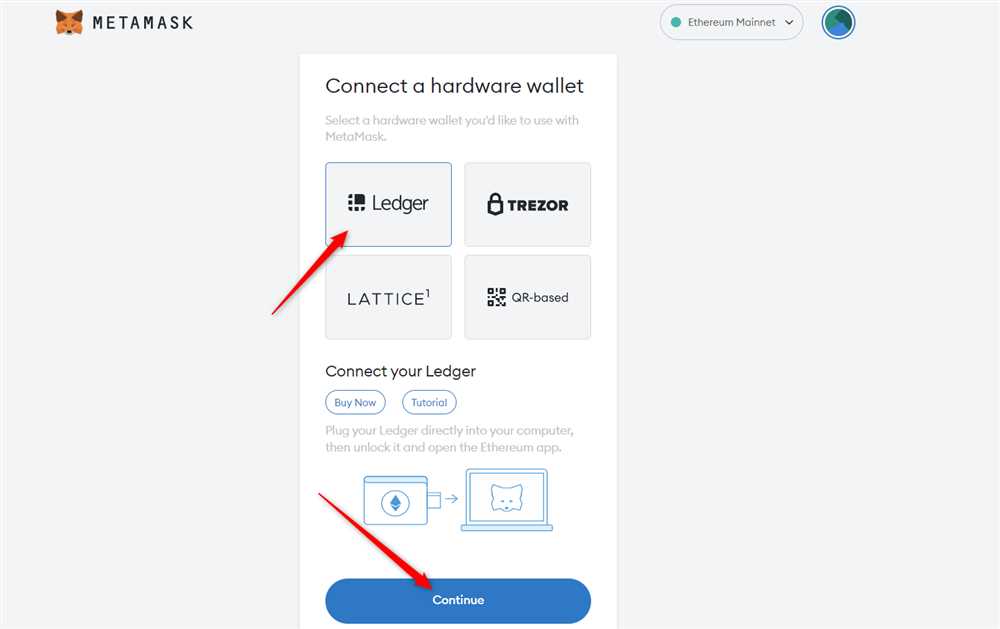
Step 2: Select “Connect Hardware Wallet”
In the account options menu, click on “Connect Hardware Wallet”. This will open a new window with different options to select your hardware wallet.
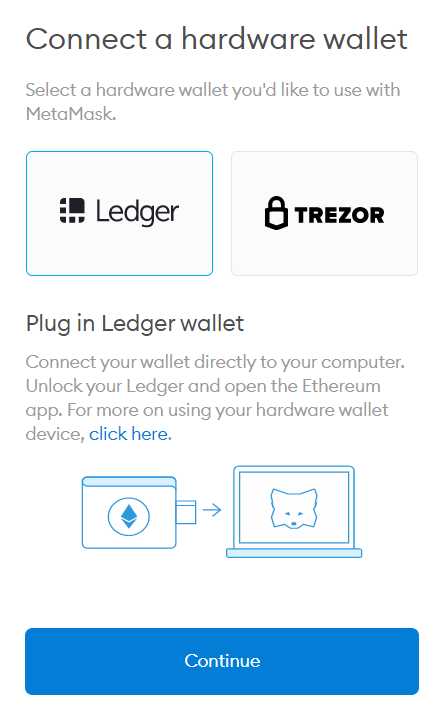
Step 3: Choose Ledger Wallet
In the hardware wallet options, select “Ledger” as your hardware wallet. Metamask will detect your Ledger wallet if it is properly connected to your computer.
Note: Make sure your Ledger wallet is unlocked and the Ethereum app is open on your device before proceeding to the next step.
Step 4: Click on “Connect”
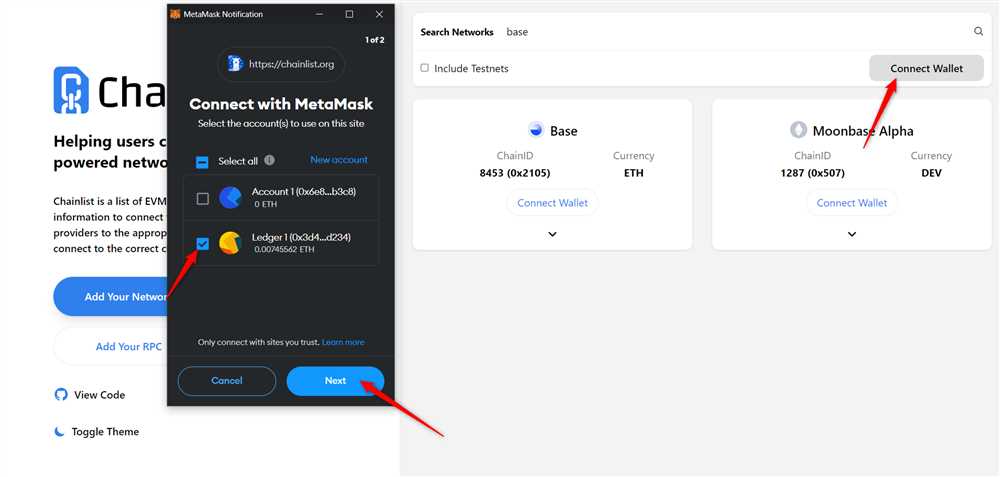
After selecting “Ledger” as your hardware wallet, click on the “Connect” button. Metamask will then prompt you to select the account on your Ledger wallet that you want to connect to Metamask.
Note: You may see a notification on your Ledger wallet asking you to confirm the connection. Use the buttons on your Ledger device to confirm the connection.
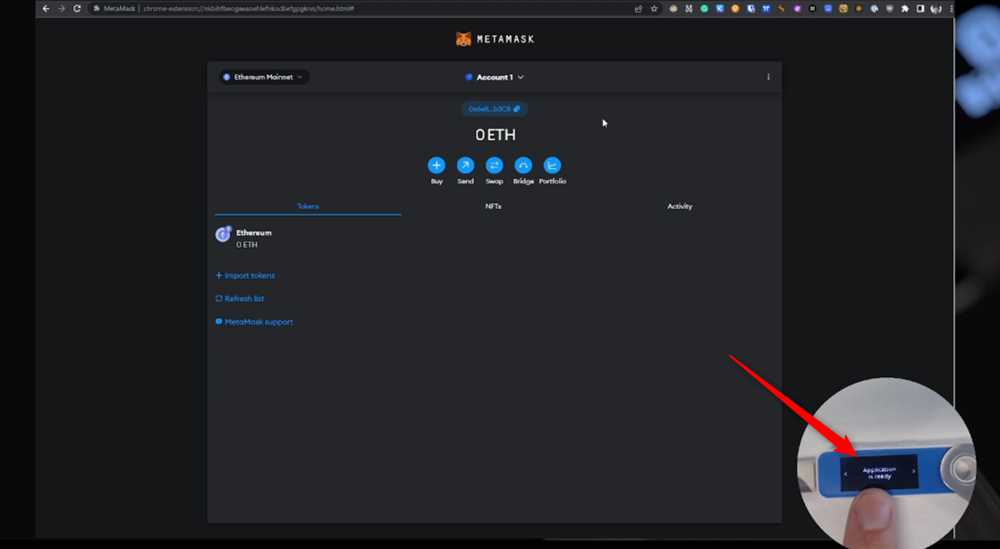
Step 5: Confirm the Connection
Once you have selected the account on your Ledger wallet, click on the “Connect” button in the Metamask window. Metamask will then connect to your Ledger wallet and import your account.
Congratulations! You have successfully connected your Metamask wallet to your Ledger hardware wallet. You can now manage your Ethereum and ERC-20 tokens using Metamask and the security of your Ledger device.
Frequently Asked Questions:
What is Metamask?
Metamask is a cryptocurrency wallet that allows users to manage their Ethereum and ERC-20 tokens. It is a browser extension that acts as a bridge between the user’s browser and the Ethereum blockchain.
Why should I connect Metamask to Ledger?
Connecting Metamask to Ledger provides an extra layer of security for your crypto assets. By using Ledger’s hardware wallet, you can store your private keys offline and securely sign transactions, reducing the risk of hacking or theft.
Can I connect Metamask to Ledger without a Ledger device?
No, you cannot connect Metamask to Ledger without a Ledger device. The hardware wallet is a necessary component for the connection, as it securely stores your private keys and authorizes transactions.
Are there any risks involved in connecting Metamask to Ledger?
While connecting Metamask to Ledger generally enhances security, there are some risks to consider. If your Ledger device is lost or damaged, you may lose access to your funds. Additionally, it’s important to ensure that you are using the official Metamask and Ledger applications from trusted sources to avoid potential scams or malicious software.

+ There are no comments
Add yours