


Welcome to our step-by-step guide on how to import the USDC (USD Coin) cryptocurrency to your Metamask wallet. Metamask is a popular browser extension that allows you to manage and interact with Ethereum-based decentralized applications (dApps). By importing USDC to your Metamask wallet, you can store, send, and receive this stablecoin easily and securely.
Step 1: Make sure you have Metamask installed on your browser. If you haven’t already installed it, head over to the official Metamask website, download the extension, and follow the installation instructions.
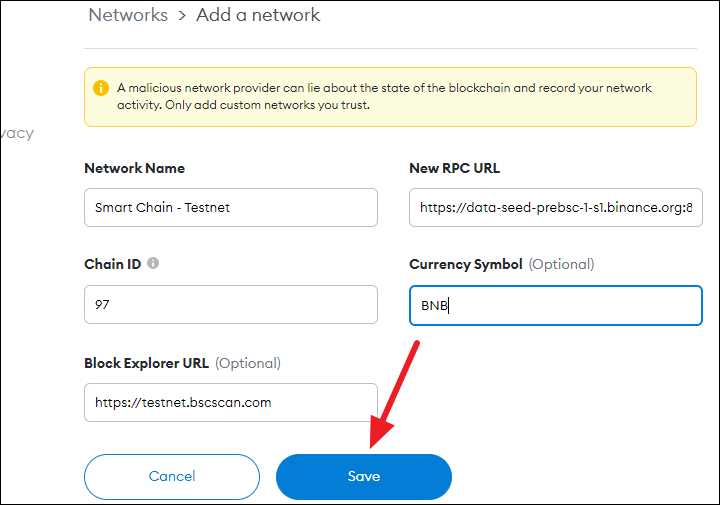
Step 2: Once installed, open Metamask by clicking on its icon in your browser toolbar. If you haven’t used Metamask before, you’ll need to create a new wallet or import an existing one. Select the option to import a wallet.
Step 3: Locate your USDC wallet address and private key. If you are importing from another wallet or exchange, you will need to find the option to export your USDC wallet’s private key. This is usually found in the settings or security section of the platform you are using.
Step 4: In Metamask, select the option to import a wallet using a private key. Paste your USDC wallet’s private key into the designated field and click “Import” to proceed.
Step 5: Metamask will validate the private key and import your USDC wallet. Once imported, you’ll be able to see your USDC balance and transaction history within the Metamask interface.
That’s it! You have successfully imported your USDC to Metamask. You can now use your Metamask wallet to send and receive USDC, as well as interact with various dApps within the Ethereum ecosystem. Remember to keep your private key secure and backup your Metamask wallet regularly to ensure the safety of your USDC and other digital assets.
Note: Make sure to double-check the accuracy of the wallet address and private key you are importing. Entering incorrect information can result in the loss of your USDC or other digital assets.
Set up a Metamask Wallet
Before you can import USDC to Metamask, you need to set up a Metamask wallet. Follow the step-by-step guide below to create your wallet:
Step 1: Install the Metamask Extension
To begin, you’ll need to install the Metamask extension in your web browser. Metamask is available for Chrome, Firefox, and Brave.
- Go to the official Metamask website
- Download and install the extension for your web browser
- Follow the on-screen prompts to set up Metamask
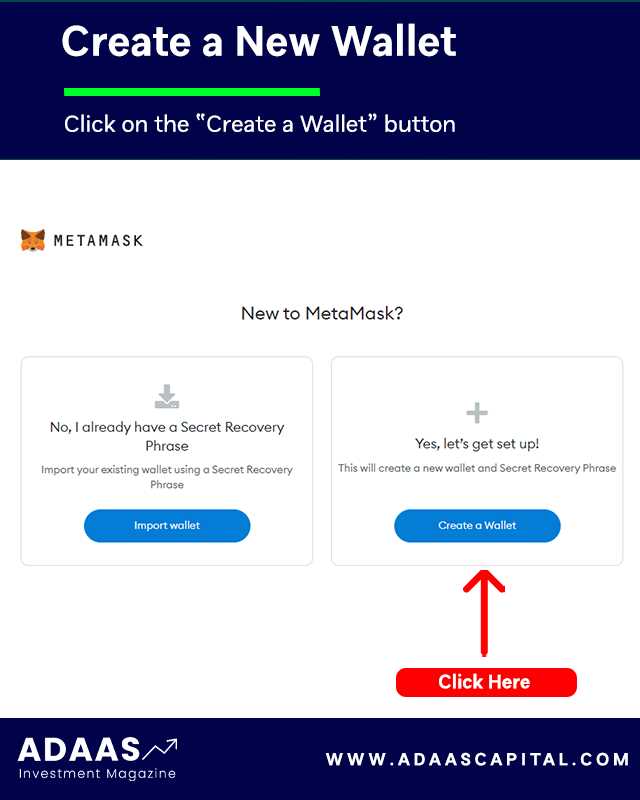
Step 2: Create a New Wallet
Once you have installed Metamask, you can create a new wallet:
- Click on the Metamask extension icon in your browser toolbar
- Click on “Get Started” to begin the wallet creation process
- Read and agree to the Terms of Use
- Create a new password for your wallet and confirm it
- Click on “Create” to generate your new wallet
- Metamask will then display a secret backup phrase. Make sure to write down and safely store this phrase
- Confirm your backup phrase by selecting the words in the correct order
Your Metamask wallet is now created and ready to use. Make sure to keep your password and backup phrase secure, as they are essential for accessing your wallet and funds.
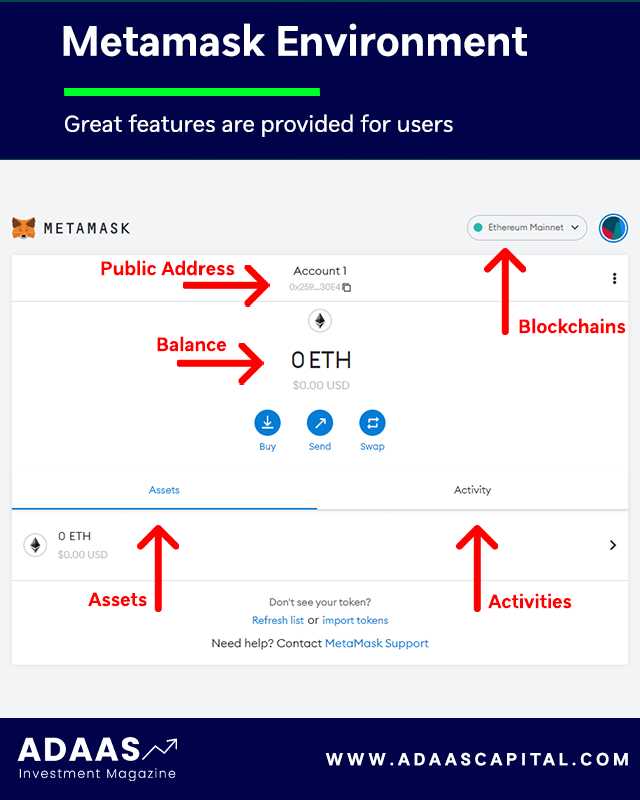
Access the Metamask Wallet
To import USDC to Metamask, you will first need to access your Metamask wallet. Follow the steps below to do so:
- Open your web browser and go to the Metamask website.
- Click on the “Get Chrome Extension” button if you are using Google Chrome, or the “Get Firefox Extension” button if you are using Mozilla Firefox. This will redirect you to the appropriate extension store.
- Click on the “Add to Chrome” or “Add to Firefox” button to install the Metamask extension.
- Once the installation is complete, you will see the Metamask fox icon added to your browser’s toolbar.
- Click on the Metamask fox icon to open the Metamask extension.
- If you already have a Metamask account, click on the “Import wallet” option and enter your seed phrase or private key to restore your account. If you don’t have a Metamask account, click on the “Create a Wallet” option to create a new one.
- Follow the instructions provided by Metamask to set up your wallet, including creating a password and agreeing to the terms of service.
- Once your wallet is set up and unlocked, you will have access to your Metamask account.
Now that you have successfully accessed your Metamask wallet, you can proceed with importing USDC by following the remaining steps in this guide.
Import USDC into Metamask
Metamask is a popular cryptocurrency wallet that allows users to manage their digital assets in a secure and easy-to-use interface. If you would like to import USDC (USD Coin) into your Metamask wallet, follow the step-by-step guide below:
Step 1: Install and Set Up Metamask
If you haven’t already, you’ll need to install the Metamask extension in your web browser. Visit the Metamask website and follow the instructions to install the extension and set up your wallet.
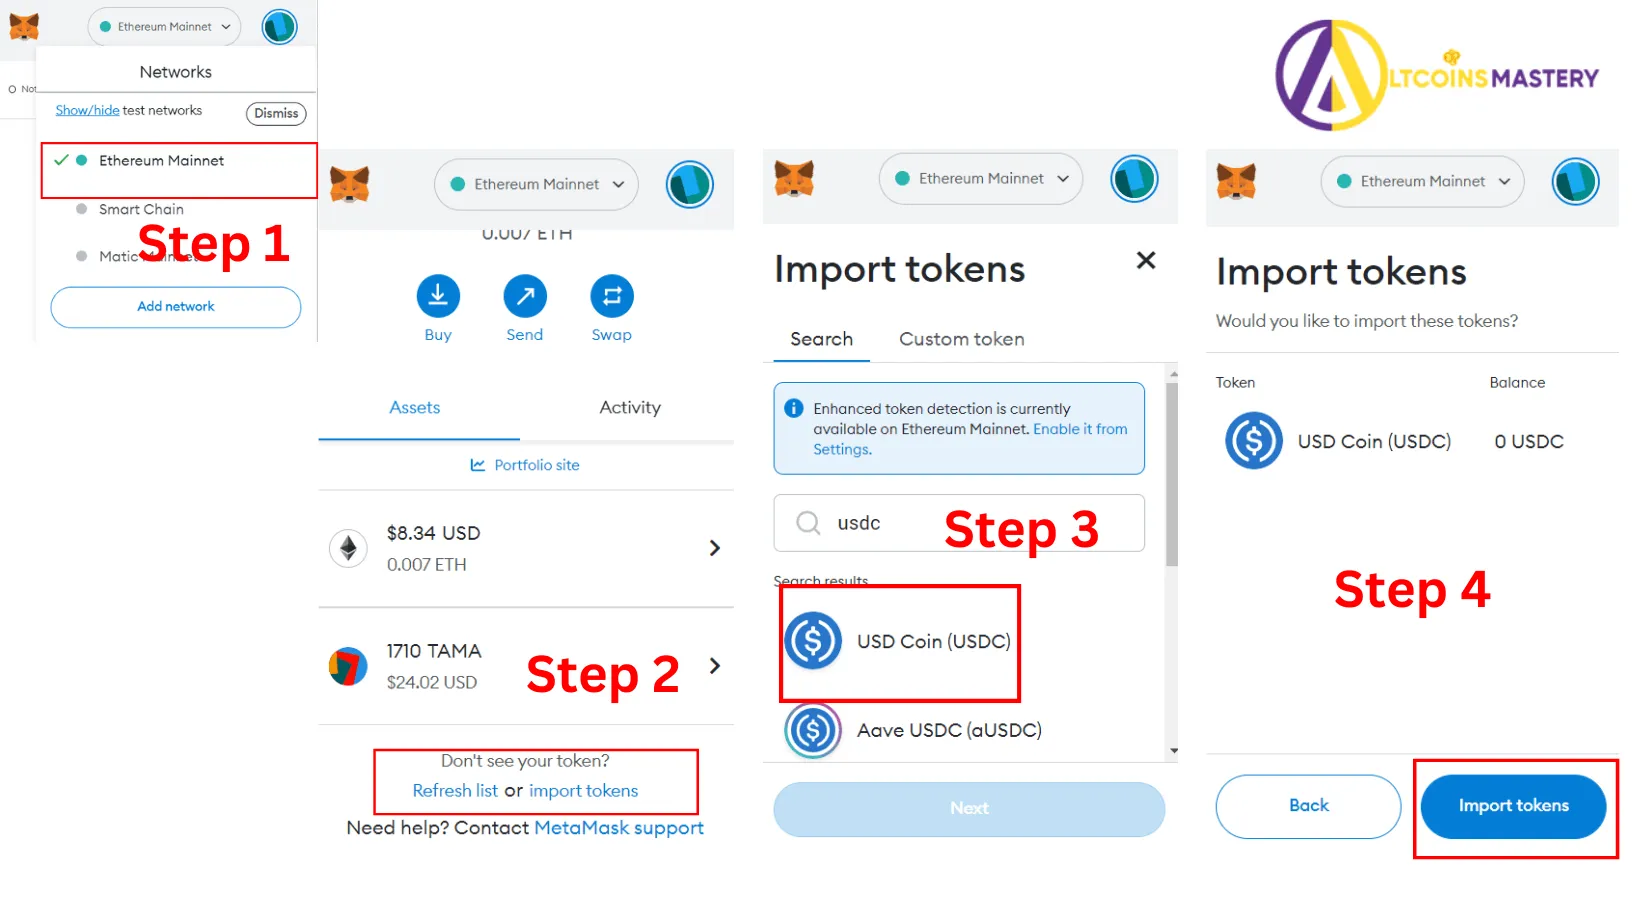
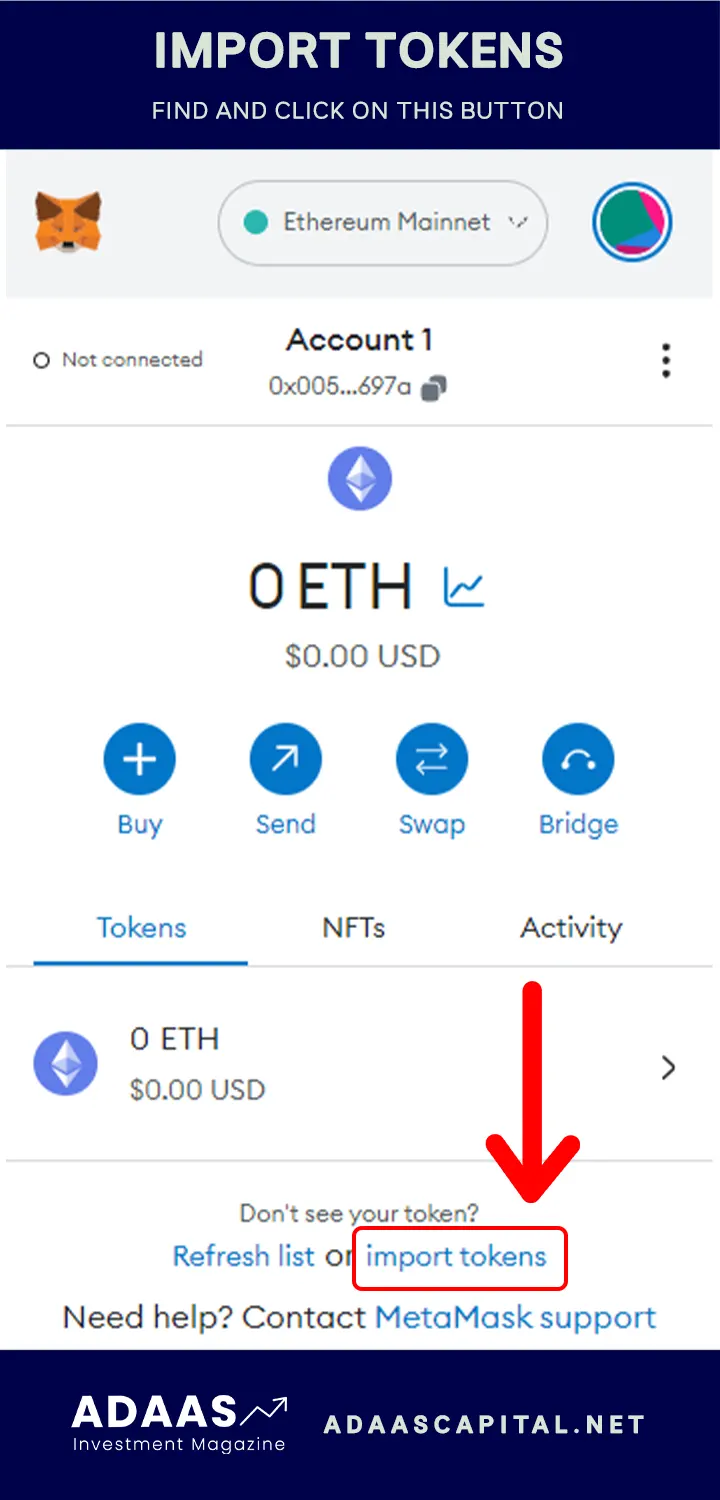
Step 2: Open Metamask and Add USDC Token
Once you have installed Metamask, open it in your web browser. On the main screen, click the menu in the top-right corner and select “Add Token” from the dropdown menu.
A new window will appear. Click on the “Custom Token” tab, and in the “Token Contract Address” field, enter the USDC contract address: 0xa0b86991c6218b36c1d19d4a2e9eb0ce3606eb48. The remaining fields should autofill with the token details. Click “Next” to proceed.
Step 3: Confirm and Import USDC
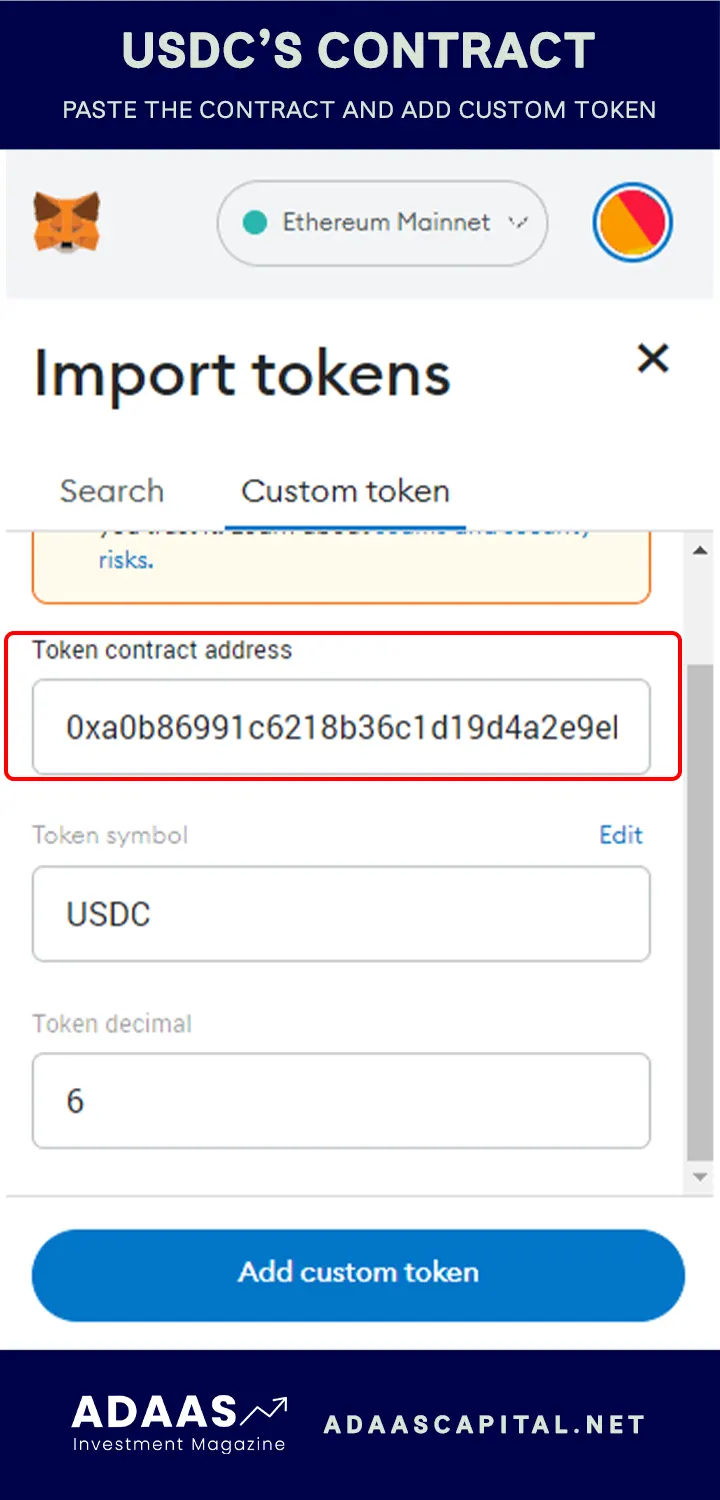
In the next window, review the token details to ensure they match USDC. Once you have confirmed the details, click “Add Tokens” to import USDC into Metamask.
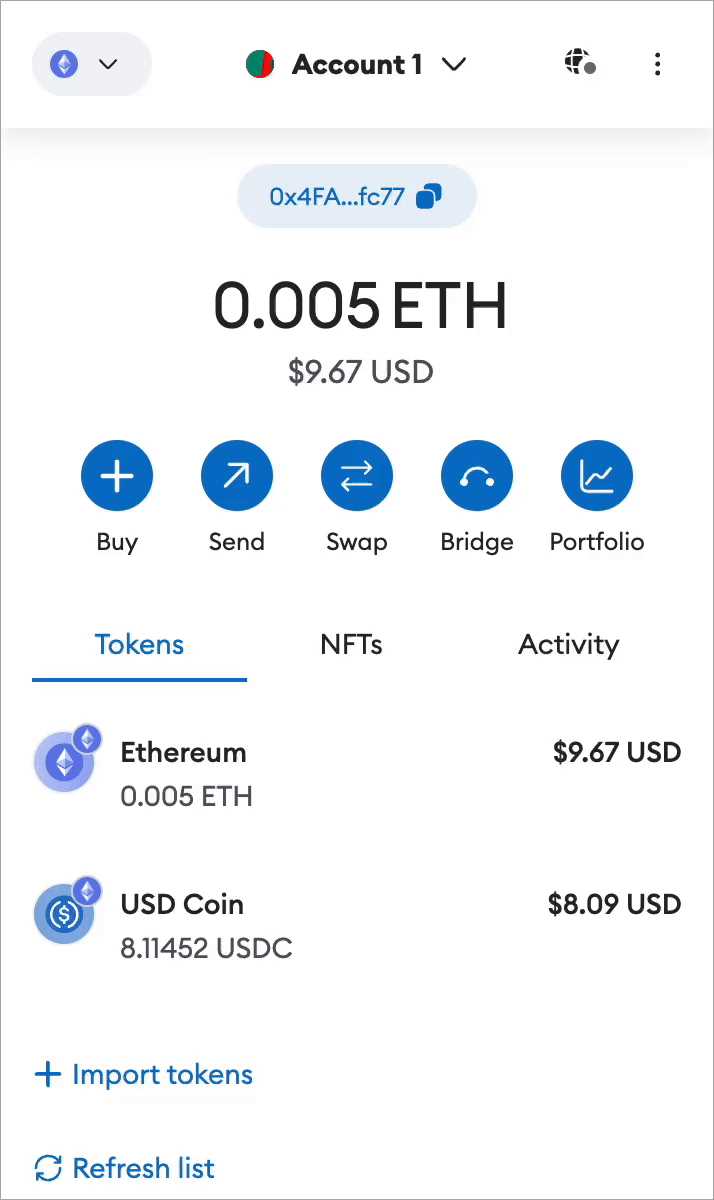
Your Metamask wallet will now display your imported USDC balance. You can use your USDC to send, receive, or trade within the Metamask interface.
| Important Note: |
|---|
| When importing USDC or any other token into Metamask, always ensure that you are using the correct contract address. Using an incorrect contract address can result in the loss of your funds. |
Frequently Asked Questions:
Is it possible to import USDC to Metamask from any USDC wallet?
Yes, you can import USDC to Metamask from any USDC wallet that supports the Wallet Connect feature. As long as the USDC wallet provides a QR code for connecting to other wallets, you can import your USDC tokens to your Metamask wallet.
Are there any fees associated with importing USDC to Metamask?
There are usually no fees for importing USDC to Metamask. However, you should check with your USDC wallet provider to confirm if they charge any fees for the wallet connect feature. Additionally, keep in mind that there may be gas fees associated with transferring USDC tokens on the Ethereum network, but these fees are not directly related to importing USDC to Metamask.
+ There are no comments
Add yours