


Welcome to the ultimate tutorial on how to add a custom token to MetaMask! MetaMask, the popular cryptocurrency wallet and browser extension, allows users to store and manage their digital assets securely. While it supports a wide range of tokens, you may come across a custom token that is not listed by default.
In this step-by-step guide, we will walk you through the process of adding a custom token to MetaMask. Whether you’re a beginner or an experienced crypto enthusiast, this tutorial is designed to help you seamlessly integrate your desired token into your MetaMask wallet.
Adding a custom token to MetaMask can open up a world of new possibilities. It allows you to interact with unique projects and gain access to exclusive tokens. By following this tutorial, you will be able to easily keep track of your custom tokens, view their balances, and even trade them on decentralized exchanges.
So, if you’re ready to expand your MetaMask wallet and take control of your custom tokens, let’s dive in and explore the step-by-step process of adding a custom token to MetaMask!
Step-by-Step Guide on Adding a Custom Token to MetaMask
Adding a custom token to MetaMask allows you to interact with decentralized applications (dApps) that are built on different blockchains. Here is a step-by-step guide on how to add a custom token to MetaMask:
Step 1: Open MetaMask
Make sure you have installed the MetaMask extension in your web browser and open it.
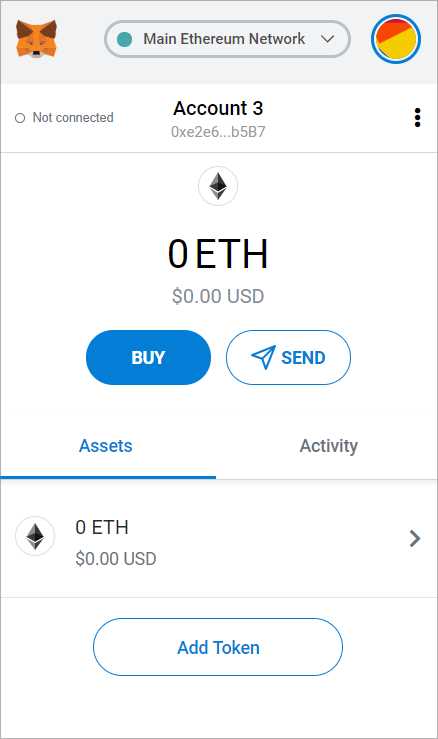
Step 2: Access Account Menu

Click on the MetaMask icon in your browser’s extensions bar to access the account menu.
Step 3: Select the Correct Network
Make sure you are on the correct network for the token you want to add. For example, if you want to add an Ethereum-based token, select the Ethereum Mainnet.
Step 4: Access Token Menu
In the account menu, click on the “…” button to access the token menu.
Step 5: Click on “Add Token”
In the token menu, click on the “Add Token” button to start the process of adding a custom token.
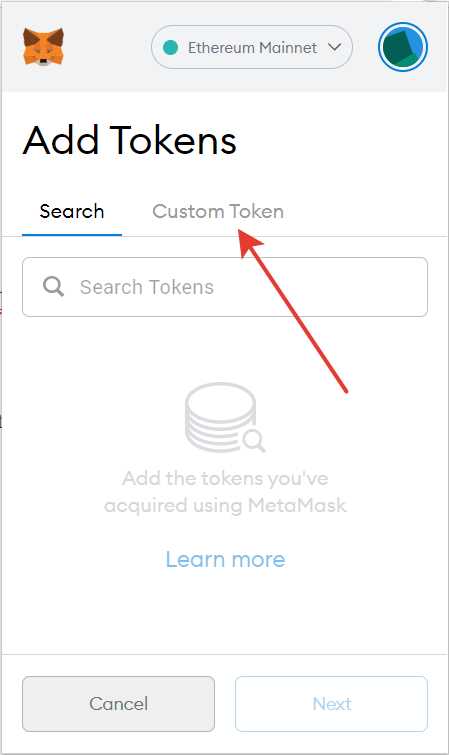
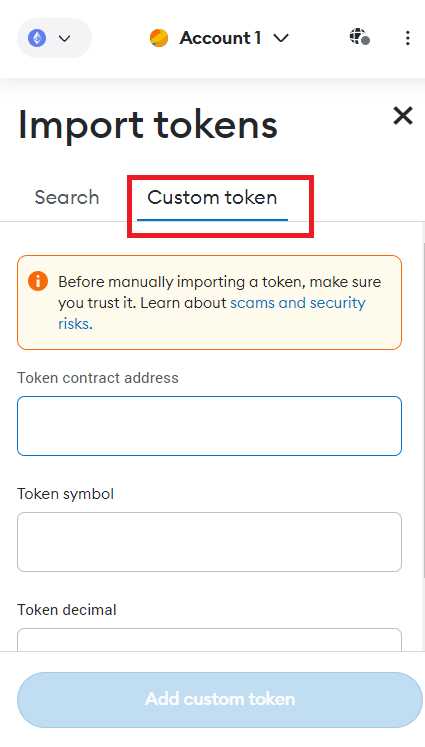
Step 6: Select Token Type
Choose the type of token you want to add. You can add tokens from the Ethereum Mainnet, Ropsten Test Network, or any other supported network.
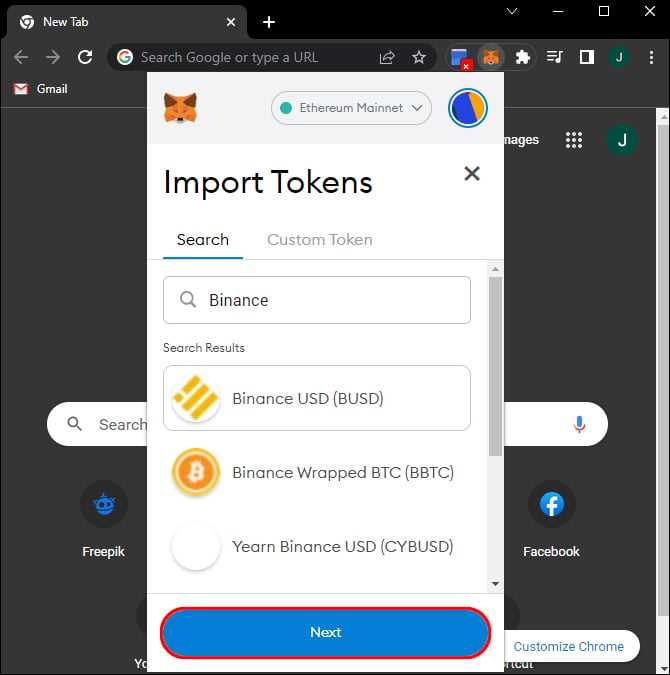
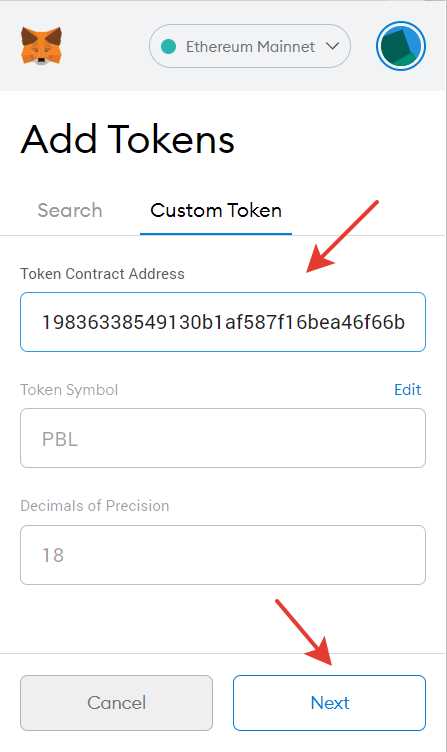
Step 7: Enter Token Contract Address
Enter the contract address of the token you want to add. You can usually find this information on the token’s website or through a token explorer like Etherscan.
Step 8: Click on “Next”
After entering the contract address, click on the “Next” button to proceed.
Step 9: Verify Token Details
Verify that the token details are correct, including the token symbol, decimal places, and token name.
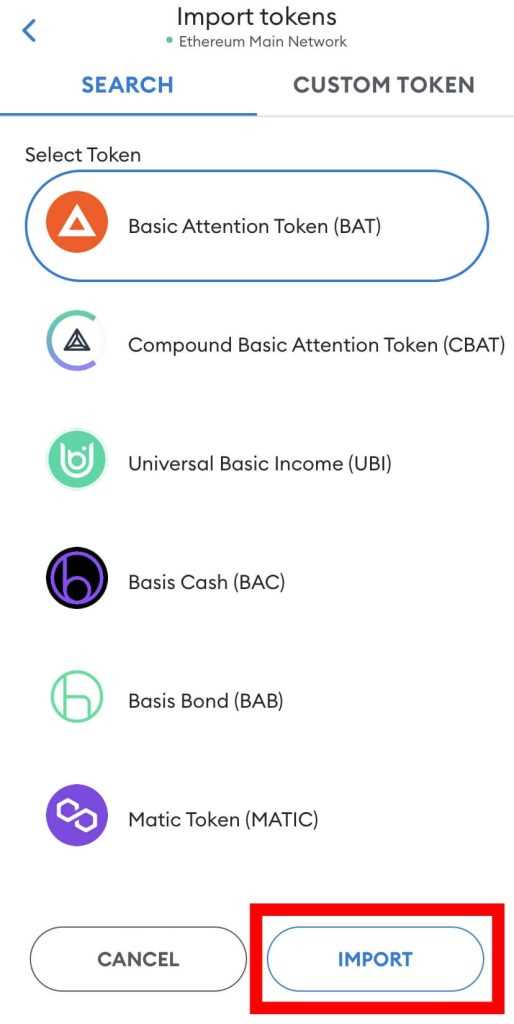
Step 10: Click on “Add Tokens”
Click on the “Add Tokens” button to finalize the process of adding the custom token to your MetaMask wallet.
Once the custom token is added, you will be able to view your token balance and use it for transactions and interactions with dApps on the supported blockchain network.
The Ultimate Tutorial
In this step-by-step guide, we will walk you through the process of adding a custom token to MetaMask. MetaMask is a popular Ethereum wallet and browser extension that allows you to interact with decentralized applications (dApps) on the Ethereum blockchain.
Adding a custom token to MetaMask is a straightforward process that can be completed in just a few simple steps. By adding a custom token, you can track and manage your tokens directly within your MetaMask wallet, making it easy to keep an eye on your token balances and transfer them as needed.
To begin, make sure you have MetaMask installed in your browser and set up with your Ethereum wallet. If you haven’t already done so, you can download and install MetaMask from the official website.
- Open MetaMask and click on the account icon in the top right corner of the extension.
- Select “Add Token” from the dropdown menu.
- In the “Token Contract Address” field, enter the contract address of the custom token. This information can typically be found on the token’s website or in the token’s documentation.
- MetaMask should automatically fill in the “Token Symbol” and “Decimals of Precision” fields based on the contract address. If not, you can manually enter this information.
- Click “Next” to proceed.
- You will be presented with a summary of the token details. Review this information and click “Add Tokens” if everything looks correct.
- Once the token has been successfully added, you will be able to see it listed in your MetaMask wallet alongside your other tokens.
And that’s it! You have successfully added a custom token to MetaMask. Now you can easily track and manage your tokens within the wallet.
Remember to exercise caution when adding custom tokens to MetaMask. Make sure you trust the token’s contract address and do your own research before interacting with any new tokens or dApps.
Prepare Your MetaMask Wallet
Before you can add a custom token to your MetaMask wallet, you need to make sure it is set up and ready to go. Here are the steps to prepare your MetaMask wallet:
Create a MetaMask Wallet

If you don’t have a MetaMask wallet yet, you’ll need to install the MetaMask extension for your browser. Go to metamask.io and follow the instructions to download and install MetaMask for your preferred browser. Once installed, create a new MetaMask wallet by following the prompts and setting up a password.
Backup Your Wallet
It’s important to back up your MetaMask wallet to protect your funds. In the MetaMask extension, click on your account avatar and select “Settings”. Then, click on “Security & Privacy” and choose “Reveal Seed Phrase”. Write down the seed phrase and keep it in a safe place. This seed phrase is the key to restoring your wallet if you ever lose access to it.
Remember to never share your seed phrase with anyone, as it can be used to access your wallet and steal your funds.
Encrypt Your Wallet
For added security, you can encrypt your MetaMask wallet. In the MetaMask extension, click on your account avatar and select “Settings”. Then, click on “Security & Privacy” and choose “Lock”. Set up a password to encrypt your wallet and protect it from unauthorized access.
Make sure to use a strong password that is unique and not used for any other accounts. This will help prevent unauthorized access to your wallet and funds.
Now that your MetaMask wallet is prepared, you’re ready to add a custom token. Let’s move on to the next step!
Learn how to set up and access your MetaMask wallet
MetaMask is a popular cryptocurrency wallet that allows users to securely store, manage, and interact with digital assets on the Ethereum blockchain. If you’re new to MetaMask and want to get started, this step-by-step guide will walk you through the process of setting up and accessing your wallet.
Step 1: Install MetaMask
To use MetaMask, you’ll first need to install it as a browser extension. Visit the MetaMask website and download the extension for your preferred browser. Once the extension is installed, you’ll see the MetaMask icon in your browser toolbar.
Step 2: Create a New Wallet
Click on the MetaMask icon in your browser toolbar and follow the prompts to create a new wallet. Make sure to set a strong password and write down the secret backup phrase that will be generated. This backup phrase is crucial for accessing your wallet and recovering it if necessary, so keep it safe and secure.
Step 3: Access Your Wallet
Once you’ve created your wallet, you can access it by clicking the MetaMask icon in your browser toolbar. Enter your password and click “Unlock” to access your wallet. You’ll be able to see your account balance, transaction history, and other wallet details.
Note: If you ever need to access your wallet from a different browser or device, you can do so by installing MetaMask and importing your wallet using the secret backup phrase.
Step 4: Add Funds to Your Wallet
To add funds to your MetaMask wallet, you’ll need to purchase Ethereum or receive it from someone else. There are various exchanges and platforms where you can buy Ethereum with fiat currency or exchange it for other cryptocurrencies. Once you have Ethereum in your wallet, you’ll be able to send and receive tokens.
Step 5: Explore MetaMask Features
Now that your wallet is set up and funded, you can start exploring the features of MetaMask. You can use MetaMask to interact with decentralized applications (dApps) on the Ethereum blockchain, manage your digital assets, and participate in token sales and other crypto activities.
Remember to always exercise caution and use secure browsing practices when using MetaMask or any other cryptocurrency wallet. Keep your wallet and backup phrase safe and be aware of potential phishing attempts or malicious websites.
By following these steps, you’ll be well on your way to setting up and accessing your MetaMask wallet like a pro. Enjoy the world of decentralized finance and seamless blockchain interactions!
Find the Contract Address of the Custom Token
Before adding a custom token to MetaMask, you need to find the contract address of the token. The contract address is a unique identifier that specifies the location on the blockchain where the token’s smart contract resides.
To find the contract address, follow these steps:
Step 1: Open the Token’s Website
First, visit the official website or the project’s documentation related to the custom token you want to add to MetaMask. Look for the contract address section or any instructions that mention the location of the contract address.
Step 2: Check Etherscan or BscScan
If you couldn’t find the contract address on the token’s website, you can search for it on blockchain explorers like Etherscan for Ethereum or BscScan for Binance Smart Chain (BSC).
On the respective explorers, use the search bar and enter the token’s name or symbol to find its official contract address. Once you find the correct token, you will be able to see the contract address listed on the token’s page.
Note that you should always double-check and ensure that you are obtaining the contract address from legitimate and trusted sources.
Step 3: Copy the Contract Address

Once you have found the contract address, make sure to copy it exactly as it is provided. The contract address is a long string of characters, usually starting with “0x” followed by a combination of letters and numbers.
In some cases, the contract address may also be provided in QR code format, allowing you to scan and copy it directly with an appropriate app or software.
Remember to take extra care to copy the contract address accurately, as any mistake could result in the loss of funds or incorrect token recognition.
After obtaining the contract address, you are ready to proceed with adding the custom token to MetaMask.
| Summary |
|---|
| Before adding a custom token to MetaMask, you need to find the contract address of the token. This can usually be found on the token’s official website or through blockchain explorers like Etherscan or BscScan. Make sure to copy the contract address accurately to avoid any errors. |
Frequently Asked Questions:
What is MetaMask?
MetaMask is a cryptocurrency wallet that allows users to securely store, manage, and interact with Ethereum-based tokens and decentralized applications (dApps) on the Ethereum blockchain.
Why would I need to add a custom token to MetaMask?
You may need to add a custom token to MetaMask if you want to interact with an Ethereum-based token that is not listed by default in the MetaMask token list. Adding a custom token allows you to view and manage your balance of that token within the MetaMask wallet.
What information do I need to add a custom token to MetaMask?
To add a custom token to MetaMask, you will need the token’s contract address, symbol, and decimals. The contract address identifies the token on the Ethereum blockchain, the symbol is the abbreviation or ticker symbol for the token, and the decimals determine the token’s precision.
How do I find the contract address, symbol, and decimals of a custom token?
You can usually find this information on the token’s official website or through a token explorer like Etherscan. Look for the token’s contract address on the respective platforms, and the symbol and decimals should be listed with the token information.
Can I add multiple custom tokens to MetaMask?
Yes, you can add multiple custom tokens to MetaMask. Simply repeat the steps outlined in the guide for each token you wish to add. Each token will have its own entry in the MetaMask token list, allowing you to manage and interact with them individually.

+ There are no comments
Add yours