


Metamask is a popular Ethereum wallet browser extension that allows users to interact with decentralized applications (dApps) and manage their Ethereum assets. However, with the rise of Binance Smart Chain (BSC), many users are now looking to connect their Metamask wallet to the BSC network to take advantage of its low transaction fees and fast confirmation times.
In this step-by-step guide, we will walk you through the process of connecting Metamask to Binance Smart Chain. By the end of this tutorial, you will be able to seamlessly switch between Ethereum and BSC networks and effortlessly manage your assets on both chains.
Step 1: Install the Metamask Browser Extension
If you haven’t already, you will need to install the Metamask browser extension, which is available for Google Chrome, Mozilla Firefox, and Brave browsers. Simply search for “Metamask” in your browser’s extension store, click on the Metamask extension, and follow the instructions to install it.
Step 2: Create or Import a Wallet
Once you have installed Metamask, open the extension and click on “Create a Wallet” if you don’t already have one. Follow the prompts to create a new wallet and make sure to securely store your seed phrase. If you already have a Metamask wallet, click on “Import Wallet” and follow the instructions to import your existing wallet using your seed phrase.
Step 3: Switch to the BSC Network
By default, Metamask is connected to the Ethereum network. To switch to the Binance Smart Chain network, click on the network dropdown at the top of the Metamask extension and select “Custom RPC” at the bottom of the list. In the “New RPC URL” field, enter the BSC RPC URL: https://bsc-dataseed1.binance.org/. Then, enter “BSC” in the “Network Name” field, and enter the BSC chain ID, which is 56. Click on “Save” to save the network settings.
Step 4: Add BNB as a Custom Token
To view and manage your BNB (Binance Coin) assets on Metamask, you will need to add BNB as a custom token. Click on the Metamask extension, click on the three dots (…) next to your wallet address, and select “Add Token”. In the “Token Contract Address” field, enter the BNB contract address for the BSC network: 0xbb4cdb9cbd36b01bd1cbaebf2de08d9173bc095c. Metamask will automatically populate the token symbol as BNB and the decimal places as 18. Click on “Next” and then “Add Tokens” to add BNB to your Metamask wallet.
Congratulations! You have successfully connected your Metamask wallet to the Binance Smart Chain network. You can now easily switch between the Ethereum and BSC networks by selecting the network from the dropdown menu in the Metamask extension. Enjoy the benefits of low fees and fast transactions on the Binance Smart Chain!
How to Connect Metamask to Binance Smart Chain
To connect your Metamask wallet to the Binance Smart Chain network, follow these step-by-step instructions:
|
Step 1: |
Open the Metamask extension in your browser and click on the profile picture at the top right corner of the window. |
|
Step 2: |
From the dropdown menu, select “Settings”. |
|
Step 3: |
In the Settings menu, click on “Networks” at the top of the window. |
|
Step 4: |
Scroll down to the “Networks” section and click on “Add Network”. |
|
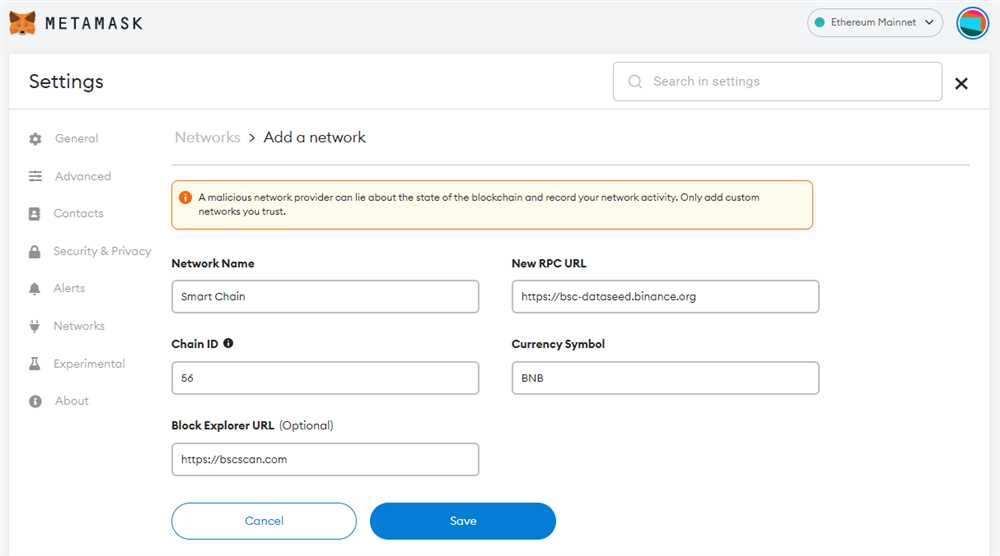
Step 5: |
In the “Network Name” field, enter “Binance Smart Chain”. |
|
Step 6: |
In the “New RPC URL” field, enter “https://bsc-dataseed.binance.org/”. |
|
Step 7: |
In the “Chain ID” field, enter “56”. |
|
Step 8: |
In the “Currency Symbol” field, enter “BNB”. |
|
Step 9: |
In the “Block Explorer URL” field, enter “https://bscscan.com/”. |
|
Step 10: |
Click on “Save” to add the Binance Smart Chain network to your Metamask wallet. |
|
Step 11: |
Once the network is added, you can switch to the Binance Smart Chain by clicking on the network dropdown at the top of the Metamask window and selecting “Binance Smart Chain”. |
Now you have successfully connected your Metamask wallet to the Binance Smart Chain network. You can now access decentralized applications (dApps) and interact with the Binance Smart Chain ecosystem.
Step 1: Install Metamask

To connect Metamask to Binance Smart Chain, you will first need to install the Metamask extension in your web browser. Follow the steps below:
- Open your web browser (Chrome or Firefox) and search for “Metamask Extension” in the search bar.
- Click on the official Metamask website or go directly to metamask.io.
- On the Metamask website, click on the “Get Chrome Extension” or “Get Firefox Extension” button.
- A new tab will open in your browser’s extension store. Click on the “Add to Chrome” or “Add to Firefox” button to start the installation process.
- Follow the instructions provided by your browser to complete the installation.
- After the installation is complete, you will see the Metamask icon added to your browser’s toolbar.
- Click on the Metamask icon and follow the instructions to create a new account or import an existing one.
- Make sure to set a strong password and write down your seed phrase in a safe place. This seed phrase will be used to recover your account if you ever lose access to it.
Step 2: Add Custom Network
After installing Metamask, follow the steps below to add the Binance Smart Chain as a custom network:
- Open the Metamask extension in your browser and click on the account icon in the top right corner.
- In the dropdown menu, select “Settings”.
- Scroll down and click on “Networks” to open the network management page.
- On the network management page, click on the “Add Network” button.
- Fill in the following information for the Binance Smart Chain:
- Network Name: Binance Smart Chain
- New RPC URL: https://bsc-dataseed.binance.org/
- Chain ID: 56
- Currency Symbol: BNB
- Block Explorer URL: https://bscscan.com/
- Click on the “Save” button to add the Binance Smart Chain network to Metamask.
Once you have added the Binance Smart Chain as a custom network, you’ll be able to interact with Binance Smart Chain dApps and use your Metamask wallet on the Binance Smart Chain.
Step 3: Connect Metamask to Binance Smart Chain
Once you have successfully installed and set up Metamask, the next step is to connect it to the Binance Smart Chain network. Follow the steps below:
Step 1: Open Metamask
Click on the Metamask extension icon in your browser to open the Metamask browser interface.
Step 2: Access Network Settings
In the Metamask interface, click on the network dropdown menu located at the top of the window, next to the Metamask logo, and select “Custom RPC”.
Step 3: Add Binance Smart Chain Network
Scroll down in the network dropdown menu and click on the “Add Network” button.
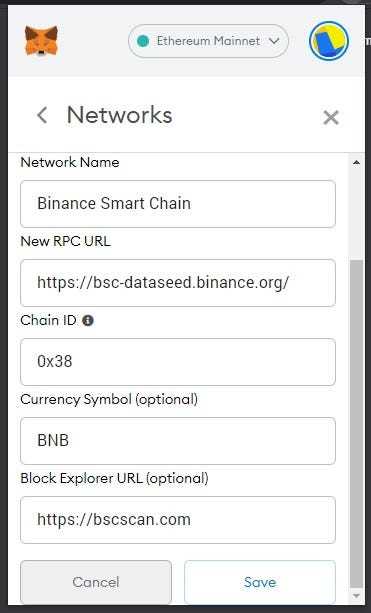
In the “New Network” form, enter the following details:
- Network Name: Binance Smart Chain
- New RPC URL: https://bsc-dataseed.binance.org/
- Chain ID: 56
- Symbol: BNB
- Block Explorer URL: https://bscscan.com/
Once you have entered all the details, click on the “Save” button to add the Binance Smart Chain network to Metamask.
Step 4: Switch to Binance Smart Chain
In the network dropdown menu, select the newly added “Binance Smart Chain” network to switch to it.
Congratulations! You have now successfully connected Metamask to the Binance Smart Chain network. You can now start using Metamask to interact with decentralized applications (DApps) and perform transactions on the Binance Smart Chain.
Step 4: Test the Connection

Now that you have successfully connected Metamask to the Binance Smart Chain, it’s time to test the connection to ensure everything is working correctly.
1. Check the Network
First, make sure that you have selected the Binance Smart Chain network in Metamask. To do this, click on the network dropdown in the top right corner of the Metamask extension and choose “Binance Smart Chain” from the list of available networks.
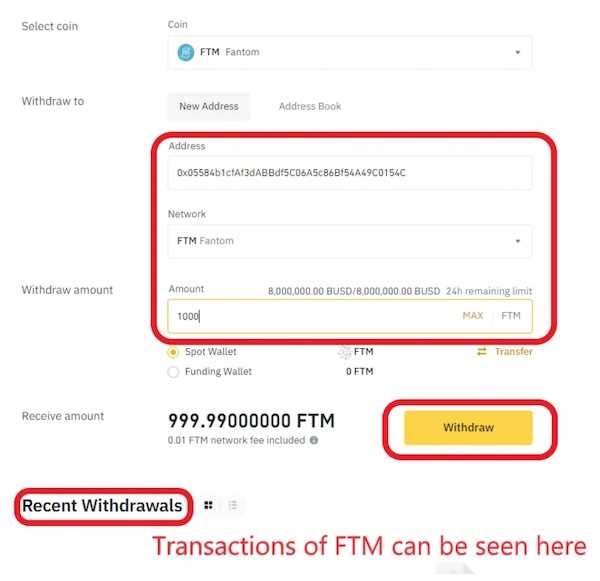
2. Send a Test Transaction
To confirm that the connection is working, you can send a small test transaction. Open your Metamask wallet and click on the “Send” button. Enter the recipient’s address and the amount you want to send. Double-check the transaction details and click on “Confirm” to send the transaction.
3. Verify the Transaction on BscScan
To ensure that the transaction was successful, you can visit BscScan, a block explorer for the Binance Smart Chain. Paste the transaction hash or the recipient’s address in the search bar and click on “Search”. You should be able to see the details of the transaction, including the confirmation status and the amount sent.
Once you have successfully tested the connection and confirmed that your transaction went through, you can start interacting with decentralized applications (DApps) on the Binance Smart Chain.
Congratulations! You have now completed all the steps to connect Metamask to the Binance Smart Chain and you are ready to start exploring the world of DeFi and decentralized applications.
Frequently Asked Questions:
What is Metamask?
Metamask is a cryptocurrency wallet and browser extension that allows users to interact with the Ethereum blockchain and decentralized applications (dApps).
Why would I want to connect Metamask to Binance Smart Chain?
By connecting Metamask to Binance Smart Chain, you gain access to a different blockchain network with its own features and decentralized applications. This can expand your options for trading, investing, and interacting with different projects.
+ There are no comments
Add yours