


Welcome to our step-by-step guide on how to add the Binance Smart Chain (BSC) network to your Metamask wallet! If you’re interested in accessing the BSC network and exploring its wide range of decentralized applications (DApps) and decentralized finance (DeFi) protocols, this guide will walk you through the process.
Metamask is a popular Ethereum wallet that allows users to securely manage their digital assets and interact with various blockchain networks. By adding the BSC network to your Metamask wallet, you’ll be able to seamlessly switch between the Ethereum and BSC networks and take advantage of the unique features and opportunities offered by both platforms.
To get started, make sure you have the latest version of Metamask installed on your browser. If you don’t already have Metamask, you can download it as a browser extension for Chrome, Firefox, or Brave. Once you have Metamask installed, follow the steps below to add the BSC network.
Step 1: Open Metamask
Launch Metamask by clicking on the Metamask icon in your browser. If you haven’t set up a wallet yet, you’ll be prompted to create one by setting up a password and agreeing to the terms of service.
Step 2: Access Network Settings
Once you have your Metamask wallet set up, click on the network dropdown menu located at the top of the Metamask interface. This will display a list of available networks. Click on the “Custom RPC” option at the bottom of the list.
Step 3: Configure BSC Network
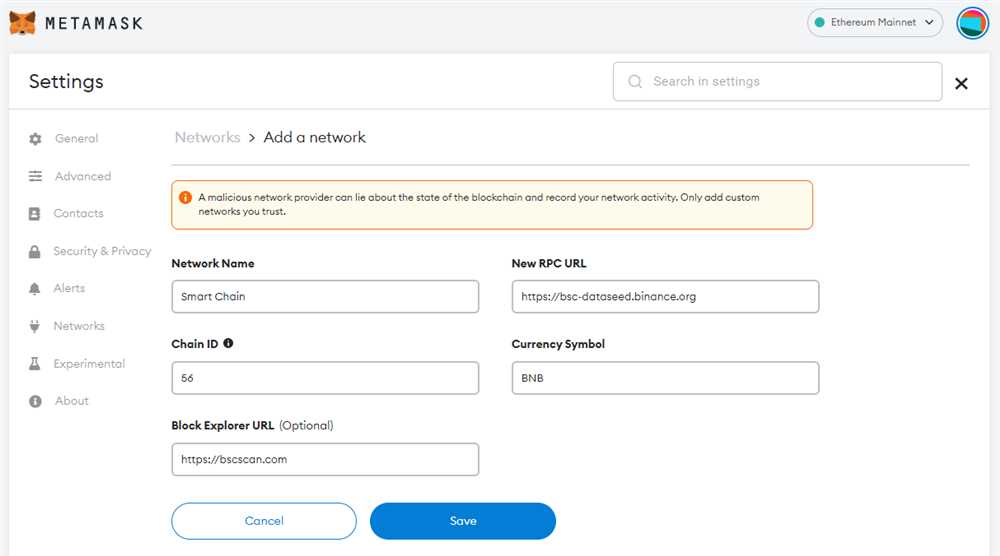
In the “Custom RPC” screen, you’ll need to provide the details for the BSC network. Enter the following information:
- Network Name: BSC Mainnet
- New RPC URL: https://bsc-dataseed.binance.org/
- Chain ID: 56
- Symbol: BNB
- Block Explorer URL: https://bscscan.com
Once you have entered the information, click on the “Save” button to add the BSC network to your Metamask wallet.
Congratulations! You have successfully added the BSC network to your Metamask wallet. You can now switch between the Ethereum and BSC networks by selecting the desired network from the network dropdown menu in Metamask. Happy exploring!
Step 1: Install the Metamask Extension
To add the BSC network to Metamask, the first step is to install the Metamask extension. Metamask is a browser extension that allows users to access decentralized applications (DApps) on different blockchain networks.
Here’s how you can install the Metamask extension:
- Open your web browser and go to the official Metamask website.
- Click on the “Get Chrome Extension” or “Get Firefox Extension” button, depending on the browser you are using.
- You will be redirected to the respective browser’s web store (Chrome Web Store or Firefox Add-Ons).
- Click on the “Add to Chrome” or “Add to Firefox” button and confirm the installation by clicking on “Add extension” or “Continue”.
- Once the installation is complete, the Metamask icon will appear in your browser’s toolbar.
- Click on the Metamask icon to open the extension.
- Follow the on-screen instructions to set up and create your Metamask wallet.
Once you have successfully installed and set up Metamask, you can proceed to the next step to add the BSC network.
Step 2: Create a Binance Smart Chain Wallet
Once you have MetaMask installed and set up, the next step is to create a Binance Smart Chain (BSC) wallet. Follow the instructions below to create your BSC wallet:
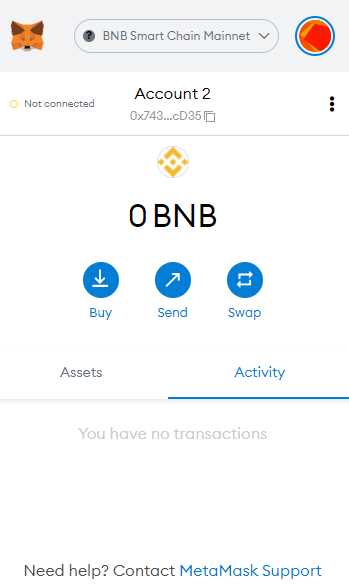
1. Open MetaMask

Open the MetaMask extension in your web browser. Click on the MetaMask icon located in the top right corner of your browser window.
2. Switch to Binance Smart Chain Network
To create a BSC wallet, you need to switch to the Binance Smart Chain network in MetaMask. Follow these steps:
- Click on the network selection dropdown. It is located at the top of the MetaMask extension, next to the account name.
- From the network selection dropdown, choose “Custom RPC”.
- In the “New RPC URL” field, enter the Binance Smart Chain RPC URL:
https://bsc-dataseed.binance.org/ - In the “Chain ID” field, enter the Binance Smart Chain Chain ID:
56 - Click on “Save” to save the changes.
Your MetaMask extension should now be connected to the Binance Smart Chain network.
3. Create a BSC Wallet
With MetaMask now connected to the Binance Smart Chain network, you can proceed to create your BSC wallet:
- Click on the account icon located in the top right corner of the MetaMask extension.
- From the account dropdown, click on “Create Account”.
- A new BSC wallet will be created, and you will be provided with the wallet address and private key. It is important to keep your private key secure and never share it with anyone.
- Click on “Next” to proceed.
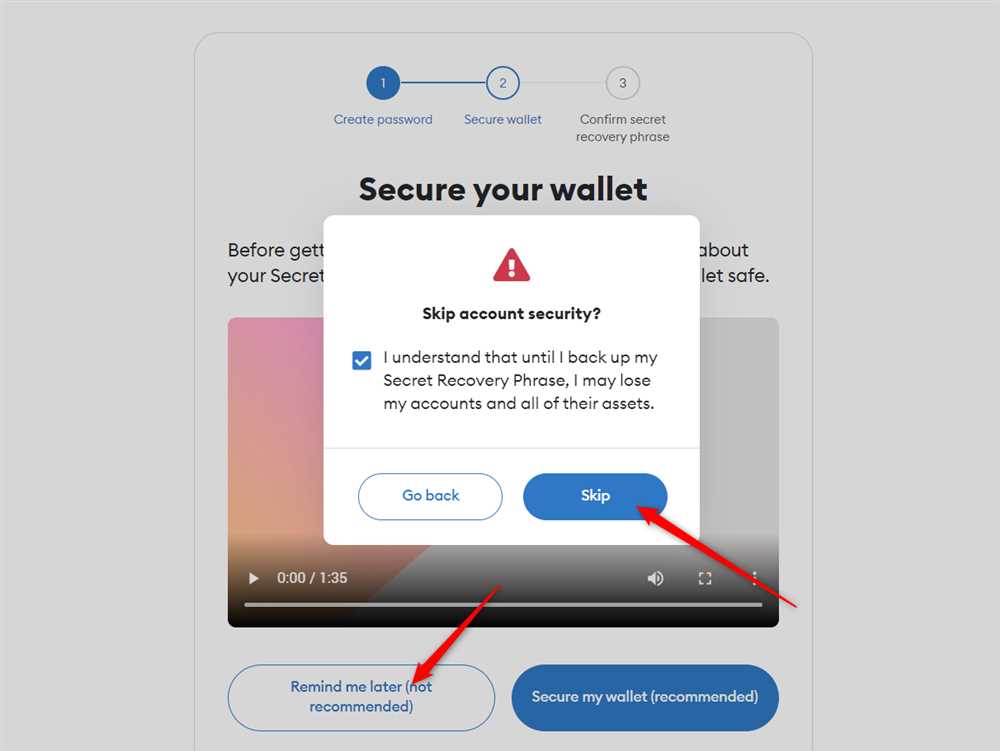
- Set a password for your wallet to secure it. Make sure to choose a strong password that is not easily guessable.
- Click on “Create” to create your BSC wallet.
Congratulations! You have successfully created a Binance Smart Chain wallet using MetaMask. Make sure to back up your wallet address and private key in a secure location. Your BSC wallet is now ready to be used for interacting with Binance Smart Chain dApps and services.
Step 3: Add BSC Network to Metamask
Once you have installed and set up MetaMask, the next step is to add the Binance Smart Chain (BSC) network to your MetaMask wallet. This will allow you to interact with BSC and use BSC-based decentralized applications (dApps).
Follow these steps to add the BSC network:
- Open MetaMask and make sure you are on the main MetaMask interface.
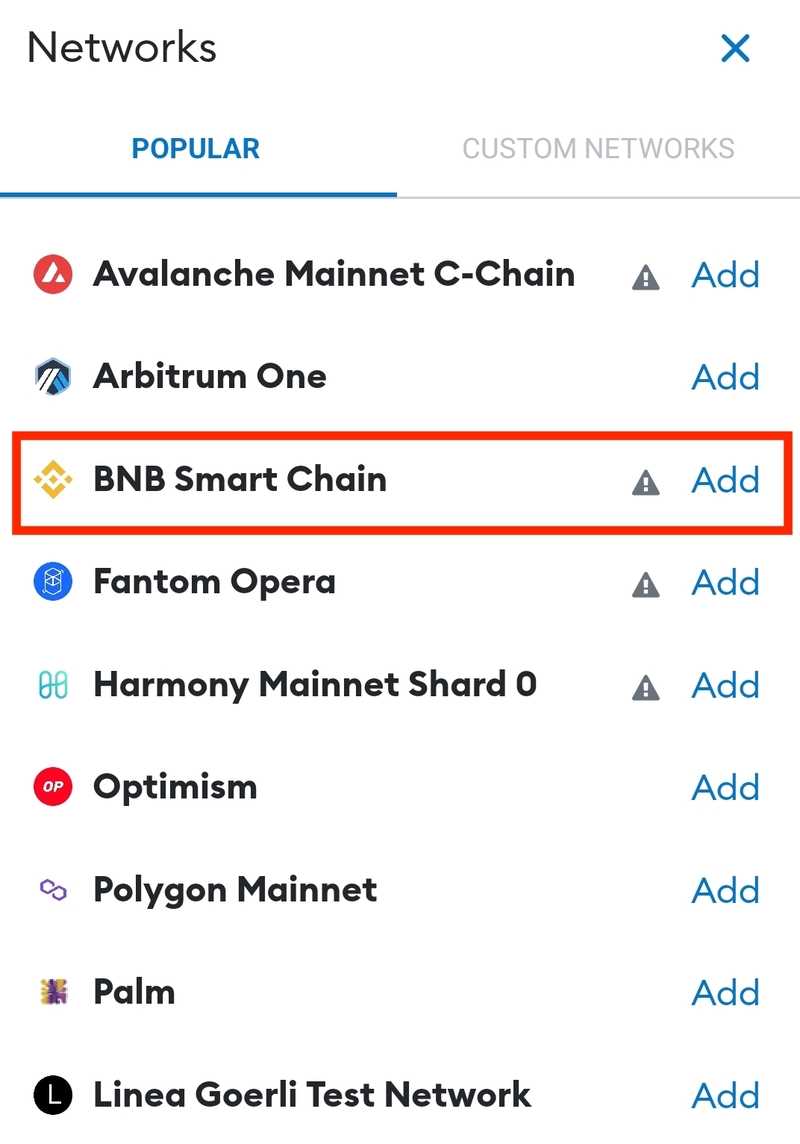
- Click on the network selection button at the top of the MetaMask interface. It should show the current network you are connected to.
- In the network selection dropdown, click on “Custom RPC” to add a custom network.
- A form will appear with various fields to fill in.
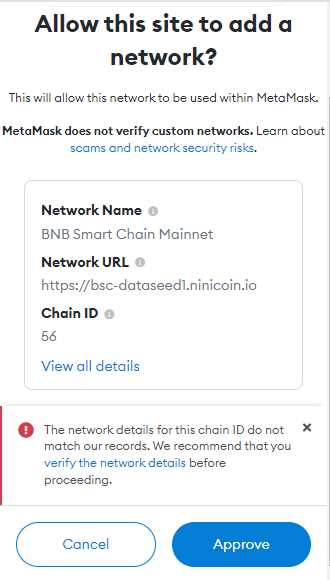
- In the “Network Name” field, enter “Binance Smart Chain” or any other name you prefer to identify this network.
- In the “New RPC URL” field, enter the Binance Smart Chain Mainnet RPC URL: “https://bsc-dataseed.binance.org/”.
- In the “Chain ID” field, enter “56” which is the chain ID for the Binance Smart Chain.
- In the “Symbol” field, enter “BNB” which is the symbol for the Binance Coin (BNB).
- In the “Block Explorer URL” field, enter “https://bscscan.com” which is the block explorer for the Binance Smart Chain.
- Click on the “Save” button to add the BSC network to MetaMask.
- You should now see the Binance Smart Chain network listed in the network selection dropdown.
- Select the Binance Smart Chain network to connect to it.
- Once connected, you can now use MetaMask with BSC and interact with BSC-based dApps.
Congratulations! You have successfully added the Binance Smart Chain network to your MetaMask wallet. You can now enjoy the benefits of using BSC and explore the various decentralized applications available on the Binance Smart Chain.
Question-answer:
What is the BSC network?
The Binance Smart Chain (BSC) is a blockchain network developed by Binance, one of the largest cryptocurrency exchanges. It is designed to provide a fast and low-cost alternative to the Ethereum network, allowing users to experience decentralized applications (dApps) and digital assets.
Why would I want to add the BSC network to Metamask?
Adding the BSC network to Metamask allows you to access and interact with decentralized applications (dApps) and digital assets built on the Binance Smart Chain. It expands your options for using different blockchain networks and gives you more opportunities to participate in the decentralized finance (DeFi) ecosystem.
+ There are no comments
Add yours