


Are you wondering how to withdraw your funds from Metamask and convert them into cash?
Look no further! We have created a simple step-by-step guide to help you with this process.
First, make sure you have the latest version of Metamask installed on your device. Once you’ve done that, open the Metamask extension and log in to your account.
Step 1: Connect Metamask to the network where your funds are located. This could be the Ethereum mainnet or any other network supported by Metamask.
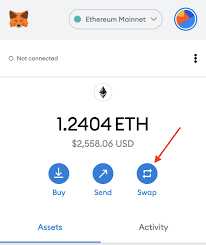
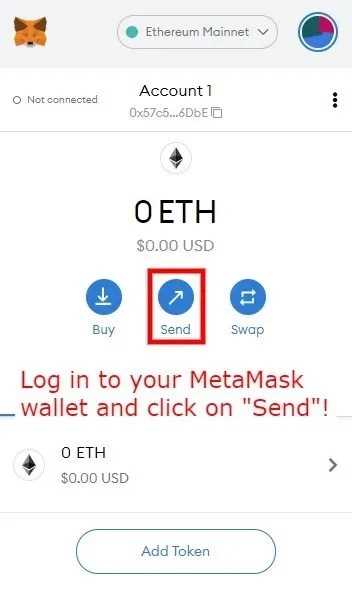
Step 2: Go to your wallet’s main page and find the “Send” option. Click on it to start the withdrawal process.
Step 3: Enter the recipient’s wallet address and the amount of funds you wish to withdraw. Double-check the address to avoid any mistakes.
Step 4: Review the transaction details and confirm the withdrawal. Metamask will show you the gas fee required for the transaction.
Step 5: Once the transaction is confirmed and the funds are transferred, you can convert them into cash. There are several platforms and services available for this purpose.
Remember to choose a trusted platform that offers competitive rates and secure transactions.
And that’s it! You have successfully withdrawn your funds from Metamask and converted them into cash.
Always remember to keep your private keys and wallet information secure to protect your funds.
Happy withdrawing!
How to Withdraw Funds from Metamask

Withdrawing funds from Metamask and converting them into cash is a simple process that can be done in just a few steps. Follow this guide to learn how:
Step 1: Access Your Metamask Wallet

To begin, open your Metamask wallet on your preferred device. Ensure that you have your wallet address and private key readily available, as you will need them to perform the withdrawal.
Step 2: Connect to an Exchange or Wallet
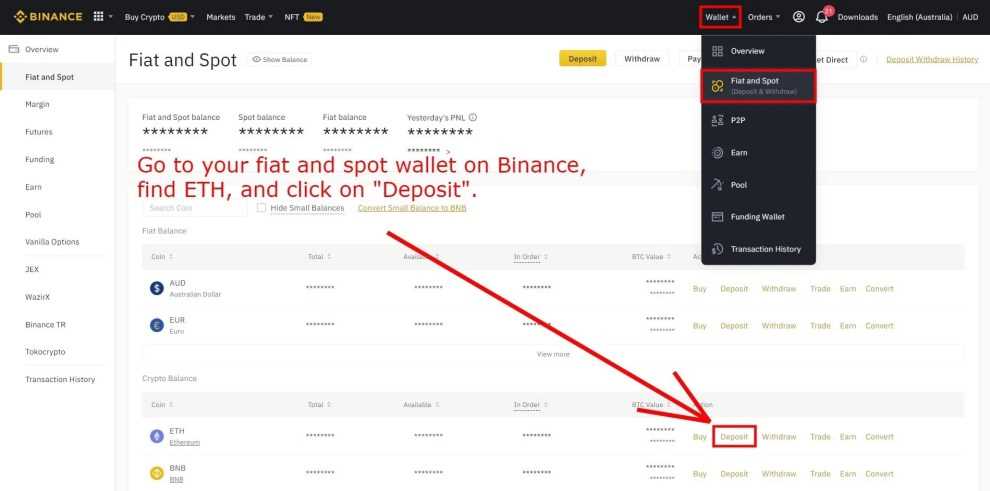
Next, navigate to an exchange or wallet platform that supports the conversion of cryptocurrency to cash. Some popular options include Coinbase, Binance, and Kraken. Sign in or create an account if necessary.
Step 3: Initiate the Withdrawal

- Once you are logged in to the exchange or wallet platform, locate the option to withdraw funds.
- Select the cryptocurrency you wish to withdraw, which will be Ethereum (ETH) for Metamask.
- Enter your Metamask wallet address as the recipient address for the withdrawal.
- Specify the amount of funds you wish to withdraw in the designated field.
- Review all the details of the transaction to ensure they are accurate.
- Click on “Withdraw” or the equivalent option to initiate the withdrawal.
Step 4: Wait for Confirmation
After initiating the withdrawal, you will need to wait for the transaction to be confirmed on the blockchain. This process may take a few minutes or longer, depending on the network congestion.
Step 5: Receive Cash
Once the withdrawal is confirmed, the cryptocurrency funds will be converted to cash and deposited into your linked bank account or payment method as specified on the exchange or wallet platform. The time it takes for the cash to become available will vary depending on the platform and your location.
That’s it! You have successfully withdrawn funds from Metamask and converted them to cash. Remember to double-check all the details and security measures before proceeding with any withdrawal to ensure the safety of your funds.
Step 1: Accessing Metamask
Before you can withdraw funds from Metamask and convert them to cash, you need to access your Metamask wallet. If you don’t have the Metamask extension installed in your browser, you can download it from the official Metamask website and follow the installation instructions.
Once you have the Metamask extension installed, follow these steps to access your Metamask wallet:
| 1. | Launch your web browser and click on the Metamask extension icon in the top-right corner of your browser window. The icon looks like a fox head. |
| 2. | A popup window will appear. Click on the “Get Started” button to create a new wallet or “Import Wallet” if you already have a wallet. |
| 3. | If you’re creating a new wallet, follow the on-screen instructions to set up a new wallet. Make sure to remember and securely store your wallet passphrase, as it is necessary to access your wallet in the future. |
| 4. | If you’re importing an existing wallet, enter your wallet’s seed phrase or private key and click on the “Import” button. |
| 5. | Once you have accessed your Metamask wallet, you will be able to see your account balance and interact with the various features and functionalities of the wallet. |
Now that you have successfully accessed your Metamask wallet, you are ready to proceed to the next step and withdraw funds from Metamask.
Step 2: Connecting to a Wallet
After setting up your Metamask wallet, the next step is to connect it to your preferred cryptocurrency exchange or platform. This will allow you to easily withdraw your funds and convert them to cash.
| 1. Open your preferred cryptocurrency exchange or platform. |
| Choose a reputable cryptocurrency exchange or platform that supports the withdrawal of funds from Metamask. Some popular options include Binance, Coinbase, and Kraken. |
| 2. Sign in to your account or create a new one. |
| If you already have an account with the chosen exchange or platform, sign in using your credentials. If not, follow the instructions provided to create a new account. |
| 3. Navigate to the wallet or funds management section. |
| Look for the section within the exchange or platform that allows you to manage your funds or access your wallet. This may be labeled as “Wallet”, “Funds”, or something similar. |
| 4. Select the option to connect an external wallet. |
| Within the wallet or funds management section, you should see an option to connect an external wallet. Click on this option to proceed. |
| 5. Choose the Metamask wallet. |
| A list of supported wallets should appear. Look for Metamask and select it from the list. |
| 6. Authorize the connection. |
| You will be prompted to authorize the connection between your chosen cryptocurrency exchange or platform and your Metamask wallet. Follow the on-screen instructions to complete the connection process. |
| 7. Ensure the connection is successful. |
| Once the connection is established, you should see a confirmation or success message indicating that your Metamask wallet is now connected to your chosen cryptocurrency exchange or platform. |
| 8. Verify the connection. |
| Double-check that the connection is functioning properly by navigating to your wallet or funds management section again. You should be able to see your Metamask wallet and access its funds. |
Now that your wallet is connected, you are ready to proceed with withdrawing your funds from Metamask and converting them to cash. Continue following the steps provided in the next section to complete the process.
Step 3: Withdrawing Funds
Once you have successfully converted your cryptocurrency to cash, the next step is to withdraw your funds from your Metamask wallet. Follow these simple steps to complete the withdrawal process:
- Open the Metamask extension: Launch the Metamask extension on your web browser. Make sure you are logged in to your account.
- Select the desired wallet: If you have multiple wallets connected to your Metamask, select the wallet from which you want to withdraw the funds.
- Click on the ‘Send’ button: In the Metamask interface, locate and click on the ‘Send’ button, which is usually represented by an arrow pointing upwards or a paper airplane icon.
- Enter the recipient’s address: Provide the wallet address to which you want to send the funds. Make sure to enter the address correctly to avoid any loss of funds.
- Enter the withdrawal amount: Specify the amount of funds you wish to withdraw. Double-check the amount to ensure accuracy.
- Set the gas fee: Adjust the gas fee depending on the network congestion. Higher gas fees usually result in faster transactions, but they can also be more expensive. Choose the appropriate gas fee for your withdrawal.
- Review and confirm: Before finalizing the transaction, review all the details carefully, including the recipient’s address, withdrawal amount, and gas fee. Once you are certain of the accuracy, click on the ‘Confirm’ or ‘Send’ button to initiate the withdrawal.
- Wait for the transaction to complete: After confirming the withdrawal, wait for the transaction to be processed on the blockchain. The time it takes for the transaction to complete may vary depending on network congestion and gas fees.
Note: It is important to keep your wallet’s private key or seed phrase safe and secure. Losing access to your wallet can result in permanent loss of funds. Always double-check the recipient’s address and withdrawal details before confirming the transaction.
By following these simple steps, you can easily withdraw your funds from Metamask and convert them into cash.
Frequently Asked Questions:
Can I convert my Metamask funds into cash?
Yes, you can convert your Metamask funds into cash. To do this, you will need to transfer your funds from Metamask to a cryptocurrency exchange that supports fiat currency withdrawals, such as Coinbase or Binance. Once your funds are on the exchange, you can sell your cryptocurrency for cash and withdraw it to your bank account.
Which cryptocurrency exchanges support withdrawing funds from Metamask?
Many cryptocurrency exchanges support withdrawing funds from Metamask. Some popular options include Coinbase, Binance, Kraken, and Gemini. However, it’s important to check if the exchange supports the specific token or cryptocurrency you want to withdraw from Metamask. Additionally, each exchange may have different fees, withdrawal limits, and verification requirements, so it’s worth comparing them before making a decision.
+ There are no comments
Add yours