


If you’re interested in exploring the potential of Avax, the Avalanche network’s native cryptocurrency, you’ll need to get familiar with Metamask. Metamask is a popular Ethereum wallet that allows you to store, manage, and interact with your Avax tokens. By following this step-by-step guide, you’ll be able to leverage the power of Metamask to fully utilize the potential of Avax.
Step 1: Download and Install Metamask
The first step is to download and install the Metamask extension for your web browser. Metamask is available for Google Chrome, Firefox, and Brave browsers. Simply visit the respective extension store for your browser, search for “Metamask,” and download the extension.
Step 2: Create a New Wallet
Once you have Metamask installed, open the extension and click on the “Create a Wallet” button. You will be asked to choose a strong password and to agree to the terms of use. Make sure to store your password in a safe place, as it cannot be recovered if lost.
Step 3: Backup Your Wallet
After creating your wallet, Metamask will provide you with a unique set of words known as a seed phrase. It is crucial to write down this seed phrase and keep it in a secure location. In case you lose access to your wallet, this seed phrase will allow you to restore it.
Step 4: Connect Metamask to the Avalanche Network
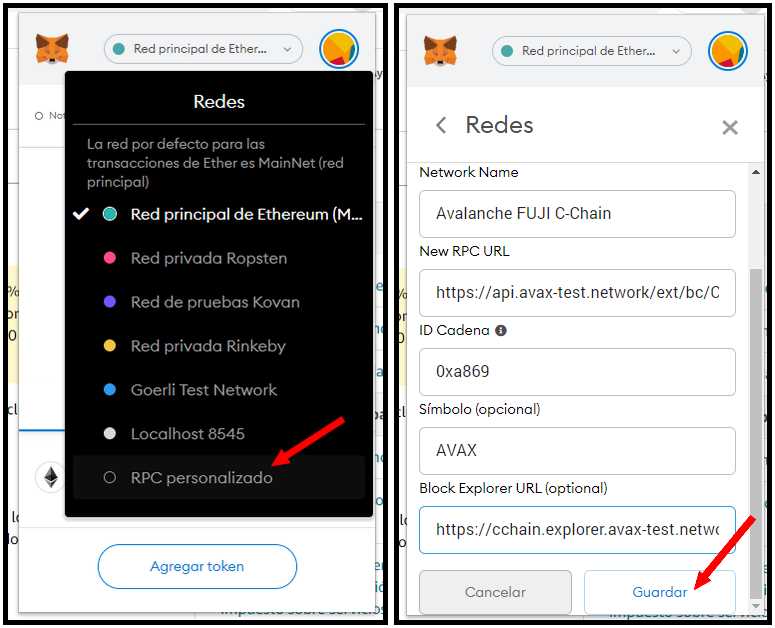
Now that you have your Metamask wallet set up, you need to connect it to the Avalanche network. Click on the network selection dropdown on the top of the Metamask interface and choose “Custom RPC.” Enter the following details:
Network Name: Avalanche
New RPC URL: https://api.avax.network/ext/bc/C/rpc
Chain ID: 43114
Symbol: AVAX
Step 5: Add Avax Tokens to Metamask
To add Avax tokens to your Metamask wallet, click on the “Add Token” button in the Metamask interface. Choose “Custom Token” and enter the following contract address for Avax: 0xb31f66aa3c1e785363f0875a1b74e27b85fd66c7
By following these steps, you’ll be able to use Metamask to harness the potential of Avax. From storing and managing your Avax tokens to interacting with the Avalanche network, Metamask serves as a powerful tool in unlocking the opportunities that Avax has to offer.
What is Metamask?
Metamask is a popular cryptocurrency wallet and browser extension that allows users to interact with the Ethereum blockchain. It acts as a bridge between your web browser and the Ethereum network, enabling you to securely manage your digital assets, interact with decentralized applications (dApps), and facilitate transactions.
At its core, Metamask provides users with a digital wallet that stores their Ethereum-based assets, such as Ether (ETH) and ERC-20 tokens. This wallet is protected by a unique password and a seed phrase that can be used to restore the wallet if necessary. It also generates public and private key pairs that are essential for authenticating transactions and securely signing messages.
Key Features of Metamask
Metamask offers a range of features that make it a powerful tool for interacting with the Ethereum ecosystem:
1. Seamless Browser Integration: Metamask is available as a browser extension for popular web browsers like Google Chrome, Mozilla Firefox, and Brave, allowing users to access their digital assets and interact with dApps directly from their browser.
2. Ethereum Account Management: With Metamask, you can easily create multiple Ethereum accounts, import existing accounts using your private key or seed phrase, and manage your accounts with ease. You can also add custom network configurations to connect to different Ethereum chains or testnets.
3. Enhanced Security Measures: Metamask focuses on security, providing users with tools to protect their funds and digital identity. It encrypts your private keys and stores them locally on your device, ensuring that you have full control over your assets. Additionally, it enables two-factor authentication (2FA) for added security.
4. Easy Token Swap and Trading: Metamask integrates with popular decentralized exchanges (DEXs) like Uniswap and SushiSwap, giving users the ability to swap tokens directly from within the wallet. It also supports direct trades on other platforms and facilitates seamless interaction with Ethereum-based DeFi protocols.
5. Customizable Transaction Fees: Metamask allows users to set their own transaction fees based on network congestion, ensuring that transactions are processed in a timely manner. This flexibility helps optimize transaction costs and ensures a smooth user experience.
Overall, Metamask empowers users to fully leverage the potential of the Ethereum blockchain by providing them with a user-friendly and secure interface to interact with dApps, manage their assets, and participate in the decentralized finance (DeFi) ecosystem.
What is Avax?
Avax, also known as Avalanche, is a decentralized blockchain platform that aims to provide fast, secure, and scalable solutions for the creation and execution of blockchain applications. Built by a team of Cornell University researchers, Avax leverages a unique consensus mechanism called Avalanche, which allows the network to achieve consensus in a highly efficient manner.
One of the key features of Avax is its ability to support multiple virtual machines (VMs) and programming languages, making it flexible and compatible with a wide range of applications. Furthermore, Avax offers sub-second transaction finality, enabling interactions on the blockchain to occur almost instantly.
Avax’s native token, also called AVAX, is used for various purposes within the ecosystem, including paying for transaction fees, participating in network governance, and securing the network through staking. AVAX has a finite supply and is distributed through a combination of network validators and token sales.
Overall, Avax offers a promising solution for developers and users seeking to harness the full potential of blockchain technology. Its scalability, security, and interoperability make it a compelling choice for building decentralized applications and exploring the possibilities of the digital economy.
Getting Started
Before you can begin using Metamask to harness the potential of Avax, you will need to go through a few simple steps to get started.
Step 1: Install the Metamask extension in your preferred web browser. Metamask is compatible with popular browsers such as Chrome, Firefox, and Brave.
Step 2: Once the extension is installed, open it and create a new wallet. You will be asked to set a strong password, so make sure to choose a combination of uppercase and lowercase letters, numbers, and special characters.
Step 3: After creating your wallet, Metamask will provide you with a secret recovery phrase. This phrase is crucial for accessing your wallet in case you forget your password or lose access to your computer. Write down this phrase and keep it in a safe place.
Step 4: Next, you will need to choose the Avax network. Click on the network selection dropdown menu within the Metamask extension and select the “Custom RPC” option. Then, enter the following details:
- Network Name: Avax
- RPC URL: https://api.avax.network/ext/bc/C/rpc
- Chain ID: 43114
- Symbol: AVAX
- Block Explorer URL: https://cchain.explorer.avax.network/
Step 5: After setting up the Avax network, you are ready to start using Metamask to interact with Avax decentralized applications (dApps). You can now connect your Metamask wallet to any Avax dApp or use it to manage your AVAX tokens.
Remember to always keep your Metamask password and secret recovery phrase secure and never share them with anyone. With Metamask, you can confidently explore and leverage the full potential of Avax in a secure and user-friendly manner.
Installing Metamask
To use the potential of Avax and interact with decentralized applications (dApps) on the Avalanche network, you need to install the Metamask wallet extension. Metamask is a widely used Ethereum-compatible wallet that provides a user-friendly interface to manage your cryptocurrency assets and interact with dApps.
Follow these simple steps to install Metamask:
Step 1: Open your preferred web browser (Google Chrome, Firefox, or Brave) and go to the official Metamask website.
Step 2: Click on the “Get Chrome Extension” button or the appropriate button for your browser.
Step 3: You will be redirected to the respective web store. Click on the “Add to Chrome” button.
Step 4: A popup window will appear, asking for confirmation to add the extension. Click on the “Add extension” button to proceed.
Step 5: Once the extension is added, the Metamask icon will appear next to the address bar in your browser.
Step 6: Click on the Metamask icon to launch the wallet extension. You will be prompted to agree to the terms and conditions.
Step 7: Set up a new wallet by clicking on the “Create a Wallet” button and follow the instructions to create a strong password and backup phrase. It is important to store the backup phrase in a secure location, as it is the only way to recover your wallet.
Step 8: After setting up your wallet, you will be directed to the main Metamask interface. Here, you can add and manage multiple accounts, view your transaction history, and customize your settings.
That’s it! You have successfully installed Metamask and are ready to harness the potential of Avax and the Avalanche network.
Note: Metamask can also be installed as a mobile app on iOS and Android devices. The installation process may vary slightly depending on your device and browser of choice.
Creating a Metamask Wallet
Metamask is a digital wallet that allows you to store and manage your AVAX tokens. Follow these step-by-step instructions to create a new Metamask Wallet:
Step 1: Install Metamask
Download and install the Metamask extension for your web browser. It is available for Chrome, Firefox, and Brave browsers.
Step 2: Create a new wallet
Click on the Metamask icon in your browser’s toolbar to launch the extension. Click on “Create a Wallet” to start the process.
Step 3: Set a strong password
Choose a strong password for your Metamask wallet. Make sure it is unique and difficult to guess. Confirm the password to proceed.
Step 4: Backup your wallet
Metamask will display a secret backup phrase consisting of twelve random words. It is crucial to write down this backup phrase and keep it in a safe place. Click on “Next” to proceed.
Step 5: Confirm your backup phrase
To ensure you have correctly backed up your wallet, Metamask will ask you to select the words in the backup phrase in the correct order. This step helps verify that you have accurately recorded your backup phrase.
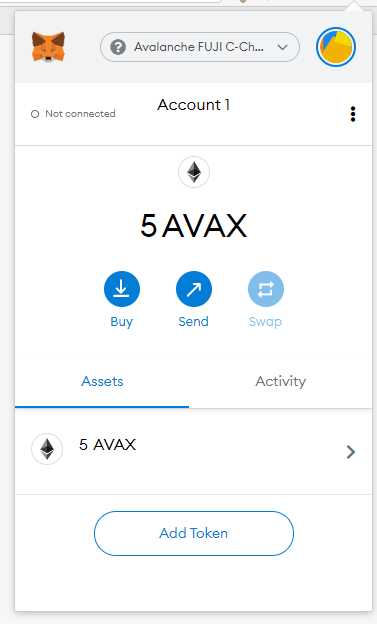
Step 6: Connect to a network
Metamask will prompt you to choose a network to connect to. Select the Avalanche Mainnet network from the list. This will allow you to interact with the AVAX tokens and other decentralized applications on Avalanche.
Step 7: Start using your Metamask wallet on Avalanche
Once you have completed the setup process, you are ready to use your Metamask wallet on Avalanche. You can now store, send, receive, and manage your AVAX tokens directly from your wallet.
Remember to always keep your Metamask wallet and backup phrase secure. Do not share your password or backup phrase with anyone, as it gives full access to your funds.
Note: The steps mentioned above are for creating a new Metamask wallet on the Avalanche network. If you already have a Metamask wallet, you can simply switch the network to Avalanche to start using AVAX tokens.
Connecting Metamask with Avax
In order to harness the potential of Avax and participate in the ecosystem, you’ll need to connect your Metamask wallet to the Avax network. Here’s a step-by-step guide on how to do it:
Step 1: Install Metamask
If you haven’t already, you’ll need to install the Metamask browser extension. Metamask is available for Google Chrome, Mozilla Firefox, and Brave browsers. Simply search for “Metamask” in your browser’s extension store and follow the installation instructions.
Step 2: Create a New Wallet or Import Existing Wallet
Once Metamask is installed, open the extension and either create a new wallet or import an existing one. Make sure to safely store your wallet’s seed phrase as it can be used to restore your wallet in case of loss or theft.
Step 3: Switch to Avax Network
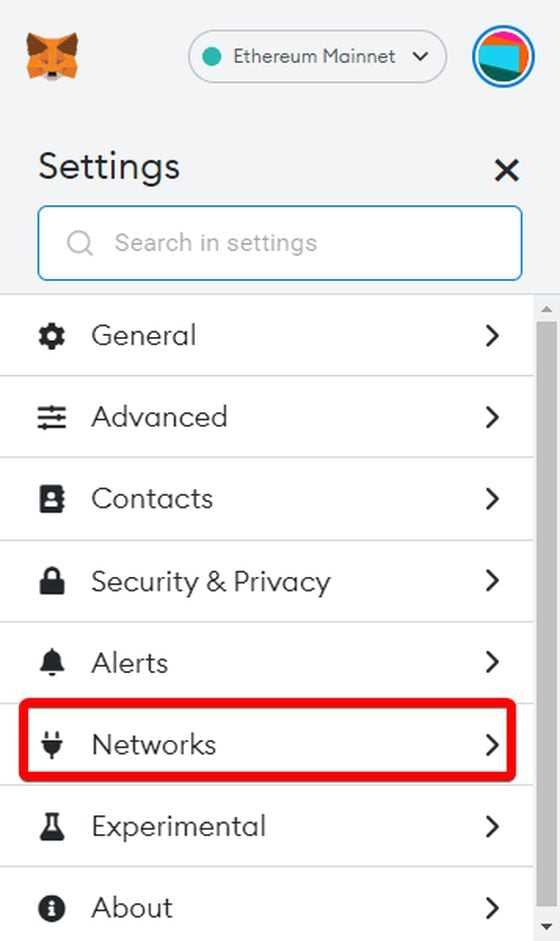
After setting up your wallet, click on the network dropdown menu in the top right corner of the Metamask extension. From the list of available networks, select “Custom RPC” to manually add the Avax network.
Step 4: Add Avax Network
- Enter “Avax Mainnet” as the network name.
- Copy and paste the Avax Mainnet RPC URL into the “New RPC URL” field: https://api.avax.network/ext/bc/C/rpc
- Leave the “Chain ID” field empty.
- Use “AVAX” as the symbol and “18” as the number of decimals.
- Click on the “Save” button to add the Avax network to Metamask.
Step 5: Switch to Avax Network
Once the Avax network is added, click on the network dropdown menu again and select “Avax Mainnet” from the list. Your Metamask wallet is now connected to the Avax network, and you can start taking advantage of the potential it offers.
Note: Make sure you have sufficient funds in your wallet to cover any transactions or fees on the Avax network, as they are separate from other Ethereum-based networks supported by Metamask.
Frequently Asked Questions:
What is Metamask?
Metamask is a browser extension wallet that allows users to interact with decentralized applications (dApps) on the Ethereum blockchain and other compatible networks.
+ There are no comments
Add yours