


Welcome to the comprehensive guide that will take you through the steps of unlocking the power of the Mumbai Testnet with Metamask. As an Ethereum developer, you understand the importance of testnets in ensuring the functionality and security of your smart contracts before deploying them onto the mainnet. Mumbai Testnet provides a valuable playground for developers like you to experiment, test, and fine-tune your applications without the risk of real funds.
In this guide, we will explore the various features and functionalities of the Mumbai Testnet and how you can utilize them effectively with Metamask, the popular Ethereum wallet and browser extension. We will walk you through the process of setting up Metamask for Mumbai Testnet, including creating a Mumbai Testnet account, configuring the network, and acquiring test Ether. We will also cover deploying and interacting with smart contracts on Mumbai Testnet using Metamask.
Whether you are a beginner looking to familiarize yourself with testnets or an experienced developer looking to leverage the capabilities of Mumbai Testnet, this comprehensive guide will provide you with the knowledge and skills necessary to unlock its full potential. By the end of this guide, you will be equipped with the tools and understanding to confidently develop, test, and deploy your Ethereum applications on the Mumbai Testnet using Metamask.
Unlocking the Power of Mumbai Testnet with Metamask

The Importance of Testnets
Testnets play a crucial role in the Ethereum ecosystem. They provide developers with a safe environment to test their smart contracts before deploying them onto the mainnet. Mumbai Testnet, a sidechain of Ethereum, is a popular testnet that offers developers the opportunity to experiment and refine their applications without the risk of real transactions or funds.
Introducing Metamask
Metamask is a popular Ethereum wallet and browser extension that allows users to interact with decentralized applications (dApps) directly from their web browsers. It provides a user-friendly interface to manage Ethereum accounts, sign transactions, and securely store private keys. With Metamask, developers can easily switch between different networks, including the Mumbai Testnet.
Unlocking Mumbai Testnet with Metamask
To unlock the power of Mumbai Testnet with Metamask, follow these steps:
- Install the Metamask browser extension if you haven’t already.
- Create a new Ethereum account or import an existing one into Metamask.
- Open the Metamask extension and click on the network dropdown at the top of the window.
- Select “Custom RPC” from the options.
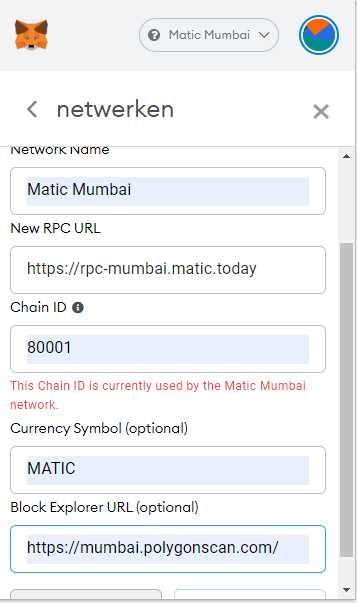
- In the “New Network” tab, enter the following details:
- Network Name: Mumbai Testnet
- New RPC URL: https://rpc-mumbai.matic.today
- ChainID: 80001
- Symbol: MATIC
- Block Explorer URL: https://explorer-mumbai.maticvigil.com
- Click “Save” to add the Mumbai Testnet to your Metamask network list.
- Back in the Metamask extension, click on the network dropdown again and select “Mumbai Testnet” from the list.
With these simple steps, you have successfully unlocked the power of Mumbai Testnet with Metamask. You can now interact with dApps deployed on Mumbai Testnet, test smart contracts, and experiment with different functionalities without risking your real funds.
Conclusion
Mumbai Testnet, coupled with the user-friendly experience provided by Metamask, offers developers a powerful environment to build and test their Ethereum applications. By following the steps outlined in this guide, you can start harnessing the power of Mumbai Testnet and bring your ideas to life on a safe and efficient testing ground. Happy coding!
A Comprehensive Guide for Ethereum Developers
Ethereum is a powerful blockchain platform that enables developers to build decentralized applications (DApps) and smart contracts. With its robust network and growing community, Ethereum has become a go-to choice for developers looking to build innovative solutions in the blockchain space.
If you are an aspiring Ethereum developer or want to enhance your skills in this field, this comprehensive guide is for you. In this guide, we will take you through the essentials of Ethereum development, covering everything from setting up your development environment to deploying smart contracts on the Ethereum network.
Getting Started:
Before diving into Ethereum development, you need to set up a development environment on your machine. This typically involves installing the necessary software tools and libraries, such as Node.js, Truffle, and Ganache. We will walk you through each step of this setup process.
Smart Contract Development:
Smart contracts are self-executing contracts with the terms of the agreement directly written into code. They automatically execute when predefined conditions are met. In this section, we will guide you through the process of writing, compiling, and deploying smart contracts using the Solidity programming language. We will also cover best practices for secure smart contract development.
Interacting with Smart Contracts:
Once you have deployed your smart contract, you need to interact with it to test its functionality and perform transactions. We will show you how to use Web3.js and Metamask to connect to the Ethereum network and interact with your smart contracts using JavaScript. We will also cover topics such as event handling and asynchronous calls.
Building DApps:
Decentralized applications (DApps) are one of the key use cases for Ethereum. In this section, we will guide you through the process of building a simple DApp using Ethereum, HTML, CSS, and JavaScript. You will learn how to integrate your smart contracts with a user-friendly web interface and provide a seamless user experience.
Testing and Deployment:
Testing is an integral part of the development process. We will introduce you to various testing frameworks and methodologies for testing Ethereum smart contracts and DApps. Additionally, we will cover the process of deploying your smart contracts and DApps to the Ethereum mainnet or testnet.
Security and Best Practices:
Security is of utmost importance when it comes to blockchain development. We will discuss common security vulnerabilities and best practices to follow in Ethereum development, including contract upgradability, access control, and handling user input.
By the end of this comprehensive guide, you will have a solid foundation in Ethereum development and be ready to start building your own projects on the Ethereum network. Whether you are a beginner or an experienced developer, this guide will equip you with the knowledge and skills needed to unlock the power of Ethereum.
Getting Started with the Mumbai Testnet
The Mumbai Testnet is a powerful tool for Ethereum developers to test and deploy their smart contracts before moving to the mainnet. It is a test network specifically designed for the Polygon ecosystem, providing developers with a sandbox environment to experiment and ensure the functionality and security of their applications. In this guide, we will walk you through the steps to get started with the Mumbai Testnet using the Metamask wallet.
Step 1: Install Metamask
To begin, you need to install the Metamask wallet extension on your web browser. Metamask is a popular Ethereum wallet that allows you to manage your Ethereum accounts and interact with decentralized applications (dApps). It is available as a browser extension for Chrome, Firefox, and Brave. Simply search for “Metamask” in your browser’s extension store and follow the installation instructions.
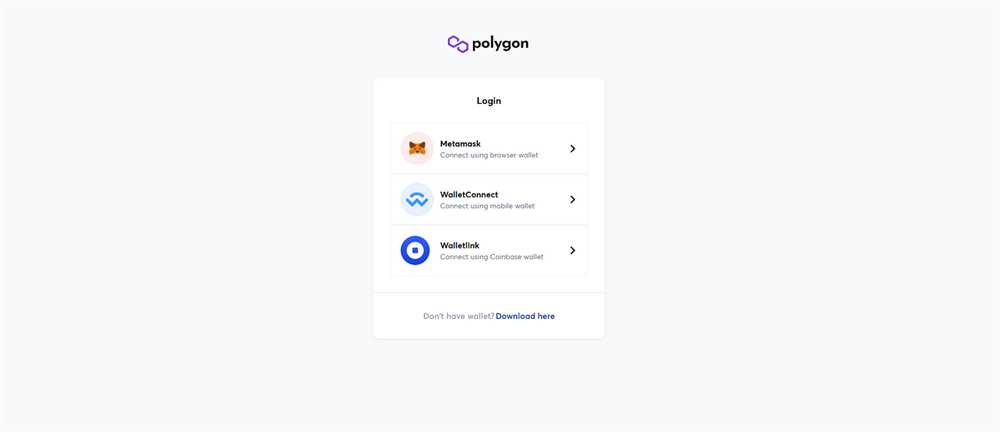
Step 2: Create or Import an Account
Once you have installed Metamask, open the wallet and create a new account or import an existing one. If you are creating a new account, make sure to securely store your seed phrase as it is the key to accessing your funds. If you are importing an account, you will need your private key or JSON file. Metamask supports multiple Ethereum networks, including the Mumbai Testnet.
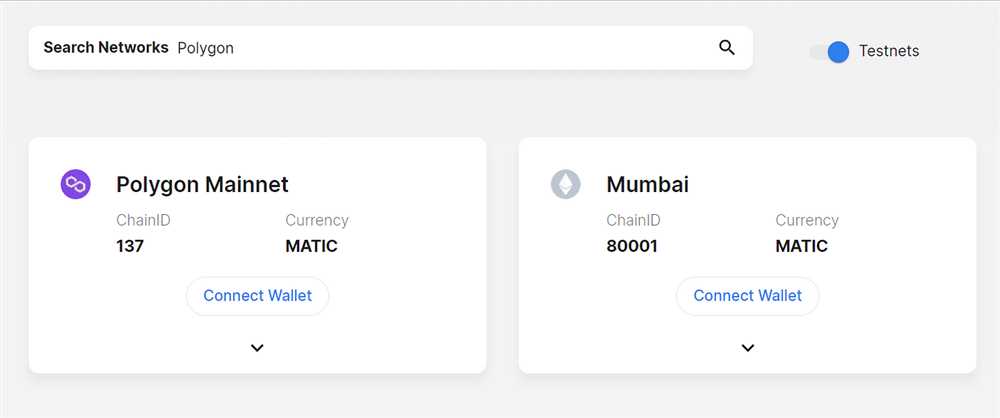
Step 3: Switch to the Mumbai Testnet
After setting up your account, it’s time to switch to the Mumbai Testnet. Click on the network dropdown in the top-right corner of the Metamask wallet interface, and select “Custom RPC” to manually add a network. In the network settings, enter the following details:
| Network Name: | Mumbai Testnet |
| New RPC URL: | https://rpc-mumbai.matic.today |
| Chain ID: | 80001 |
| Symbol: | MATIC |
Save the network settings and you will now be connected to the Mumbai Testnet. You can verify this by checking that the network name and symbol are displayed correctly in the Metamask wallet interface.
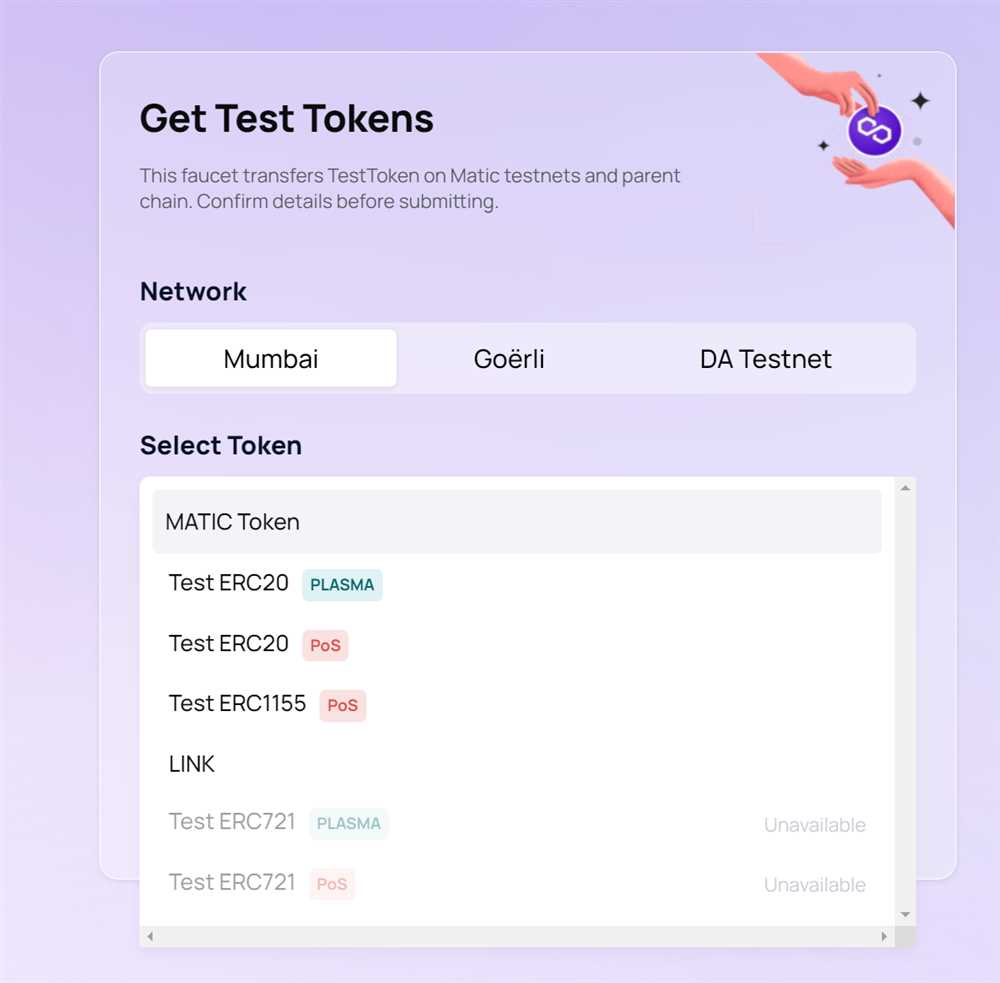
Step 4: Obtain Testnet MATIC

In order to interact with the Mumbai Testnet, you will need some testnet MATIC tokens. These tokens are used to pay for gas fees and test the functionality of your smart contracts. You can obtain testnet MATIC from the Polygon Faucet, a service that provides free tokens for testing purposes. Simply visit the Polygon Faucet website, enter your Ethereum address, and click on the “Request” button to receive testnet MATIC to your Metamask account.
Step 5: Start Developing on the Mumbai Testnet
With your Metamask wallet configured for the Mumbai Testnet and testnet MATIC in your account, you are now ready to start developing on the Mumbai Testnet. You can write and deploy your smart contracts, interact with existing dApps, and test the functionality of your applications in a safe and controlled environment. Remember to always double-check your transactions and contract addresses before executing them on the mainnet to avoid any costly mistakes.
Happy developing on the Mumbai Testnet!
Supercharging Your Ethereum Development with Metamask
If you’re an Ethereum developer, you’re probably familiar with the immensely powerful tool called Metamask. Metamask is a browser extension that allows users to interact with Ethereum decentralized applications (dApps) without having to run a full Ethereum node.
With Metamask, you can:
- Manage multiple Ethereum accounts and switch between them with ease.
- Connect to different Ethereum networks, such as the Ethereum mainnet, testnets, or private networks.
- Send and receive Ether and other ERC-20 tokens.
- Interact with smart contracts and execute transactions.
- Sign messages and verify signatures.
- Import and export account keys securely.
- Browse and interact with dApps seamlessly.
Metamask provides a user-friendly interface that makes it easy for developers to integrate Ethereum functionality into their web applications. It provides a web3.js provider, which allows developers to interact with the Ethereum blockchain directly from their applications.
By leveraging the power of Metamask, you can save time and effort in setting up and managing your own Ethereum node. It also eliminates the need for users to install additional software, making it more convenient for them to use your dApp.
Whether you’re building a decentralized finance (DeFi) application, a decentralized marketplace, or any other type of Ethereum-based dApp, Metamask is an essential tool that can greatly speed up your development process.
In this comprehensive guide, we’ll dive deep into the features and functionalities of Metamask, and show you how to utilize its full potential to supercharge your Ethereum development.
Frequently Asked Questions:
How can I unlock the power of Mumbai Testnet with Metamask?
To unlock the power of Mumbai Testnet with Metamask, follow these steps:
1. Install Metamask extension in your browser
2. Create a wallet and set up your password
3. Click on the Metamask icon in your browser to open the extension
4. Change the network from Ethereum Mainnet to Mumbai Testnet
5. Click on the account icon to select your account
6. You’re now connected to Mumbai Testnet and can start testing and developing your Ethereum applications.
What is Mumbai Testnet and why should Ethereum developers use it?
Mumbai Testnet is a test network for Ethereum developers built by the Polygon team. It is designed to closely mimic the Ethereum Mainnet environment but without the need to spend real Ether. Developers should use Mumbai Testnet for testing and developing their applications because it allows them to experiment, identify and fix any issues or bugs before deploying their smart contracts and applications to the Ethereum Mainnet. It is a safe and cost-effective way to develop and test Ethereum applications.
Can I use Mumbai Testnet with other Ethereum development tools?
Yes, you can use Mumbai Testnet with other Ethereum development tools. Once you have connected to Mumbai Testnet using Metamask, you can use any Ethereum development tool that supports custom networks. Some popular development tools that can be used with Mumbai Testnet include Remix, Truffle, Hardhat, and Ganache. These tools will allow you to write, compile, deploy, and test your smart contracts on the Mumbai Testnet network.
+ There are no comments
Add yours