


Transferring Ethereum (ETH) from Coinbase to MetaMask is a seamless process that allows you to easily access and utilize your Ethereum tokens in the MetaMask wallet. Whether you’re new to cryptocurrency or a seasoned investor, this detailed step-by-step guide will help you navigate the transfer process smoothly.
MetaMask is a popular browser extension that serves as a digital wallet for Ethereum and other cryptocurrencies. It provides a convenient way to interact with decentralized applications (DApps) and manage your Ethereum tokens.
Before you begin the transfer, make sure you have both a Coinbase account with Ethereum and the MetaMask extension installed in your browser. Once you have these prerequisites in place, you can proceed with the following steps to transfer your ETH from Coinbase to MetaMask.
Step 1: Copy your MetaMask wallet address
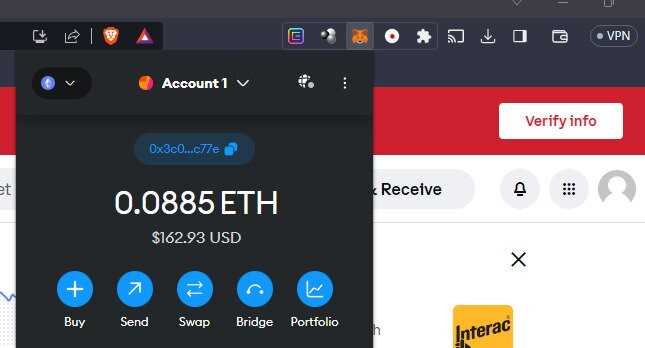
Open MetaMask in your browser and click on the account you want to receive the ETH transfer. Click on the three dots (…) icon and select “Copy Address” to copy your wallet address to the clipboard. This will be the address where you will receive the ETH from Coinbase.
Step 1: Setting up Coinbase and MetaMask accounts
Before you can transfer ETH from Coinbase to MetaMask, you need to make sure you have accounts on both platforms. Here’s a step-by-step guide on setting up Coinbase and MetaMask accounts:
Creating a Coinbase account
To get started, visit the Coinbase website and click on the “Get started” button to create a new account. You will be asked to provide your email address, create a password, and complete a verification process to secure your account. Once you have successfully created your Coinbase account, you can proceed to the next step.
Installing MetaMask
To use MetaMask, you’ll need to add it as an extension to your browser. Follow these steps to install MetaMask:
- Open your preferred browser (e.g., Google Chrome, Mozilla Firefox) and search for the MetaMask extension.
- Click on the official MetaMask website (metamask.io) to add the extension.
- Click on the “Get Started” button and choose the browser you are using.
- Click “Add to Chrome” (or the respective button for your browser) to add the MetaMask extension.
- Follow the prompts to install and set up MetaMask, including creating a new password and agreeing to the terms of use.
Once you have successfully installed MetaMask, you will see the MetaMask icon in your browser’s toolbar. Click on the icon to launch MetaMask and proceed to the next step.
Step 2: Generating a MetaMask wallet address
After installing the MetaMask extension on your browser, follow these steps to generate a wallet address:
1. Click on the MetaMask icon located in the top-right corner of your browser window.
2. You will be prompted to set up your MetaMask wallet. Click on the “Get Started” button to continue.
3. In the next window, you will be presented with the option to either import an existing wallet or create a new one. Since we are generating a new address, click on the “Create a Wallet” button.
4. Set a strong password for your MetaMask wallet and click on the “Create” button.
5. You will be shown a secret backup phrase. It is crucial to write down this backup phrase and store it in a safe and secure place. Click on “Next” once you have done this.
6. Confirm the backup phrase by selecting the words in the order they appear. This step is to ensure that you have correctly backed up your wallet. Click on “Confirm” once you have verified this.
7. Congratulations! You have successfully set up your MetaMask wallet and generated a wallet address. You can now view your wallet address by clicking on the account icon located in the top-right corner of the MetaMask extension window.
8. Copy your wallet address by clicking on the copy button next to it. You will need this address in the next step to transfer ETH from Coinbase to your MetaMask wallet.
By following these steps, you have successfully generated a MetaMask wallet address that can be used to receive ETH from Coinbase.
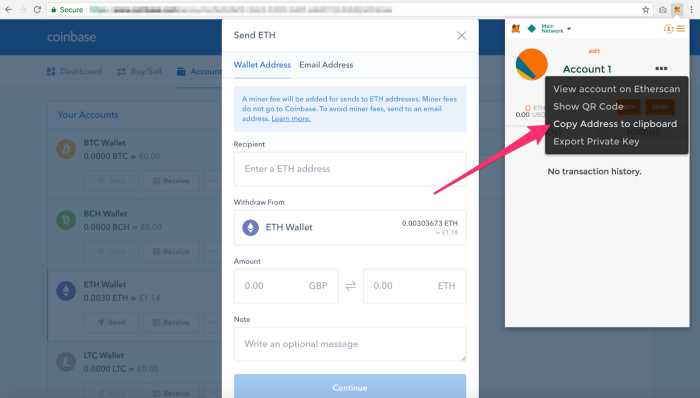
Step 3: Withdrawing ETH from Coinbase to MetaMask

Now that you have set up your MetaMask wallet and obtained the necessary wallet address, it’s time to transfer your ETH from Coinbase to MetaMask. Follow the steps below to complete the withdrawal:
Step 1:
Open your Coinbase account and log in.
Step 2:
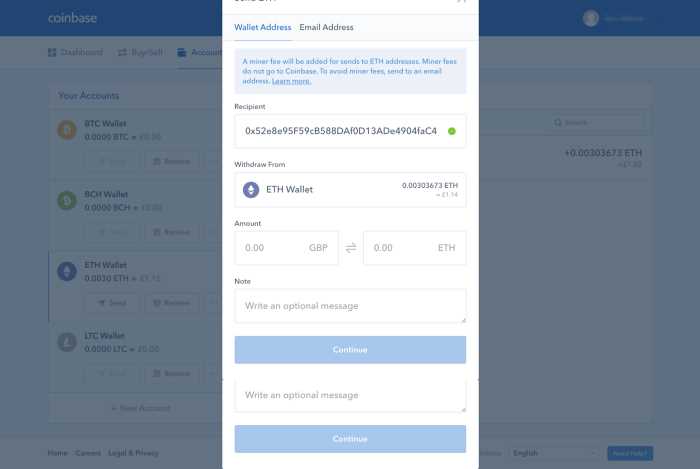
Once logged in, navigate to the “Accounts” section of your Coinbase dashboard.
Step 3:
Locate the Ethereum wallet linked to your Coinbase account. Click on the “Send” button associated with this wallet.
Step 4:
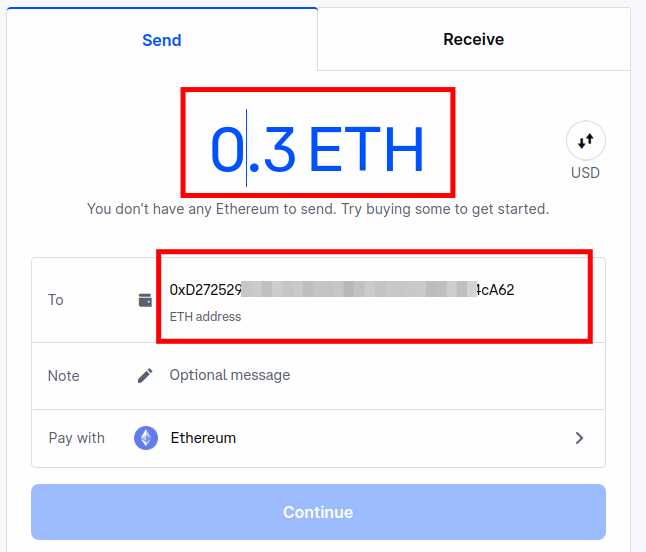
In the “Recipient” field of the withdrawal form, paste the wallet address copied from your MetaMask account. Double-check to ensure that the address is correct, as cryptocurrency transactions are irreversible.
Step 5:
Enter the amount of ETH you wish to withdraw from Coinbase to MetaMask. You can either enter the amount in ETH or the equivalent amount in your local currency.
Step 6:
Review the transaction details, including the withdrawal fee, and ensure everything is accurate. Take note of the fee as it will be deducted from your total amount.
Step 7:
Click the “Confirm” or “Send” button to initiate the withdrawal. Coinbase may send you an email or SMS verification code to confirm the transaction, so keep an eye out for any additional prompts.
Step 8:
After the withdrawal is confirmed and processed by Coinbase, your ETH will be transferred from your Coinbase wallet to your MetaMask wallet. The transaction may take a few moments to be completed, depending on the current network congestion.
Once the transfer is complete, you will be able to view your ETH balance in your MetaMask wallet. You can now use your ETH for various decentralized applications (DApps) and transactions.
Note: It’s always a good practice to keep a record of your transaction details, such as transaction ID or hash, for future reference.
Step 4: Verifying the transfer in MetaMask
Once the ETH transfer is initiated from Coinbase, you need to verify and confirm the transaction in your MetaMask wallet. Follow these steps to complete the verification process:
- Open the MetaMask extension by clicking on the MetaMask icon in your browser.
- If prompted, enter your password to unlock your MetaMask wallet.
- In the MetaMask interface, click on the “Activity” tab.
- Scroll through the list of recent transactions and look for the one that matches the ETH transfer from Coinbase.
- Check that the transaction details, such as the sender, recipient, and amount, match the transfer you initiated on Coinbase.
- Review the gas fee associated with the transaction. This fee is paid to miners and is necessary for the transfer to be processed on the Ethereum network.
- Click on the transaction to view more details, if needed.
- If everything looks correct, click on the “Confirm” button to complete the transaction.
- Wait for the transaction to be successfully confirmed on the Ethereum network. This process may take a few minutes, depending on network congestion.
Once the transfer is confirmed, the ETH will be available in your MetaMask wallet, and you can use it for various purposes within the Ethereum ecosystem.
Frequently Asked Questions:
Can I transfer ETH from Coinbase to MetaMask?
Yes, you can transfer ETH from Coinbase to MetaMask. MetaMask is a digital wallet that allows you to store and manage your Ether and ERC-20 tokens.
What is the process to transfer ETH from Coinbase to MetaMask?
The process to transfer ETH from Coinbase to MetaMask involves copying your MetaMask wallet address, logging into your Coinbase account, selecting your Ethereum wallet, clicking on the “Send” button, entering your MetaMask wallet address, specifying the amount of ETH to transfer, and confirming the transaction.
Is it necessary to have a MetaMask wallet to transfer ETH from Coinbase?
Yes, it is necessary to have a MetaMask wallet to transfer ETH from Coinbase. MetaMask is a digital wallet that acts as a bridge between your browser and the Ethereum blockchain, allowing you to interact with decentralized applications (dApps) and securely manage your Ether and ERC-20 tokens.
Are there any fees associated with transferring ETH from Coinbase to MetaMask?
Yes, there are fees associated with transferring ETH from Coinbase to MetaMask. Coinbase charges a network fee for sending ETH, while MetaMask also charges gas fees for executing transactions on the Ethereum network. The fees can vary depending on network congestion and other factors.
Can I transfer other cryptocurrencies from Coinbase to MetaMask?
No, you cannot directly transfer other cryptocurrencies from Coinbase to MetaMask. MetaMask primarily supports Ether and ERC-20 tokens. If you want to transfer other cryptocurrencies, you would need to convert them to ETH or an ERC-20 token first and then transfer them to MetaMask.
+ There are no comments
Add yours