


Are you a crypto enthusiast and want to send your CRO tokens to your Metamask wallet? Look no further! In this step-by-step guide, we will walk you through the process of sending CRO to your Metamask wallet. Whether you are new to crypto or a seasoned pro, this guide will provide you with easy-to-follow instructions to complete the transaction smoothly.
Before we begin, make sure you have a valid CRO wallet address and the necessary amount of CRO tokens in your wallet. If you don’t have a Metamask wallet, you can easily install and set it up in no time. Once you are all set, follow the steps below to send your CRO tokens to your Metamask wallet.
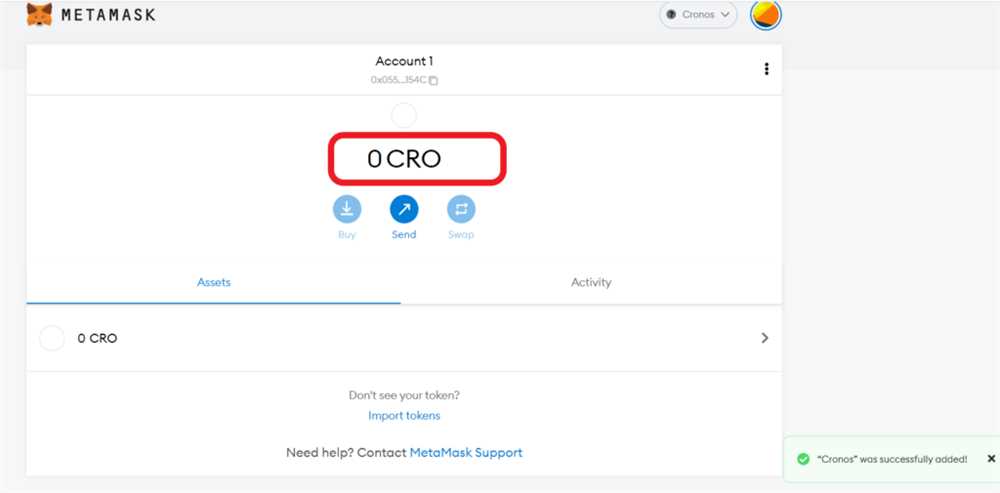
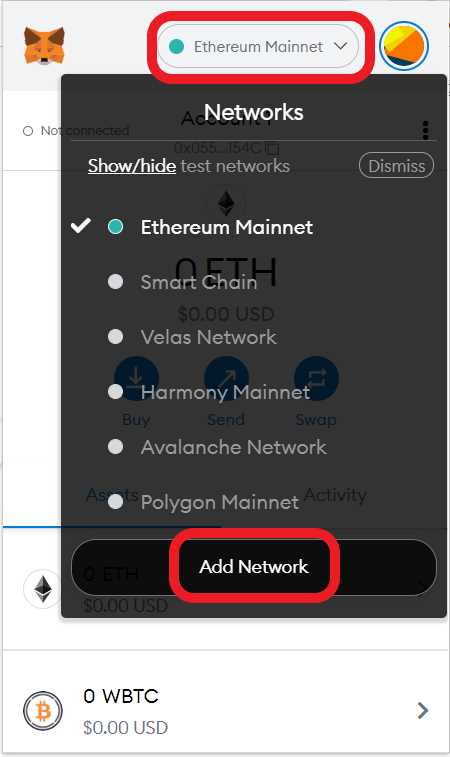
Step 1: Open your Metamask wallet and make sure you are on the main dashboard. If you haven’t connected your wallet to the desired network, select the network you wish to use (e.g. Ethereum mainnet or Binance Smart Chain).
Step 2: Click on the “Assets” tab in your Metamask wallet and then select “Add Token”.
Step 3: In the “Add Token” window, choose the “Custom Token” tab and enter your CRO token contract address. You can easily find the contract address on a reliable token explorer or from the token issuer’s official website.
Step 4: Once you have entered the contract address, Metamask should automatically fetch the token details, including the token symbol (CRO) and decimals. Verify that the information displayed is correct and click on the “Next” button.
Step 5: In the next window, you will be asked to confirm the addition of the CRO token to your Metamask wallet. Click on the “Add Tokens” button to proceed.
Step 6: Congratulations! You have successfully added the CRO token to your Metamask wallet. You will now see the CRO token listed under the “Assets” tab.
Step 7: To send CRO tokens from your CRO wallet to your Metamask wallet, click on the “Send” button in your CRO wallet.
Step 8: In the “Send” window, enter your Metamask wallet address in the “Recipient Address” field. Double-check the address to ensure it is correct.
Step 9: Enter the amount of CRO tokens you wish to send in the “Amount” field. You can choose to send a specific amount or the entire balance.
Step 10: Review the transaction details carefully, including the transaction fee, and click on the “Send” button to initiate the transfer.
Step 11: Wait for the transaction to be confirmed on the blockchain. Once it is confirmed, you will see the CRO tokens in your Metamask wallet under the “Assets” tab.
And that’s it! You have successfully sent CRO tokens to your Metamask wallet. Now you can enjoy all the benefits of using your CRO tokens within the Metamask ecosystem. Remember to keep your wallet secure and never share your private keys with anyone.
Note: The steps mentioned above are applicable for sending CRO tokens to Metamask from any CRO wallet. The process may vary slightly for different crypto wallets, but the overall concept remains the same.
A Step-by-Step Guide to Sending CRO to MetaMask
MetaMask is a popular cryptocurrency wallet that allows users to store, manage, and interact with various cryptocurrencies. If you are a crypto enthusiast and want to send CRO tokens to your MetaMask wallet, follow these simple steps:
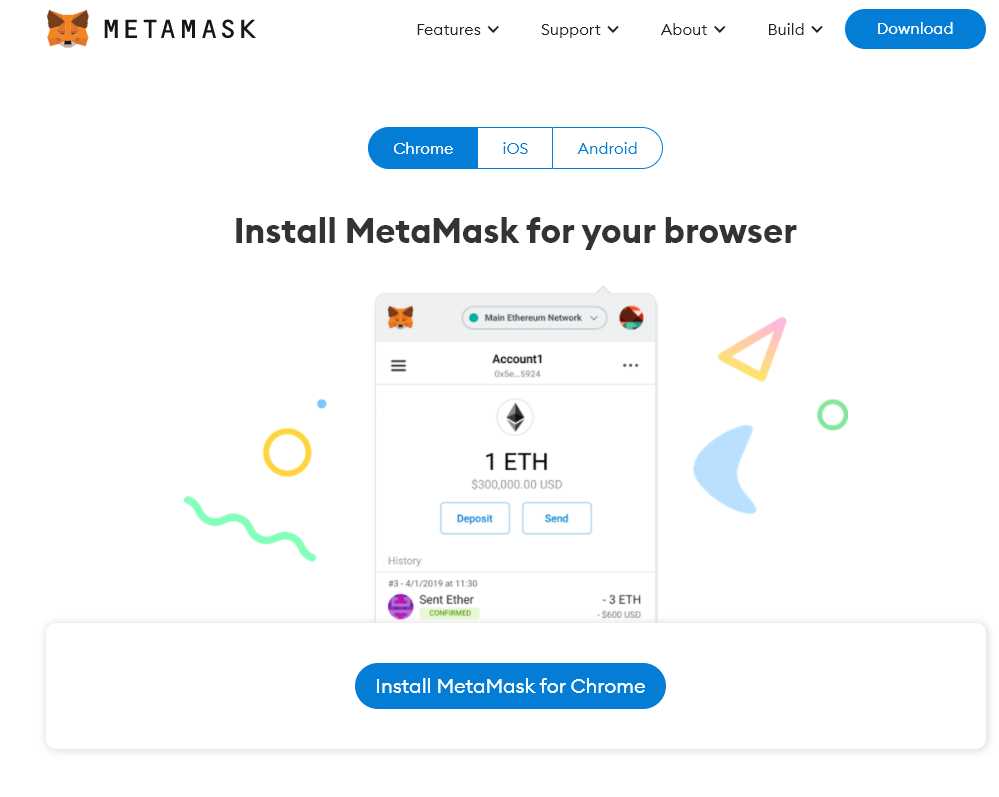
Step 1: Install MetaMask

First, make sure you have MetaMask installed on your browser. If you haven’t installed it yet, visit the MetaMask website, download the extension, and follow the installation instructions.
Step 2: Create or Import a Wallet
If you don’t have a MetaMask wallet yet, you need to create one. Click on the MetaMask extension icon in your browser toolbar, and select “Create a Wallet”. Follow the prompts to set up a password and save your seed phrase securely.
If you already have a MetaMask wallet, skip this step and proceed to the next one.
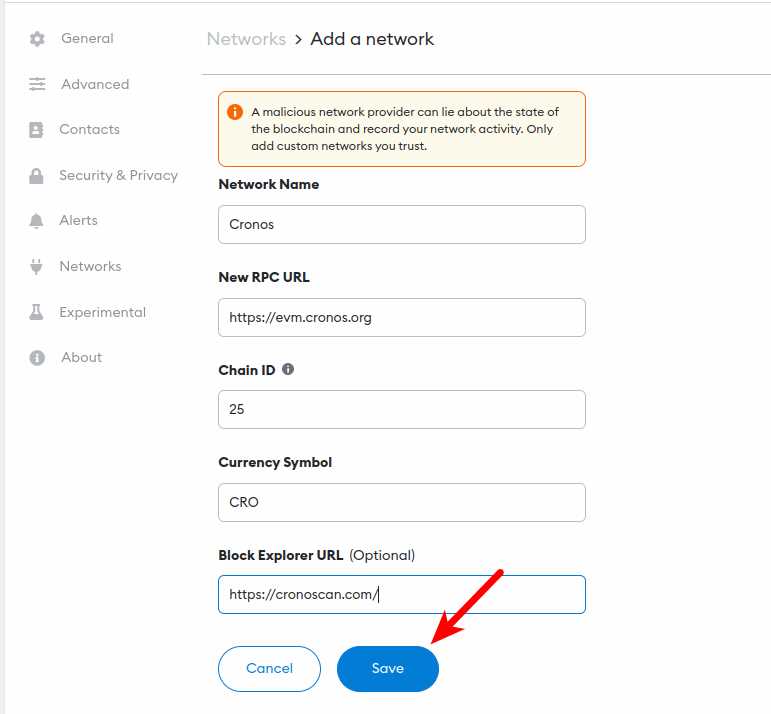
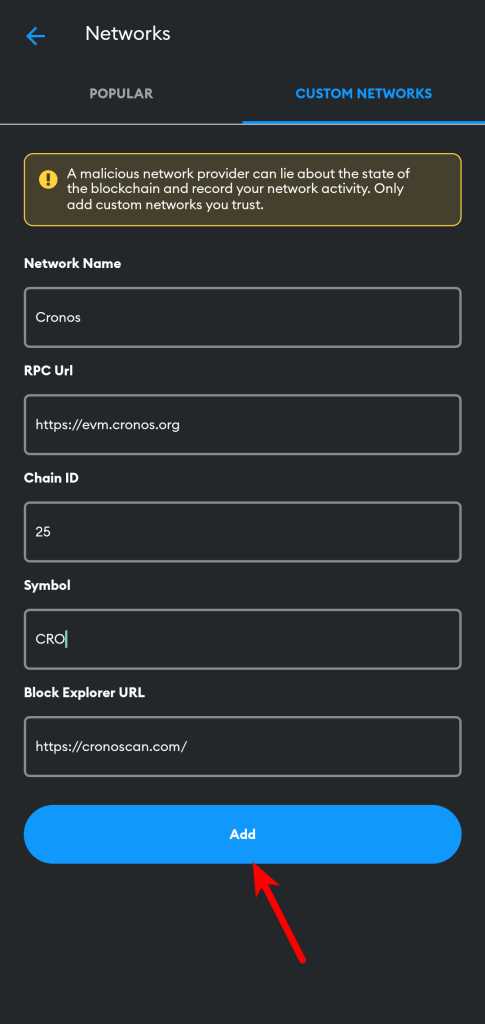
Step 3: Add CRO to MetaMask
Once you have MetaMask set up, you need to add the CRO token to your wallet. Open the MetaMask extension, select the “Assets” tab, and click on “Add Token”. Then, choose the “Custom Token” tab, and enter the following details:
- Token Contract Address: [Enter the contract address for CRO]
- Token Symbol: CRO
- Decimals of Precision: 8
Click on “Next” and then “Add Tokens” to add the CRO token to your MetaMask wallet.
Step 4: Obtain CRO Wallet Address
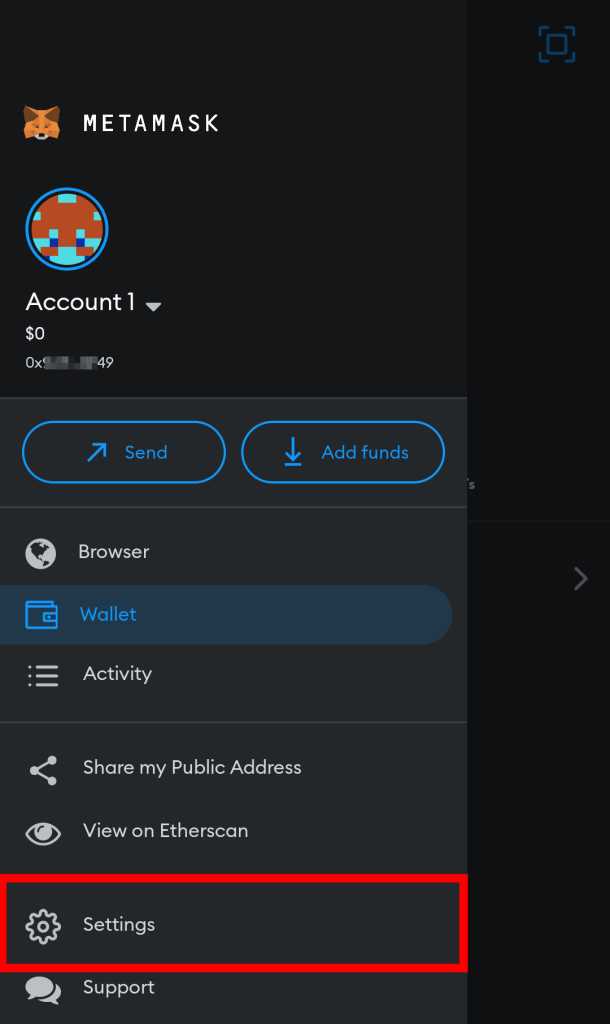
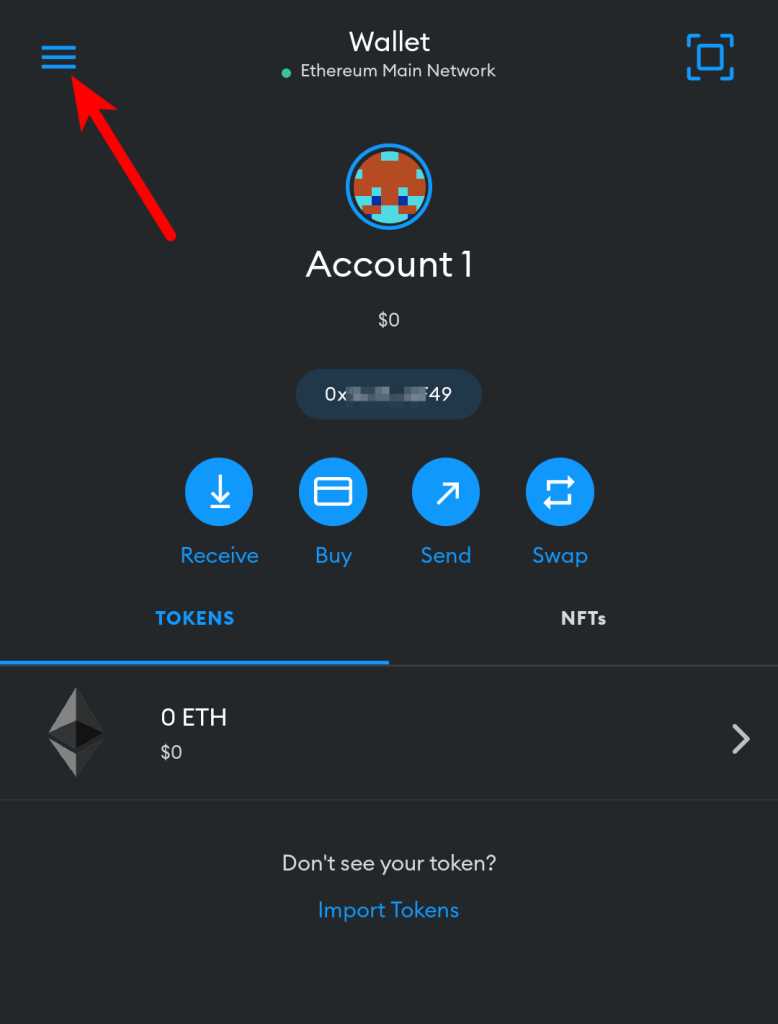
In order to send CRO tokens to your MetaMask wallet, you need to obtain your wallet address. Open the MetaMask extension and click on the account icon. Your wallet address will be displayed under “Account 1”. Copy this address to your clipboard.
Step 5: Send CRO to MetaMask
Now that you have your CRO wallet address, you can send CRO tokens to your MetaMask wallet from another wallet or exchange. Open the wallet or exchange from which you want to send CRO, navigate to the withdrawal or send funds section, and paste your MetaMask wallet address as the recipient. Enter the amount of CRO you want to send and click on “Send”. Confirm the transaction and wait for it to be processed.
That’s it! You have successfully sent CRO tokens to your MetaMask wallet. You can now use your CRO tokens for various transactions and interactions within the MetaMask ecosystem.
Easy Instructions for Crypto Enthusiasts
If you are a crypto enthusiast looking to send CRO to Metamask, follow these easy step-by-step instructions:
- First, open your Metamask wallet and make sure you have enough CRO in your account.
- Go to the “Transfer” or “Send” option in your Metamask wallet.
- Copy the recipient’s wallet address. Make sure to double-check the address to prevent any mistakes.
- In your Metamask wallet, enter the recipient’s wallet address in the appropriate field.
- Specify the amount of CRO you want to send. Take note of any applicable transaction fees.
- Review the transaction details and ensure all the information is correct.
- Click the “Send” button to initiate the transfer.
- Wait for the transaction to be confirmed on the blockchain. This may take some time depending on the network congestion.
- Once the transaction is confirmed, you have successfully sent CRO to the recipient’s Metamask wallet!
Remember to always exercise caution and double-check all the details before sending any crypto. Once a transaction is confirmed on the blockchain, it cannot be reversed.
Following these easy instructions will ensure a smooth and secure transfer of CRO to Metamask. Happy crypto sending!
Setting Up MetaMask Wallet
MetaMask is a popular cryptocurrency wallet that allows users to securely store and manage their digital assets. Follow these steps to set up your MetaMask wallet:
Step 1: Installing MetaMask
To get started, visit the MetaMask website or search for MetaMask in the Chrome Web Store. Click on the “Add to Chrome” button to install the MetaMask extension for your browser.
Step 2: Creating a New Wallet
Once MetaMask is installed, the extension icon will appear in the top right corner of your browser. Click on the icon and select “Create a Wallet” to begin the wallet creation process.
Follow the prompts to set up a new wallet by creating a password and accepting the terms and conditions. Make sure to choose a strong password and write it down in a secure location.
Step 3: Backing Up Your Seed Phrase
After creating your wallet, MetaMask will display a unique 12-word seed phrase. This phrase is crucial for recovering your wallet if you ever forget your password or lose access to your device.
Write down the seed phrase and keep it in a safe place. Do not store it digitally or share it with anyone. This phrase is the key to your wallet, so treat it with extreme caution.
Step 4: Confirming Your Seed Phrase
To ensure that you have correctly written down your seed phrase, MetaMask will ask you to confirm it in the next step. Click on the words in the correct order to confirm your seed phrase.
Once you have confirmed your seed phrase, your MetaMask wallet will be fully set up and ready to use. You can now start managing your cryptocurrencies and interact with decentralized applications (DApps) on the Ethereum blockchain.
Step 5: Funding Your Wallet
Before you can send CRO to your MetaMask wallet, you will first need to fund it with some Ether (ETH) to cover transaction fees. You can purchase Ether from various cryptocurrency exchanges or transfer it from another wallet.
Once your wallet is funded, you can proceed with sending CRO to your MetaMask wallet by following the step-by-step guide provided in the article.
| Wallet Address | Copy the wallet address provided by MetaMask to receive CRO |
|---|---|
| Network | Select the Ethereum network in MetaMask to send and receive CRO |
By following these simple steps, you can easily set up your MetaMask wallet and start interacting with the world of cryptocurrencies.
Create a Secure Crypto Wallet
In the world of cryptocurrencies, security should always be a top priority. When dealing with valuable digital assets, it is crucial to create a secure crypto wallet to safeguard your funds from potential threats. Follow these steps to ensure the safety of your digital assets:
Step 1: Choose a Reliable Wallet Provider
The first step in creating a secure crypto wallet is to choose a trusted and reliable wallet provider. Look for providers that have a proven track record, positive user reviews, and strong security measures in place.
Step 2: Set Up Two-Factor Authentication (2FA)
To add an extra layer of security to your crypto wallet, enable two-factor authentication (2FA). This ensures that even if someone manages to get access to your password, they will still need a second form of verification, such as a code sent to your mobile device, to gain entry.
Step 3: Use a Strong Password
When setting up your crypto wallet, it is essential to create a strong and unique password. Avoid using common phrases or easily guessable information. Instead, use a combination of uppercase and lowercase letters, numbers, and special characters to make your password as secure as possible.
Step 4: Keep Your Wallet Software Updated
Regularly update your crypto wallet software to ensure you have the latest security patches and bug fixes. Wallet providers often release updates to address any vulnerabilities that may be discovered, so staying up to date is vital for maintaining the security of your funds.
Step 5: Backup Your Wallet
Always create a backup of your crypto wallet and store it in a secure location. This backup should include your private keys or seed phrase, which are necessary for recovering your funds if your wallet is lost or compromised. Consider using an offline storage option, such as a hardware wallet or a paper wallet, for additional security.
By following these steps and implementing strong security measures, you can create a secure crypto wallet that protects your digital assets from potential threats and ensures peace of mind while engaging in the world of cryptocurrencies.
Obtaining CRO Tokens
In order to send CRO tokens to your Metamask wallet, you first need to obtain the tokens. Here is a step-by-step guide on how to do it:
1. Create an account on a reputable cryptocurrency exchange platform that supports CRO trading.
2. Complete the required identity verification process, which typically involves providing personal information and supporting documents.
3. Deposit funds into your exchange account. This can usually be done by linking your bank account or by transferring funds from another cryptocurrency wallet.
4. Find the CRO trading pair on the platform and place a buy order for the desired amount of CRO tokens.
5. Wait for the buy order to be filled, and ensure that the CRO tokens appear in your exchange wallet.
6. Once you have obtained the CRO tokens, you can proceed to send them to your Metamask wallet using the wallet address provided by Metamask.
Note: It is important to double-check the wallet address before initiating the transfer to avoid any errors or loss of funds. Always copy and paste the address to ensure accuracy.
How to Acquire CRO
Acquiring CRO (Crypto.com Coin) is a straightforward process that involves a few simple steps. Follow the guide below to get started:
Step 1: Create an Account
The first step in acquiring CRO is to create an account on the Crypto.com platform. Visit their website and click on the “Sign Up” button to get started. Fill in the required information and complete the verification process.
Step 2: Deposit Fiat Currency or Crypto
Once your account is set up, you’ll need to deposit funds to purchase CRO. Crypto.com accepts both fiat currency and various cryptocurrencies. You can deposit funds using a bank transfer, credit/debit card, or by transferring crypto from another wallet.
Step 3: Navigate to the CRO Market
After you have funded your account, navigate to the platform’s marketplace and locate the CRO market. This is where you can buy CRO with your deposited funds. Check the current market price and decide on the amount you wish to purchase.
Step 4: Place an Order
Once you have determined the amount of CRO you want to acquire, place an order by specifying the amount and the price you are willing to pay. You can choose between a market order or a limit order depending on your preference.
Step 5: Confirm the Order and Complete the Purchase
Review the details of your order and confirm that everything is correct. Once you are satisfied, click on the “Buy” button to complete the purchase. The CRO tokens will be added to your account balance.
Step 6: Secure Your CRO
After acquiring CRO, it is crucial to secure your tokens. Consider transferring them to a hardware wallet like a Ledger or Trezor for maximum security. Remember to keep your private keys safe and never share them with anyone.
That’s it! You have successfully acquired CRO. You can now use your CRO tokens for various purposes like staking, trading, or participating in the Crypto.com ecosystem.
Frequently Asked Questions:
What is Metamask?
Metamask is a browser extension that serves as a digital wallet for managing cryptocurrencies and interacting with decentralized applications (dApps) on the Ethereum blockchain.
How do I install Metamask?
To install Metamask, you need to go to the official website of Metamask and download the extension for your preferred browser (Chrome, Firefox, Brave, etc.). Once downloaded, follow the installation instructions provided by Metamask.

+ There are no comments
Add yours