


If you’re a cryptocurrency enthusiast, chances are you’ve heard of Metamask. This popular browser extension allows you to interact with decentralized applications (dApps) and manage your digital assets securely. However, by default, Metamask is set up to connect to the Ethereum mainnet. If you’re looking to explore the world of Ethereum’s sister networks, like the Mumbai testnet, you’ll need to add it to your Metamask wallet.
Adding Mumbai to Metamask is a straightforward process that can be completed in just a few simple steps. In this guide, we’ll walk you through the process, giving you the confidence to explore the exciting opportunities offered by Mumbai and other Ethereum testnets.
Step 1: Install Metamask
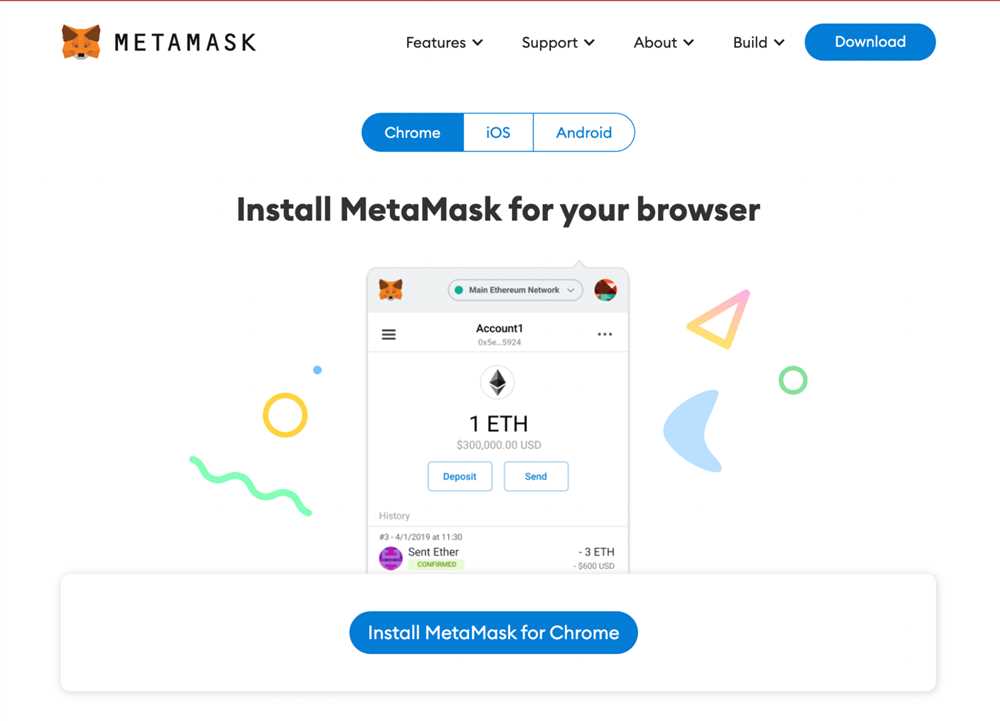
The first step is to make sure you have Metamask installed in your browser. Metamask is available for Chrome, Firefox, and Brave. Simply visit the Metamask website and follow the instructions to install the extension. Once installed, you’ll see the Metamask icon on your browser toolbar.
Step 2: Set up a Wallet
Next, you’ll need to set up a wallet on Metamask. Click on the Metamask icon and follow the prompts to create a new wallet or import an existing one. Make sure to securely store your wallet’s seed phrase, as this is the key to accessing your funds.
Step 3: Connect to Mumbai
With your wallet set up, it’s time to connect to the Mumbai testnet. Click on the Metamask icon to open the extension, and then click on the network dropdown menu. Scroll down and select “Custom RPC.”
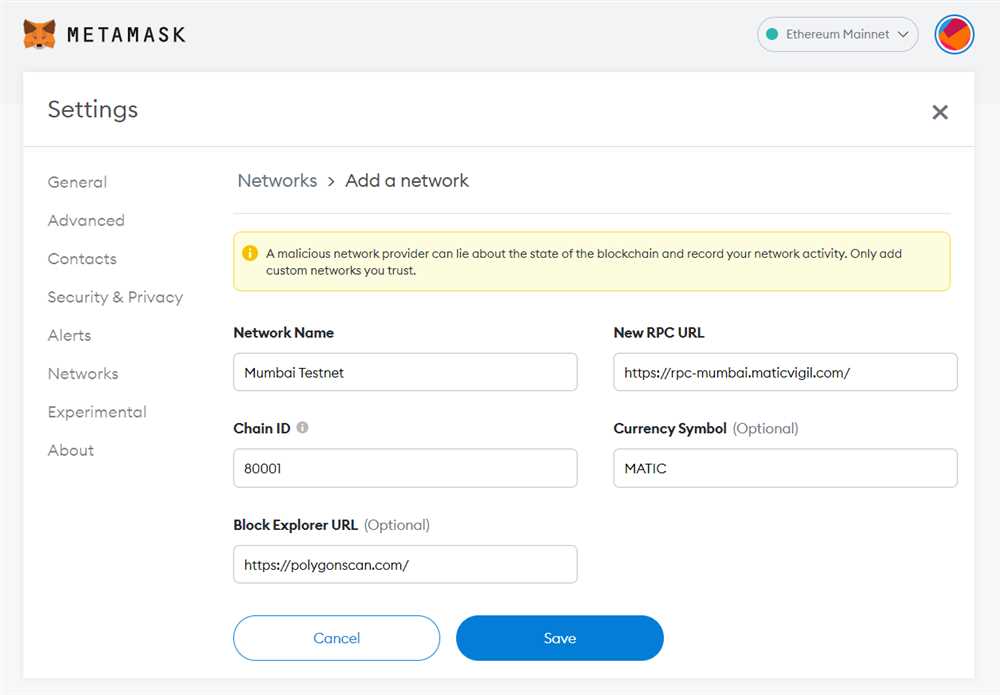
In the “New RPC URL” field, enter the Mumbai testnet’s URL: “https://rpc-mumbai.maticvigil.com/”. Once you’ve entered the URL, click “Save.”
Step 4: Add Mumbai to your Wallet
After saving the Mumbai testnet’s URL, you’ll need to add it to your wallet. To do this, click on the network dropdown menu again and select “Mumbai Testnet.” Your Metamask wallet is now connected to the Mumbai testnet, and you can start exploring dApps and interacting with smart contracts on this network.
By following these steps, you can easily add Mumbai to your Metamask wallet and fully experience the Mumbai testnet. This opens up a whole new world of opportunities to engage with Ethereum’s ecosystem and test out new decentralized applications. Happy exploring!
The Basics of Adding Mumbai to Metamask
Metamask is a popular browser extension that allows users to access decentralized applications on the Ethereum blockchain. By default, Metamask is set up to connect to the Ethereum mainnet. However, users also have the option to add other networks, such as the Mumbai testnet, to their Metamask wallet to interact with applications on different networks.
Step 1: Install Metamask
To get started, you’ll need to have Metamask installed in your browser. You can download and install the Metamask extension from the official website or the browser’s extension store. Once installed, you’ll need to set up a new wallet or import an existing one.
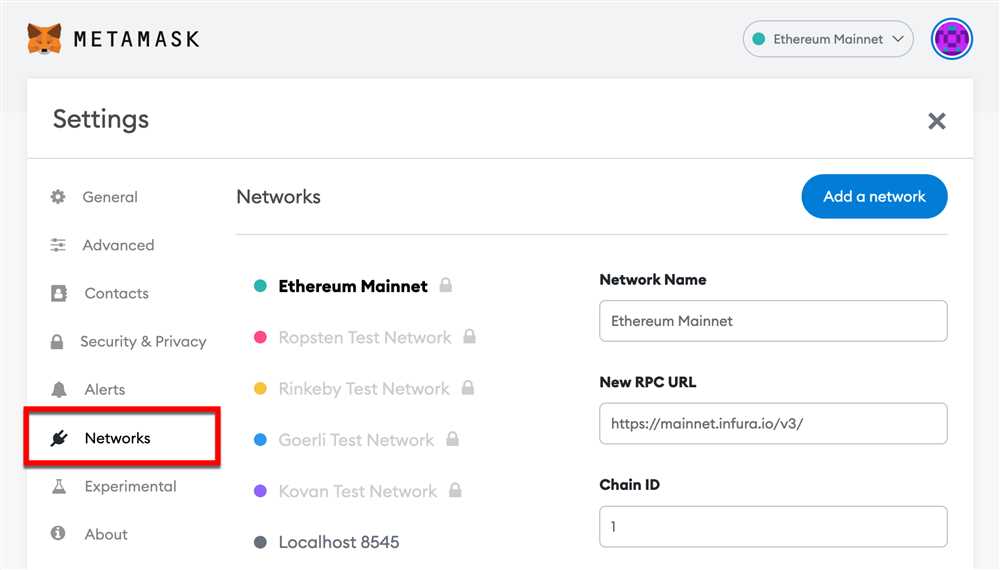
Step 2: Open Metamask and Access Network Settings
After setting up your wallet, open Metamask by clicking on the extension icon in your browser. Then, click on the account icon in the top right corner and select “Settings” from the dropdown menu.
Step 3: Add the Mumbai Network
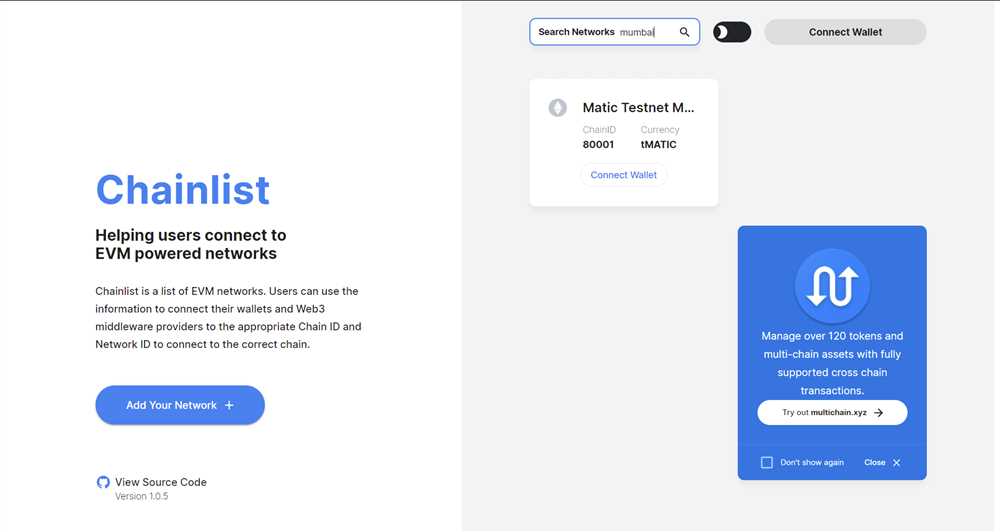
In the settings menu, navigate to the “Networks” tab. Here, you’ll find a list of networks already added to your Metamask wallet. To add the Mumbai network, click on the “Add Network” button.
In the network settings, you’ll need to provide the following information:
- Network Name: Mumbai
- New RPC URL: https://rpc-mumbai.maticvigil.com/
- Chain ID: 80001
- Currency Symbol: MUMBAI
Step 4: Save and Connect to the Mumbai Network
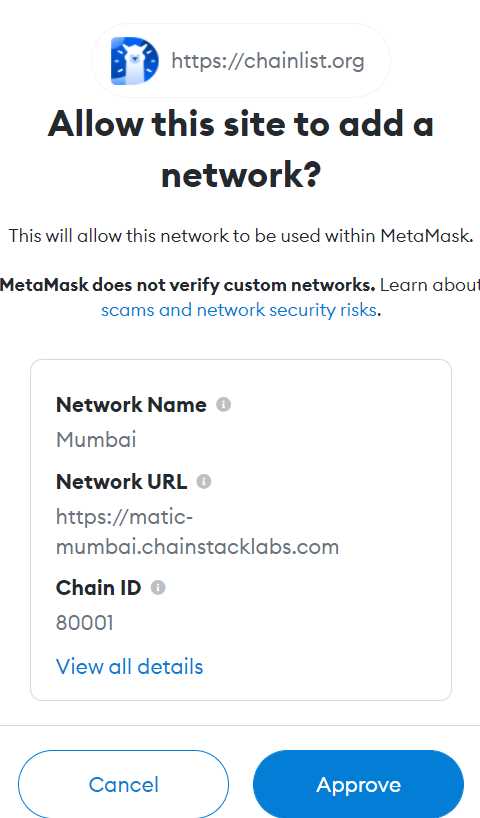
After entering the necessary information, click on the “Save” button to add the Mumbai network to your Metamask wallet. Once saved, you can select the Mumbai network from the network dropdown in the account icon menu.
By adding the Mumbai network to your Metamask wallet, you’ll be able to interact with decentralized applications deployed on the Mumbai testnet, which is useful for testing purposes or accessing specific applications that are only available on the Mumbai network.
Step 1: Install and Set Up Metamask Extension
To add Mumbai to Metamask, you first need to install and set up the Metamask extension on your browser. Follow the steps below to proceed:
- Open your preferred web browser and go to the official Metamask website.
- Click on the “Get Chrome Extension” button or the “Get Firefox Extension” button, depending on your browser.
- Once the extension is downloaded, click on it to open Metamask.
- A new tab will open, and you will see a welcome screen. Click on the “Get Started” button.
- You will be asked to create a password to secure your Metamask account. Enter a strong password and click “Create”.
- Metamask will then provide you with a secret backup phrase. Make sure to write it down and keep it in a safe place. This backup phrase can be used to restore your account if you ever lose access to it.
- Click on the buttons that display the backup phrase words in the correct order to confirm that you have correctly recorded them.
- Once you have confirmed the backup phrase, you will be taken to the main Metamask interface.
Congratulations! You have successfully installed and set up the Metamask extension on your browser. Now, you are ready to proceed with adding Mumbai to Metamask.
Step 2: Create a New Ethereum Network

After installing the Metamask extension in your browser, follow these easy steps to add Mumbai to your Metamask:
- Open the Metamask extension by clicking on the icon in your browser’s toolbar.
- Click on the network selection dropdown, located at the top of the Metamask interface, and select “Custom RPC”.
- A form will appear where you can enter the details of the new Ethereum network. Fill in the following information:
| Network Name: | Mumbai |
| New RPC URL: | https://rpc-mumbai.maticvigil.com/ |
| Chain ID: | 80001 |
| Symbol: | MATIC |
| Block Explorer URL: | https://explorer-mumbai.maticvigil.com/ |
Once you have entered all the details, click on the “Save” button to create the new Ethereum network.
Now you have successfully added Mumbai to your Metamask. You can switch between networks by clicking on the network selection dropdown and selecting the desired network.
Note: It is always recommended to double-check the network details before making any transactions to ensure that you are connected to the correct network.
Step 3: Configure the Mumbai Network on Metamask
Once you have successfully installed and set up the Metamask extension on your browser, you will need to configure it to connect to the Mumbai network. Follow the steps below to do so:
Step 1: Open Metamask
Click on the Metamask icon located at the top-right corner of your browser to open the extension.
Step 2: Switch to the Mumbai Network

Once the Metamask extension is open, you will see the “Main Ethereum Network” selected by default. Click on this network name to open the network options.
In the network options, choose “Custom RPC” to manually enter the details of the Mumbai network.
Step 3: Configure the Mumbai Network
In the “Custom RPC” section, you will see a form where you can enter the details of the Mumbai network:
- Network Name: Enter “Mumbai” or any name you prefer.
- New RPC URL: Enter “https://rpc-mumbai.maticvigil.com” as the RPC URL for the Mumbai network.
- Chain ID: Enter “80001” as the Chain ID for the Mumbai network.
- Currency Symbol: Enter “MATIC” or any preferred currency symbol for the Mumbai network.
Make sure to double-check the information you have entered to avoid any errors.
Step 4: Save the Configuration
After entering the Mumbai network details, click on the “Save” button to save the configuration.
Congratulations! You have successfully configured the Mumbai network on Metamask. You are now ready to interact with decentralized applications (dApps) on the Mumbai network.
Remember to switch to the Mumbai network whenever you want to transact or interact with dApps specific to this network.
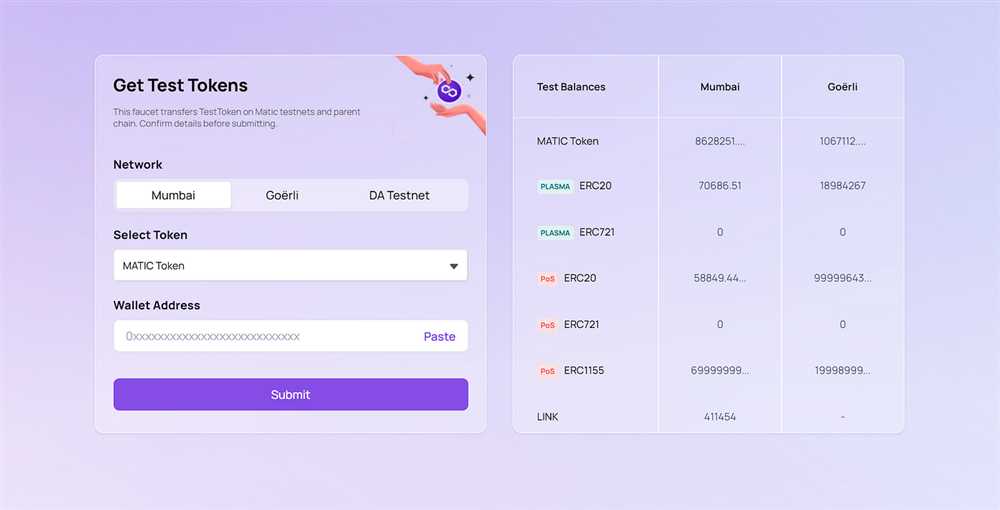
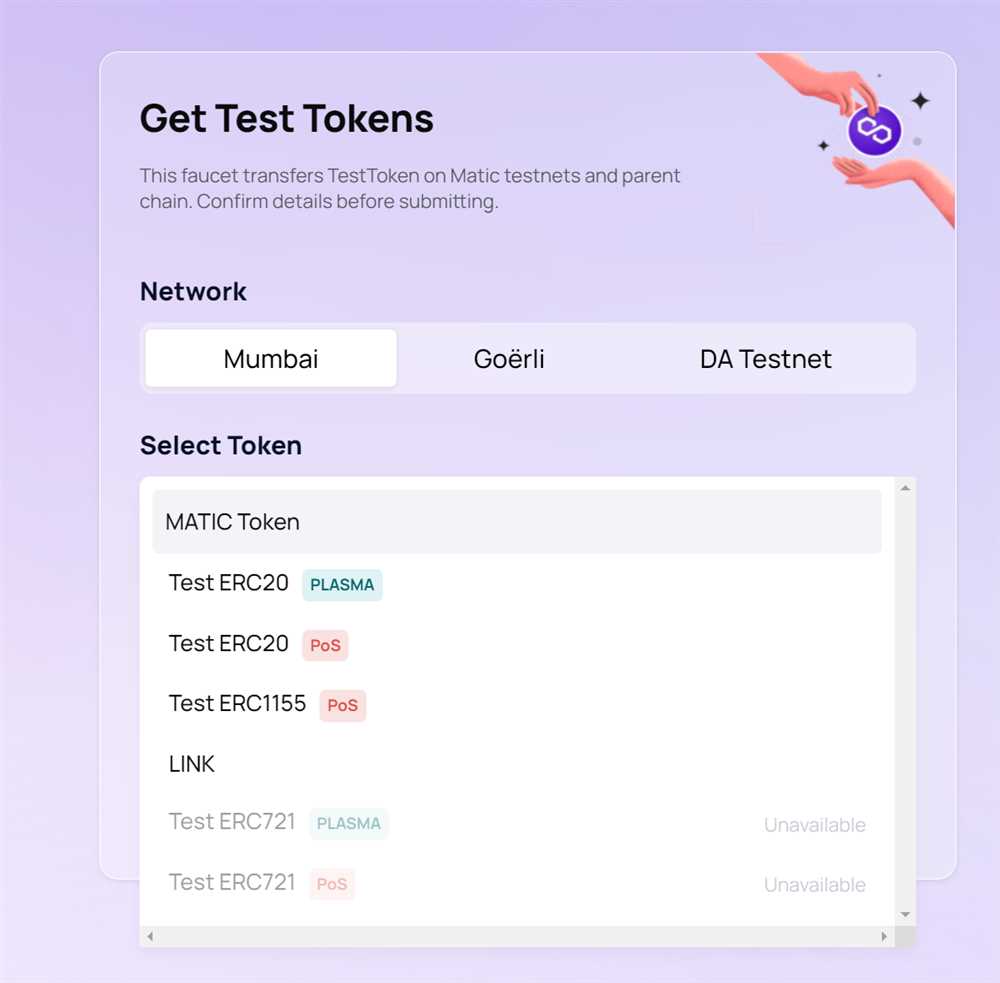
Step 4: Add Mumbai Tokens to Your Wallet
Once you have successfully added Mumbai to your Metamask wallet, you will need to add Mumbai tokens to your wallet in order to transact with them on the network.
Here are the steps to add Mumbai tokens to your wallet:
- Open your Metamask wallet and make sure you are on the Mumbai network.
- Click on the “Add Token” button.
- In the “Custom Token” tab, enter the token contract address for the Mumbai token you want to add.
- Enter the token symbol and the number of decimal places for the token.
- Click on “Next” and then “Add Tokens” to confirm.
Once you have followed these steps, the Mumbai token should be successfully added to your wallet. You will now be able to see your Mumbai token balance and transact with Mumbai tokens on the Mumbai network.
Frequently Asked Questions:
Why would I want to add Mumbai to Metamask?
You would want to add Mumbai to Metamask in order to interact with the Ethereum network using the Mumbai test network. This allows you to test your smart contracts and DApps before deploying them on the main Ethereum network.
What is Metamask?
Metamask is a cryptocurrency wallet and browser extension that allows users to interact with the Ethereum network. It provides a user-friendly interface for managing Ethereum addresses, sending and receiving ETH, and interacting with decentralized applications (DApps).
Can I use Mumbai for testing my smart contracts?
Yes, you can use Mumbai for testing your smart contracts. It is a test network that mirrors the Ethereum mainnet, allowing you to test your code and interactions without using real ETH. This helps you identify and fix any issues before deploying your contracts on the main Ethereum network.

+ There are no comments
Add yours