


If you’re new to the world of cryptocurrency, you’ve probably heard about Bitcoin (BTC), the most popular and widely used digital currency. To securely store and manage your BTC, you need a reliable wallet, and Metamask BTC Wallet is a great choice.
In this step-by-step tutorial, we’ll guide you through the process of setting up and using Metamask BTC Wallet. Whether you’re a beginner or an experienced crypto enthusiast, this tutorial will help you get started with your BTC wallet.
Step 1: Install Metamask BTC Wallet
To begin, open your web browser and go to the Metamask website. Click on the “Get Started” button and follow the instructions to install the Metamask browser extension. Once installed, you’ll see the Metamask logo at the top right corner of your browser.
Step 2: Create a New Wallet
Next, click on the Metamask logo and choose the “Create a Wallet” option. You’ll be prompted to create a password for your wallet. Make sure to choose a strong and secure password that you can remember. Once you’ve entered your password, click on “Create” to proceed.
Step 3: Backup Your Wallet
Backing up your wallet is crucial in case you ever lose access to it. Metamask will provide you with a secret phrase (also known as a seed phrase) consisting of 12 words. Write down this phrase and keep it in a safe place. It’s important to never share this phrase with anyone, as it can be used to access your wallet.
Note: Make sure to store your secret phrase offline and never enter it on any website or online service.
Step 4: Connect to the Bitcoin Network
Once you’ve set up your wallet, you’ll need to connect to the Bitcoin network. Click on the Metamask logo and choose the “Settings” option. In the settings menu, click on “Networks” and then select “Add Network”. Enter the following details:
Network Name: Bitcoin Mainnet
New RPC URL: https://mainnet.infura.io/v3/YOUR_INFURA_PROJECT_ID
Chain ID: 1
Click on “Save” to connect to the Bitcoin network.
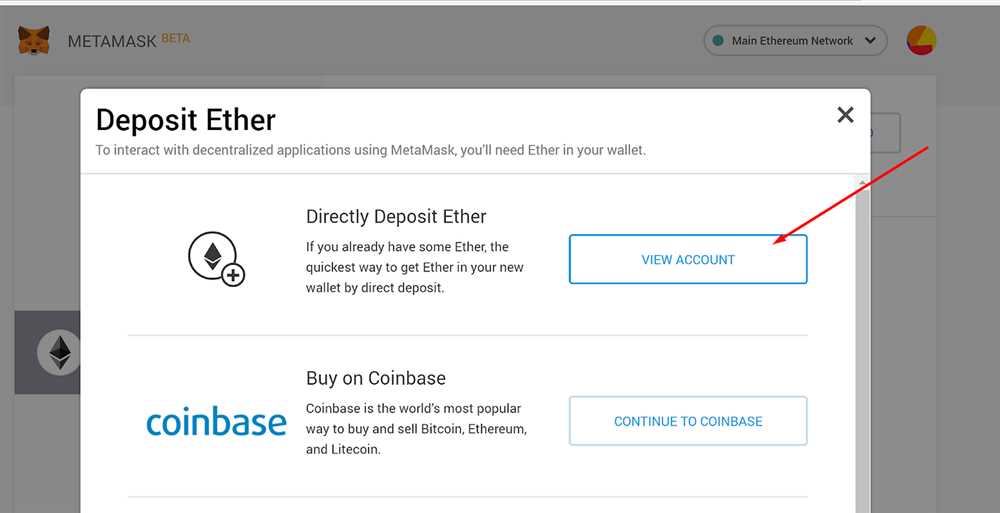
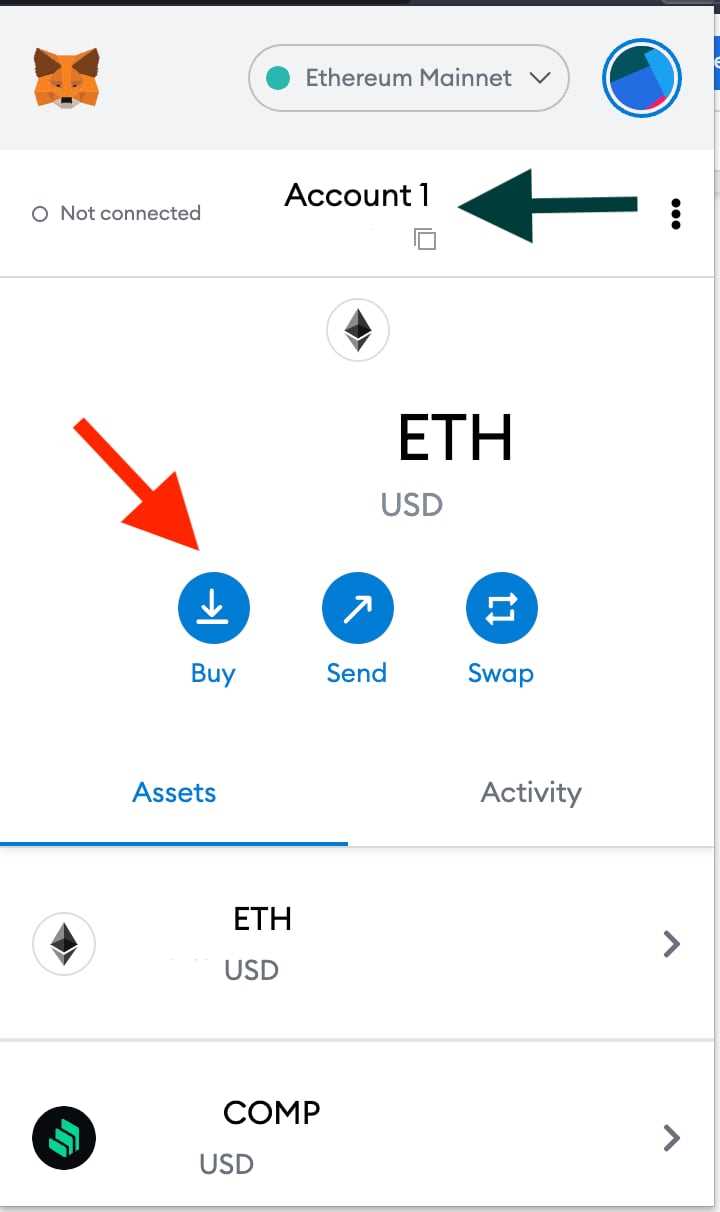
Step 5: Receive and Send BTC
Now that your wallet is set up and connected to the Bitcoin network, you can start receiving and sending BTC. To receive BTC, simply click on the “Receive” button and copy your BTC address. Share this address with the person or platform that will be sending you BTC.
To send BTC, click on the “Send” button and enter the recipient’s BTC address and the amount you want to send. Review the transaction details and click on “Confirm” to complete the transaction. Metamask will ask you to confirm the transaction using your wallet password.
Conclusion
Setting up and using Metamask BTC Wallet is a straightforward process that allows you to securely store and manage your BTC. By following this step-by-step tutorial, you can start using your BTC wallet with confidence. Remember to keep your wallet password and secret phrase safe, and stay vigilant against phishing attempts or suspicious websites.
Step 1: Download and Install Metamask

Before you can start using the Metamask BTC Wallet, you’ll need to download and install the Metamask extension for your preferred web browser. Follow these steps:
- Open your web browser and go to the Metamask website.
- Click on the “Get Chrome Extension” or “Get Firefox Add-on” button, depending on your browser.
- A pop-up will appear asking for your confirmation to add the extension. Click on the “Add” button to proceed.
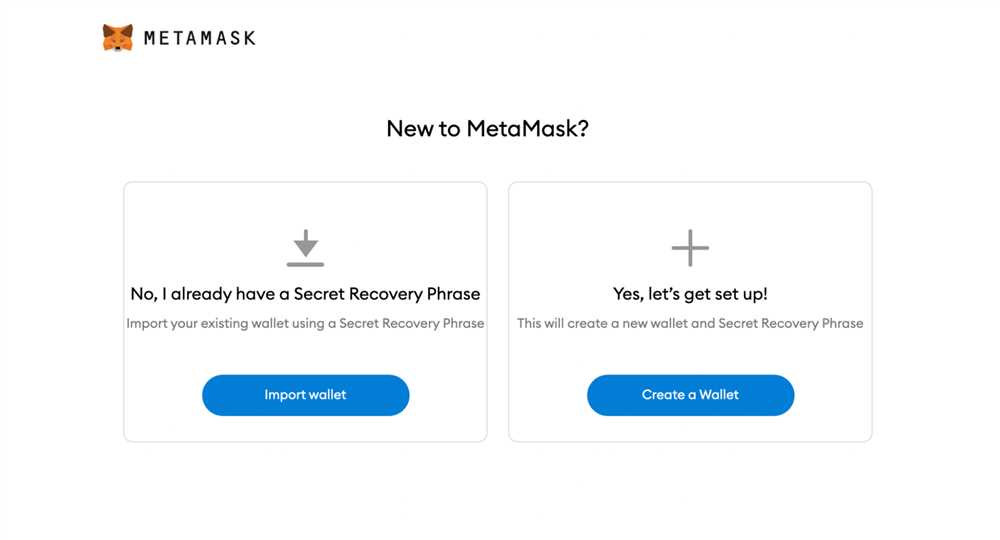
- After the installation is complete, a new tab will open with the Metamask welcome screen. Click on the “Get Started” button.
- You will be asked to create a password for your wallet. Make sure to choose a strong password that you can remember and click on the “Create” button.
- Next, you will be presented with a unique set of words called a seed phrase. It is important to write down this seed phrase and keep it in a safe place. It acts as a backup for your wallet and can be used to recover your funds if you ever lose access to your wallet.
- After writing down the seed phrase, click on the words in the correct order to confirm that you have saved them somewhere safe.
- Congratulations! You have successfully downloaded and installed Metamask on your browser. You can now start using the Metamask BTC Wallet to manage your Bitcoin funds.
Remember to always keep your Metamask password and seed phrase secure and never share them with anyone. If anyone gets access to this information, they can potentially steal your funds.
Step 2: Create a New Wallet and Secure Your Private Key
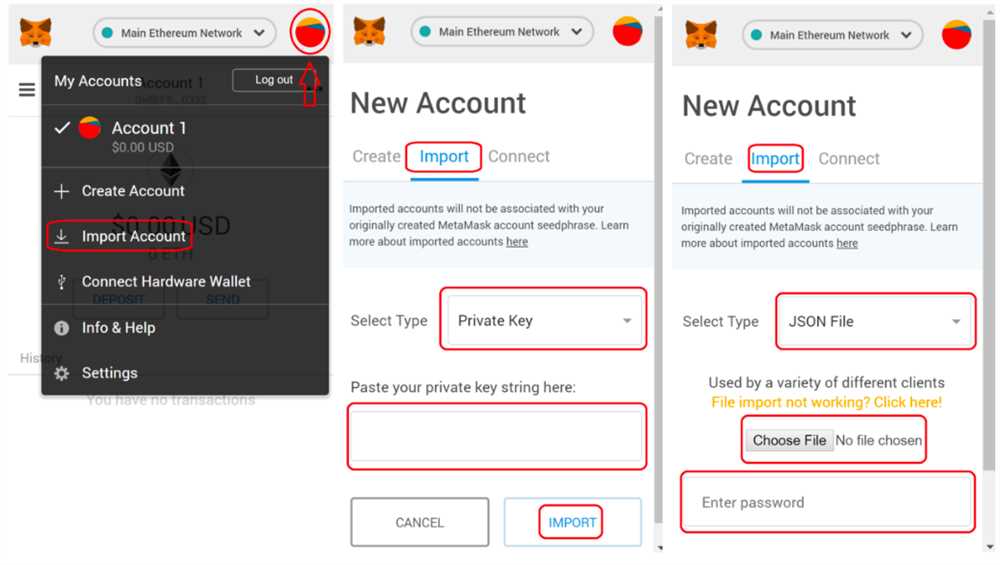
Creating a new wallet in Metamask BTC is a straightforward process. Here’s a step-by-step guide to help you create your wallet and secure your private key:
1. Install Metamask BTC Extension
The first thing you need to do is install the Metamask BTC extension on your browser. To do this, go to the official Metamask BTC website and download the extension for your preferred browser.
2. Set Up a New Wallet
Once you have installed the extension, click on the Metamask BTC icon in your browser’s toolbar to open the wallet. If this is your first time using Metamask BTC or you don’t have an existing wallet, click “Get Started” on the welcome screen.
On the next screen, read and accept the terms of use, and then click “Create a Wallet” to proceed.
3. Create a Strong Password
Next, you will be prompted to create a strong password for your wallet. Make sure your password is unique and contains a combination of uppercase and lowercase letters, numbers, and special characters.
Remember to choose a password that you can easily remember but is not easily guessable by others.
4. Backup Your Seed Phrase

After setting your password, you will be presented with a unique seed phrase. This seed phrase is a series of 12 or 24 random words that can be used to recover your wallet.
Write down your seed phrase and store it in a safe and secure place. It is crucial to keep your seed phrase offline and away from prying eyes to protect your funds.
5. Verify Your Seed Phrase
To ensure that you have correctly written down your seed phrase, Metamask BTC will ask you to select the words in the correct order.
Select the words from the drop-down menus according to the order of the words in your seed phrase. Once you have completed this step, click “Verify” to proceed.
6. Protect Your Wallet with a PIN
In the final step, you will need to set up a PIN for accessing your wallet quickly. Choose a PIN that is easy for you to remember but difficult for others to guess.
Enter your PIN twice and click “Done” to finalize the setup process.
Congratulations! You have successfully created a new wallet in Metamask BTC and secured your private key. Remember to keep your seed phrase and PIN private and never share them with anyone.
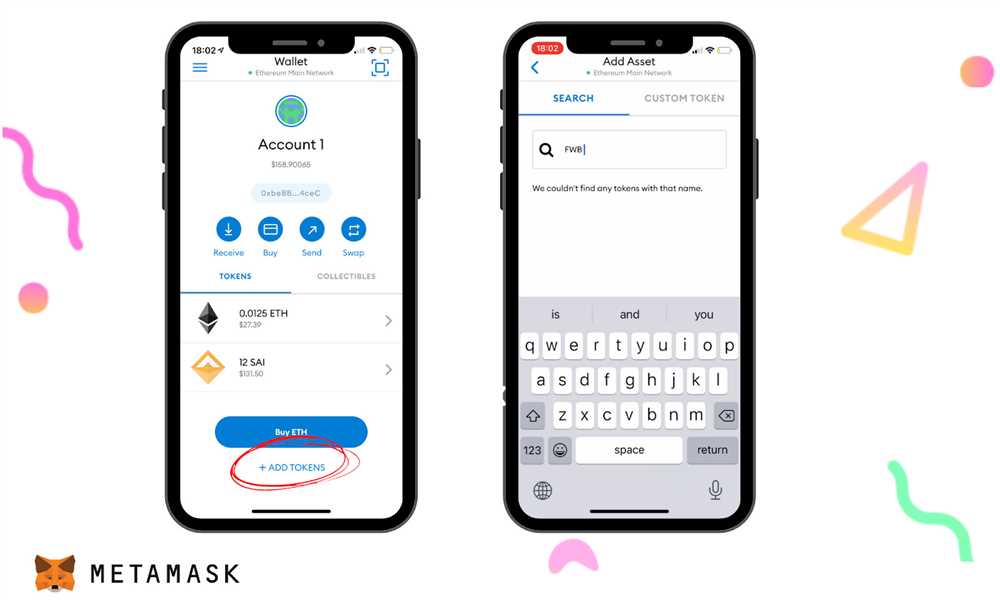
Step 3: Add BTC to Your Metamask Wallet
Once you have set up your Metamask BTC wallet and have it connected to your browser, the next step is to add BTC to your wallet. Here’s how you can do it:
1. Open your Metamask BTC wallet by clicking on the extension icon in your browser’s toolbar.
2. In the wallet interface, click on the “Receive” button. This will show you your BTC wallet address.
3. Copy the BTC wallet address to your clipboard.
4. Open your external BTC wallet or exchange account from where you want to send BTC to your Metamask wallet.
5. Initiate a BTC withdrawal or send transaction from your external wallet or exchange account.
6. Paste the BTC wallet address you copied from your Metamask wallet as the recipient address for the transaction.
7. Enter the amount of BTC you want to send and review the transaction details carefully.
8. Confirm and submit the transaction from your external wallet or exchange account.
9. Wait for the transaction to be confirmed on the Bitcoin network. This can take some time depending on the network congestion.
10. Once the transaction is confirmed, you will see the BTC balance reflected in your Metamask BTC wallet.
It is important to note that the process of adding BTC to your Metamask wallet may vary slightly depending on the external wallet or exchange you are using. Make sure to follow the specific instructions provided by the wallet or exchange to ensure a successful transaction.
Now that you have BTC in your Metamask wallet, you can use it for various blockchain-based activities like decentralized finance (DeFi), purchasing goods and services from merchants that accept BTC, or simply holding it as an investment.
| Note: | Make sure to double-check the BTC wallet address when sending funds to your Metamask wallet to avoid any loss of funds. |
Frequently Asked Questions:
What is Metamask BTC wallet?
Metamask BTC wallet is a digital wallet that allows you to securely store and manage your Bitcoin.
How do I set up Metamask BTC wallet?
Setting up Metamask BTC wallet is easy. First, you need to download the Metamask browser extension. Then, create a new wallet and follow the instructions to set it up. Make sure to save your seed phrase in a safe place.
Can I use Metamask BTC wallet on my mobile phone?
No, currently Metamask BTC wallet is only available as a browser extension and can be used on desktop computers.

+ There are no comments
Add yours