


Welcome to the world of cryptocurrency! If you’re new to the Metamask wallet, you may be wondering how to import tokens and get started with your digital assets. Whether you’ve recently purchased some tokens or received them from someone, this guide will walk you through the process of importing tokens on Metamask.
What is Metamask?
Metamask is a popular Ethereum wallet that allows you to securely store, send, and receive ERC20 tokens. It acts as a bridge between your web browser and the Ethereum network, providing you with a user-friendly interface to manage your digital assets. By importing tokens on Metamask, you can keep track of your investments and easily access them whenever you need.
Step 1: Install and Set Up Metamask
The first step is to install the Metamask extension on your preferred web browser. Once installed, follow the on-screen instructions to create a new wallet or import an existing one using your seed phrase or private key. Remember to keep your seed phrase or private key safe and never share them with anyone.
Step 2: Add Custom Tokens
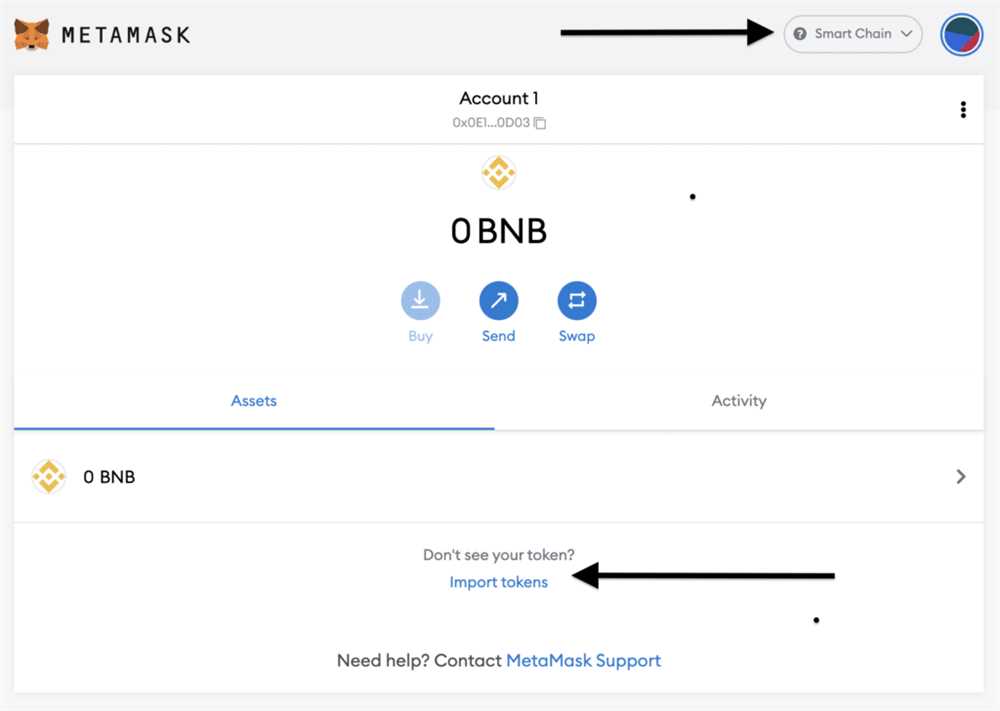
After setting up your wallet, you can now add custom tokens to your Metamask account. To do this, click on the Metamask extension icon and navigate to the “Assets” tab. From there, click on “Add Token” and select “Custom Token”.
Step 3: Enter Token Details
In the “Token Contract Address” field, paste the token’s contract address that you want to import. The token symbol, decimal places, and token name should be automatically populated. If not, you can usually find this information on the token’s website or from the person who sent you the tokens.
Step 4: Confirm and Import
Once you’ve filled in the token details, click on “Next” and then “Add Tokens” to import the tokens. Metamask will now display your imported tokens in the “Assets” tab, allowing you to view their balances and transaction history.
Importing tokens on Metamask is a straightforward process that allows you to keep all your digital assets in one place. By following the steps outlined in this guide, you’ll be able to import tokens and start managing your cryptocurrency portfolio with ease.
Getting Started with Metamask

Metamask is a web browser extension that allows you to interact with the Ethereum blockchain. It acts as a digital wallet, enabling you to store, manage, and transfer Ethereum and other ERC-20 tokens.
To get started with Metamask:
- Install Metamask: Go to the Metamask website and choose the version that matches your web browser. Follow the instructions to install the extension.
- Create a new wallet: Open Metamask by clicking on the extension icon in your browser toolbar. Click on “Get Started” and then “Create a Wallet.” Follow the prompts to set a strong password and agree to the terms of use.
- Back up your wallet: After creating a wallet, Metamask will provide you with a secret backup phrase. Write this phrase down and store it in a safe place. This phrase is used to restore your wallet if you lose access to your account.
- Connect to a network: By default, Metamask connects to the Ethereum mainnet. However, you can also connect to other networks such as the Ropsten testnet or a local development network. Click on the network dropdown in Metamask and choose the desired network.
- Add funds: To add funds to your Metamask wallet, click on the account avatar in the top right corner and select “Account Details.” Copy your wallet address and use it to receive Ethereum or tokens from another wallet or exchange.
- Interact with dApps: Metamask allows you to interact with decentralized applications (dApps) on the Ethereum blockchain. When you open a dApp, Metamask will prompt you to connect your wallet. Once connected, you can securely transact on the dApp.
Now that you are familiar with the basics of getting started with Metamask, you can explore more advanced features such as importing tokens and managing multiple accounts.
Importing Tokens on Metamask
If you want to manage multiple tokens on Metamask, you can easily import them by following these steps:
Step 1: Open Metamask
Launch the Metamask extension on your browser and make sure you are signed in to your account.
Step 2: Access Token Import
Click on the Metamask extension icon and select the wallet you wish to import the tokens to. Then, click on the “Assets” tab.
Step 3: Import Token
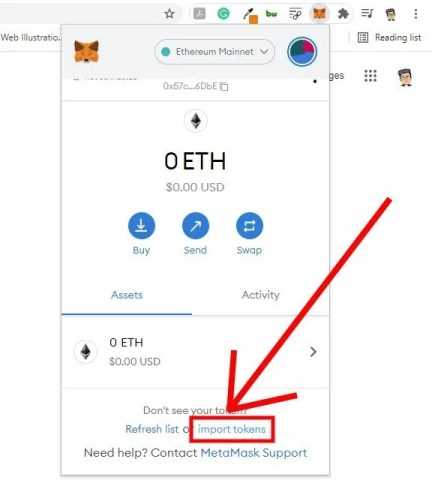
Scroll down to the bottom of the page and click on “Import Token”.
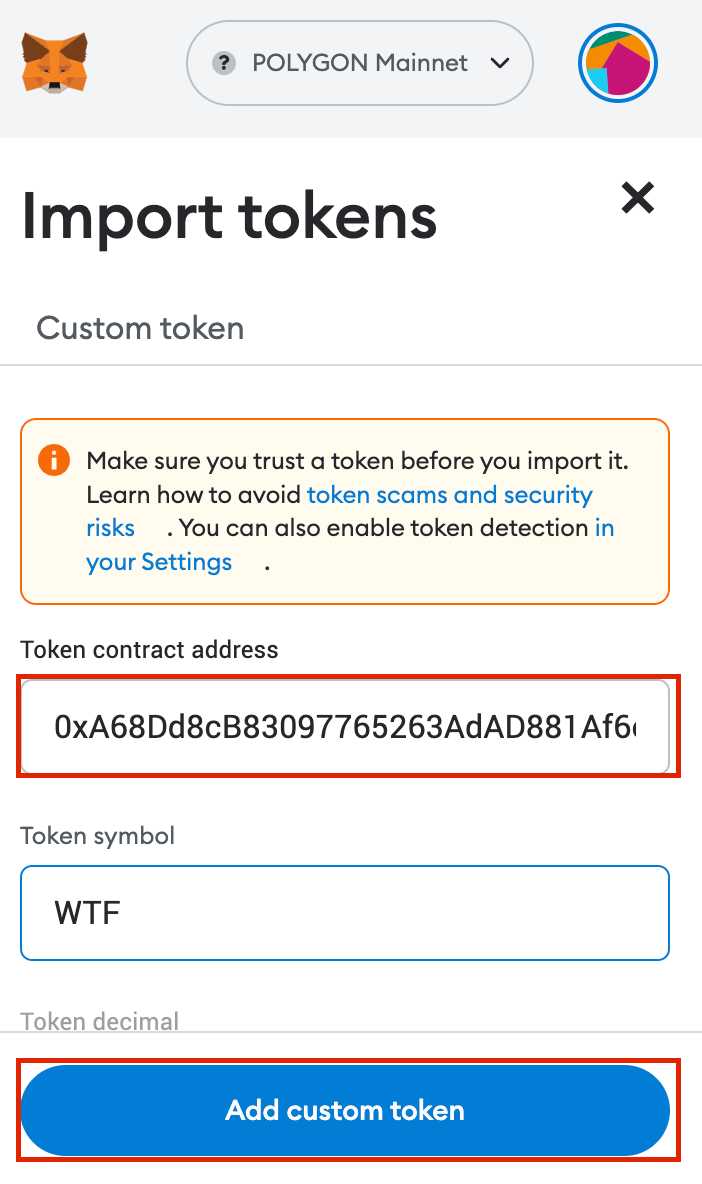
Step 4: Enter Token Details
A form will appear where you need to fill in the contract address, symbol, and decimals of the token you want to import. You can find these details on the token’s official website or by contacting the token issuer.
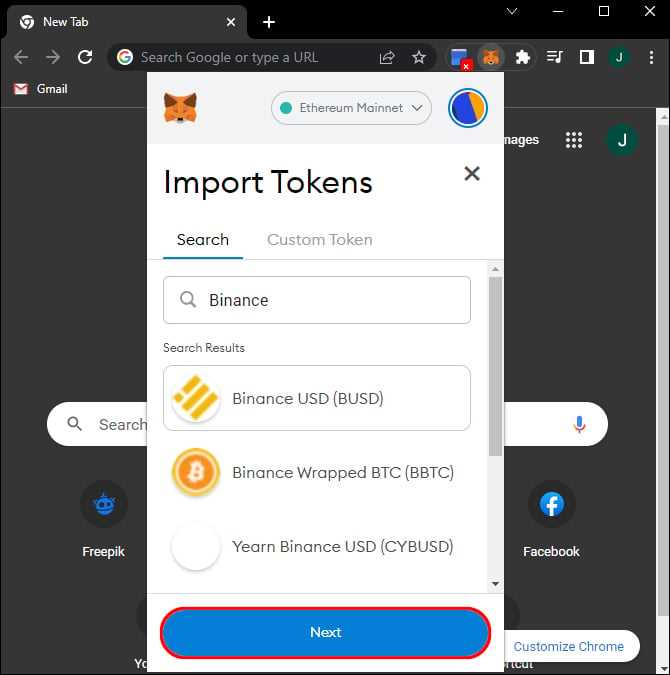
Step 5: Confirm Token Import
After entering the token details, click on “Next” to confirm the token import. Metamask will display a summary of the token information. If everything looks correct, click on “Add Tokens” to complete the import process.
Once the tokens are successfully imported, you will be able to see them in your Metamask wallet under the “Assets” tab.
Note: Importing tokens on Metamask requires you to have a small amount of Ether (ETH) in your wallet to cover the transaction fees.
| Contract Address | Token Symbol | Decimals |
|---|---|---|
| 0x123456789ABCDEF | TOKEN | 18 |
| 0xABCDEF123456789 | TOKEN2 | 8 |
| 0x9876543210FEDCBA | TOKEN3 | 6 |
Managing Imported Tokens on Metamask
Metamask allows users to import custom tokens into their wallet in order to track and manage them. Here are some steps to help you manage imported tokens on Metamask:
Step 1: Accessing Your Wallet
To manage your imported tokens, first, you need to access your Metamask wallet. Open the Metamask extension in your browser and enter your password to unlock your wallet.
Step 2: Navigating to the Tokens Section
Once you have accessed your wallet, click on the menu icon (usually three horizontal lines) in the top-left corner. From the dropdown menu, select “Assets” and then click on “Tokens.”
Step 3: Viewing Imported Tokens
In the Tokens section, you will be able to view all the tokens that you have imported into your Metamask wallet. Each token will be listed with its symbol, name, and contract address.
Step 4: Adding New Tokens
If you want to add new tokens to your wallet, click on the “Add Token” button. Enter the token contract address, symbol, and decimals. Metamask will automatically fetch the token details if it is supported.
Step 5: Managing Token Preferences
Metamask allows you to manage your token preferences. You can toggle the visibility of tokens in your wallet by clicking on the eye icon next to each token. Additionally, you can also edit or remove tokens by clicking on the three-dot icon and selecting the desired option.
By following these steps, you can easily manage the imported tokens on your Metamask wallet and stay in control of your digital assets.
Frequently Asked Questions:
What is Metamask?
Metamask is a cryptocurrency wallet and browser extension that allows users to interact with Ethereum decentralized applications (dApps) directly through their web browser.
Can I import any type of token on Metamask?
Yes, you can import any ERC-20 token on Metamask as long as you have the token contract address, token symbol, and decimal places.
Is it safe to import tokens on Metamask?
Importing tokens on Metamask is generally considered safe, as long as you ensure that the token contract address you are importing is legitimate. It’s important to double-check the contract address and verify its authenticity before importing tokens.
+ There are no comments
Add yours