


Metamask is a popular Ethereum wallet and browser extension that allows users to manage their digital assets and interact with decentralized applications (dApps) seamlessly. One of the most sought-after features by its users is the ability to connect their hardware wallets, such as Ledger, to Metamask for enhanced security and convenience.
In this comprehensive guide, we will walk you through the step-by-step process of adding Ledger support on Metamask. By connecting your Ledger hardware wallet to Metamask, you can securely store your private keys offline and easily sign transactions without exposing your sensitive data to potential cyber threats.
To get started, you will need to have both Metamask and Ledger set up and ready to go. If you haven’t already done so, make sure to download and install the latest versions of Metamask extension on your browser and Ledger Live on your computer. If you haven’t set up your Ledger device yet, follow the instructions provided by Ledger to initialize and set up your wallet. Once everything is set up, you’re ready to proceed to the next steps.
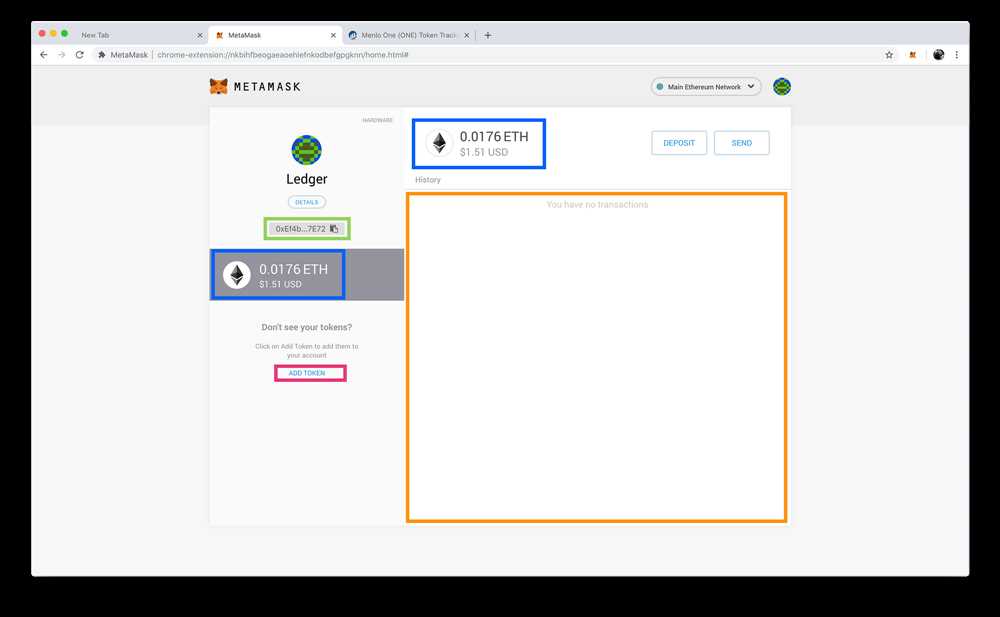
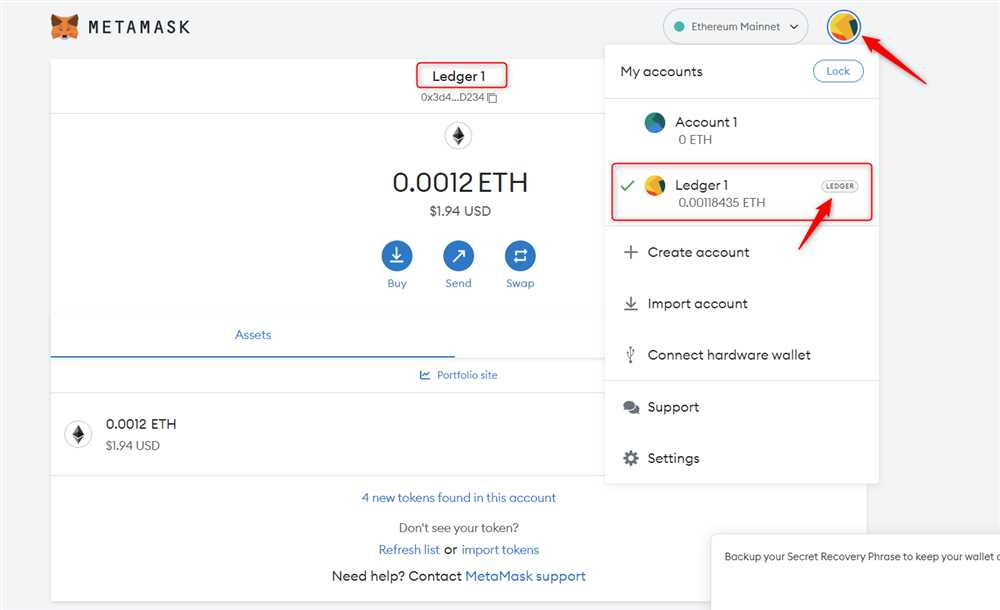
Next, open the Metamask extension on your browser and click on the account icon at the top right corner. In the dropdown menu, select “Connect Hardware Wallet.” You will be presented with different hardware wallet options. Choose “Ledger” from the list. Make sure your Ledger device is connected to your computer via USB and unlocked.
Metamask will prompt you to allow access to your Ledger device. Verify that the device shown on Metamask matches your own Ledger device, and click “Connect.” Your Ledger device will display a prompt asking you to export your public key. Confirm the export by pressing both buttons on your Ledger device when prompted.
How to Set Up a Ledger Device for Metamask Integration
If you are using Metamask and want to ensure the highest level of security for your crypto transactions, integrating it with a Ledger device is a great option. Follow these steps to set up a Ledger device for Metamask integration:
1. Make sure you have a Ledger device and the Ledger Live app installed on your computer. If not, visit the official Ledger website and follow the instructions to set up your device and install the necessary software.
2. Connect your Ledger device to your computer using the USB cable provided. Enter your PIN code on the device when prompted.
3. Open the Ledger Live app on your computer, and make sure your Ledger device is connected and recognized by the app.
4. In the Ledger Live app, navigate to the “Manager” tab and update the firmware on your Ledger device if necessary.
5. Once your Ledger device is up-to-date, open the Metamask extension in your web browser.
6. Click on the Metamask icon in the browser toolbar, and select “Connect Hardware Wallet” from the dropdown menu.
7. Choose “Ledger” as the type of hardware wallet you want to connect.
8. Follow the on-screen instructions to connect your Ledger device to Metamask. This may involve confirming the connection on your Ledger device and selecting the Ethereum app.
9. Once your Ledger device is successfully connected to Metamask, you can start using your Ledger for secure crypto transactions within the Metamask interface.
By setting up a Ledger device for Metamask integration, you can enhance the security of your crypto assets and have peace of mind knowing that your private keys remain stored securely on your Ledger device.
Configuring Metamask for Ledger Integration
To configure Metamask for Ledger integration, follow the steps below:
Step 1: Install Metamask Extension
If you haven’t already done so, install the Metamask extension in your web browser. Visit the official Metamask website and follow the instructions for your specific browser.
Step 2: Connect Ledger Device
Connect your Ledger device to your computer using the USB cable provided. Make sure the device is powered on and unlocked.
Step 3: Enable Browser Support on Ledger
On your Ledger device, navigate to the settings menu and navigate to the “Browser Support” option. Make sure it is enabled. This allows the Ledger device to communicate with the web browser.
Step 4: Open Metamask
Open the Metamask extension in your browser by clicking on the Metamask icon.
Step 5: Access Account Settings

In the Metamask interface, click on the account avatar on the top right corner and select “Settings” from the dropdown menu.
Step 6: Add Ledger Account
In the Metamask settings menu, click on the “Connected Hardware Wallets” tab. From the list of supported hardware wallets, select “Ledger” and click on the “Continue” button.
Step 7: Connect Ledger Wallet
Follow the on-screen instructions to connect your Ledger wallet to Metamask. Make sure your Ledger device is still connected and unlocked.
Step 8: Confirm Account on Ledger
On your Ledger device, navigate to the Ethereum app and open it. Confirm the account address shown on Metamask matches the one displayed on your Ledger device. If they match, select the account on the Ledger device.
Step 9: Success!
Congratulations! You have successfully configured Metamask for Ledger integration. You can now use your Ledger device to securely manage and sign transactions in Metamask.
Step-by-Step Guide to Adding Ledger Support on Metamask

If you are looking to enhance the security of your Metamask wallet, adding Ledger support is a great option. Ledger is a hardware wallet that stores your private keys offline, protecting them from potential online threats. In this step-by-step guide, we will walk you through the process of adding Ledger support on Metamask.
Step 1: Install the Metamask Extension
If you haven’t already, start by installing the Metamask extension on your browser. You can find the extension on the official Metamask website or through the browser’s extension store. Once installed, create a new wallet or import an existing one.
Step 2: Connect Your Ledger Wallet
Connect your Ledger wallet to your computer using the USB cable. Follow the instructions on the Ledger device screen to unlock it and open the Ethereum app.
Step 3: Enable “Browser Support” on Your Ledger
On your Ledger device, navigate to the Settings menu and select “Browser Support”. Make sure it is set to “Yes” to enable browser support for Metamask.
Step 4: Open Metamask and Go to Settings
In your browser, click on the Metamask extension icon to open the wallet. Once opened, click on the profile icon and select “Settings” from the dropdown menu.
Step 5: Add a New Network
In the Settings menu, click on the “Networks” tab. Scroll down and click on “Add Network” to add a new network.
Step 6: Fill in the Network Details
Now, you need to fill in the network details. Enter a name for the network and the following details:
- Network Name: Ledger Live
- New RPC URL: https://rpc.ledgerwallet.com/eth
- Chain ID: 1
- Symbol (optional): ETH
- Block Explorer URL (optional): https://etherscan.io/
Step 7: Save the Network
After filling in the network details, click on the “Save” button to save the new network. The network will now appear in the Networks list.
Step 8: Switch to the Ledger Live Network
To use your Ledger hardware wallet with Metamask, click on the Metamask extension icon again to open the wallet. In the wallet, click on the network dropdown menu and select “Ledger Live”.
Step 9: Connect Your Ledger Wallet to Metamask
Click on the connect button to initiate the connection between your Ledger wallet and Metamask. Follow the prompts on your Ledger device to confirm the connection.
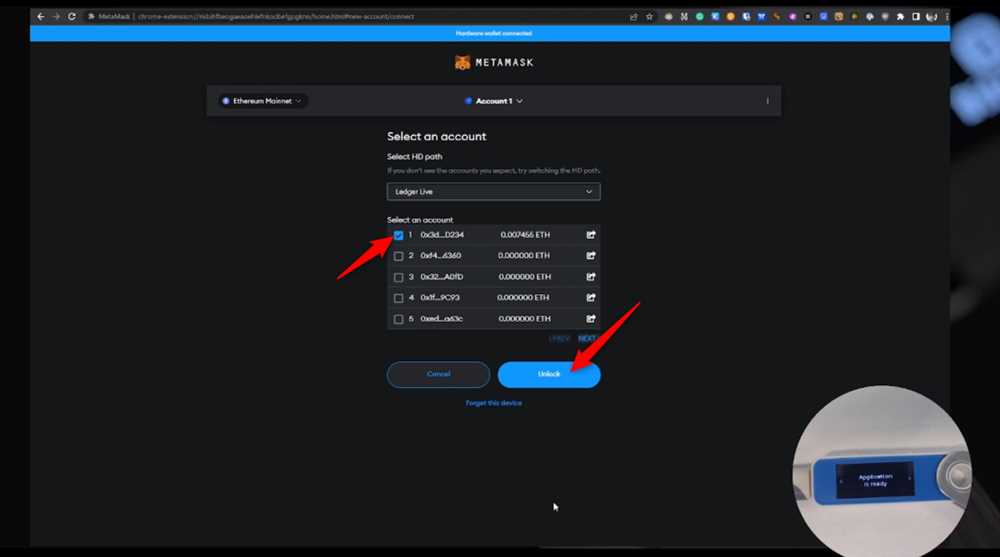
Step 10: Add Accounts to Metamask
Your Ledger wallet is now connected to Metamask! You can add accounts from your Ledger by clicking on the account icon in the wallet and selecting “Add Account”. Follow the prompts on your Ledger device to add the account.
That’s it! You have successfully added Ledger support to your Metamask wallet. Now you can enjoy enhanced security for your Ethereum transactions and manage your funds using your Ledger hardware wallet.
Frequently Asked Questions:
What is Metamask?
Metamask is a cryptocurrency wallet and browser extension that allows users to interact with decentralized applications (DApps) on the Ethereum network.
What are the benefits of adding Ledger support on Metamask?
Adding Ledger support on Metamask provides enhanced security for your cryptocurrency assets. It allows you to securely manage your private keys and sign transactions directly on your Ledger device, ensuring that your sensitive information is never exposed to the internet.

+ There are no comments
Add yours