


Are you a cryptocurrency enthusiast looking to securely store your Ethereum? If so, transferring your Ethereum from Coinbase to MetaMask is a simple and effective solution. MetaMask is a popular Ethereum wallet that allows you to safely manage your digital assets and interact with decentralized applications (dApps) on the Ethereum network. This step-by-step guide will walk you through the process of transferring your Ethereum from Coinbase to MetaMask.
Step 1: Set up your MetaMask wallet
The first step is to install the MetaMask extension for your preferred browser. Once installed, follow the prompts to create a new wallet or import an existing one. Make sure to securely store your seed phrase as it will be needed to restore your wallet in case of loss.
Step 2: Retrieve your Ethereum wallet address from MetaMask
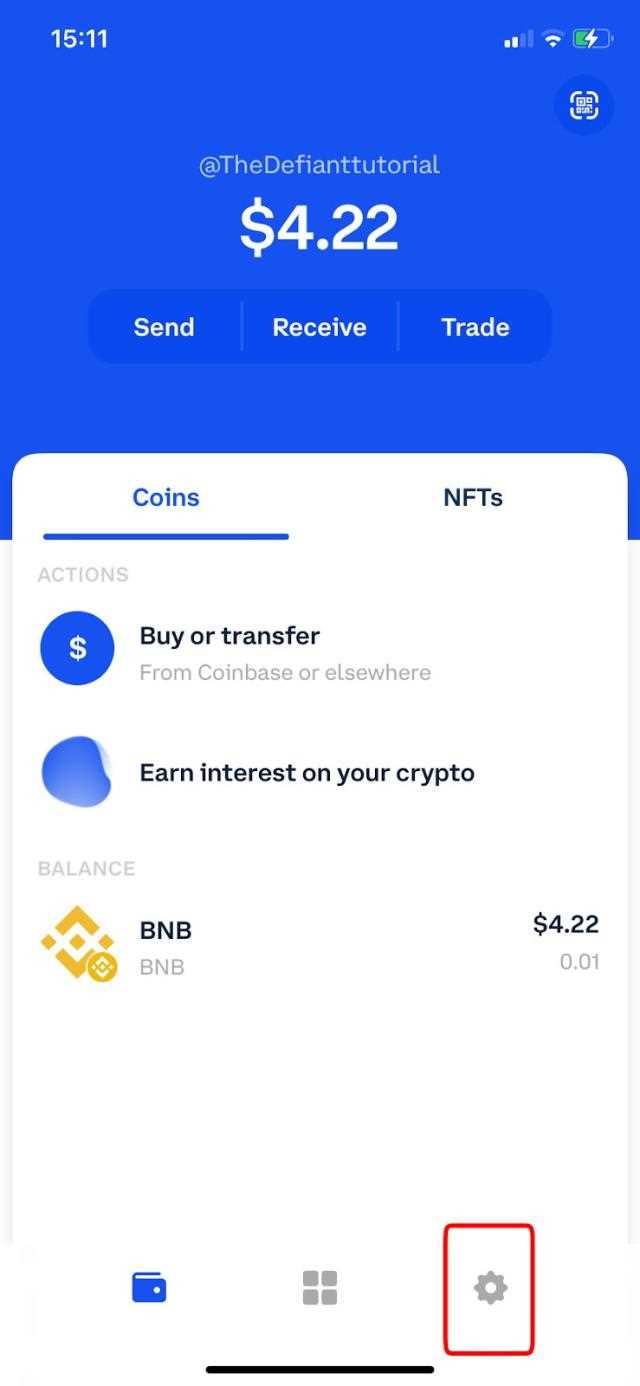
After setting up your MetaMask wallet, navigate to the main screen and copy your Ethereum wallet address. This address will be used to receive the Ethereum from Coinbase.
Step 3: Log in to your Coinbase account
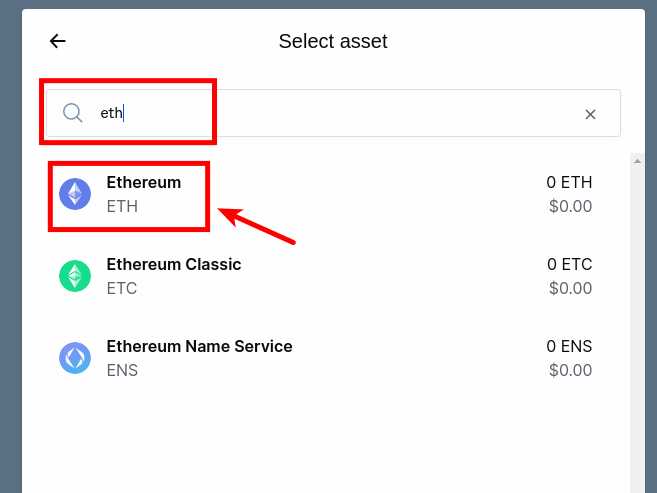
If you don’t have a Coinbase account yet, sign up for one and complete the necessary verification steps. Once logged in, navigate to your wallet and select the Ethereum wallet.
Step 4: Initiate the Ethereum withdrawal
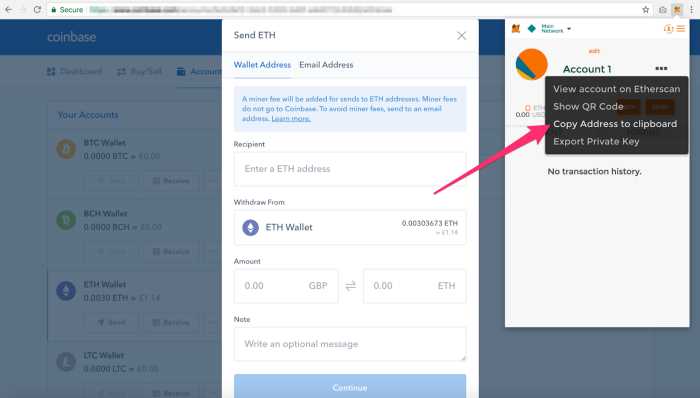
In your Coinbase Ethereum wallet, click on the “Send” button. Paste your MetaMask wallet address in the recipient field and enter the amount of Ethereum you wish to transfer. Double-check that the address is correct before proceeding.
Step 5: Confirm and finalize the transaction
After reviewing the transaction details, click on the “Send” button to initiate the transfer. Coinbase may require you to enter your 2-factor authentication (2FA) code or verify the transaction via email. Follow the instructions provided to complete the withdrawal.
Step 6: Check your MetaMask wallet for the Ethereum
Once the transaction is confirmed and finalized, the Ethereum should appear in your MetaMask wallet. You can verify the transfer by checking your wallet balance and transaction history within the MetaMask interface.
Congratulations! You have successfully transferred your Ethereum from Coinbase to MetaMask. Now you can securely manage and interact with your Ethereum assets using the MetaMask wallet.
Note: The transaction time and fees may vary depending on network congestion and transaction size. Make sure to keep an eye on the Ethereum network status to ensure timely and cost-effective transfers.
A beginner’s guide: How to move Ethereum from Coinbase to MetaMask
If you have recently started getting into cryptocurrency and have purchased some Ethereum on Coinbase, you may be wondering how to transfer it to a more secure wallet like MetaMask. This step-by-step guide will walk you through the process and ensure that your Ethereum is safely stored in your MetaMask wallet.
| Step 1: | Create a MetaMask wallet |
| Step 2: | Go to the MetaMask website and click on “Get Chrome Extension” if you are using Google Chrome, or choose the appropriate option for your browser. |
| Step 3: | Follow the instructions to install the MetaMask extension and set up your wallet. |
| Step 4: | Once your wallet is set up, click on the MetaMask icon in your browser’s toolbar to open the wallet. |
| Step 5: | In the MetaMask wallet, click on the account icon in the top right corner and select “Copy Address” to copy your wallet’s Ethereum address. |
| Step 6: | Open Coinbase and sign in to your account. |
| Step 7: | Click on the “Accounts” tab and select your Ethereum wallet. |
| Step 8: | Click on the “Send” button. |
| Step 9: | Paste your MetaMask Ethereum address into the recipient field. |
| Step 10: | Enter the amount of Ethereum you want to transfer in the “Amount” field. |
| Step 11: | Double-check the address and amount, then click on the “Send” button to initiate the transaction. |
| Step 12: | Wait for the transaction to be confirmed on the Ethereum network. This can take a few minutes, so be patient. |
| Step 13: | Once the transaction is confirmed, you will see the transferred Ethereum in your MetaMask wallet. |
| Step 14: | Congratulations! You have successfully moved Ethereum from Coinbase to MetaMask. |
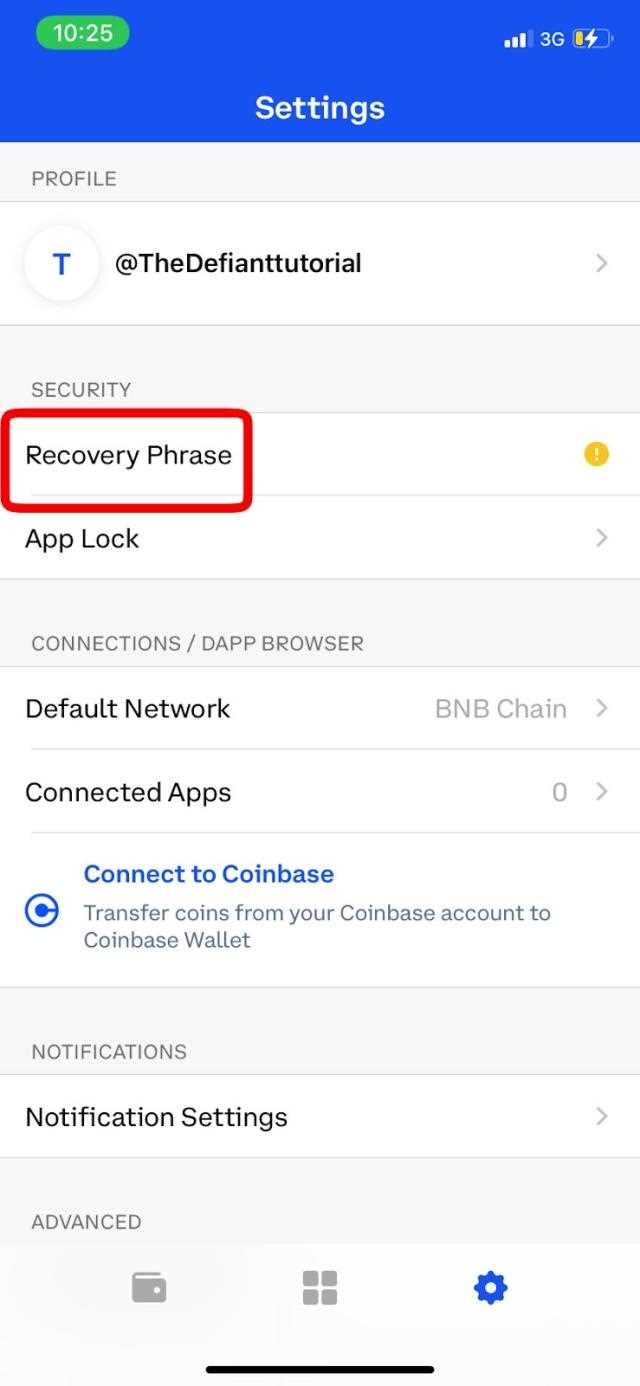
It’s important to note that cryptocurrency transactions are irreversible, so ensure that you have copied the correct address and double-checked the amount before initiating the transfer. Additionally, always keep your wallet’s private key or recovery phrase secure to prevent unauthorized access to your funds.
Step 1: Create and set up your MetaMask wallet
To transfer Ethereum from Coinbase to MetaMask, you will first need to create a MetaMask wallet and set it up. Follow these steps:
- Install MetaMask extension: Visit the MetaMask website and download the extension for your preferred web browser (Chrome, Firefox, or Brave).
- Add MetaMask to your browser: Click on the downloaded extension file and follow the installation prompts to add MetaMask to your browser.
- Create a new wallet: Once MetaMask is installed, click on the extension icon at the top right corner of your browser to proceed. If this is your first time using MetaMask, click on “Get Started” and then “Create a Wallet”.
- Set a strong password: Create a strong password for your MetaMask wallet. Ensure that it is unique and not used for any other accounts.
- Backup your seed phrase: MetaMask will then provide you with a unique seed phrase. Write down this seed phrase and keep it in a safe place. This phrase will be used to recover your wallet if you ever lose access to it.
- Confirm your seed phrase: To ensure you have correctly written down the seed phrase, MetaMask will ask you to confirm a few words from it. Select the words in the correct order to proceed.
- Agree to the terms: Read and agree to MetaMask’s terms of service and privacy policy.
- Create a password vault: MetaMask will prompt you to create a password vault to store your wallet’s password. Follow the instructions to set up the password vault. This will help protect your wallet.
- Connect to the Ethereum network: Once your wallet is set up, you will be connected to the Ethereum network through MetaMask. You can see your account address at the top of the MetaMask extension window.
Now that your MetaMask wallet is created and set up, you are ready to proceed with transferring Ethereum from Coinbase.
Step 2: Generate your MetaMask wallet address
Once you have installed the MetaMask extension in your browser, follow these steps to generate your wallet address:
1. Launch MetaMask
Click on the MetaMask extension icon in your browser to open the MetaMask wallet.
2. Set up your wallet
If you already have a MetaMask wallet, you can import it by clicking on “Import Wallet” and entering your seed phrase. Otherwise, click on “Create a Wallet” to set up a new wallet.
3. Create a strong password
Choose a strong password for your wallet. Make sure it is something you can remember, but not easy for others to guess.
4. Backup your seed phrase
MetaMask will provide you with a unique seed phrase that you must write down and store securely. This phrase is essential for restoring your wallet if you ever lose access to it.
5. Confirm your seed phrase
MetaMask will ask you to confirm your seed phrase by selecting the words in the correct order. This is an additional security measure to ensure you have stored your seed phrase correctly.
6. Get your wallet address
Once you have completed the setup process, you will be redirected to the MetaMask dashboard. Here, you will find your wallet address displayed at the top of the page.
Important: Your MetaMask wallet address is unique to you and should only be shared with trusted parties. It is the address you will use to receive Ethereum from Coinbase.
Make sure to double-check that you have copied the correct wallet address before proceeding with the next steps.
Now that you have successfully generated your MetaMask wallet address, you are ready to move on to the next step, which involves transferring Ethereum from Coinbase to your MetaMask wallet.
Step 3: Transfer Ethereum from Coinbase to MetaMask
Now that you have set up your MetaMask wallet and obtained the account address, it’s time to transfer your Ethereum from Coinbase to MetaMask. Follow the steps below to complete this process:
Step 1: Open your Coinbase account
Go to the Coinbase website and log in to your account using your credentials.
Step 2: Navigate to the Ethereum wallet
Once you are logged in, click on the “Accounts” tab in the top menu. Then, locate your Ethereum wallet and click on it to access the wallet details.
Step 3: Initiate the transfer

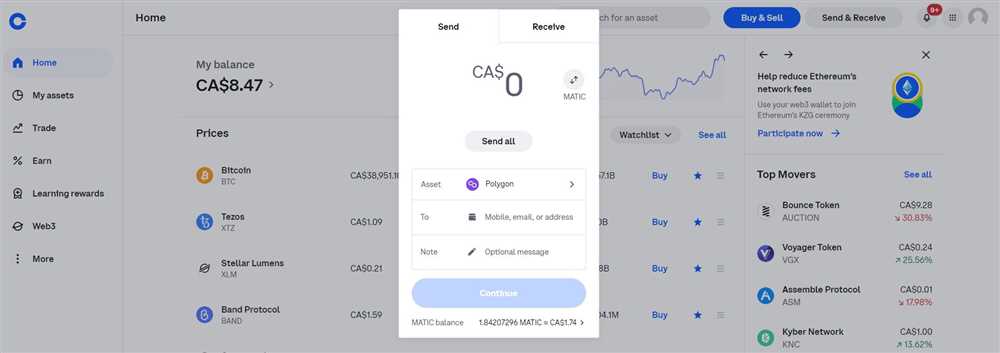
Within your Ethereum wallet, click on the “Send” button to initiate the transfer process.
Step 4: Enter the MetaMask address
Copy your MetaMask wallet address and paste it into the “Recipient” field in your Coinbase Ethereum wallet. Make sure to double-check that the address you entered is correct.
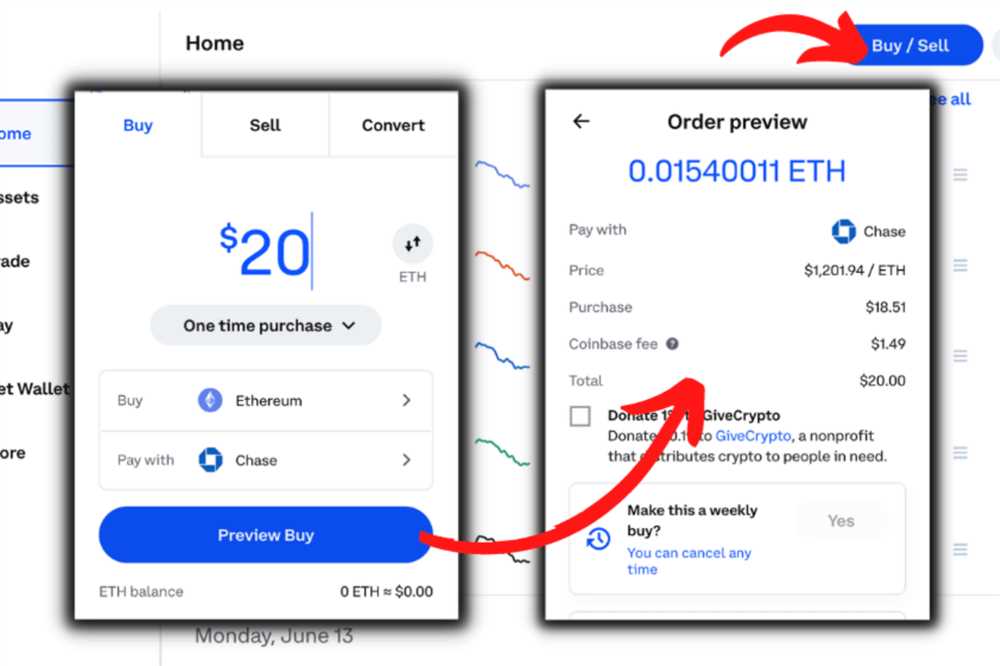
Step 5: Specify the amount
Enter the amount of Ethereum you wish to transfer from Coinbase to MetaMask in the “Amount” field. Ensure that you have enough funds in your Coinbase Ethereum wallet to cover the transaction fees.
Step 6: Review and confirm
Review the details of the transfer, including the recipient address and the amount. Once you are certain that everything is correct, click on the “Confirm” button to proceed with the transfer.
It may take some time for the Ethereum transfer to be processed and confirmed on the blockchain. You can track the progress of the transfer by checking your MetaMask wallet.
Once the transfer is completed, you will be able to see the Ethereum balance in your MetaMask wallet. Congratulations, you have successfully transferred Ethereum from Coinbase to MetaMask!
Step 4: Confirm the transaction and check your MetaMask balance
Once you have completed the previous steps and initiated the transfer of Ethereum from Coinbase to MetaMask, you will need to confirm the transaction in MetaMask to finalize the transfer.
To do this, follow the steps below:
Step 1: Open your MetaMask extension
Click on the MetaMask extension icon in your browser toolbar.
Step 2: Review the pending transaction
Inside the MetaMask extension, you will see a notification indicating a pending transaction. Click on the notification to view the details of the transaction.
Make sure to verify that the details, such as the amount of Ethereum to be transferred and the recipient address, are correct.
Note: It is important to double-check the recipient address to avoid sending your Ethereum to the wrong wallet.
Step 3: Confirm the transaction

After reviewing the transaction details, click the “Confirm” button in MetaMask to proceed with the transfer.
MetaMask will then initiate the transaction on the Ethereum network.
Step 4: Check your MetaMask balance
Once the transaction is confirmed and successfully processed on the Ethereum network, you can check your MetaMask balance to ensure that the Ethereum has been transferred.
Inside the MetaMask extension, click on the account icon at the top-right corner of the window to view your wallet’s balance.
You should see the Ethereum you transferred from Coinbase reflected in your MetaMask balance.
Congratulations! You have successfully transferred Ethereum from Coinbase to MetaMask and confirmed the transaction. Now you can use your Ethereum within the MetaMask wallet for various decentralized applications (DApps) and decentralized finance (DeFi) activities.
Frequently Asked Questions:
What is Coinbase?
Coinbase is a popular cryptocurrency exchange and wallet service that allows users to buy, sell, and store various cryptocurrencies, including Ethereum.
What is MetaMask?
MetaMask is a digital wallet and a browser extension that allows users to interact with decentralized applications (dApps) on the Ethereum blockchain. It also acts as a secure storage for cryptocurrencies.
Is there a fee for transferring Ethereum from Coinbase to MetaMask?
Yes, there is a fee for transferring Ethereum from Coinbase to MetaMask. The fee amount can vary depending on network congestion and other factors. Coinbase will show you the estimated fee before you confirm the transaction.

+ There are no comments
Add yours