


Are you looking to sell your cryptocurrency on MetaMask?
MetaMask is a popular Ethereum wallet that allows users to securely store and manage their digital assets. Selling crypto on MetaMask is a simple and straightforward process that can be done in just a few steps.
Here is a step-by-step guide to help you sell your crypto on MetaMask:
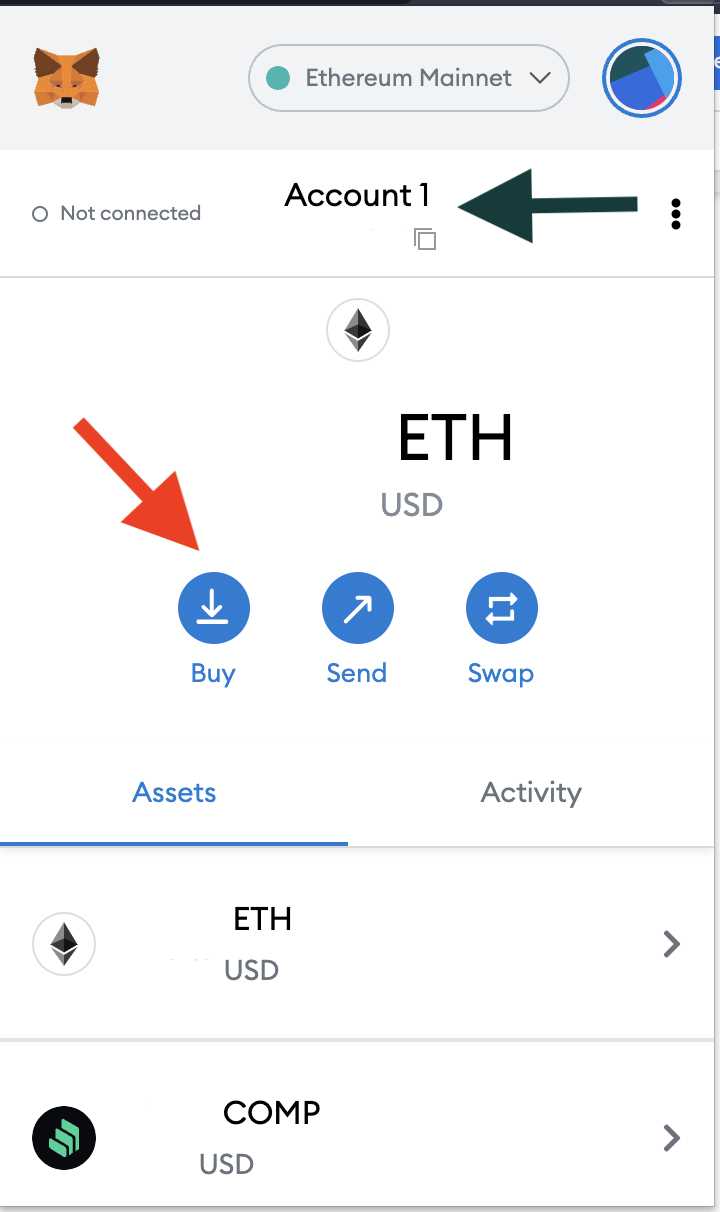
Step 1: Connect Your Wallet
Make sure you have MetaMask installed on your browser and your wallet is connected. If you don’t have MetaMask, you can download and install it from the official website and create a new wallet.
Step 2: Select the Crypto
Once your wallet is connected, navigate to the “Assets” tab and choose the cryptocurrency you want to sell.
Step 3: Click on “Send” or “Transfer”
Next, click on the “Send” or “Transfer” button to initiate the process of sending your crypto to an exchange or a peer-to-peer platform.
Step 4: Enter the Recipient Address
Enter the recipient address provided by the platform or exchange where you want to sell your crypto. Double-check the address to ensure its accuracy.
Step 5: Enter the Amount
Specify the amount of crypto you want to sell. Make sure you enter the correct amount to avoid any mistakes.
Step 6: Confirm the Transaction
Review the transaction details, including the recipient address and the amount, and click on the “Confirm” button to proceed with the transaction.
Step 7: Wait for the Confirmation
Wait for the transaction to be confirmed on the blockchain. The time it takes for the confirmation can vary depending on the network congestion.
Step 8: Receive the Funds
Once the transaction is confirmed, you will receive the funds in your designated account on the platform or exchange where you sold your crypto.
Congratulations! You have successfully sold your cryptocurrency on MetaMask. Remember to always exercise caution and double-check all the transaction details before proceeding.
Disclaimer: The information provided in this guide is for educational and informational purposes only. Selling cryptocurrency involves risks, and it is important to do thorough research and seek professional advice before making any financial decisions.
What is MetaMask?
MetaMask is a browser extension and wallet that allows you to store, send, and receive cryptocurrencies directly from your web browser. It is compatible with popular browsers like Chrome, Firefox, and Brave, making it accessible to a wide range of users.
With MetaMask, you can securely manage your digital assets and interact with decentralized applications (dApps) on the Ethereum network. It acts as a bridge between your web browser and the Ethereum blockchain, enabling you to participate in the decentralized finance (DeFi) ecosystem and explore the world of blockchain technology.
Key Features of MetaMask:
1. Wallet and Account Management: MetaMask securely stores your private keys and allows you to create multiple accounts, making it easy to manage your crypto assets. You can import an existing wallet or create a new one within the extension.
2. Secure Transactions: MetaMask makes it simple to send and receive cryptocurrencies securely. You can review transaction details, adjust gas fees, and customize transaction speed to ensure your transactions are executed smoothly.
3. Browser Integration: As a browser extension, MetaMask seamlessly integrates with your web browser, providing a user-friendly interface for interacting with dApps and accessing decentralized applications and services.
4. Network Support: In addition to the Ethereum network, MetaMask also supports other networks like Binance Smart Chain, allowing you to access a broader range of blockchain applications.
By using MetaMask, you can take control of your financial sovereignty in the digital world and explore the limitless possibilities of blockchain technology.
Step 1: Set Up MetaMask
Before you can sell crypto on MetaMask, you’ll need to set up an account. Follow these steps to get started:
1. Install the MetaMask extension:
Visit the MetaMask website and download the extension for your browser. Once installed, you’ll see the MetaMask icon appear in your browser toolbar.
Tip: MetaMask is available for Chrome, Firefox, Brave, and Edge browsers.
2. Create a new wallet:
Click on the MetaMask icon in your browser toolbar, then click “Get Started”. Follow the prompts to create a new wallet, set your password, and agree to the terms of service.
Tip: Make sure to choose a strong password and keep it safe. Losing your password means losing access to your funds.
3. Backup your wallet:
After creating your wallet, you’ll be given a secret backup phrase. This phrase is crucial for recovering your wallet in case you forget your password or lose access to your device. Write down the backup phrase and keep it somewhere safe.
Tip: Never share your backup phrase with anyone. Treat it like your personal key to your funds.
4. Connect your wallet to your MetaMask account:
Once your wallet is created and backed up, you’ll be taken to the MetaMask main interface. Here, you can connect your wallet to your MetaMask account by clicking on the account avatar and selecting “Connect Wallet”. Follow the instructions to complete the process.
Tip: Make sure you’re connected to the correct account before proceeding with any transactions.
Congratulations! You have now set up MetaMask and are ready to start selling crypto. Stay tuned for Step 2.
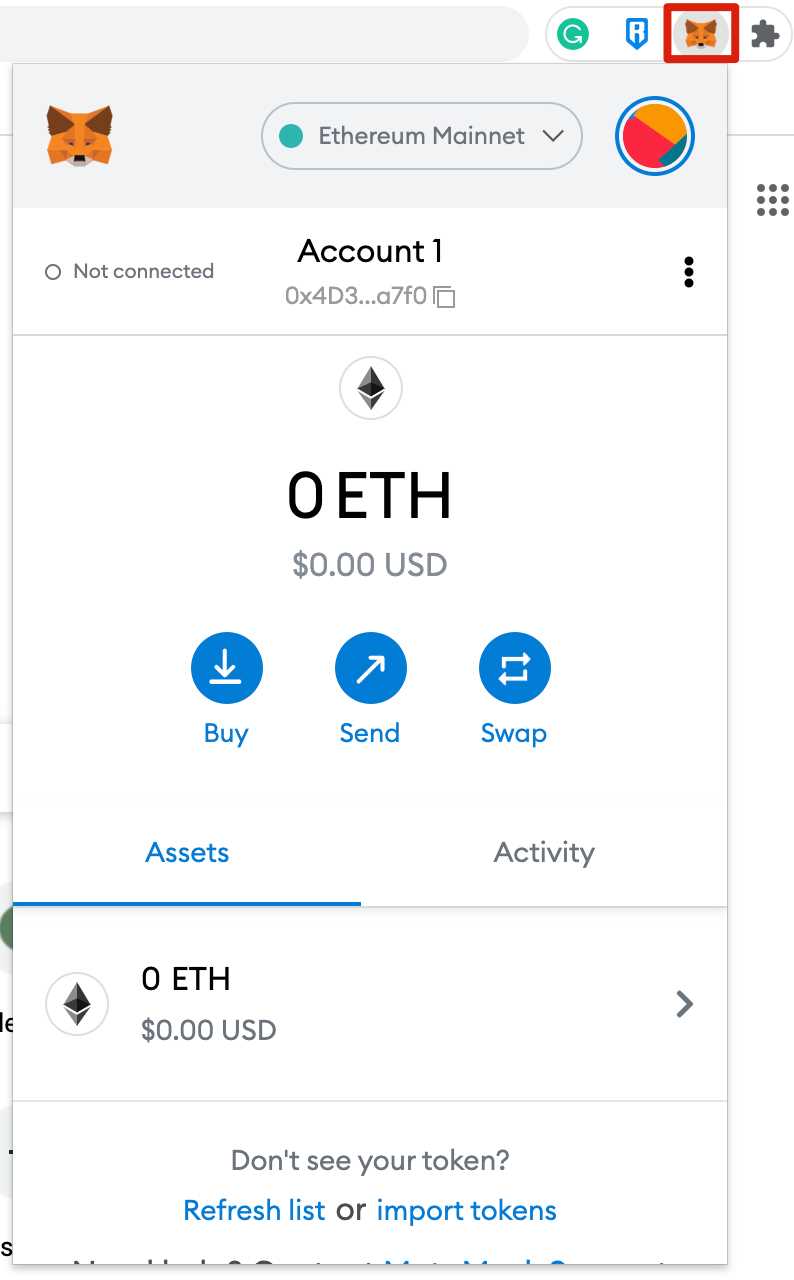
Step 2: Connect Your Wallet
After installing the MetaMask extension on your browser, the next step is to connect your wallet. Follow the simple instructions below to get started:
1. Open the MetaMask extension
Click on the MetaMask icon, which is usually located in the top right corner of your browser. This will open the MetaMask extension.
2. Create a new wallet or import an existing one
If you don’t have a MetaMask wallet yet, click on “Create a Wallet” and follow the prompts to set up a new wallet. If you already have a MetaMask wallet, click on “Import Wallet” and enter your seed phrase or private key.
3. Connect to the Ethereum network
Once you have created or imported your wallet, you will need to connect to the Ethereum network. MetaMask usually defaults to the Ethereum Mainnet, but you can also choose other networks like the Ropsten Testnet or the Binance Smart Chain.
4. Grant permission to connect
When you visit a dApp or a website that requires access to your wallet, MetaMask will prompt you to grant permission. Review the requested permissions, and if you are comfortable, click on “Connect” to allow the website or dApp to access your wallet.
5. Check your wallet status
Once you have successfully connected your wallet, you can check the status at the top of the MetaMask extension. It will display the wallet address and the network you are connected to.
Now you are ready to start selling your crypto on MetaMask! With your wallet connected, you can securely manage and trade your cryptocurrencies directly from your browser.
Note: It is important to always be cautious and double-check the website or dApp you are connecting to. Make sure it is trustworthy and secure before granting access to your wallet.
Step 3: Sell Your Crypto

Once you have followed the previous steps and are ready to sell your crypto on MetaMask, follow these instructions:
- Open the MetaMask extension in your browser and navigate to the “Assets” tab.
- Select the cryptocurrency you want to sell from your list of assets.
- Click on the “Sell” button next to the cryptocurrency you have chosen.
- Specify the amount of cryptocurrency you wish to sell or select the maximum amount available.
- Choose the currency in which you want to receive the funds for your sale.
- Review the transaction details and make sure everything is correct.
- Click on the “Confirm” button to proceed with the sale.
- Enter your password or use your preferred authentication method to authorize the transaction.
- Wait for the transaction to be processed and confirmed on the blockchain.
- Once the transaction is confirmed, you will receive the funds in your selected currency.
Congratulations! You have successfully sold your crypto on MetaMask. You can now use your funds for other purposes or choose to reinvest in different cryptocurrencies.
Frequently Asked Questions:
Can I sell my cryptocurrencies on MetaMask?
Yes, you can sell your cryptocurrencies on MetaMask. MetaMask offers a built-in feature that allows you to sell your crypto assets directly from your wallet.
How do I sell my cryptocurrencies using MetaMask?
To sell your cryptocurrencies on MetaMask, you need to connect your wallet to a decentralized exchange (DEX) that supports the tokens you want to sell. Once connected, you can choose the currency you want to sell, specify the amount, and execute the transaction.
Which decentralized exchanges can I use to sell my cryptocurrencies on MetaMask?
MetaMask supports various decentralized exchanges, such as Uniswap, SushiSwap, and 1inch. You can choose the exchange based on the liquidity and availability of the tokens you want to sell.
Are there any fees associated with selling cryptocurrencies on MetaMask?
Yes, when you sell cryptocurrencies on MetaMask using a decentralized exchange, you may incur transaction fees. These fees are usually network fees required to process the transaction on the blockchain. The fee amount depends on the current network congestion and the tokens being traded.
+ There are no comments
Add yours